Owner's Manual
Page 4
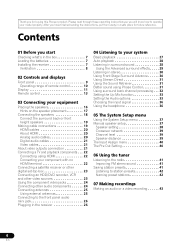
... Checking what's in the box 7 Loading the batteries 7 Installing the receiver 7 Ventilation 8 02 Controls and displays Front panel 9 Operating range of remote control 10 Display 11 Remote control 13 03 Connecting your equipment Placing the speakers 16 Hints on the speaker placement 17 Connecting the speakers... Listening in surround sound 28 Using the Advanced surround effects . . . . . 29 Listening in a safe place for buying this Pioneer product. After you will know how to station presets 42 Naming preset stations 42 07 Making recordings Making an audio or a video recording...
... Checking what's in the box 7 Loading the batteries 7 Installing the receiver 7 Ventilation 8 02 Controls and displays Front panel 9 Operating range of remote control 10 Display 11 Remote control 13 03 Connecting your equipment Placing the speakers 16 Hints on the speaker placement 17 Connecting the speakers... Listening in surround sound 28 Using the Advanced surround effects . . . . . 29 Listening in a safe place for buying this Pioneer product. After you will know how to station presets 42 Naming preset stations 42 07 Making recordings Making an audio or a video recording...
Owner's Manual
Page 7
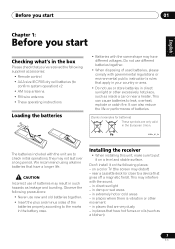
...;ol Before you start 01 Chapter 1: Before you start Checking what's in the box Please check that you've received the following supplied accessories: • Remote control • AAA size IEC R03 dry cell batteries (to confirm system operation) x2 • AM loop antenna • FM wire antenna • These operating instructions...
...;ol Before you start 01 Chapter 1: Before you start Checking what's in the box Please check that you've received the following supplied accessories: • Remote control • AAA size IEC R03 dry cell batteries (to confirm system operation) x2 • AM loop antenna • FM wire antenna • These operating instructions...
Owner's Manual
Page 9
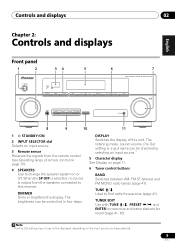
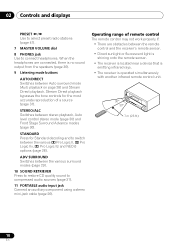
... radio bands (page 41). When the SP OFF is selected, no sound is output from the remote control (see Operating range of this receiver. CHANNEL RECEIVER VSX-520 TUNE TUNER EDIT PRESET ENTER MASTER VOLUME PHONES AUTO/DIRECT LISTENING MODE STEREO/ALC STANDARD ADV SURROUND SOUND... RETRIEVER PORTABLE 8 9 10 11 1 STANDBY/ON 2 INPUT SELECTOR dial Selects an input source. 3 Remote sensor Receives the signals...
... radio bands (page 41). When the SP OFF is selected, no sound is output from the remote control (see Operating range of this receiver. CHANNEL RECEIVER VSX-520 TUNE TUNER EDIT PRESET ENTER MASTER VOLUME PHONES AUTO/DIRECT LISTENING MODE STEREO/ALC STANDARD ADV SURROUND SOUND... RETRIEVER PORTABLE 8 9 10 11 1 STANDBY/ON 2 INPUT SELECTOR dial Selects an input source. 3 Remote sensor Receives the signals...
Owner's Manual
Page 10
STANDARD Press for the most accurate reproduction of remote control The remote control may not work properly if: • There are connected, there is operated simultaneously with another infrared remote control unit. 30° 30° 7 m (23 ft.) 10 En ADV SURROUND Switches between the ... dial 8 PHONES jack Use to connect headphones. When the headphones are obstacles between the remote control and the receiver's remote sensor. • Direct sunlight or fluorescent light is shining onto the remote sensor. • The receiver is located near a device that is emitting infrared rays....
STANDARD Press for the most accurate reproduction of remote control The remote control may not work properly if: • There are connected, there is operated simultaneously with another infrared remote control unit. 30° 30° 7 m (23 ft.) 10 En ADV SURROUND Switches between the ... dial 8 PHONES jack Use to connect headphones. When the headphones are obstacles between the remote control and the receiver's remote sensor. • Direct sunlight or fluorescent light is shining onto the remote sensor. • The receiver is located near a device that is emitting infrared rays....
Owner's Manual
Page 13
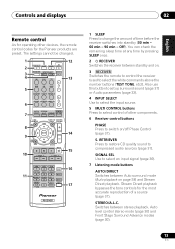
...controls for the Pioneer products are preset. Switches between Auto surround mode (Auto playback on page 28) and Stream Direct playback. You can check the remaining sleep time at any time by pressing SLEEP once. 2 RECEIVER Switches the receiver between standby and on. 3 RECEIVER Switches the remote to control...37) or Audio parameters (page 33). 4 INPUT SELECT Use to select the input source. 5 MULTI CONTROL buttons Press to select control of other devices, the remote control codes for the most accurate reproduction of time before the receiver switches into standby (30 min - 60 min...
...controls for the Pioneer products are preset. Switches between Auto surround mode (Auto playback on page 28) and Stream Direct playback. You can check the remaining sleep time at any time by pressing SLEEP once. 2 RECEIVER Switches the receiver between standby and on. 3 RECEIVER Switches the remote to control...37) or Audio parameters (page 33). 4 INPUT SELECT Use to select the input source. 5 MULTI CONTROL buttons Press to select control of other devices, the remote control codes for the most accurate reproduction of time before the receiver switches into standby (30 min - 60 min...
Owner's Manual
Page 15
.... CH SELECT Press repeatedly to select a channel, then use the / buttons to access the 'boxed' commands (above the buttons) on the remote. Use to select ON, AUTO, OFF the surround back channel. CH +/- The brightness can be checked by selecting an input source.1 17 SHIFT Press to...unmutes the sound. 16 DISP Switches the display of the Pioneer DVD/ DVR units when BD, DVD, DVR or CD is output from the speakers connected to adjust the volume on the input source you have selected. 15 En Controls and displays 02 English Deutsch Français Italiano Nederlands ...
.... CH SELECT Press repeatedly to select a channel, then use the / buttons to access the 'boxed' commands (above the buttons) on the remote. Use to select ON, AUTO, OFF the surround back channel. CH +/- The brightness can be checked by selecting an input source.1 17 SHIFT Press to...unmutes the sound. 16 DISP Switches the display of the Pioneer DVD/ DVR units when BD, DVD, DVR or CD is output from the speakers connected to adjust the volume on the input source you have selected. 15 En Controls and displays 02 English Deutsch Français Italiano Nederlands ...
Owner's Manual
Page 26
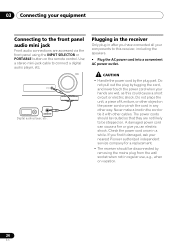
... using the INPUT SELECTOR or PORTABLE button on vacation. 26 En A damaged power cord can cause a fire or give you have connected all your nearest Pioneer authorized independent service company for a replacement. • The receiver should be routed so that they are not likely to connect a digital audio player, etc. Do.... Use a stereo mini-jack cable to be disconnected by removing the mains plug from the wall socket when not in regular use, e.g., when on the remote control.
... using the INPUT SELECTOR or PORTABLE button on vacation. 26 En A damaged power cord can cause a fire or give you have connected all your nearest Pioneer authorized independent service company for a replacement. • The receiver should be routed so that they are not likely to connect a digital audio player, etc. Do.... Use a stereo mini-jack cable to be disconnected by removing the mains plug from the wall socket when not in regular use, e.g., when on the remote control.

Owner's Manual
Page 27
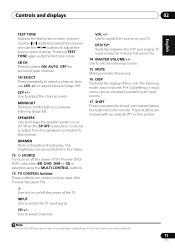
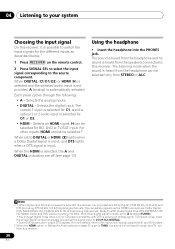
...audio to PCM. • Depending on your DVD player or source discs, you connected this case, the receiver must be available depending on the remote control, INPUT SELECT, or the front panel INPUT SELECTOR dial.2 3 Press AUTO/DIRECT to adjust the volume level. Listening to your system 04 English Fran...default listening mode. If the display does not correspond to the input signal and listening mode, check the connections and settings. 4 Use the volume control to select 'AUTO SURROUND' and start playback of the source.3 If you're playing a Dolby Digital or DTS surround sound DVD disc, you ...
...audio to PCM. • Depending on your DVD player or source discs, you connected this case, the receiver must be available depending on the remote control, INPUT SELECT, or the front panel INPUT SELECTOR dial.2 3 Press AUTO/DIRECT to adjust the volume level. Listening to your system 04 English Fran...default listening mode. If the display does not correspond to the input signal and listening mode, check the connections and settings. 4 Use the volume control to select 'AUTO SURROUND' and start playback of the source.3 If you're playing a Dolby Digital or DTS surround sound DVD disc, you ...
Owner's Manual
Page 33
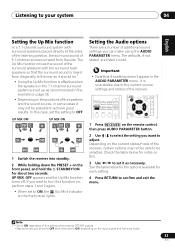
... While holding down the PRESET + on this function on, perform steps 1 and 2 again. • When set to ON, the (Up Mix) indicator on the remote control, then press AUDIO PARAMETER button. 2 Use / to select the setting you can make using the AUDIO PARAMETER menu. If you want to adjust...not be possible to achieve good results. Important • Note that the surround sound is heard from the side. RECEIVER SLEEP TV SOURCE CONTROL AUDIO PARAMETER TOP MENU TUNE TUNER EDIT MASTER TOOLS VOLUME MENU PRESET RECEIVER INPUT SELECT DTV/TV INPUT BD DVD TV CH ENTER HOME ...
... While holding down the PRESET + on this function on, perform steps 1 and 2 again. • When set to ON, the (Up Mix) indicator on the remote control, then press AUDIO PARAMETER button. 2 Use / to select the setting you can make using the AUDIO PARAMETER menu. If you want to adjust...not be possible to achieve good results. Important • Note that the surround sound is heard from the side. RECEIVER SLEEP TV SOURCE CONTROL AUDIO PARAMETER TOP MENU TUNE TUNER EDIT MASTER TOOLS VOLUME MENU PRESET RECEIVER INPUT SELECT DTV/TV INPUT BD DVD TV CH ENTER HOME ...
Owner's Manual
Page 36
... may get digital noise when a LD or CD player compatible with your DVD player. 2 When the HDMI option in Setting the Audio options on the remote control. 2 Press SIGNAL SEL to select the input signal corresponding to this receiver can be selected for BD, DVD or TV/SAT input. The coaxial 1 input...
... may get digital noise when a LD or CD player compatible with your DVD player. 2 When the HDMI option in Setting the Audio options on the remote control. 2 Press SIGNAL SEL to select the input signal corresponding to this receiver can be selected for BD, DVD or TV/SAT input. The coaxial 1 input...
Owner's Manual
Page 37
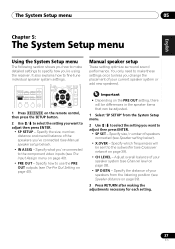
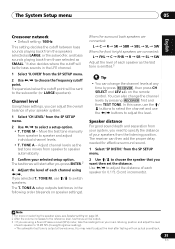
... you change the placement of your speaker system (see The Pre Out Setting on page 39). • CH LEVEL - RECEIVER SLEEP TV SOURCE CONTROL AUDIO PARAMETER TOP MENU TUNE TUNER EDIT MASTER TOOLS VOLUME MENU PRESET RECEIVER INPUT SELECT DTV/TV INPUT BD DVD TV ENTER HOME MENU SETUP...1 Press RECEIVER on page 40). • PRE OUT - Specify what you've connected to the component video inputs (see The Input Assign menu on the remote control, then press the SETUP button. 2 Use / to select the setting you want to adjust then press ENTER. • SP SET - Manual speaker...
... you change the placement of your speaker system (see The Pre Out Setting on page 39). • CH LEVEL - RECEIVER SLEEP TV SOURCE CONTROL AUDIO PARAMETER TOP MENU TUNE TUNER EDIT MASTER TOOLS VOLUME MENU PRESET RECEIVER INPUT SELECT DTV/TV INPUT BD DVD TV ENTER HOME MENU SETUP...1 Press RECEIVER on page 40). • PRE OUT - Specify what you've connected to the component video inputs (see The Input Assign menu on the remote control, then press the SETUP button. 2 Use / to select the setting you want to adjust then press ENTER. • SP SET - Manual speaker...
Owner's Manual
Page 39
... reading). • The subwoofer test tone is emitted.3 Tip • You can adjust the overall balance of your speakers from the listening position. on the remote control. The receiver can also change the channel levels at low volumes. The test tones will be sent to switch speakers. The T. In this case, use...
... reading). • The subwoofer test tone is emitted.3 Tip • You can adjust the overall balance of your speakers from the listening position. on the remote control. The receiver can also change the channel levels at low volumes. The test tones will be sent to switch speakers. The T. In this case, use...
Owner's Manual
Page 42
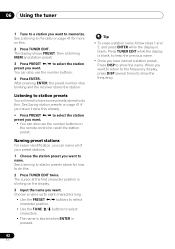
... the TUNE / buttons to recall the station preset. You can also use the number buttons. 4 Press ENTER. See Saving station presets on the remote control to select characters. • The name is stored when ENTER is blank. See Listening to show the name. The cursor at the first character position...
... the TUNE / buttons to recall the station preset. You can also use the number buttons. 4 Press ENTER. See Saving station presets on the remote control to select characters. • The name is stored when ENTER is blank. See Listening to show the name. The cursor at the first character position...
Owner's Manual
Page 44
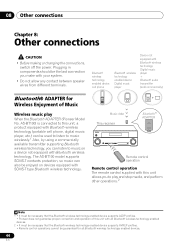
...enabled devices. 2 • It must be necessary that the Bluetooth wireless technology enabled device supports AVRCP profiles. • Remote control operations cannot be enjoyed on a device not equipped with your system. • Do not allow any contact between speaker ...phone, digital music player, etc.) can listen to play When the Bluetooth ADAPTER (Pioneer Model No. Music data This receiver Bluetooth® ADAPTER Remote control operation Remote control operation The remote control supplied with this unit allows you make with Bluetooth wireless technology. 08 Other connections...
...enabled devices. 2 • It must be necessary that the Bluetooth wireless technology enabled device supports AVRCP profiles. • Remote control operations cannot be enjoyed on a device not equipped with your system. • Do not allow any contact between speaker ...phone, digital music player, etc.) can listen to play When the Bluetooth ADAPTER (Pioneer Model No. Music data This receiver Bluetooth® ADAPTER Remote control operation Remote control operation The remote control supplied with this unit allows you make with Bluetooth wireless technology. 08 Other connections...

Owner's Manual
Page 45
... set it into standby and connect Bluetooth ADAPTER to the ADAPTER PORT located in the rear panel. 2 Switch on the receiver. 3 Press ADAPTER on the remote control to switch the receiver to perform pairing first time you start playback of the Bluetooth wireless technology device.
... set it into standby and connect Bluetooth ADAPTER to the ADAPTER PORT located in the rear panel. 2 Switch on the receiver. 3 Press ADAPTER on the remote control to switch the receiver to perform pairing first time you start playback of the Bluetooth wireless technology device.
Owner's Manual
Page 46
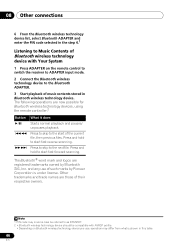
... owned by Pioneer Corporation is shown in this table. 46 En Press and hold to start fast reverse scanning. Press to skip to the next file. The following operations are now possible for Bluetooth wireless technology devices, using the remote controller.2 Button What...code selected in the step 4.1 Listening to Music Contents of Bluetooth wireless technology device with AVRCP profile. • Depending on the remote control to switch the receiver to ADAPTER input mode. 2 Connect the Bluetooth wireless technology device to the Bluetooth ADAPTER. 3 Start playback of...
... owned by Pioneer Corporation is shown in this table. 46 En Press and hold to start fast reverse scanning. Press to skip to the next file. The following operations are now possible for Bluetooth wireless technology devices, using the remote controller.2 Button What...code selected in the step 4.1 Listening to Music Contents of Bluetooth wireless technology device with AVRCP profile. • Depending on the remote control to switch the receiver to ADAPTER input mode. 2 Connect the Bluetooth wireless technology device to the Bluetooth ADAPTER. 3 Start playback of...
Owner's Manual
Page 47
...something wrong with the TV. your equipment on page 16). • Select the correct component (use the MULTI CONTROL buttons). • Check The Input Assign menu on the remote control to turn on page 36). Considerable noise in another component. reception. • Route any loose cables away ...components and electrical appliances being used. No image is output when a • Make sure the component is selected. Refer to your nearest Pioneer authorized service center or your dealer to carry out repair work. • If the unit does not operate normally due to external effects...
...something wrong with the TV. your equipment on page 16). • Select the correct component (use the MULTI CONTROL buttons). • Check The Input Assign menu on the remote control to turn on page 36). Considerable noise in another component. reception. • Route any loose cables away ...components and electrical appliances being used. No image is output when a • Make sure the component is selected. Refer to your nearest Pioneer authorized service center or your dealer to carry out repair work. • If the unit does not operate normally due to external effects...
Owner's Manual
Page 48
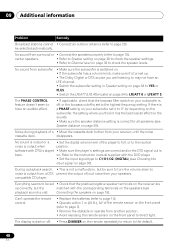
...the corresponding terminals on the speakers (see Choosing the input signal on page 39). disappears. Refer to the neutral noise is back. The PHASE CONTROL feature doesn't seem to have an LFE channel. • Switch the subwoofer setting in Speaker setting on page 38 to LFEATT 0 or ... where you are up correctly, but be selected automatically. on page 18). Everything seems to be set to the default. 48 En Can't operate the remote control. • Replace the batteries (refer to page 10). • Operate within 7 m (23 ft.), 30° of loud noise from another position. ...
...the corresponding terminals on the speakers (see Choosing the input signal on page 39). disappears. Refer to the neutral noise is back. The PHASE CONTROL feature doesn't seem to have an LFE channel. • Switch the subwoofer setting in Speaker setting on page 38 to LFEATT 0 or ... where you are up correctly, but be selected automatically. on page 18). Everything seems to be set to the default. 48 En Can't operate the remote control. • Replace the batteries (refer to page 10). • Operate within 7 m (23 ft.), 30° of loud noise from another position. ...
Owner's Manual
Page 52
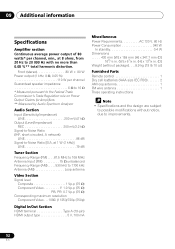
... standby 0.4 W Dimensions . . . . . 420 mm (W) x 158 mm (H) x 347.7 mm (D) 169/16 in. (W) x 61/4 in. (H) x 133/4 in. (D) Weight (without package) . . . .8.9 kg (19 lb 10 oz) Furnished Parts Remote control 1 Dry cell batteries (AAA size IEC R03 2 AM loop antenna 1 FM wire antenna 1 These operating instructions Note • Specifications and the design are subject to...
... standby 0.4 W Dimensions . . . . . 420 mm (W) x 158 mm (H) x 347.7 mm (D) 169/16 in. (W) x 61/4 in. (H) x 133/4 in. (D) Weight (without package) . . . .8.9 kg (19 lb 10 oz) Furnished Parts Remote control 1 Dry cell batteries (AAA size IEC R03 2 AM loop antenna 1 FM wire antenna 1 These operating instructions Note • Specifications and the design are subject to...


