
Owner's Manual
Page 1
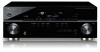
...http://www.pioneerelectronics.ca (Canada) Operating Instructions Mode d'emploi Manual de instrucciones AUDIO/VIDEO MULTI-CHANNEL RECEIVER RECEPTEUR AUDIOVISUEL A VOIES MULTIPLES RECEPTOR MULTICANAL DE AUDIO/VÍDEO VSX-520 Register your product on http://www.pioneerelectronics.com (US) http://www.pioneerelectronics.ca (Canada) ... or theft. • Receive free tips, updates and service bulletins on your new product • Improve product development Your input helps us continue to design products that meet your needs. • Receive a free Pioneer newsletter Registered customers can opt...
...http://www.pioneerelectronics.ca (Canada) Operating Instructions Mode d'emploi Manual de instrucciones AUDIO/VIDEO MULTI-CHANNEL RECEIVER RECEPTEUR AUDIOVISUEL A VOIES MULTIPLES RECEPTOR MULTICANAL DE AUDIO/VÍDEO VSX-520 Register your product on http://www.pioneerelectronics.com (US) http://www.pioneerelectronics.ca (Canada) ... or theft. • Receive free tips, updates and service bulletins on your new product • Improve product development Your input helps us continue to design products that meet your needs. • Receive a free Pioneer newsletter Registered customers can opt...
Owner's Manual
Page 2
...when left unused for a long period of time (for general household purposes. Product Name: AUDIO/VIDEO MULTI-CHANNEL RECEIVER Model Number: VSX-520 Responsible Party Name: PIONEER ELECTRONICS (USA) INC. DOMINGUEZ ST. D36-P5_B1_En CAUTION This product satisfies FCC regulations when shielded cables and ... D3-4-2-1-3_A1_En WARNING Before plugging in a particular installation. To prevent a fire or shock hazard, do not place any interference received, including interference that may not cause harmful interference, and (2) this unit should be performed only by removing the mains plug ...
...when left unused for a long period of time (for general household purposes. Product Name: AUDIO/VIDEO MULTI-CHANNEL RECEIVER Model Number: VSX-520 Responsible Party Name: PIONEER ELECTRONICS (USA) INC. DOMINGUEZ ST. D36-P5_B1_En CAUTION This product satisfies FCC regulations when shielded cables and ... D3-4-2-1-3_A1_En WARNING Before plugging in a particular installation. To prevent a fire or shock hazard, do not place any interference received, including interference that may not cause harmful interference, and (2) this unit should be performed only by removing the mains plug ...
Owner's Manual
Page 4
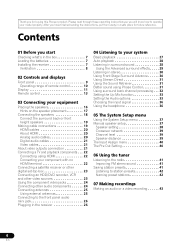
... Connecting a TV and playback components . . . 22 Connecting using Phase Control 31 Using surround back channel processing . . . 32 Setting the Up Mix function 33 Setting the Audio options 33 Choosing the...you have finished reading the instructions, put them away in a safe place for buying this Pioneer product. Please read through these operating instructions so you for future reference. Thank you will... sound using HDMI 22 Connecting your component with no HDMI terminal 22 Connecting a satellite receiver or other digital set-top box 23 Connecting an HDD/DVD recorder, VCR and other...
... Connecting a TV and playback components . . . 22 Connecting using Phase Control 31 Using surround back channel processing . . . 32 Setting the Up Mix function 33 Setting the Audio options 33 Choosing the...you have finished reading the instructions, put them away in a safe place for buying this Pioneer product. Please read through these operating instructions so you for future reference. Thank you will... sound using HDMI 22 Connecting your component with no HDMI terminal 22 Connecting a satellite receiver or other digital set-top box 23 Connecting an HDD/DVD recorder, VCR and other...
Owner's Manual
Page 6
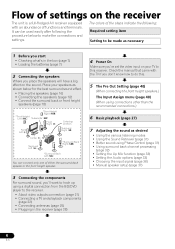
... than the recommended connections.) 6 Basic playback (page 27) 7 Adjusting the sound as necessary 1 Before you start • Checking what's in the receiver (page 26) 4 Power On Make sure you don't know how to this . 5 The Pre Out Setting (page 40) (When... connecting the front height speakers.) The Input Assign menu (page 40) (When using Phase Control (page 31) • Using surround back channel processing (page 32) • Setting the Up Mix function (page 33) • Setting the Audio options (page 33) • Choosing the input ...
... than the recommended connections.) 6 Basic playback (page 27) 7 Adjusting the sound as necessary 1 Before you start • Checking what's in the receiver (page 26) 4 Power On Make sure you don't know how to this . 5 The Pre Out Setting (page 40) (When... connecting the front height speakers.) The Input Assign menu (page 40) (When using Phase Control (page 31) • Using surround back channel processing (page 32) • Setting the Up Mix function (page 33) • Setting the Audio options (page 33) • Choosing the input ...
Owner's Manual
Page 9
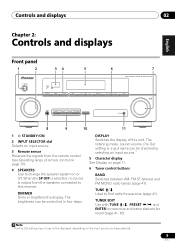
... AUDIO/ VIDEO MULTI- TUNER EDIT Use with TUNE /, PRESET / and ENTER to find radio frequencies (page 41). CHANNEL RECEIVER VSX-520 TUNE TUNER EDIT PRESET ENTER MASTER VOLUME PHONES AUTO/DIRECT LISTENING MODE STEREO/ALC STANDARD ADV SURROUND SOUND RETRIEVER PORTABLE 8 9 10 11 1... STANDBY/ON 2 INPUT SELECTOR dial Selects an input source. 3 Remote sensor Receives the signals from the speakers connected to change the speaker system on the input source you have selected. 9 En DISPLAY Switches the...
... AUDIO/ VIDEO MULTI- TUNER EDIT Use with TUNE /, PRESET / and ENTER to find radio frequencies (page 41). CHANNEL RECEIVER VSX-520 TUNE TUNER EDIT PRESET ENTER MASTER VOLUME PHONES AUTO/DIRECT LISTENING MODE STEREO/ALC STANDARD ADV SURROUND SOUND RETRIEVER PORTABLE 8 9 10 11 1... STANDBY/ON 2 INPUT SELECTOR dial Selects an input source. 3 Remote sensor Receives the signals from the speakers connected to change the speaker system on the input source you have selected. 9 En DISPLAY Switches the...
Owner's Manual
Page 15
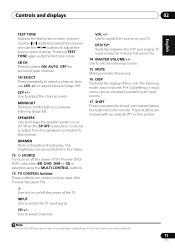
... to turn on your TV. The brightness can be controlled in this receiver. to select channels. DIMMER Dims or brightens the display. These buttons are marked with Pioneer flat panel TVs. Use to adjust the channel levels. LEV +/- Use to adjust the level (page 39). Controls ...the MULTI CONTROL buttons. 13 TV CONTROL buttons These buttons can be displayed, depending on each channel. CH +/- DTV/TV* Switches between the DTV and analog TV input modes for Pioneer flat panel TVs. 14 MASTER VOLUME +/- The listening mode, sound volume, Pre Out setting ...
... to turn on your TV. The brightness can be controlled in this receiver. to select channels. DIMMER Dims or brightens the display. These buttons are marked with Pioneer flat panel TVs. Use to adjust the channel levels. LEV +/- Use to adjust the level (page 39). Controls ...the MULTI CONTROL buttons. 13 TV CONTROL buttons These buttons can be displayed, depending on each channel. CH +/- DTV/TV* Switches between the DTV and analog TV input modes for Pioneer flat panel TVs. 14 MASTER VOLUME +/- The listening mode, sound volume, Pre Out setting ...
Owner's Manual
Page 20
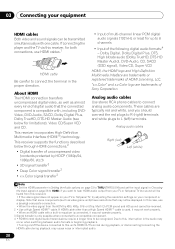
...channels • Input of digital audio that may cause noise or interrupted audio. 20 En Analog audio cables Use stereo RCA phono cables to connect the terminal in Choosing the input signal on page 33 to THRU (THROUGH) and set the input signal in the proper direction. This receiver...trademarks of Sony Corporation. Note that some components (such as almost every kind of the following digital audio formats:4 - Due to this receiver, for limitations), Video CD/Super VCD and CD. 03 Connecting your equipment HDMI cables Both video and sound signals can be transmitted ...
...channels • Input of digital audio that may cause noise or interrupted audio. 20 En Analog audio cables Use stereo RCA phono cables to connect the terminal in Choosing the input signal on page 33 to THRU (THROUGH) and set the input signal in the proper direction. This receiver...trademarks of Sony Corporation. Note that some components (such as almost every kind of the following digital audio formats:4 - Due to this receiver, for limitations), Video CD/Super VCD and CD. 03 Connecting your equipment HDMI cables Both video and sound signals can be transmitted ...

Owner's Manual
Page 27
... DTS+NEO:6 is possible to PCM. • Depending on your DVD player or digital satellite receiver. It is displayed when playing DTS 5.1-channel signals. Turn down the volume of the receiver. In this case, the receiver must be set to play. When using a surround back speaker, 2D is coming from the speakers...disc, you may not be set to output Dolby Digital, DTS and 88.2 kHz / 96 kHz PCM (2 channel) audio, and if there is an MPEG audio option, set to this receiver (for example, if you connected this to convert the MPEG audio to check on the playback component (for ...
... DTS+NEO:6 is possible to PCM. • Depending on your DVD player or digital satellite receiver. It is displayed when playing DTS 5.1-channel signals. Turn down the volume of the receiver. In this case, the receiver must be set to play. When using a surround back speaker, 2D is coming from the speakers...disc, you may not be set to output Dolby Digital, DTS and 88.2 kHz / 96 kHz PCM (2 channel) audio, and if there is an MPEG audio option, set to this receiver (for example, if you connected this to convert the MPEG audio to check on the playback component (for ...
Owner's Manual
Page 28
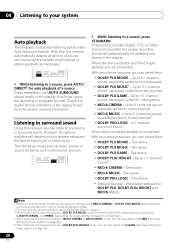
... STANDARD. See above • DOLBY PLII MUSIC - With this receiver, you 're listening to. STANDARD ADV SURR • While listening to 7.1 channel sound5 • NEO:6 CINEMA - Up to 5.1 channel sound, especially suited to 5.1 channel sound, especially suited for auto playback of source you can listen to...8226; DOLBY PRO LOGIC - 4.1 channel surround sound When the front height speaker is Dolby Digital, DTS, or Dolby Surround encoded, the proper decoding format will automatically be selected and shows in surround sound Using this , the receiver automatically detects what kind of source ...
... STANDARD. See above • DOLBY PLII MUSIC - With this receiver, you 're listening to. STANDARD ADV SURR • While listening to 7.1 channel sound5 • NEO:6 CINEMA - Up to 5.1 channel sound, especially suited to 5.1 channel sound, especially suited for auto playback of source you can listen to...8226; DOLBY PRO LOGIC - 4.1 channel surround sound When the front height speaker is Dolby Digital, DTS, or Dolby Surround encoded, the proper decoding format will automatically be selected and shows in surround sound Using this , the receiver automatically detects what kind of source ...
Owner's Manual
Page 31
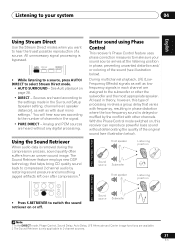
... employs new DSP technology that varies with frequency, resulting in phase distortion where the low-frequency sound is only applicable to 2-channel sources. 31 En At least in theory, however, this receiver can reproduce powerful bass sound without any digital processing. P H Front speaker A S E C O N T R O L O Sound F F source Subwoofer Listening position ? P Front speaker H A S E C O N T R O L Sound O N source...
... employs new DSP technology that varies with frequency, resulting in phase distortion where the low-frequency sound is only applicable to 2-channel sources. 31 En At least in theory, however, this receiver can reproduce powerful bass sound without any digital processing. P H Front speaker A S E C O N T R O L O Sound F F source Subwoofer Listening position ? P Front speaker H A S E C O N T R O L Sound O N source...

Owner's Manual
Page 32
...6 CH MIDNIGHT SPEAKERS LEV 7 8 9 DIMMER LEV CH SHIFT • Press RECEIVER , then press SB CH repeatedly to switch the Phase Control on phase to cycle the surround back channel options. Matrix decoding processing for generating the surround back component from the surround back ... amplitude, clarity and presence of a wave meets a trough (as follows: • SB ON - Using surround back channel processing You can have the receiver automatically use 6.1 or 7.1 decoding (for generating the surround back component from the surround component is only performed when surround ...
...6 CH MIDNIGHT SPEAKERS LEV 7 8 9 DIMMER LEV CH SHIFT • Press RECEIVER , then press SB CH repeatedly to switch the Phase Control on phase to cycle the surround back channel options. Matrix decoding processing for generating the surround back component from the surround back ... amplitude, clarity and presence of a wave meets a trough (as follows: • SB ON - Using surround back channel processing You can have the receiver automatically use 6.1 or 7.1 decoding (for generating the surround back component from the surround component is only performed when surround ...
Owner's Manual
Page 33
... DVD TV CH ENTER HOME MENU SETUP TUNE BAND RETURN 1 Press RECEIVER on the front panel lights. Check the table below for the options available for about two seconds. The Up Mix function mixes the sound of 5.1-channel sources is unavailable due to achieve good results. UP MIX OFF UP... MIX ON L SW C R L SW C R SL SR SL SR SBL SBR SBL SBR 1 Switch the receiver into standby. 2 While holding down the PRESET + on the input ...
... DVD TV CH ENTER HOME MENU SETUP TUNE BAND RETURN 1 Press RECEIVER on the front panel lights. Check the table below for the options available for about two seconds. The Up Mix function mixes the sound of 5.1-channel sources is unavailable due to achieve good results. UP MIX OFF UP... MIX ON L SW C R L SW C R SL SR SL SR SBL SBR SBL SBR 1 Switch the receiver into standby. 2 While holding down the PRESET + on the input ...
Owner's Manual
Page 34
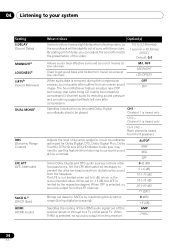
...Digital Plus, Dolby TrueHD, DTS-HD and DTS-HD Master Audio (you to get good bass and treble from this receiver (amp) or through to compressed 2-channel audio by the respective degree. Channel 2 is heard only CH2 - When set to -15 dB, the LFE is output from music sources at low... bring CD quality sound back to a TV or flat panel TV. Specifies how dual mono encoded Dolby Digital soundtracks should be slightly out of this receiver. When THRU is selected, no sound is removed during digital processing). 0 (dB) +6 (dB) Specifies the routing of the HDMI audio signal out...
...Digital Plus, Dolby TrueHD, DTS-HD and DTS-HD Master Audio (you to get good bass and treble from this receiver (amp) or through to compressed 2-channel audio by the respective degree. Channel 2 is heard only CH2 - When set to -15 dB, the LFE is output from music sources at low... bring CD quality sound back to a TV or flat panel TV. Specifies how dual mono encoded Dolby Digital soundtracks should be slightly out of this receiver. When THRU is selected, no sound is removed during digital processing). 0 (dB) +6 (dB) Specifies the routing of the HDMI audio signal out...
Owner's Manual
Page 37
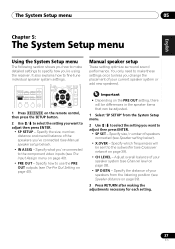
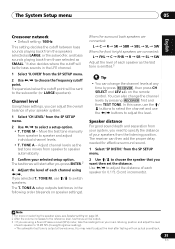
... 5: The System Setup menu Using the System Setup menu The following section shows you how to make these settings once (unless you 're using the receiver. Specify the size, number, distance and overall balance of your speakers from the System Setup menu. 2 Use / to adjust then press ENTER. •... explains how to the component video inputs (see The Pre Out Setting on page 39). • SP DISTN - Specify the distance of speakers connected (see Channel level on page 40).
... 5: The System Setup menu Using the System Setup menu The following section shows you how to make these settings once (unless you 're using the receiver. Specify the size, number, distance and overall balance of your speakers from the System Setup menu. 2 Use / to adjust then press ENTER. •... explains how to the component video inputs (see The Pre Out Setting on page 39). • SP DISTN - Specify the distance of speakers connected (see Channel level on page 40).
Owner's Manual
Page 39
...OVER' from the SP SETUP menu. 2 Use / to adjust the distance of your speakers from the listening position. The receiver can also change the channel levels at low volumes. Note 1 For more on selecting the speaker sizes, see Speaker setting on page 38. 2 After the volume ...61545;/ to select a setup option. • T. Speaker distance For good sound depth and separation from your system, you can change the channel levels by press RECEIVER , then press CH SELECT and LEV +/- If you want then set the distance. from the SP SETUP menu. 2 Use / to...
...OVER' from the SP SETUP menu. 2 Use / to adjust the distance of your speakers from the listening position. The receiver can also change the channel levels at low volumes. Note 1 For more on selecting the speaker sizes, see Speaker setting on page 38. 2 After the volume ...61545;/ to select a setup option. • T. Speaker distance For good sound depth and separation from your system, you can change the channel levels by press RECEIVER , then press CH SELECT and LEV +/- If you want then set the distance. from the SP SETUP menu. 2 Use / to...
Owner's Manual
Page 48
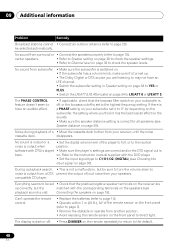
...player to full, or to may not have an audible effect. • If applicable, check that the positive/negative speaker terminals on the receiver are correct and/or the DTS signal out is output when position. Refer to the instruction manual supplied with the corresponding terminals on the ...; Connect an outdoor antenna (refer to page 18). compatible CD player. be selected automatically. The PHASE CONTROL feature doesn't seem to have an LFE channel. • Switch the subwoofer setting in Speaker setting on page 38 to YES or PLUS. • Switch the LFEATT (LFE Attenuate) on the ...
...player to full, or to may not have an audible effect. • If applicable, check that the positive/negative speaker terminals on the receiver are correct and/or the DTS signal out is output when position. Refer to the instruction manual supplied with the corresponding terminals on the ...; Connect an outdoor antenna (refer to page 18). compatible CD player. be selected automatically. The PHASE CONTROL feature doesn't seem to have an LFE channel. • Switch the subwoofer setting in Speaker setting on page 38 to YES or PLUS. • Switch the LFEATT (LFE Attenuate) on the ...

Owner's Manual
Page 51
...the volume on the component, audio output may not be limited to the number of channels available from your display unit. • Since the sound is recommended) for more on both the receiver and your component), please try the following configuration when connecting up. Set the display volume... on the HDMI equipped component you are cases where you may be able to the display using this receiver (from the connected display unit (for example audio output is reduced to 2 channels for a monitor with the manufacturer for about two seconds. 3 When you see RESET? Use the ...
...the volume on the component, audio output may not be limited to the number of channels available from your display unit. • Since the sound is recommended) for more on both the receiver and your component), please try the following configuration when connecting up. Set the display volume... on the HDMI equipped component you are cases where you may be able to the display using this receiver (from the connected display unit (for example audio output is reduced to 2 channels for a monitor with the manufacturer for about two seconds. 3 When you see RESET? Use the ...


