
Owner's Manual
Page 4
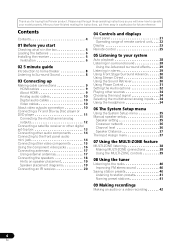
...28 Listening in surround sound 28 Using the Advanced surround effects . . . . . 29 Listening in a safe place for buying this Pioneer product. After you for future reference. Please read through these operating instructions so you start Checking what's in the box 6 Loading the batteries... speakers 18 Hints on speaker placement 19 Speaker placement diagrams 19 Connecting an IR receiver 20 04 Controls and displays Front panel 21 Operating range of remote control unit. . . . 22 Display 23 Remote control 25 05 Listening to your model properly. Contents Contents 4 01 Before you will...
...28 Listening in surround sound 28 Using the Advanced surround effects . . . . . 29 Listening in a safe place for buying this Pioneer product. After you for future reference. Please read through these operating instructions so you start Checking what's in the box 6 Loading the batteries... speakers 18 Hints on speaker placement 19 Speaker placement diagrams 19 Connecting an IR receiver 20 04 Controls and displays Front panel 21 Operating range of remote control unit. . . . 22 Display 23 Remote control 25 05 Listening to your model properly. Contents Contents 4 01 Before you will...
Owner's Manual
Page 6
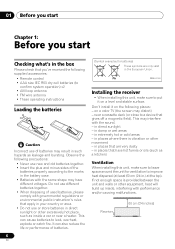
Pb K058c_A1_En Installing the receiver • When installing this unit, make sure to a device that gives off a magnetic field). near a heater. in damp or wet areas - This can also reduce ... cm (24 inches) 01 Before you start Chapter 1: Before you start Checking what's in the box Please check that you've received the following supplied accessories: • Remote control • AAA size IEC R03 dry cell batteries (to the marks in the battery case. • Batteries with the same shape may have hot...
Pb K058c_A1_En Installing the receiver • When installing this unit, make sure to a device that gives off a magnetic field). near a heater. in damp or wet areas - This can also reduce ... cm (24 inches) 01 Before you start Chapter 1: Before you start Checking what's in the box Please check that you've received the following supplied accessories: • Remote control • AAA size IEC R03 dry cell batteries (to the marks in the battery case. • Batteries with the same shape may have hot...

Owner's Manual
Page 14
...to record to/from digital components (like an MD) to the CD-R/TAPE analog output jack using the INPUT SELECTOR or PORTABLE button on the remote control. Use a stereo mini-jack cable to a set of the component to connect a digital audio player, etc. You'll need to make this... LOOP C 1 3 2 OPTICAL COAXIAL DIGITAL OUT R IN REC L AUDIO IN R OUT L PLAY AUDIO OUT 1 If your component has a digital output, connect this receiver. The example shows an optical connection to the DIGITAL OPTICAL IN 1 (CD-R/TAPE) input. 2 If necessary, connect the analog audio outputs of spare audio inputs...
...to record to/from digital components (like an MD) to the CD-R/TAPE analog output jack using the INPUT SELECTOR or PORTABLE button on the remote control. Use a stereo mini-jack cable to a set of the component to connect a digital audio player, etc. You'll need to make this... LOOP C 1 3 2 OPTICAL COAXIAL DIGITAL OUT R IN REC L AUDIO IN R OUT L PLAY AUDIO OUT 1 If your component has a digital output, connect this receiver. The example shows an optical connection to the DIGITAL OPTICAL IN 1 (CD-R/TAPE) input. 2 If necessary, connect the analog audio outputs of spare audio inputs...

Owner's Manual
Page 20
... came with your system instead of the remote sensor on the front panel of this receiver.1 1 Connect the IR receiver sensor to check for IR compatibility. • If using two remote controls (at the same time), the IR receiver's remote sensor takes priority over the remote sensor on connecting the IR receiver, see the Installation Instructions for the IR...
... came with your system instead of the remote sensor on the front panel of this receiver.1 1 Connect the IR receiver sensor to check for IR compatibility. • If using two remote controls (at the same time), the IR receiver's remote sensor takes priority over the remote sensor on connecting the IR receiver, see the Installation Instructions for the IR...
Owner's Manual
Page 22
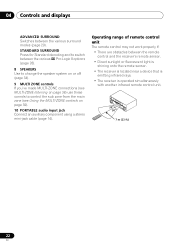
... a stereo mini-jack cable (page 14). CHANNEL RECEIVER VSX-519V PORTABLE VMOALSUTMERE 30 7 m (23 ft.) 22 En ASUTTROESAUMRDRIOREUCNTD/ STAE.LR.CEO. / TUNE + SAUDRVRAONCUENDD TUNER EDIT SSUTARNRDOAURNDD PRESET - Operating range of remote control unit The remote control may not work properly if: • There are obstacles between the remote control and the receiver's remote sensor. • Direct sunlight or fluorescent light is...
... a stereo mini-jack cable (page 14). CHANNEL RECEIVER VSX-519V PORTABLE VMOALSUTMERE 30 7 m (23 ft.) 22 En ASUTTROESAUMRDRIOREUCNTD/ STAE.LR.CEO. / TUNE + SAUDRVRAONCUENDD TUNER EDIT SSUTARNRDOAURNDD PRESET - Operating range of remote control unit The remote control may not work properly if: • There are obstacles between the remote control and the receiver's remote sensor. • Direct sunlight or fluorescent light is...
Owner's Manual
Page 25
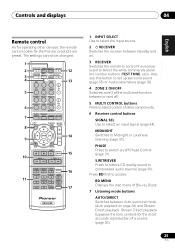
...RECEIVER Switches the receiver between Auto surround mode (Auto playback on and off Phase Control (page 31). MIDNIGHT Switches to compressed audio sources (page 30). Stream Direct playback bypasses the tone controls for the Pioneer products are preset. PHASE Press to switch on/off . 5 MULTI CONTROL buttons Press to select control of other devices, the remote control...BD MENU AUTO/ STEREO/ 7 DIRECT A.L.C. Controls and displays 04 English Français Español PRESET Remote control As for operating other components. 6 Receiver control buttons SIGNAL SEL Use to select an ...
...RECEIVER Switches the receiver between Auto surround mode (Auto playback on and off Phase Control (page 31). MIDNIGHT Switches to compressed audio sources (page 30). Stream Direct playback bypasses the tone controls for the Pioneer products are preset. PHASE Press to switch on/off . 5 MULTI CONTROL buttons Press to select control of other devices, the remote control...BD MENU AUTO/ STEREO/ 7 DIRECT A.L.C. Controls and displays 04 English Français Español PRESET Remote control As for operating other components. 6 Receiver control buttons SIGNAL SEL Use to select an ...

Owner's Manual
Page 27
...off the power of time before the receiver switches into standby (30 min - 60 min - 90 min - DIMMER Dims or brightens the display. INPUT Use to select a channel, then use the / buttons to adjust the level (page 36). These buttons are marked with Pioneer flat panel TVs. Use...the channel levels. to adjust the level on your TV. 14 MASTER VOLUME +/- Use to access the 'boxed' commands (above the buttons) on the remote. Controls and displays 04 English Français Español TEST TONE Outputs the test tones on each channel. The brightness can be...
...off the power of time before the receiver switches into standby (30 min - 60 min - 90 min - DIMMER Dims or brightens the display. INPUT Use to select a channel, then use the / buttons to adjust the level (page 36). These buttons are marked with Pioneer flat panel TVs. Use...the channel levels. to adjust the level on your TV. 14 MASTER VOLUME +/- Use to access the 'boxed' commands (above the buttons) on the remote. Controls and displays 04 English Français Español TEST TONE Outputs the test tones on each channel. The brightness can be...

Owner's Manual
Page 32
...of the video. 0.0 to 9.0 (frames) 1 second = 30 frames (NTSC) Default: 0.0 Allows you to hear effective surround sound of the receiver. Channel 1 is removed during the compression OFF process, sound quality often suffers from an uneven sound image. Channel 2 is unavailable due to the current... restoring sound pressure and smoothing jagged artifacts left over after compression. Check the table below for the options available for notes on the remote control, then press AUDIO PARAMETER button. 2 Use / to select the setting you can make using the AUDIO PARAMETER menu....
...of the video. 0.0 to 9.0 (frames) 1 second = 30 frames (NTSC) Default: 0.0 Allows you to hear effective surround sound of the receiver. Channel 1 is removed during the compression OFF process, sound quality often suffers from an uneven sound image. Channel 2 is unavailable due to the current... restoring sound pressure and smoothing jagged artifacts left over after compression. Check the table below for the options available for notes on the remote control, then press AUDIO PARAMETER button. 2 Use / to select the setting you can make using the AUDIO PARAMETER menu....

Owner's Manual
Page 34
... instruction manual supplied with your DVD player. 2 • When the HDMI option in step 1. Each press cycles through your TV, not from this receiver. 3 • During playback from STEREO or A.L.C.. H can only play back Dolby Digital, PCM (32 kHz to select SP OFF. When the ...sources 1 Turn on the power of the playback component. 2 Turn on the power of the receiver. 3 Select the source you selected in Setting the Audio options on the remote control. Use the MULTI CONTROL buttons (INPUT SELECTOR). 4 Start playback of the component you want to the other input signal.
... instruction manual supplied with your DVD player. 2 • When the HDMI option in step 1. Each press cycles through your TV, not from this receiver. 3 • During playback from STEREO or A.L.C.. H can only play back Dolby Digital, PCM (32 kHz to select SP OFF. When the ...sources 1 Turn on the power of the playback component. 2 Turn on the power of the receiver. 3 Select the source you selected in Setting the Audio options on the remote control. Use the MULTI CONTROL buttons (INPUT SELECTOR). 4 Start playback of the component you want to the other input signal.

Owner's Manual
Page 35
... speakers the subwoofer is fixed to set to LARGE if the front speakers are sent to the subwoofer (see The Input Assign menu on the remote control, then press the SETUP button. 2 Use / to select the setting you 've connected to SMALL. Adjust overall balance of the ...speakers: • Front (F) - You only need to make detailed settings to specify how you want to choose the speaker(s) that you 're using the receiver. Select LARGE if your current speaker system or add new speakers). 1 Select SP SETUP from the SP SETUP menu. 2 Use / to adjust...
... speakers the subwoofer is fixed to set to LARGE if the front speakers are sent to the subwoofer (see The Input Assign menu on the remote control, then press the SETUP button. 2 Use / to select the setting you 've connected to SMALL. Adjust overall balance of the ...speakers: • Front (F) - You only need to make detailed settings to specify how you want to choose the speaker(s) that you 're using the receiver. Select LARGE if your current speaker system or add new speakers). 1 Select SP SETUP from the SP SETUP menu. 2 Use / to adjust...

Owner's Manual
Page 36
... will be output. 4 • If you press ENTER.3 4 Adjust the level of each speaker as the test tone is output at any time by pressing RECEIVER first and then starting the following order (depends on speaker settings): L C R SR SL SW Adjust...sent to the reference level, test tones will be for the front speakers. 2 For more on selecting the speaker sizes, see Speaker setting on the remote control. Channel level Using these settings, you can also change the channel levels at low volumes. 06 The System Setup menu • Center (C) - ...
... will be output. 4 • If you press ENTER.3 4 Adjust the level of each speaker as the test tone is output at any time by pressing RECEIVER first and then starting the following order (depends on speaker settings): L C R SR SL SW Adjust...sent to the reference level, test tones will be for the front speakers. 2 For more on selecting the speaker sizes, see Speaker setting on the remote control. Channel level Using these settings, you can also change the channel levels at low volumes. 06 The System Setup menu • Center (C) - ...

Owner's Manual
Page 38
... connections if you have made the proper MULTI-ZONE connections. You should have a pair of this receiver. The main and sub zones have independent power (the main zone power can be controlled by the remote or front panel controls. AUDIO IN MONITOR OUT BD/DVD IN TV/SAT IN A PR PB Y OUT COMPONENT VIDEO...
... connections if you have made the proper MULTI-ZONE connections. You should have a pair of this receiver. The main and sub zones have independent power (the main zone power can be controlled by the remote or front panel controls. AUDIO IN MONITOR OUT BD/DVD IN TV/SAT IN A PR PB Y OUT COMPONENT VIDEO...

Owner's Manual
Page 39
... for the zone you 're finished, press CONTROL again to return to the main zone controls. CHANNEL RECEIVER VSX-519V PHASE CONTROL BAND TUNE - PRESET + SPEAKERS MULTI-ZONE CONTROL ON/OFF ENTER MASTER VOLUME PHONES SPEAKERS MULTI-ZONE CONTROL ON/OFF PORTABLE 1 Press the MULTI-ZONE ...Using the MULTI-ZONE controls The following table shows the possible MULTIZONE remote controls: Button What it does ZONE 2 Switches on/off all output to the sub zone.3 MULTI-ZONE remote controls Press the RECEIVER button on the remote control, then with this receiver. STANDBY/ON INPUT ...
... for the zone you 're finished, press CONTROL again to return to the main zone controls. CHANNEL RECEIVER VSX-519V PHASE CONTROL BAND TUNE - PRESET + SPEAKERS MULTI-ZONE CONTROL ON/OFF ENTER MASTER VOLUME PHONES SPEAKERS MULTI-ZONE CONTROL ON/OFF PORTABLE 1 Press the MULTI-ZONE ...Using the MULTI-ZONE controls The following table shows the possible MULTIZONE remote controls: Button What it does ZONE 2 Switches on/off all output to the sub zone.3 MULTI-ZONE remote controls Press the RECEIVER button on the remote control, then with this receiver. STANDBY/ON INPUT ...

Owner's Manual
Page 41
...the station preset you want. • You can also use the number buttons. 4 Press ENTER. After pressing ENTER, the preset number stop blinking and the receiver stores the station. You can name all of your preset stations. 1 Choose the station preset you have some presets stored to show the frequency. 41... DISPLAY to do this . Press TUNER EDIT while the display is blinking on page 40 if you can also use the number buttons on the remote control to show the name. The cursor at the first character position is blank, to keep the previous name. • Once you want to return to...
...the station preset you want. • You can also use the number buttons. 4 Press ENTER. After pressing ENTER, the preset number stop blinking and the receiver stores the station. You can name all of your preset stations. 1 Choose the station preset you have some presets stored to show the frequency. 41... DISPLAY to do this . Press TUNER EDIT while the display is blinking on page 40 if you can also use the number buttons on the remote control to show the name. The cursor at the first character position is blank, to keep the previous name. • Once you want to return to...
Owner's Manual
Page 43
... 're assigned the correct input. • The video input selected on the remote control to shut off automatically. • If the power shuts off equipment causing interference or move it away from the receiver (or move antennas farther away from the outlet, and insert again. •...selected. Considerable noise in another component. Refer to the instruction manual supplied with this component, check the points below , ask your nearest Pioneer authorized service center or your dealer for servicing. • Make sure the component is connected correctly (refer to Connecting up on page ...
... 're assigned the correct input. • The video input selected on the remote control to shut off automatically. • If the power shuts off equipment causing interference or move it away from the receiver (or move antennas farther away from the outlet, and insert again. •...selected. Considerable noise in another component. Refer to the instruction manual supplied with this component, check the points below , ask your nearest Pioneer authorized service center or your dealer for servicing. • Make sure the component is connected correctly (refer to Connecting up on page ...

Owner's Manual
Page 44
Refer to the instruction manual supplied with DTS is played back. • Set the digital volume level of the remote sensor on the front panel to direct light. Can't operate the remote control. • Replace the batteries (refer to page 22). • Operate within 7 m (23 ft.), 30...• Avoid exposing the remote sensor on the front panel (refer to 0º (or depending on the subwoofer, the setting where you are matched with the corresponding terminals on page 37). No sound from your receiver, until the noise disappears. The PHASE CONTROL feature • If applicable...
Refer to the instruction manual supplied with DTS is played back. • Set the digital volume level of the remote sensor on the front panel to direct light. Can't operate the remote control. • Replace the batteries (refer to page 22). • Operate within 7 m (23 ft.), 30...• Avoid exposing the remote sensor on the front panel (refer to 0º (or depending on the subwoofer, the setting where you are matched with the corresponding terminals on page 37). No sound from your receiver, until the noise disappears. The PHASE CONTROL feature • If applicable...

Owner's Manual
Page 47
... is dirty, wipe with a soft cloth dipped in . (D) Weight (without package). . . . 8.8 kg (19 lb 7 oz) Furnished Parts Remote control 1 Dry cell batteries (AAA size IEC R03 2 AM loop antenna 1 FM wire antenna 1 These operating instructions Note • Specifications and the design ...are subject to possible modifications without notice, due to improvements. Copyright © 2008 Pioneer Corporation. Published by Pioneer Corporation. Additional information 10 English Français Español Digital I/O HDMI terminal 19-pin (Not DVI) HDMI ...
... is dirty, wipe with a soft cloth dipped in . (D) Weight (without package). . . . 8.8 kg (19 lb 7 oz) Furnished Parts Remote control 1 Dry cell batteries (AAA size IEC R03 2 AM loop antenna 1 FM wire antenna 1 These operating instructions Note • Specifications and the design ...are subject to possible modifications without notice, due to improvements. Copyright © 2008 Pioneer Corporation. Published by Pioneer Corporation. Additional information 10 English Français Español Digital I/O HDMI terminal 19-pin (Not DVI) HDMI ...
Product Brochure
Page 1
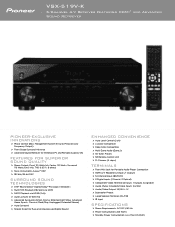
VSX-519V-K 5-Channel A/V Receiver Featuring HDMI® and Advanced Sound Retriever PIONEER-EXCLUSIVE INNOVATIONS ›› Phase Control (Bass Management System Ensures Precision Low Frequency Output) ›› Front Stage Surround Advance ›› Advanced ...8250; x.v.Color Compatible ›› Deep Color Compatible ›› Multi-Zone Audio (Zone 2) ›› 30 Tuner Presets ›› SR Remote Control Unit ›› FL Dimmer (4 steps) TERMINALS ›› Front Mini Jack for Portable Audio Player Connection ›› HDMI A/V Repeater (2 ...
VSX-519V-K 5-Channel A/V Receiver Featuring HDMI® and Advanced Sound Retriever PIONEER-EXCLUSIVE INNOVATIONS ›› Phase Control (Bass Management System Ensures Precision Low Frequency Output) ›› Front Stage Surround Advance ›› Advanced ...8250; x.v.Color Compatible ›› Deep Color Compatible ›› Multi-Zone Audio (Zone 2) ›› 30 Tuner Presets ›› SR Remote Control Unit ›› FL Dimmer (4 steps) TERMINALS ›› Front Mini Jack for Portable Audio Player Connection ›› HDMI A/V Repeater (2 ...


