Owner's Manual
Page 2
...This equipment has been tested and found to comply with the limits for help. However, there is properly disposed of time (for buying this Pioneer product. Reorient or relocate the receiving antenna. - Consult the dealer or an experienced radio/TV technician for a Class B digital device, pursuant...one or more of Dolby Laboratories. Increase the separation between the equipment and receiver. - Connect the equipment into an outlet on the power supply cord of an AC plug on a circuit different from that interference will not occur in accordance with electric appliances such as ...
...This equipment has been tested and found to comply with the limits for help. However, there is properly disposed of time (for buying this Pioneer product. Reorient or relocate the receiving antenna. - Consult the dealer or an experienced radio/TV technician for a Class B digital device, pursuant...one or more of Dolby Laboratories. Increase the separation between the equipment and receiver. - Connect the equipment into an outlet on the power supply cord of an AC plug on a circuit different from that interference will not occur in accordance with electric appliances such as ...
Owner's Manual
Page 3
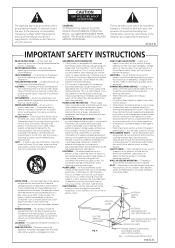
...repairs to this product yourself as a bookcase or rack unless proper ventilation is provided or the manufacturer's instructions have fallen into such power lines or circuits. RETAIN INSTRUCTIONS - ATTACHMENTS - Do not use attachments not recommended by the manufacturer. If you are provided for...follow the manufacturer's instructions, and should use instructions should be installed in damage and will only fit into a grounding type power outlet. A product and cart combination should be unplugged from the wall outlet and refer servicing to qualified service personnel under the...
...repairs to this product yourself as a bookcase or rack unless proper ventilation is provided or the manufacturer's instructions have fallen into such power lines or circuits. RETAIN INSTRUCTIONS - ATTACHMENTS - Do not use attachments not recommended by the manufacturer. If you are provided for...follow the manufacturer's instructions, and should use instructions should be installed in damage and will only fit into a grounding type power outlet. A product and cart combination should be unplugged from the wall outlet and refer servicing to qualified service personnel under the...
Owner's Manual
Page 4
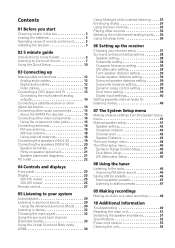
...18 FM wire antenna 18 AM loop antenna 18 Using external antennas 18 Connecting the speakers (VSX-415 19 Connecting the speakers (VSX-515 20 Speaker terminals 21 Hints on speaker placement 21 Speaker placement diagrams 21 AC outlet 22... 04 Controls and displays Front panel 23 Display 25 VSX-515 model 25 VSX-415 model 25 Remote control 27 05 Listening to your system Auto playback 29 Listening in surround ...49 Resetting the main unit 51 Switching the speaker impedance 51 Specifications 52 Power cord caution 53 Cleaning the unit 53
...18 FM wire antenna 18 AM loop antenna 18 Using external antennas 18 Connecting the speakers (VSX-415 19 Connecting the speakers (VSX-515 20 Speaker terminals 21 Hints on speaker placement 21 Speaker placement diagrams 21 AC outlet 22... 04 Controls and displays Front panel 23 Display 25 VSX-515 model 25 VSX-415 model 25 Remote control 27 05 Listening to your system Auto playback 29 Listening in surround ...49 Resetting the main unit 51 Switching the speaker impedance 51 Specifications 52 Power cord caution 53 Cleaning the unit 53
Owner's Manual
Page 7
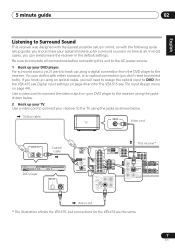
... 5.1CH REC INPUT CD-R IN / TAPE / MD CEN- 5 minute guide 02 English Deutsch Français Italiano Nederlands Español Listening to the AC power source. 1 Hook up your DVD player. SUB TER WOOFER R L SURROUND DVD 5.1CH INPUT COMPONENT VIDEO ASSIGNABLE (DVD / LD) IN ¥ Y PB PR... ø R SURROUND BACK L OUT SINGLE SEE INSTRUCTION MONITOR MANUAL OUT SUB WOOFER PREOUT R SURROUND L Video cord * The illustration shows the VSX-515, but connections for surround sound in the default settings. Be sure to complete all . Use a video cord to connect the video output on...
... 5.1CH REC INPUT CD-R IN / TAPE / MD CEN- 5 minute guide 02 English Deutsch Français Italiano Nederlands Español Listening to the AC power source. 1 Hook up your DVD player. SUB TER WOOFER R L SURROUND DVD 5.1CH INPUT COMPONENT VIDEO ASSIGNABLE (DVD / LD) IN ¥ Y PB PR... ø R SURROUND BACK L OUT SINGLE SEE INSTRUCTION MONITOR MANUAL OUT SUB WOOFER PREOUT R SURROUND L Video cord * The illustration shows the VSX-515, but connections for surround sound in the default settings. Be sure to complete all . Use a video cord to connect the video output on...

Owner's Manual
Page 8
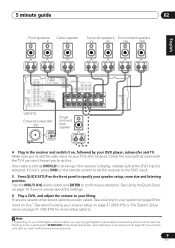
...OUT SUB WOOFER PREOUT CENTER SUB WOOFER R L SURROUND DVD 5.1CH INPUT FRONT SPEAKER RL CENTER SPEAKER SURROUND SPEAKERS RL L R SURROUND PREOUT Powered subwoofer SW INPUT AC OUTLET VSX-415 Note 1 • If you plan to the left channel (-) terminal as shown below.1 The receiver will work with an impedance .... Also make sure the positive and negative (+/-) terminals on the receiver match those on page 38) to the left to large. • VSX-515 only - If you have as shown. 8 En A complete setup of less than 8Ω). 02 5 minute guide 3 Connect your speakers.
...OUT SUB WOOFER PREOUT CENTER SUB WOOFER R L SURROUND DVD 5.1CH INPUT FRONT SPEAKER RL CENTER SPEAKER SURROUND SPEAKERS RL L R SURROUND PREOUT Powered subwoofer SW INPUT AC OUTLET VSX-415 Note 1 • If you plan to the left channel (-) terminal as shown below.1 The receiver will work with an impedance .... Also make sure the positive and negative (+/-) terminals on the receiver match those on page 38) to the left to large. • VSX-515 only - If you have as shown. 8 En A complete setup of less than 8Ω). 02 5 minute guide 3 Connect your speakers.
Owner's Manual
Page 9
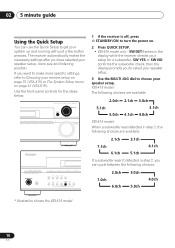
...) IN ¥ Y PB PR Y PB PR MONITOR OUT (T V / SAT)IN ø S R FRONT L CENTER R SURROUND BACK L R SURROUND L P E A SINGLE K SEE INSTRUCTION MANUAL E R S VSX-515 Powered subwoofer SW INPUT Single surround back speaker AC OUTLET 4 Plug in the receiver and switch it on your selection. Note 1 Depending on , followed by your... size and listening position. If it should already be set to specify your receiver setup on page 37 (VSX-415) or The System Setup menu on page 41 (VSX-515) for more on page 29 if you may only get digital 2 channel stereo and analog sound. In...
...) IN ¥ Y PB PR Y PB PR MONITOR OUT (T V / SAT)IN ø S R FRONT L CENTER R SURROUND BACK L R SURROUND L P E A SINGLE K SEE INSTRUCTION MANUAL E R S VSX-515 Powered subwoofer SW INPUT Single surround back speaker AC OUTLET 4 Plug in the receiver and switch it on your selection. Note 1 Depending on , followed by your... size and listening position. If it should already be set to specify your receiver setup on page 37 (VSX-415) or The System Setup menu on page 41 (VSX-515) for more on page 29 if you may only get digital 2 channel stereo and analog sound. In...
Owner's Manual
Page 10
...automatically makes the necessary settings after you can use the Quick Setup to turn the power on page 41 (VSX-515). VSX-415 model: The following choices are available: 2.0ch 2.1ch 3.0ch 5.1ch 3.1ch 5.0ch 4.1ch 4.0ch VSX-515 model: When a subwoofer was detected in step 2, the following choices: 7.0ch... 2.0ch 6.0ch 3.0ch 5.0ch 4.0ch * Illustration shows the VSX-515 model 10 En AUDIO/VIDEO MULTI-CHANNEL RECEIVER VSX-515 MULTI JOG ENTER CD CD-R/TAPE/MD FM AM MASTER VOLUME DOWN UP ADVANCED ST/DIRECT SIGNAL STANDARD SURR /AUTO...
...automatically makes the necessary settings after you can use the Quick Setup to turn the power on page 41 (VSX-515). VSX-415 model: The following choices are available: 2.0ch 2.1ch 3.0ch 5.1ch 3.1ch 5.0ch 4.1ch 4.0ch VSX-515 model: When a subwoofer was detected in step 2, the following choices: 7.0ch... 2.0ch 6.0ch 3.0ch 5.0ch 4.0ch * Illustration shows the VSX-515 model 10 En AUDIO/VIDEO MULTI-CHANNEL RECEIVER VSX-515 MULTI JOG ENTER CD CD-R/TAPE/MD FM AM MASTER VOLUME DOWN UP ADVANCED ST/DIRECT SIGNAL STANDARD SURR /AUTO...

Owner's Manual
Page 12
...digital connections. 12 En Analog audio cables Use stereo RCA phono cables to L (left) terminals. Standard RCA video cable Component video cables (VSX-515 only) Use component video cables to damage the shutter protecting the optical socket. • When storing optical cable, coil loosely. In this ...unit (as shown in this receiver.1 Important • Before making or changing any connections, switch off the power and disconnect the power cord from the speakers. 03 Connecting up Chapter 3: Connecting up Making cable connections Make sure not to bend the cables over...
...digital connections. 12 En Analog audio cables Use stereo RCA phono cables to L (left) terminals. Standard RCA video cable Component video cables (VSX-515 only) Use component video cables to damage the shutter protecting the optical socket. • When storing optical cable, coil loosely. In this ...unit (as shown in this receiver.1 Important • Before making or changing any connections, switch off the power and disconnect the power cord from the speakers. 03 Connecting up Chapter 3: Connecting up Making cable connections Make sure not to bend the cables over...
Owner's Manual
Page 19
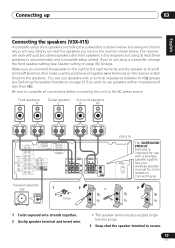
...PREOUT CENTER SUB WOOFER R L SURROUND DVD 5.1CH INPUT FRONT SPEAKER RL CENTER SPEAKER SURROUND SPEAKERS RL L R SURROUND PREOUT Powered subwoofer SW INPUT 1 2 10mm or ª · VSX-415 AC OUTLET The SURROUND PREOUT terminal is intended for more details on the left to the left terminal. Simply connect the... (see Switching the speaker impedance on the speakers. Be sure to complete all connections before connecting this unit to the AC power source. If you connect the speaker on the right to the right terminal and the speaker on connecting up 03 Connecting the speakers...
...PREOUT CENTER SUB WOOFER R L SURROUND DVD 5.1CH INPUT FRONT SPEAKER RL CENTER SPEAKER SURROUND SPEAKERS RL L R SURROUND PREOUT Powered subwoofer SW INPUT 1 2 10mm or ª · VSX-415 AC OUTLET The SURROUND PREOUT terminal is intended for more details on the left to the left terminal. Simply connect the... (see Switching the speaker impedance on the speakers. Be sure to complete all connections before connecting this unit to the AC power source. If you connect the speaker on the right to the right terminal and the speaker on connecting up 03 Connecting the speakers...
Owner's Manual
Page 20
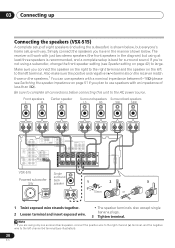
...Y PB PR Y PB PR MONITOR OUT (T V / SAT)IN ø S R FRONT L CENTER R SURROUND BACK L R SURROUND L P E A SINGLE K SEE INSTRUCTION MANUAL E R S AC OUTLET VSX-515 Single surround Powered subwoofer SW back speaker 1 2 3 INPUT 10mm or 1 Twist exposed wire strands together. 2 Loosen terminal and insert exposed wire. • The speaker terminals also accept...impedance of eight speakers (including the subwoofer) is best for surround sound. 03 Connecting up Connecting the speakers (VSX-515) A complete setup of less than 8Ω). The receiver will vary.
...Y PB PR Y PB PR MONITOR OUT (T V / SAT)IN ø S R FRONT L CENTER R SURROUND BACK L R SURROUND L P E A SINGLE K SEE INSTRUCTION MANUAL E R S AC OUTLET VSX-515 Single surround Powered subwoofer SW back speaker 1 2 3 INPUT 10mm or 1 Twist exposed wire strands together. 2 Loosen terminal and insert exposed wire. • The speaker terminals also accept...impedance of eight speakers (including the subwoofer) is best for surround sound. 03 Connecting up Connecting the speakers (VSX-515) A complete setup of less than 8Ω). The receiver will vary.
Owner's Manual
Page 21
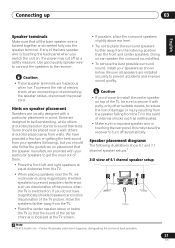
...damage or injury resulting from the speaker falling from the TV in mind. To prevent the risk of 6.1 channel speaker setup Note 1 VSX-415 model only - Be sure all the bare speaker wire is twisted together and inserted fully into the speaker terminal. We have ... (following illustrations show 6.1 and 7.1 channel speaker setups.1 3-D view of electric shock when connecting or disconnecting the speaker cables, disconnect the power cord. Connecting up 03 English Deutsch Français Italiano Nederlands Español Speaker terminals Make sure that the speaker manufacturer provided with ...
...damage or injury resulting from the speaker falling from the TV in mind. To prevent the risk of 6.1 channel speaker setup Note 1 VSX-415 model only - Be sure all the bare speaker wire is twisted together and inserted fully into the speaker terminal. We have ... (following illustrations show 6.1 and 7.1 channel speaker setups.1 3-D view of electric shock when connecting or disconnecting the speaker cables, disconnect the power cord. Connecting up 03 English Deutsch Français Italiano Nederlands Español Speaker terminals Make sure that the speaker manufacturer provided with ...
Owner's Manual
Page 22
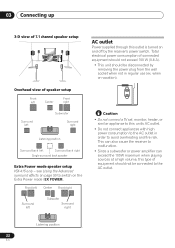
... left Subwoofer Surround right Listening position Surround back left Subwoofer Surround right AC outlet Power supplied through this outlet is turned on and off by removing the power plug from the wall socket when not in order to avoid overheating and fire risk... A). • This unit should not be disconnected by the receiver's power switch. Front left Center Front right Surround left Surround back right Single surround back speaker Extra Power mode speaker setup VSX-415 only - Total electrical power consumption of equipment should be connected to switch on vacation).
... left Subwoofer Surround right Listening position Surround back left Subwoofer Surround right AC outlet Power supplied through this outlet is turned on and off by removing the power plug from the wall socket when not in order to avoid overheating and fire risk... A). • This unit should not be disconnected by the receiver's power switch. Front left Center Front right Surround left Surround back right Single surround back speaker Extra Power mode speaker setup VSX-415 only - Total electrical power consumption of equipment should be connected to switch on vacation).

Owner's Manual
Page 28
... between the three banks (classes) of the receiver (page 40). LEVEL +/- page 37, VSX-515 - page 37, VSX-515 - MPX Use to the start fast forward scanning. If the signal is weak then switching ...speaker when setting up the surround sound for the receiver (VSX-415 - page 41). Button What it does DVD Turns DVD power on multilingual DVD-Video discs. Press to the next track...surround sound system (VSX-415 - Stops playback. EFFECT +/- TEST TONE Sounds the test tone when setting up your system. buttons can use these buttons to control a Pioneer DVD player connected to...
... between the three banks (classes) of the receiver (page 40). LEVEL +/- page 37, VSX-515 - page 37, VSX-515 - MPX Use to the start fast forward scanning. If the signal is weak then switching ...speaker when setting up the surround sound for the receiver (VSX-415 - page 41). Button What it does DVD Turns DVD power on multilingual DVD-Video discs. Press to the next track...surround sound system (VSX-415 - Stops playback. EFFECT +/- TEST TONE Sounds the test tone when setting up your system. buttons can use these buttons to control a Pioneer DVD player connected to...
Owner's Manual
Page 31
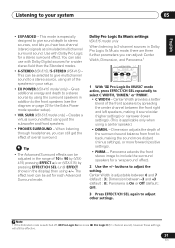
... for a wider stereo field than the Standard modes. • 6-STEREO (VSX-515) / 5-STEREO (VSX-415) - You can be effective. 31 En The effect level can also use with Dolby Pro Logic for the Extra Power mode speaker setup). • VIR. Panorama extends the front stereo image to...mode, there are three further parameters you hear two-channel (stereo) signals as simulated multichannel surround sound. SURR (VSX-515 model only) - Dolby Pro Logic IIx Music settings VSX-515 model only When listening to back, making it sound wider (higher settings) or narrower (lower settings). (This...
... for a wider stereo field than the Standard modes. • 6-STEREO (VSX-515) / 5-STEREO (VSX-415) - You can be effective. 31 En The effect level can also use with Dolby Pro Logic for the Extra Power mode speaker setup). • VIR. Panorama extends the front stereo image to...mode, there are three further parameters you hear two-channel (stereo) signals as simulated multichannel surround sound. SURR (VSX-515 model only) - Dolby Pro Logic IIx Music settings VSX-515 model only When listening to back, making it sound wider (higher settings) or narrower (lower settings). (This...
Owner's Manual
Page 36
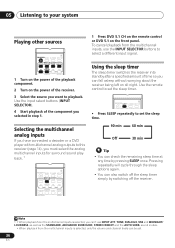
... INPUT SELECTOR DVD/LD DVD 5.1CH TV/SAT DVR/VCR CD-R/ CD TAPE/MD FM AM ADVANCED MIDNIGHT/ 1 Turn on the power of the playback component. 2 Turn on the power of the receiver. 3 Select the source you want to set the sleep time. 90 min 60 min Off 30 min Tip •...
... INPUT SELECTOR DVD/LD DVD 5.1CH TV/SAT DVR/VCR CD-R/ CD TAPE/MD FM AM ADVANCED MIDNIGHT/ 1 Turn on the power of the playback component. 2 Turn on the power of the receiver. 3 Select the source you want to set the sleep time. 90 min 60 min Off 30 min Tip •...
Owner's Manual
Page 47
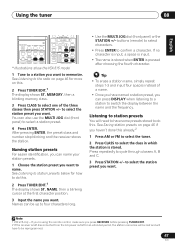
... this . 2 Press TUNER EDIT.1 The display shows ST. Listening to station presets You will have some presets stored to do this . Note 1 VSX-415 only - See Saving station presets on this already.2 1 Press AM or FM to select the tuner. 2 Press CLASS to select the class ... ADVANCED MIDNIGHT/ STANDARD SURROUND STEREO LOUDNESS SUB TITLE DVD CONTROL * Illustrations show the VSX-515 model 1 Tune to a station you press RECEIVER before pressing TUNER EDIT. 2 If the receiver is left disconnected from the AC power outlet for more on page 46 if you want . After pressing ENTER, the...
... this . 2 Press TUNER EDIT.1 The display shows ST. Listening to station presets You will have some presets stored to do this . Note 1 VSX-415 only - See Saving station presets on this already.2 1 Press AM or FM to select the tuner. 2 Press CLASS to select the class ... ADVANCED MIDNIGHT/ STANDARD SURROUND STEREO LOUDNESS SUB TITLE DVD CONTROL * Illustrations show the VSX-515 model 1 Tune to a station you press RECEIVER before pressing TUNER EDIT. 2 If the receiver is left disconnected from the AC power outlet for more on page 46 if you want . After pressing ENTER, the...
Owner's Manual
Page 49
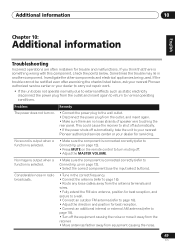
... (use the input select buttons). This could cause the receiver to shut off automatically. • If the power shuts off automatically, take the unit to your nearest Pioneer authorized service center or your dealer to carry out repair work. • If the unit does not operate ...when a function is selected. • Make sure the component is something wrong with this component, check the points below , ask your nearest Pioneer authorized service center or your dealer for best reception. • Connect an additional internal or external AM antenna (refer to normal operating conditions....
... (use the input select buttons). This could cause the receiver to shut off automatically. • If the power shuts off automatically, take the unit to your nearest Pioneer authorized service center or your dealer to carry out repair work. • If the unit does not operate ...when a function is selected. • Make sure the component is something wrong with this component, check the points below , ask your nearest Pioneer authorized service center or your dealer for best reception. • Connect an additional internal or external AM antenna (refer to normal operating conditions....
Owner's Manual
Page 52
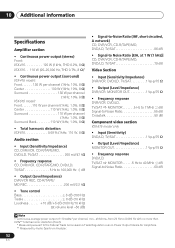
... Specifications Amplifier section • Continuous power output (stereo) Front: VSX-415 120 W (1kHz, THD 0.2%, 8 Ω) VSX-515 . . 110 W (20-20,000 Hz, THD 0.7%, 8 Ω)1 • Continuous power output (surround) VSX-415 model: Front. . . . . . 130 W per channel (1kHz, 10%, 8 Ω) Center 130 W (1kHz, 10%, 8 Ω) Surround 130 W per channel (1kHz, 10%, 8 Ω) VSX-515 model: Front. . . . . . 110 W per channel...
... Specifications Amplifier section • Continuous power output (stereo) Front: VSX-415 120 W (1kHz, THD 0.2%, 8 Ω) VSX-515 . . 110 W (20-20,000 Hz, THD 0.7%, 8 Ω)1 • Continuous power output (surround) VSX-415 model: Front. . . . . . 130 W per channel (1kHz, 10%, 8 Ω) Center 130 W (1kHz, 10%, 8 Ω) Surround 130 W per channel (1kHz, 10%, 8 Ω) VSX-515 model: Front. . . . . . 110 W per channel...
Owner's Manual
Page 53
... 350 µV/m Signal-to-Noise Ratio 50 dB Antenna Loop antenna Miscellaneous Power requirements AC 120V / 60Hz Power consumption: VSX-415 260 W / 340 VA VSX-515 300 W / 420 VA In standby 0.5 W Dimensions: VSX-415. . . .169/16 (W) x 61/4 (H) x 159/16 (D) in. 420 (W) x 158 (H) x 394.5 (D) mm VSX-515. . . . 169/16 (W) x 61/4 (H) x 157/8 (D) in. 420 (W) ...out well, and then wipe again with other chemicals on the power cord, or pinch the cord. Check the power cord once in the cord or tie it damaged, ask your nearest Pioneer authorized service center or your hands are wet as this unit...
... 350 µV/m Signal-to-Noise Ratio 50 dB Antenna Loop antenna Miscellaneous Power requirements AC 120V / 60Hz Power consumption: VSX-415 260 W / 340 VA VSX-515 300 W / 420 VA In standby 0.5 W Dimensions: VSX-415. . . .169/16 (W) x 61/4 (H) x 159/16 (D) in. 420 (W) x 158 (H) x 394.5 (D) mm VSX-515. . . . 169/16 (W) x 61/4 (H) x 157/8 (D) in. 420 (W) ...out well, and then wipe again with other chemicals on the power cord, or pinch the cord. Check the power cord once in the cord or tie it damaged, ask your nearest Pioneer authorized service center or your hands are wet as this unit...


