
Owner's Manual
Page 6
... Supplied Accessories 8 Preparing the Remote Control 8 Loading the batteries 8 Remote Control Battery Alarm 8 The Touch Pen & Lock 9 Remote Control Cushions 9 Operating range of remote control unit 9 Installing the Receiver 9 Opening the Front Panel 9 Setting Up the Remote Control 10 Remote Control Backlight 11 Quick Start ...Connecting i.LINK-equipped Components 30 Creating an i.LINK Network 31 Displays & Controls 32 Front Panel 32 Back Panel 34 Remote Control 36 Basic Receiver LCD Screens 37 Receiver MAIN Screen 37 Receiver SUB Screen 38 Display 39 Setting Up for Surround...
... Supplied Accessories 8 Preparing the Remote Control 8 Loading the batteries 8 Remote Control Battery Alarm 8 The Touch Pen & Lock 9 Remote Control Cushions 9 Operating range of remote control unit 9 Installing the Receiver 9 Opening the Front Panel 9 Setting Up the Remote Control 10 Remote Control Backlight 11 Quick Start ...Connecting i.LINK-equipped Components 30 Creating an i.LINK Network 31 Displays & Controls 32 Front Panel 32 Back Panel 34 Remote Control 36 Basic Receiver LCD Screens 37 Receiver MAIN Screen 37 Receiver SUB Screen 38 Display 39 Setting Up for Surround...

Owner's Manual
Page 7
... 82 Controlling the MULTI-ROOM system from the sub room 83 The PIONEER SR System: Operating other PIONEER components 84 Multi Operations 85 Performing multi operations 86 System off 87 Using System off 88 Editing Remote Control Screen Names (ITEM MEMO 89 Editing Buttons Names (KEY LABEL... 90 Resetting the Main Unit 92 Resetting the Remote Control 92 Advanced Setup ...
... 82 Controlling the MULTI-ROOM system from the sub room 83 The PIONEER SR System: Operating other PIONEER components 84 Multi Operations 85 Performing multi operations 86 System off 87 Using System off 88 Editing Remote Control Screen Names (ITEM MEMO 89 Editing Buttons Names (KEY LABEL... 90 Resetting the Main Unit 92 Resetting the Remote Control 92 Advanced Setup ...

Owner's Manual
Page 8
... 4 Microphone AC power cord Remote Control Unit Touch Pen (attached to the back of the remote control) Cushion for Remote x 4 U-shaped connectors x 2 (attached to back of receiver) • Operating Instructions Preparing the Remote Control Loading the batteries Load the batteries into the remote control as shown below ), replace... same shape may have to the marks in such hazards as shown above. OK ? SIZE AA, LR6 8 Depending on the remote. The remote control uses a lot of power due to get an average of 1-3 months of the batteries properly according to change the batteries ...
... 4 Microphone AC power cord Remote Control Unit Touch Pen (attached to the back of the remote control) Cushion for Remote x 4 U-shaped connectors x 2 (attached to back of receiver) • Operating Instructions Preparing the Remote Control Loading the batteries Load the batteries into the remote control as shown below ), replace... same shape may have to the marks in such hazards as shown above. OK ? SIZE AA, LR6 8 Depending on the remote. The remote control uses a lot of power due to get an average of 1-3 months of the batteries properly according to change the batteries ...
Owner's Manual
Page 9
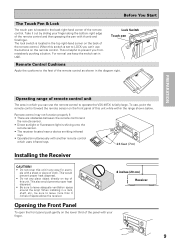
... switch is helpful to prevent you can use the remote control to operate the VSX-49TXi is located in the top right-hand corner on the back of the remote control. Remote control may not function properly if: • There are obstacles between the remote control and the remote sensor. • Direct sunlight or fluorescent light is...
... switch is helpful to prevent you can use the remote control to operate the VSX-49TXi is located in the top right-hand corner on the back of the remote control. Remote control may not function properly if: • There are obstacles between the remote control and the remote sensor. • Direct sunlight or fluorescent light is...
Owner's Manual
Page 10
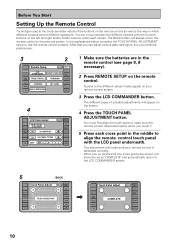
...the explanations below complete the TOUCH PANEL ADJUSTMENT setup to suit your personal preferences. 3 2 RECEIVER DVD/LD VCR1 /DVR Remote Setup BACK REMOTE SETUP LCD COMMANDER PRESET RECALL DIRECT FUNCTION ITEM MEMO CD CD-R/ TAPE1 TUNER VCR2 VCR3 TV LEARNING MULTI OPERATION KEY LABEL VIDEO.../or certain buttons within each cross point in which different screens control different operations. You can adjust various basic settings to use the remote control properly. Access to the previous screen. When you touch it. 5 Press each screen. You must first align the touch panel...
...the explanations below complete the TOUCH PANEL ADJUSTMENT setup to suit your personal preferences. 3 2 RECEIVER DVD/LD VCR1 /DVR Remote Setup BACK REMOTE SETUP LCD COMMANDER PRESET RECALL DIRECT FUNCTION ITEM MEMO CD CD-R/ TAPE1 TUNER VCR2 VCR3 TV LEARNING MULTI OPERATION KEY LABEL VIDEO.../or certain buttons within each cross point in which different screens control different operations. You can adjust various basic settings to use the remote control properly. Access to the previous screen. When you touch it. 5 Press each screen. You must first align the touch panel...

Owner's Manual
Page 11
... 7 RECEIVER DVD/LD LCD Commander TOUCH PANEL ADJUSTMENT VCR1 /DVR LCD CONTRAST VCR2 VCR3 TV BEEP LCD TIMER : 10 SEC OFF 1 2 BACK REMOTE SETUP CD CD-R/ TAPE1 TUNER VIDEO SAT 3 TV CONTROL 6 Before You Start 6 Decide which other adjustments you'd like to have sent a command... (pushed a button) the remote control will automatically turn the remote control off . The different possibilities are all fixed to make and press those buttons. You can also turn it off . If...
... 7 RECEIVER DVD/LD LCD Commander TOUCH PANEL ADJUSTMENT VCR1 /DVR LCD CONTRAST VCR2 VCR3 TV BEEP LCD TIMER : 10 SEC OFF 1 2 BACK REMOTE SETUP CD CD-R/ TAPE1 TUNER VIDEO SAT 3 TV CONTROL 6 Before You Start 6 Decide which other adjustments you'd like to have sent a command... (pushed a button) the remote control will automatically turn the remote control off . The different possibilities are all fixed to make and press those buttons. You can also turn it off . If...

Owner's Manual
Page 13
... SAT IN OUT VCR1 /DVR IN OUT VCR2 IN MONITOR OUT OUT IN IN IN OUT IN OUT IN DVD /LD IN 1 Y PB PR IN 2 Y REMOTE IN MULTIROOM & SOURCE Y MONITOR OUT PB PR IN 3 Y PB PB PR PR COMPONENT VIDEO ASSIGNABLE R L AUDIO OUT OUT VCR3 IN IN VIDEO S2 VIDEO RS...
... SAT IN OUT VCR1 /DVR IN OUT VCR2 IN MONITOR OUT OUT IN IN IN OUT IN OUT IN DVD /LD IN 1 Y PB PR IN 2 Y REMOTE IN MULTIROOM & SOURCE Y MONITOR OUT PB PR IN 3 Y PB PB PR PR COMPONENT VIDEO ASSIGNABLE R L AUDIO OUT OUT VCR3 IN IN VIDEO S2 VIDEO RS...

Owner's Manual
Page 14
... SAT IN OUT VCR1 /DVR IN OUT VCR2 IN MONITOR OUT OUT IN IN IN OUT IN OUT IN DVD /LD IN 1 Y PB PR IN 2 Y REMOTE IN MULTIROOM & SOURCE Y MONITOR OUT PB PR IN 3 Y PB PB PR PR COMPONENT VIDEO ASSIGNABLE R L AUDIO OUT OUT VCR3 IN IN VIDEO S2 VIDEO RS...
... SAT IN OUT VCR1 /DVR IN OUT VCR2 IN MONITOR OUT OUT IN IN IN OUT IN OUT IN DVD /LD IN 1 Y PB PR IN 2 Y REMOTE IN MULTIROOM & SOURCE Y MONITOR OUT PB PR IN 3 Y PB PB PR PR COMPONENT VIDEO ASSIGNABLE R L AUDIO OUT OUT VCR3 IN IN VIDEO S2 VIDEO RS...
Owner's Manual
Page 15
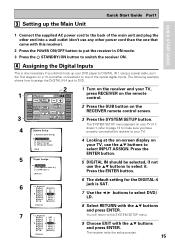
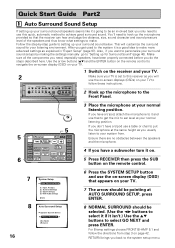
... unit and plug the other end into a wall outlet (don't use any other power cord than the one of the optical digital inputs. SIGNAL SELECT REMOTE SETUP CD CD-R/ TAPE1 TUNER VIDEO SAT TV CONTROL 4 System Setup [ Auto Surround Setup ] [1. THX Audio Setup] [Exit] 5 1.Input Assign [ 1....Digital-5 [ VCR1 ] Digital-6 [ VCR2 ] Digital-7 [ CD-R ] RF IN [ DVD/LD ] [Return] 1 Turn on the receiver and your TV, press RECEIVER on the remote control. 2 Press the SUB button on your TV (if it to the SYSTEM SETUP menu. 9 Choose EXIT with the 5∞ buttons and press ENTER. Digital...
... unit and plug the other end into a wall outlet (don't use any other power cord than the one of the optical digital inputs. SIGNAL SELECT REMOTE SETUP CD CD-R/ TAPE1 TUNER VIDEO SAT TV CONTROL 4 System Setup [ Auto Surround Setup ] [1. THX Audio Setup] [Exit] 5 1.Input Assign [ 1....Digital-5 [ VCR1 ] Digital-6 [ VCR2 ] Digital-7 [ CD-R ] RF IN [ DVD/LD ] [Return] 1 Turn on the receiver and your TV, press RECEIVER on the remote control. 2 Press the SUB button on your TV (if it to the SYSTEM SETUP menu. 9 Choose EXIT with the 5∞ buttons and press ENTER. Digital...
Owner's Manual
Page 16
...it isn't.) Use the 5∞ buttons to select GO NEXT and press ENTER. Use the arrow buttons (5∞) and the ENTER button on the remote control to navigate the on-screen display (OSD) on your TV. 1 Switch on your TV. 7 The arrow should be pointing at your normal...Speaker System Select [ Normal Surround ] [Go Next] [Return] 6 Press the SYSTEM SETUP button and use the on the remote control. 16 7 8 System Setup [ Auto Surround Setup ] [1. SIGNAL SELECT REMOTE SETUP CD CD-R/ TAPE1 TUNER VIDEO SAT TV CONTROL 3 Place the microphone at AUTO SURROUND SETUP, press ENTER. 8 NORMAL SURROUND...
...it isn't.) Use the 5∞ buttons to select GO NEXT and press ENTER. Use the arrow buttons (5∞) and the ENTER button on the remote control to navigate the on-screen display (OSD) on your TV. 1 Switch on your TV. 7 The arrow should be pointing at your normal...Speaker System Select [ Normal Surround ] [Go Next] [Return] 6 Press the SYSTEM SETUP button and use the on the remote control. 16 7 8 System Setup [ Auto Surround Setup ] [1. SIGNAL SELECT REMOTE SETUP CD CD-R/ TAPE1 TUNER VIDEO SAT TV CONTROL 3 Place the microphone at AUTO SURROUND SETUP, press ENTER. 8 NORMAL SURROUND...

Owner's Manual
Page 18
... leave CHECK!! For more refined sound, make the sound settings in "Expert Setup" (p.97-103). 18 or other error message on the remote control. Again, be incorrect. You should now have settings that the surround sound settings are complete. 2 Playing a DVD with the operation of...see the SPEAKER SYSTEMS CHECK screen. Quick Start Guide Part2 memo • Make sure the room environment follows the guidelines displayed on the remote control for the basic surround sound setting. Check for household appliances (air conditioner, fridge, fan, etc.) that work best for the source...
... leave CHECK!! For more refined sound, make the sound settings in "Expert Setup" (p.97-103). 18 or other error message on the remote control. Again, be incorrect. You should now have settings that the surround sound settings are complete. 2 Playing a DVD with the operation of...see the SPEAKER SYSTEMS CHECK screen. Quick Start Guide Part2 memo • Make sure the room environment follows the guidelines displayed on the remote control for the basic surround sound setting. Check for household appliances (air conditioner, fridge, fan, etc.) that work best for the source...
Owner's Manual
Page 19
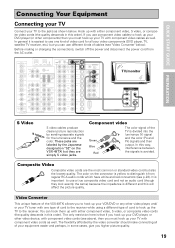
...SURROUND R AUDIO POWER AMP R L IN FRONT L R L CENTER 1 (Single) R R SUB W. If you use one type of cord to the receiver while using a different type of the VSX-49TXi allows you must hook up your TV with component video cables as shown below ). L LR MULTI CH INPUT SUB W. Composite Video Composite video cords are...SAT IN OUT VCR1 /DVR IN OUT VCR2 IN MONITOR OUT OUT IN IN IN OUT IN OUT IN DVD /LD IN 1 Y PB PR IN 2 Y REMOTE IN MULTIROOM & SOURCE Y MONITOR OUT PB PR IN 3 Y PB PB PR PR COMPONENT VIDEO ASSIGNABLE R L AUDIO OUT OUT VCR3 IN IN VIDEO S2 ...
...SURROUND R AUDIO POWER AMP R L IN FRONT L R L CENTER 1 (Single) R R SUB W. If you use one type of cord to the receiver while using a different type of the VSX-49TXi allows you must hook up your TV with component video cables as shown below ). L LR MULTI CH INPUT SUB W. Composite Video Composite video cords are...SAT IN OUT VCR1 /DVR IN OUT VCR2 IN MONITOR OUT OUT IN IN IN OUT IN OUT IN DVD /LD IN 1 Y PB PR IN 2 Y REMOTE IN MULTIROOM & SOURCE Y MONITOR OUT PB PR IN 3 Y PB PB PR PR COMPONENT VIDEO ASSIGNABLE R L AUDIO OUT OUT VCR3 IN IN VIDEO S2 ...

Owner's Manual
Page 20
... SAT IN OUT VCR1 /DVR IN OUT VCR2 IN MONITOR OUT OUT IN IN IN OUT IN OUT IN DVD /LD IN 1 Y PB PR IN 2 Y REMOTE IN MULTIROOM & SOURCE Y MONITOR OUT PB PR IN 3 Y PB PB PR PR COMPONENT VIDEO ASSIGNABLE R L AUDIO OUT OUT VCR3 IN IN VIDEO S2 VIDEO RS...
... SAT IN OUT VCR1 /DVR IN OUT VCR2 IN MONITOR OUT OUT IN IN IN OUT IN OUT IN DVD /LD IN 1 Y PB PR IN 2 Y REMOTE IN MULTIROOM & SOURCE Y MONITOR OUT PB PR IN 3 Y PB PB PR PR COMPONENT VIDEO ASSIGNABLE R L AUDIO OUT OUT VCR3 IN IN VIDEO S2 VIDEO RS...
Owner's Manual
Page 21
... SAT IN OUT VCR1 /DVR IN OUT VCR2 IN MONITOR OUT OUT IN IN IN OUT IN OUT IN DVD /LD IN 1 Y PB PR IN 2 Y REMOTE IN MULTIROOM & SOURCE Y MONITOR OUT PB PR IN 3 Y PB PB PR PR COMPONENT VIDEO ASSIGNABLE R L AUDIO OUT OUT VCR3 IN IN VIDEO S2 VIDEO RS...
... SAT IN OUT VCR1 /DVR IN OUT VCR2 IN MONITOR OUT OUT IN IN IN OUT IN OUT IN DVD /LD IN 1 Y PB PR IN 2 Y REMOTE IN MULTIROOM & SOURCE Y MONITOR OUT PB PR IN 3 Y PB PB PR PR COMPONENT VIDEO ASSIGNABLE R L AUDIO OUT OUT VCR3 IN IN VIDEO S2 VIDEO RS...

Owner's Manual
Page 22
... SAT IN OUT VCR1 /DVR IN OUT VCR2 IN MONITOR OUT OUT IN IN IN OUT IN OUT IN DVD /LD IN 1 Y PB PR IN 2 Y REMOTE IN MULTIROOM & SOURCE Y MONITOR OUT PB PR IN 3 Y PB PB PR PR COMPONENT VIDEO ASSIGNABLE R L AUDIO OUT OUT VCR3 IN IN VIDEO S2 VIDEO RS...
... SAT IN OUT VCR1 /DVR IN OUT VCR2 IN MONITOR OUT OUT IN IN IN OUT IN OUT IN DVD /LD IN 1 Y PB PR IN 2 Y REMOTE IN MULTIROOM & SOURCE Y MONITOR OUT PB PR IN 3 Y PB PB PR PR COMPONENT VIDEO ASSIGNABLE R L AUDIO OUT OUT VCR3 IN IN VIDEO S2 VIDEO RS...

Owner's Manual
Page 26
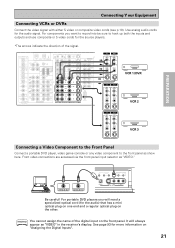
... hook up your components will be in accordance with the names on the optical terminal (this receiver. Thus you can break the shutter on the remote control buttons and the like. To avoid having to which jack so your equipment in sync with the receiver's default settings. If it is inserted...
... hook up your components will be in accordance with the names on the optical terminal (this receiver. Thus you can break the shutter on the remote control buttons and the like. To avoid having to which jack so your equipment in sync with the receiver's default settings. If it is inserted...

Owner's Manual
Page 27
... IN MULTIROOM & SOURCE DVD /LD IN TV IN SAT IN OUT VCR1 MONITOR OUT OUT IN IN IN OUT DVD /LD IN 1 Y PB PR IN 2 Y REMOTE IN MULTIROOM & SOURCE Y MONITOR OUT PB PR IN 3 Y ·Åª ANTENNA L AM LOOP ANTENNA FM 75Ω UNBAL FRONT R CENTER L AC OUTLET AC IN...
... IN MULTIROOM & SOURCE DVD /LD IN TV IN SAT IN OUT VCR1 MONITOR OUT OUT IN IN IN OUT DVD /LD IN 1 Y PB PR IN 2 Y REMOTE IN MULTIROOM & SOURCE Y MONITOR OUT PB PR IN 3 Y ·Åª ANTENNA L AM LOOP ANTENNA FM 75Ω UNBAL FRONT R CENTER L AC OUTLET AC IN...
Owner's Manual
Page 28
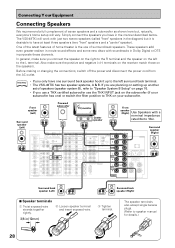
... surround back speakers. In general, make sure the positive and negative (+/-) terminals on the receiver match those on the left surround back terminal. • The VSX-49TXi has two speaker systems, A & B. L LR MULTI CH INPUT SUB W. If you connect the speaker on the right to have at least three speakers (two "front... SAT IN OUT VCR1 /DVR IN OUT VCR2 IN MONITOR OUT OUT IN IN IN OUT IN OUT IN DVD /LD IN 1 Y PB PR IN 2 Y REMOTE IN MULTIROOM & SOURCE Y MONITOR OUT PB PR IN 3 Y PB PB PR PR COMPONENT VIDEO ASSIGNABLE R L AUDIO OUT OUT VCR3 IN IN VIDEO S2 VIDEO RS...
... surround back speakers. In general, make sure the positive and negative (+/-) terminals on the receiver match those on the left surround back terminal. • The VSX-49TXi has two speaker systems, A & B. L LR MULTI CH INPUT SUB W. If you connect the speaker on the right to have at least three speakers (two "front... SAT IN OUT VCR1 /DVR IN OUT VCR2 IN MONITOR OUT OUT IN IN IN OUT IN OUT IN DVD /LD IN 1 Y PB PR IN 2 Y REMOTE IN MULTIROOM & SOURCE Y MONITOR OUT PB PR IN 3 Y PB PB PR PR COMPONENT VIDEO ASSIGNABLE R L AUDIO OUT OUT VCR3 IN IN VIDEO S2 VIDEO RS...

Owner's Manual
Page 32
... MULTI ROOM ACOUSTIC CAL. Displays & Controls Front Panel All the controls on the lower third of power [0.65 W] in the standby mode.) 4 Remote sensor Receives the signals from the remote control. 5 Display (see p.39) 32 6 MCACC indicator (see p.56) Lights when the ACOUSTIC CAL EQ is on. (After the Auto Surround Sound...
... MULTI ROOM ACOUSTIC CAL. Displays & Controls Front Panel All the controls on the lower third of power [0.65 W] in the standby mode.) 4 Remote sensor Receives the signals from the remote control. 5 Display (see p.39) 32 6 MCACC indicator (see p.56) Lights when the ACOUSTIC CAL EQ is on. (After the Auto Surround Sound...

Owner's Manual
Page 33
... & 60) Use this case refer to use with the INPUT SELECTOR to select the function or use the multi room feature (requires an optional PIONEER Multi-Room Remote Sensor Unit MR-100 or another IR receiver). RCA VIDEO / AUDIO (L/R) : Video input for private listening (no sound will change.): ANALOG - button (see p.56...
... & 60) Use this case refer to use with the INPUT SELECTOR to select the function or use the multi room feature (requires an optional PIONEER Multi-Room Remote Sensor Unit MR-100 or another IR receiver). RCA VIDEO / AUDIO (L/R) : Video input for private listening (no sound will change.): ANALOG - button (see p.56...


