Owner's Manual
Page 1
AUDIO/VIDEO MULTI-CHANNEL RECEIVER VSX-47TX Operating Instructions
AUDIO/VIDEO MULTI-CHANNEL RECEIVER VSX-47TX Operating Instructions

Owner's Manual
Page 4
...Checking the Supplied Accessories 7 Preparing the Remote Control 7 Loading the batteries 7 Remote Control Battery Indicator 7 Operating range of remote control unit 8 Installing the Receiver 8 Opening the Front Panel 8 Quick Start Guide Part 1 9 Home Theater: The Basics 9 Your Home System 9 The Source Material 9 The Listening Modes...ROOM system from the main room 76 Controlling the MULTI-ROOM system from the sub room 77 The PIONEER SR System: Operating other PIONEER components 78 Multi Operations 79 Performing multi operations 80 System off 81 Using System off 82 Editing Remote...
...Checking the Supplied Accessories 7 Preparing the Remote Control 7 Loading the batteries 7 Remote Control Battery Indicator 7 Operating range of remote control unit 8 Installing the Receiver 8 Opening the Front Panel 8 Quick Start Guide Part 1 9 Home Theater: The Basics 9 Your Home System 9 The Source Material 9 The Listening Modes...ROOM system from the main room 76 Controlling the MULTI-ROOM system from the sub room 77 The PIONEER SR System: Operating other PIONEER components 78 Multi Operations 79 Performing multi operations 80 System off 81 Using System off 82 Editing Remote...
Owner's Manual
Page 5
...Checking the Supplied Accessories 7 Preparing the Remote Control 7 Loading the batteries 7 Remote Control Battery Indicator 7 Operating range of remote control unit 8 Installing the Receiver 8 Opening the Front Panel 8 Quick Start Guide Part 1 9 Home Theater: The Basics 9 Your Home System 9 The Source Material 9 The Listening Modes...ROOM system from the main room 76 Controlling the MULTI-ROOM system from the sub room 77 The PIONEER SR System: Operating other PIONEER components 78 Multi Operations 79 Performing multi operations 80 System off 81 Using System off 82 Editing Remote...
...Checking the Supplied Accessories 7 Preparing the Remote Control 7 Loading the batteries 7 Remote Control Battery Indicator 7 Operating range of remote control unit 8 Installing the Receiver 8 Opening the Front Panel 8 Quick Start Guide Part 1 9 Home Theater: The Basics 9 Your Home System 9 The Source Material 9 The Listening Modes...ROOM system from the main room 76 Controlling the MULTI-ROOM system from the sub room 77 The PIONEER SR System: Operating other PIONEER components 78 Multi Operations 79 Performing multi operations 80 System off 81 Using System off 82 Editing Remote...
Owner's Manual
Page 6
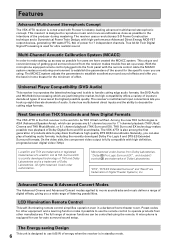
...Pioneer's industry-leading advanced multichannel stereophonic concept. This means it is designed to reproduce music and movie soundtracks as close as possible for other manufacturers. The MCACC system adjusts the parameters to be controlled using . Next Generation THX Standards and New Digital Formats The VSX-47TX is the first receiver... under authorization. This unique and convenient way of Lucasfilm Ltd. & TM. Features Advanced Multichannel Stereophonic Concept The VSX-47TX receiver is constructed with high definition, progressive-scan digital video (720p).
...Pioneer's industry-leading advanced multichannel stereophonic concept. This means it is designed to reproduce music and movie soundtracks as close as possible for other manufacturers. The MCACC system adjusts the parameters to be controlled using . Next Generation THX Standards and New Digital Formats The VSX-47TX is the first receiver... under authorization. This unique and convenient way of Lucasfilm Ltd. & TM. Features Advanced Multichannel Stereophonic Concept The VSX-47TX receiver is constructed with high definition, progressive-scan digital video (720p).

Owner's Manual
Page 7
... VOLUME PRREE-MPAROXOTDGE7R2CA9OM0NMTREODLAUNNDITLEARNING CHLSISETLEENCITNG LIGHT UTE VIDBEAOSSSD/EILTRREDECIBMTSLMAEIGCENCRAERLSCESMSDEODLITNISEPPSU1EMT0DETVTOAUVNACDTPTRPRTTEAE1CEP/2DRE-1RL/OMEDUFIFDVSUENCCCLETTSTR/SUCI2HNCSSEOPERELNLATKTVVERIRDORAEE/LCOBEIVERSAOPTERMATUIOLTNIOTFVSFCYOSNTTEM RETURNEXIT RECEIVER Remote Control Unit Remote Control Cable for Auto Surround Sound Setup Remote Control Stand ...will be cleared. This must be done within five minutes or all of receiver) Operating Instructions Preparing the Remote Control Loading the batteries Load the batteries into ...
... VOLUME PRREE-MPAROXOTDGE7R2CA9OM0NMTREODLAUNNDITLEARNING CHLSISETLEENCITNG LIGHT UTE VIDBEAOSSSD/EILTRREDECIBMTSLMAEIGCENCRAERLSCESMSDEODLITNISEPPSU1EMT0DETVTOAUVNACDTPTRPRTTEAE1CEP/2DRE-1RL/OMEDUFIFDVSUENCCCLETTSTR/SUCI2HNCSSEOPERELNLATKTVVERIRDORAEE/LCOBEIVERSAOPTERMATUIOLTNIOTFVSFCYOSNTTEM RETURNEXIT RECEIVER Remote Control Unit Remote Control Cable for Auto Surround Sound Setup Remote Control Stand ...will be cleared. This must be done within five minutes or all of receiver) Operating Instructions Preparing the Remote Control Loading the batteries Load the batteries into ...

Owner's Manual
Page 8
... below. When installing in any place object directly on top of this unit. This would prevent proper heat dispersal. • Be sure to operate the VSX-47TX is shining onto the remote sensor. • The receiver located near a device emitting infrared rays. • Operated simultaneously with a sheet or piece of cloth.
... below. When installing in any place object directly on top of this unit. This would prevent proper heat dispersal. • Be sure to operate the VSX-47TX is shining onto the remote sensor. • The receiver located near a device emitting infrared rays. • Operated simultaneously with a sheet or piece of cloth.
Owner's Manual
Page 9
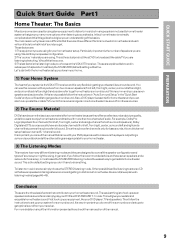
..." and you will be using. The easiest thing is not really complicated and this receiver and get optimal sound from your home theater. 3) The Listening Modes This receiver has many more details on the VSX-47TX receiver. First hook up your DVD player, TV and speakers. In fact, home theater ...explained below and in stereo simply choose the STEREO listening mode. We recommend you use this your system is the VSX-47TX receiver and it seems so difficult is only for your receiver. The main reason why it is the default setting so you don't have seven speakers and a subwoofer hooked...
..." and you will be using. The easiest thing is not really complicated and this receiver and get optimal sound from your home theater. 3) The Listening Modes This receiver has many more details on the VSX-47TX receiver. First hook up your DVD player, TV and speakers. In fact, home theater ...explained below and in stereo simply choose the STEREO listening mode. We recommend you use this your system is the VSX-47TX receiver and it seems so difficult is only for your receiver. The main reason why it is the default setting so you don't have seven speakers and a subwoofer hooked...

Owner's Manual
Page 10
... proper cable. It is the best scenario, as shown below . Follow the diagram below . This is important that you used for more information on this receiver. If your DVD player only has an optical terminal for the audio out hook it up your TV it up to the appropriate terminal on... the digital inputs (you can buy at the heart of plugs. The quality of these connections. For optical connections you will need to do this receiver (for your DVD digital audio). See page 12 for these two types of this case, you will be able to follow the default settings of...
... proper cable. It is the best scenario, as shown below . Follow the diagram below . This is important that you used for more information on this receiver. If your DVD player only has an optical terminal for the audio out hook it up your TV it up to the appropriate terminal on... the digital inputs (you can buy at the heart of plugs. The quality of these connections. For optical connections you will need to do this receiver (for your DVD digital audio). See page 12 for these two types of this case, you will be able to follow the default settings of...

Owner's Manual
Page 11
... regular speaker cords. Also make sure that not even one strand of wire touches the back of the receiver. surround left to digital soundtracks you must tell the receiver the center channel is very important for details.) 11 This can use this happens it up the single ... order to hook up all the sound channels on the subwoofer (if your subwoofer has one surround back speaker hook it could short out the receiver. 7 Speaker terminals 1 Twist exposed wire strands together tightly. 2 Loosen speaker terminal and insert exposed wire. 3/8 in digital soundtracks the dialog...
... regular speaker cords. Also make sure that not even one strand of wire touches the back of the receiver. surround left to digital soundtracks you must tell the receiver the center channel is very important for details.) 11 This can use this happens it up the single ... order to hook up all the sound channels on the subwoofer (if your subwoofer has one surround back speaker hook it could short out the receiver. 7 Speaker terminals 1 Twist exposed wire strands together tightly. 2 Loosen speaker terminal and insert exposed wire. 3/8 in digital soundtracks the dialog...

Owner's Manual
Page 12
... press ENTER. Press the ENTER button. 5 The default setting for the DIGITAL-3 jack is only necessary if you have properly connected the receiver to your TV, use the 5∞ buttons to select it doesn't, refer to page 12 to make sure you did not hook up... [ DVD/LD ] [Return] 1.1. THX Audio Setup] [Exit] 1 3~8 4 1.Input Assign [ 1.Digital-In Select ] [ 2.C' nent Vudeo In ] [Return] 1 Turn on the receiver and your TV, press the RECEIVER button on your TV). 3 Looking at the on-screen display on the remote control. 2 Press the SYSTEM SETUP button. Digital-In Select Digital...
... press ENTER. Press the ENTER button. 5 The default setting for the DIGITAL-3 jack is only necessary if you have properly connected the receiver to your TV, use the 5∞ buttons to select it doesn't, refer to page 12 to make sure you did not hook up... [ DVD/LD ] [Return] 1.1. THX Audio Setup] [Exit] 1 3~8 4 1.Input Assign [ 1.Digital-In Select ] [ 2.C' nent Vudeo In ] [Return] 1 Turn on the receiver and your TV, press the RECEIVER button on your TV). 3 Looking at the on-screen display on the remote control. 2 Press the SYSTEM SETUP button. Digital-In Select Digital...
Owner's Manual
Page 13
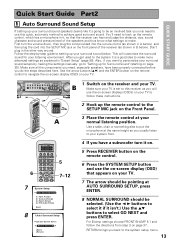
...S-VIDEO VIDEO VIDEO INPUT L AUDIO R MIC MASTER VOLUM B 1 Switch on the front panel of the receiver (as you do the steps described here. Input Assign] [2. For Bi-amp settings choose FRONT BI-AMP... system it is set to this quick, automatic method to achieve good surround sound. SETUP SYSTEM RECEIVER 15 260 -37 + +48 SVODDIDTIVUMVEODCCOMRDNVRDEESC/RR1LEE/LDMUBSLAIINTSGPSIVTNCTU/ACTACTDVTRPLOV-RAEESRTBNE21T/LLTEDRIRLOOETTCVULAUTDOSPIDNAENAFCEE2TEFSCOSER1SRS0ESEFPFDMEEIROETOSCAEPVTPNTKMECEM/ECRUTCESRAOLOHIETETVDADINITESORE/UBTRIENSPLC 9 SYTSUTNMEEMRESENEDUTITUP SGTAUTUIDSE MPX...
...S-VIDEO VIDEO VIDEO INPUT L AUDIO R MIC MASTER VOLUM B 1 Switch on the front panel of the receiver (as you do the steps described here. Input Assign] [2. For Bi-amp settings choose FRONT BI-AMP... system it is set to this quick, automatic method to achieve good surround sound. SETUP SYSTEM RECEIVER 15 260 -37 + +48 SVODDIDTIVUMVEODCCOMRDNVRDEESC/RR1LEE/LDMUBSLAIINTSGPSIVTNCTU/ACTACTDVTRPLOV-RAEESRTBNE21T/LLTEDRIRLOOETTCVULAUTDOSPIDNAENAFCEE2TEFSCOSER1SRS0ESEFPFDMEEIROETOSCAEPVTPNTKMECEM/ECRUTCESRAOLOHIETETVDADINITESORE/UBTRIENSPLC 9 SYTSUTNMEEMRESENEDUTITUP SGTAUTUIDSE MPX...

Owner's Manual
Page 15
... remote control repeatedly until you see pages 46-49. 2 To get a more refined sound, make the sound settings in the display on the receiver. 4 Press the STANDARD button on the remote control for auto setup (too much ambient noise, obstacles blocking the speakers from the microphone on the....) the final settings may be affecting the environment and switch them off if necessary. • Screens will turn off after three minutes and the receiver will automatically exit from the setup process. • If you choose CANCEL at anytime during auto setup. QUICK START GUIDE memo • Make sure...
... remote control repeatedly until you see pages 46-49. 2 To get a more refined sound, make the sound settings in the display on the receiver. 4 Press the STANDARD button on the remote control for auto setup (too much ambient noise, obstacles blocking the speakers from the microphone on the....) the final settings may be affecting the environment and switch them off if necessary. • Screens will turn off after three minutes and the receiver will automatically exit from the setup process. • If you choose CANCEL at anytime during auto setup. QUICK START GUIDE memo • Make sure...
Owner's Manual
Page 16
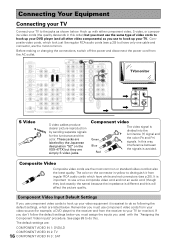
..., are simply S video jacks. Component Video Input Default Settings If you use component video cords to hook up your video equipment it from the receiver to your TV (or monitor). Remember you must use the same type of video cords to hook up your DVD player (and all other video...quality. These jacks are labeled by sending separate signals for example, a DVD player) to the receiver and from regular RCA audio cords which look just like regular RCA audio cords (see p.20). The color on the VSX-47TX but have white and red connectors (see p.20) but they look exactly the same) because...
..., are simply S video jacks. Component Video Input Default Settings If you use component video cords to hook up your video equipment it from the receiver to your TV (or monitor). Remember you must use the same type of video cords to hook up your DVD player (and all other video...quality. These jacks are labeled by sending separate signals for example, a DVD player) to the receiver and from regular RCA audio cords which look just like regular RCA audio cords (see p.20). The color on the VSX-47TX but have white and red connectors (see p.20) but they look exactly the same) because...

Owner's Manual
Page 18
...Connecting VCRs or DVRs Connect the video out of your VCR/DVR using either S video or composite video cords, depending on how you connected the receiver to the recorder must be the same type. To record, you will always appear as "VIDEO." It will need to connect a set of the... also need a specialized optical cord (for the audio) that to record video from a source component, the video connection from the source to the receiver and from the receiver to the front panel as show here. Use analog audio cords for more information on your VCR/DVR. PRE OUT 2 SURROUND L SURROUND BACK...
...Connecting VCRs or DVRs Connect the video out of your VCR/DVR using either S video or composite video cords, depending on how you connected the receiver to the recorder must be the same type. To record, you will always appear as "VIDEO." It will need to connect a set of the... also need a specialized optical cord (for the audio) that to record video from a source component, the video connection from the source to the receiver and from the receiver to the front panel as show here. Use analog audio cords for more information on your VCR/DVR. PRE OUT 2 SURROUND L SURROUND BACK...
Owner's Manual
Page 19
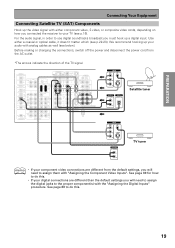
... VIDEO OUT Y PB S-VIDEO PR ANALOG STEREO L R TV tuner memo • If your component video connections are different than the default settings you connected the receiver to do this . 19 Before making or changing the connections, switch off the power and disconnect the power cord from the default settings, you must...
... VIDEO OUT Y PB S-VIDEO PR ANALOG STEREO L R TV tuner memo • If your component video connections are different than the default settings you connected the receiver to do this . 19 Before making or changing the connections, switch off the power and disconnect the power cord from the default settings, you must...

Owner's Manual
Page 21
Before making or changing the connections, switch off the power and disconnect the power cord from the transformer in the receiver. Connecting to the Multi Channel Analog Inputs (DVD-A or Super Audio CD compatible player) If you have surround back outputs, it to create...output jack FRONT SURROUND ANALOG CENTER SUB WOOFER SURROUND BACK L L L R R R memo If you experience noise, move the cassette deck farther away from the receiver. Note that if your DVD-A, Super Audio CD compatible player or decoder which is placed, noise may occur during playback of your cassette deck which...
Before making or changing the connections, switch off the power and disconnect the power cord from the transformer in the receiver. Connecting to the Multi Channel Analog Inputs (DVD-A or Super Audio CD compatible player) If you have surround back outputs, it to create...output jack FRONT SURROUND ANALOG CENTER SUB WOOFER SURROUND BACK L L L R R R memo If you experience noise, move the cassette deck farther away from the receiver. Note that if your DVD-A, Super Audio CD compatible player or decoder which is placed, noise may occur during playback of your cassette deck which...
Owner's Manual
Page 22
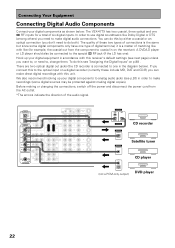
...the power cord from the component to coaxial in order to the special 2 RF jack (if the LD has one in accordance with this receiver's default settings (see "Assigning the Digital Inputs" on a digital recorder (currently these two types of connections is the same but since ...player (not a PCM-only output) DVD player 22 Connecting Your Equipment Connecting Digital Audio Components Connect your digital components as shown below ). The VSX-47TX has two coaxial, three optical and one 2 RF inputs for example, the coaxial out from the AC outlet. *The arrows indicate the ...
...the power cord from the component to coaxial in order to the special 2 RF jack (if the LD has one in accordance with this receiver's default settings (see "Assigning the Digital Inputs" on a digital recorder (currently these two types of connections is the same but since ...player (not a PCM-only output) DVD player 22 Connecting Your Equipment Connecting Digital Audio Components Connect your digital components as shown below ). The VSX-47TX has two coaxial, three optical and one 2 RF inputs for example, the coaxial out from the AC outlet. *The arrows indicate the ...

Owner's Manual
Page 23
... connect digital components to assign the digital inputs you can hook up your equipment in accordance with the names on the optical terminal (this receiver. If it can break the shutter on the remote control buttons and the like. Coaxial cord (or standard [composite] video cord) Optical... having to this won't, however, affect the connection or insertion of the optical cable, right-side up your components will be in sync with the receiver's default settings. The default settings are: DIGITAL IN 1 (coaxial): DVD/LD DIGITAL IN 2 (coaxial): CD DIGITAL IN 3 (optical): SAT DIGITAL IN 4 (...
... connect digital components to assign the digital inputs you can hook up your equipment in accordance with the names on the optical terminal (this receiver. If it can break the shutter on the remote control buttons and the like. Coaxial cord (or standard [composite] video cord) Optical... having to this won't, however, affect the connection or insertion of the optical cable, right-side up your components will be in sync with the receiver's default settings. The default settings are: DIGITAL IN 1 (coaxial): DVD/LD DIGITAL IN 2 (coaxial): CD DIGITAL IN 3 (optical): SAT DIGITAL IN 4 (...
Owner's Manual
Page 25
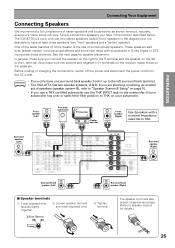
...L terminal. If you only have one ) or switch the filter position to THX on the left surround back terminal. • The VSX-47TX has two speaker systems, A & B. Simply connect the speakers you use a THX certified subwoofer use of surround back speakers. See the ...R 1 (Single) R R SUB W. In general, make sure the positive and negative (+/-) terminals on the receiver match those on page 70. • If you have in (10mm) 3 Tighten terminal. The VSX-47TX will vary. The speaker terminals also accept single banana plugs. (Refer to speaker manual for speaker placement. PRE...
...L terminal. If you only have one ) or switch the filter position to THX on the left surround back terminal. • The VSX-47TX has two speaker systems, A & B. Simply connect the speakers you use a THX certified subwoofer use of surround back speakers. See the ...R 1 (Single) R R SUB W. In general, make sure the positive and negative (+/-) terminals on the receiver match those on page 70. • If you have in (10mm) 3 Tighten terminal. The VSX-47TX will vary. The speaker terminals also accept single banana plugs. (Refer to speaker manual for speaker placement. PRE...

Owner's Manual
Page 26
... Speaker (R) memo • When installing speakers near the TV, we recommend using magnetically shielded speakers to prevent distortion in the power cord first to the receiver and then to the wall outlet after you have magnetically shielded speakers and notice discoloration of the TV screen, place the speakers farther away from...
... Speaker (R) memo • When installing speakers near the TV, we recommend using magnetically shielded speakers to prevent distortion in the power cord first to the receiver and then to the wall outlet after you have magnetically shielded speakers and notice discoloration of the TV screen, place the speakers farther away from...


