
Owner's Manual
Page 4
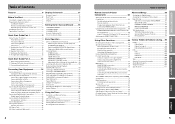
... Channel Analog Inputs (DVD-A or Super Audio CD compatible player) ... 21 Connecting Digital Audio Components 22 Digital Input Default Settings 23 Connecting the Radio Antennas 24 Using outdoor antennas 24 Connecting Speakers 25 Placing Your Speakers 26 Speaker placement 26 AC Power Cord 26 AC Outlet [switched 100w max 26 Displays & Controls 27 Remote Control 27 Back Panel 30 Front Panel 32 Display 34 Setting Up for Surround Sound ........ 35 SPEAKER SYSTEMS 36 CHANNEL DELAY 38 CHANNEL LEVEL 39 Acoustic Calibration EQ 41 Check the Auto Settings 42 Basic Operation 43 Stereo...
... Channel Analog Inputs (DVD-A or Super Audio CD compatible player) ... 21 Connecting Digital Audio Components 22 Digital Input Default Settings 23 Connecting the Radio Antennas 24 Using outdoor antennas 24 Connecting Speakers 25 Placing Your Speakers 26 Speaker placement 26 AC Power Cord 26 AC Outlet [switched 100w max 26 Displays & Controls 27 Remote Control 27 Back Panel 30 Front Panel 32 Display 34 Setting Up for Surround Sound ........ 35 SPEAKER SYSTEMS 36 CHANNEL DELAY 38 CHANNEL LEVEL 39 Acoustic Calibration EQ 41 Check the Auto Settings 42 Basic Operation 43 Stereo...
Owner's Manual
Page 5
... Channel Analog Inputs (DVD-A or Super Audio CD compatible player) ... 21 Connecting Digital Audio Components 22 Digital Input Default Settings 23 Connecting the Radio Antennas 24 Using outdoor antennas 24 Connecting Speakers 25 Placing Your Speakers 26 Speaker placement 26 AC Power Cord 26 AC Outlet [switched 100w max 26 Displays & Controls 27 Remote Control 27 Back Panel 30 Front Panel 32 Display 34 Setting Up for Surround Sound ........ 35 SPEAKER SYSTEMS 36 CHANNEL DELAY 38 CHANNEL LEVEL 39 Acoustic Calibration EQ 41 Check the Auto Settings 42 Basic Operation 43 Stereo...
... Channel Analog Inputs (DVD-A or Super Audio CD compatible player) ... 21 Connecting Digital Audio Components 22 Digital Input Default Settings 23 Connecting the Radio Antennas 24 Using outdoor antennas 24 Connecting Speakers 25 Placing Your Speakers 26 Speaker placement 26 AC Power Cord 26 AC Outlet [switched 100w max 26 Displays & Controls 27 Remote Control 27 Back Panel 30 Front Panel 32 Display 34 Setting Up for Surround Sound ........ 35 SPEAKER SYSTEMS 36 CHANNEL DELAY 38 CHANNEL LEVEL 39 Acoustic Calibration EQ 41 Check the Auto Settings 42 Basic Operation 43 Stereo...
Owner's Manual
Page 6
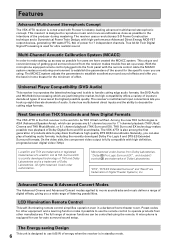
... system adjusts the parameters to decode all existing audio formats, including the recently developed Dolby Pro Logic II and DTS-ES Extended Surround formats. Used under license from the receiver makes trouble-free set up eight discrete channels of audio. The full range of receiver functions can also play discs that feature high quality DTS 96/24 soundtracks. With the microphone equipped remote control plugged into the front panel with high definition, progressive-scan digital video...
... system adjusts the parameters to decode all existing audio formats, including the recently developed Dolby Pro Logic II and DTS-ES Extended Surround formats. Used under license from the receiver makes trouble-free set up eight discrete channels of audio. The full range of receiver functions can also play discs that feature high quality DTS 96/24 soundtracks. With the microphone equipped remote control plugged into the front panel with high definition, progressive-scan digital video...

Owner's Manual
Page 11
... Guide Part1 2 Speaker Connections Home theater is off or when you attached your speakers. If this happens it up the single speaker as "FRONT." If you only have to hook up all the sound channels on new, eight channel home theater DVDs. See page 102-103 for the other speakers use surround back speakers. If possible, use regular speaker cords. Front speaker (Left) Powered subwoofer TV/monitor Front speaker (Right) Center speaker INPUT Surround speaker (Left) DIGITAL PCM/2DIGITAL/DTS 2 OUT 1 PHONO OUT IN R AUDIO L CD DIGITAL...
... Guide Part1 2 Speaker Connections Home theater is off or when you attached your speakers. If this happens it up the single speaker as "FRONT." If you only have to hook up all the sound channels on new, eight channel home theater DVDs. See page 102-103 for the other speakers use surround back speakers. If possible, use regular speaker cords. Front speaker (Left) Powered subwoofer TV/monitor Front speaker (Right) Center speaker INPUT Surround speaker (Left) DIGITAL PCM/2DIGITAL/DTS 2 OUT 1 PHONO OUT IN R AUDIO L CD DIGITAL...

Owner's Manual
Page 12
... Unit 1 Connect the supplied AC power cord to select DVD/ LD. 5 6 12 1.1. SETUP 2 S0URCE TV SYSTEM RECEIVER OFF DVD/LD TV SAT MULTI CONTROL VCR1/ DVR VCR2 VIDEO TV CONT MULTI OPERATION CD CD-R/ TAPE1 TUNER RECEIVER DIMMER INPUT ATT LOUDNESS SPEAKER A/B 1 2 3 4 VIDEO SEL SIGNAL SEL TAPE 2 EFFECT/CH SELL 5 6 7 8 TONE BASS/TREBLE 9 0 - +10 + DISC ENTER SYSTEM SETUP DIRECT ACCESS DISP MODE REMOTE SETUP MENU TUNER EDIT ENTER STATUS EXIT GUIDE RETURN MPX ¶ TUNING - 1 DTV ON/OFF 8 BAND 3 EXTRA MENU TUNING + ¡ 3 System Setup [ Auto Surround Setup...
... Unit 1 Connect the supplied AC power cord to select DVD/ LD. 5 6 12 1.1. SETUP 2 S0URCE TV SYSTEM RECEIVER OFF DVD/LD TV SAT MULTI CONTROL VCR1/ DVR VCR2 VIDEO TV CONT MULTI OPERATION CD CD-R/ TAPE1 TUNER RECEIVER DIMMER INPUT ATT LOUDNESS SPEAKER A/B 1 2 3 4 VIDEO SEL SIGNAL SEL TAPE 2 EFFECT/CH SELL 5 6 7 8 TONE BASS/TREBLE 9 0 - +10 + DISC ENTER SYSTEM SETUP DIRECT ACCESS DISP MODE REMOTE SETUP MENU TUNER EDIT ENTER STATUS EXIT GUIDE RETURN MPX ¶ TUNING - 1 DTV ON/OFF 8 BAND 3 EXTRA MENU TUNING + ¡ 3 System Setup [ Auto Surround Setup...
Owner's Manual
Page 13
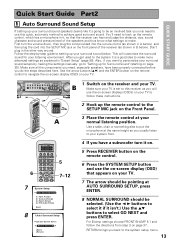
... TUNER STATION LISTENING MULTI ROOM & SOURCE CH SELECT CONTROL ON/OFF PHONES SP SYSTEM A/B SIGNAL SELECT VIDEO SELECT TAPE2 MONITOR MULTI CH INPUT (DVD-A/SACD) SETUP MIC DIGITAL IN S-VIDEO VIDEO VIDEO INPUT L AUDIO R MIC MASTER VOLUM B 1 Switch on the Front Panel. 3 Place the remote control at the same height as explained in the other way around. For Bi-amp settings choose FRONT BI-AMP 5.1 and follow these instructions. THX Audio Setup] [Exit] 8 1.Auto Surround Setup Speaker System Select [ Normal Surround ] [Next] [Return] 4 If you need to hook up the remote...
... TUNER STATION LISTENING MULTI ROOM & SOURCE CH SELECT CONTROL ON/OFF PHONES SP SYSTEM A/B SIGNAL SELECT VIDEO SELECT TAPE2 MONITOR MULTI CH INPUT (DVD-A/SACD) SETUP MIC DIGITAL IN S-VIDEO VIDEO VIDEO INPUT L AUDIO R MIC MASTER VOLUM B 1 Switch on the Front Panel. 3 Place the remote control at the same height as explained in the other way around. For Bi-amp settings choose FRONT BI-AMP 5.1 and follow these instructions. THX Audio Setup] [Exit] 8 1.Auto Surround Setup Speaker System Select [ Normal Surround ] [Next] [Return] 4 If you need to hook up the remote...
Owner's Manual
Page 16
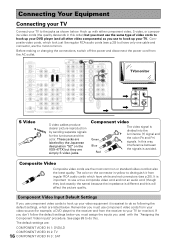
... PLAY OUT IN 2 (CD) REC TAPE2 MONITOR IN 1 (DVD /LD) IN PLAY FRONT R R 1 (Single) R R SUB W. 0UT AUDIO POWER AMP IN L FRONT L CENTER SUB W. Connecting Your Equipment Connecting your TV Connect your TV to the jacks as you must assign the inputs you use component video cords to hook up your video equipment it from regular RCA audio cords which have only one cable and connector, are the most common or standard video cord but have white and red...
... PLAY OUT IN 2 (CD) REC TAPE2 MONITOR IN 1 (DVD /LD) IN PLAY FRONT R R 1 (Single) R R SUB W. 0UT AUDIO POWER AMP IN L FRONT L CENTER SUB W. Connecting Your Equipment Connecting your TV Connect your TV to the jacks as you must assign the inputs you use component video cords to hook up your video equipment it from regular RCA audio cords which have only one cable and connector, are the most common or standard video cord but have white and red...

Owner's Manual
Page 17
...) IN IN PLAY OUT IN 2 (CD) REC TAPE2 MONITOR IN 1 (DVD /LD) IN PLAY FRONT R R 1 (Single) R R SUB W. See your DVD manual for example, a DVD player) there are different from your components with the "Assigning the Digital Inputs" procedure. Connecting a DVD, DVD/LD or LD player Hook up your DVD player composite (or S video) cord connections and analog audio connections are different than the default settings you don't need to assign the digital jacks to do this order) but you used to cover...
...) IN IN PLAY OUT IN 2 (CD) REC TAPE2 MONITOR IN 1 (DVD /LD) IN PLAY FRONT R R 1 (Single) R R SUB W. See your DVD manual for example, a DVD player) there are different from your components with the "Assigning the Digital Inputs" procedure. Connecting a DVD, DVD/LD or LD player Hook up your DVD player composite (or S video) cord connections and analog audio connections are different than the default settings you don't need to assign the digital jacks to do this order) but you used to cover...
Owner's Manual
Page 19
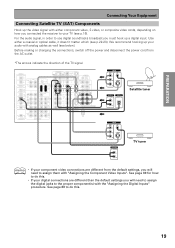
...L LR MULTI CH INPUT SURROUND BACK L (Single) VIDEO COMPONENT VIDEO OUT Y PB S-VIDEO PR ANALOG STEREO L DIGITAL DIGITAL R Satellite tuner VIDEO COMPONENT VIDEO OUT Y PB S-VIDEO PR ANALOG STEREO L R TV tuner memo • If your component video connections are different than the default settings you will need to assign the digital jacks to do this . 19 PREPARATION PREPARATION Connecting Your Equipment Connecting Satellite TV (SAT) Components Hook up the video signal with the "Assigning the Digital Inputs" procedure. DIGITAL PCM/2DIGITAL/DTS 2 OUT 1 PHONO OUT IN...
...L LR MULTI CH INPUT SURROUND BACK L (Single) VIDEO COMPONENT VIDEO OUT Y PB S-VIDEO PR ANALOG STEREO L DIGITAL DIGITAL R Satellite tuner VIDEO COMPONENT VIDEO OUT Y PB S-VIDEO PR ANALOG STEREO L R TV tuner memo • If your component video connections are different than the default settings you will need to assign the digital jacks to do this . 19 PREPARATION PREPARATION Connecting Your Equipment Connecting Satellite TV (SAT) Components Hook up the video signal with the "Assigning the Digital Inputs" procedure. DIGITAL PCM/2DIGITAL/DTS 2 OUT 1 PHONO OUT IN...
Owner's Manual
Page 20
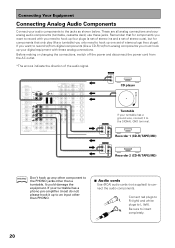
...S VIDEO 2RF IN (DVD /LD) (For LD) ASSIGNABLE R SURROUND R L LR MULTI CH INPUT SURROUND BACK L (Single) ANALOG OUTPUT L R CD player ANALOG INPUT (REC) OUTPUT (PLAY) L L R R Turntable If your analog audio components (turntable, cassette deck) use these analog connections. ROOM & OUT SOURCE AUDIO POWER AMP IN L FRONT L CENTER SUB W. R Be sure to L (left). If you want to record with these jacks. Recorder 1 (CD-R/TAPE/MD) ANALOG INPUT (REC) OUTPUT (PLAY) L L R R Recorder 2 (CD-R/TAPE/MD) memo Don't hook up to an input other than PHONO. 7 Audio cords...
...S VIDEO 2RF IN (DVD /LD) (For LD) ASSIGNABLE R SURROUND R L LR MULTI CH INPUT SURROUND BACK L (Single) ANALOG OUTPUT L R CD player ANALOG INPUT (REC) OUTPUT (PLAY) L L R R Turntable If your analog audio components (turntable, cassette deck) use these analog connections. ROOM & OUT SOURCE AUDIO POWER AMP IN L FRONT L CENTER SUB W. R Be sure to L (left). If you want to record with these jacks. Recorder 1 (CD-R/TAPE/MD) ANALOG INPUT (REC) OUTPUT (PLAY) L L R R Recorder 2 (CD-R/TAPE/MD) memo Don't hook up to an input other than PHONO. 7 Audio cords...
Owner's Manual
Page 22
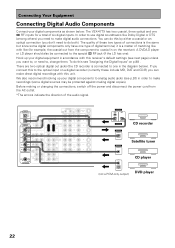
... LD) ASSIGNABLE R SURROUND R L LR MULTI CH INPUT SURROUND BACK L (Single) DIGITAL OUTPUT (PLAY) INPUT (REC) DIGITAL DIGITAL OUTPUT DIGITAL OUTPUT OUTPUT CD recorder Satellite tuner CD player (not a PCM-only output) DVD player 22 A DVD/LD player or LD player should also be protected against making or changing the connections, switch off the power and disconnect the power cord from the component to make recordings (some digital components only have one 2 RF inputs for a total of the audio signal. If you connect this to the special 2 RF jack (if...
... LD) ASSIGNABLE R SURROUND R L LR MULTI CH INPUT SURROUND BACK L (Single) DIGITAL OUTPUT (PLAY) INPUT (REC) DIGITAL DIGITAL OUTPUT DIGITAL OUTPUT OUTPUT CD recorder Satellite tuner CD player (not a PCM-only output) DVD player 22 A DVD/LD player or LD player should also be protected against making or changing the connections, switch off the power and disconnect the power cord from the component to make recordings (some digital components only have one 2 RF inputs for a total of the audio signal. If you connect this to the special 2 RF jack (if...
Owner's Manual
Page 25
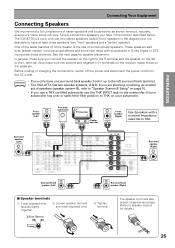
...305; SELECTABLE L R Surround speaker (Right) Surround back speaker (Left) Surround back speaker (Right) 7 Speaker terminals 1 Twist exposed wire strands tightly together. 2 Loosen speaker terminal and insert exposed wire. 3/8 in Dolby Digital or DTS incorporate these channels. IN AUDIO POWER AMP IN L FRONT L CENTER SUB W. The VSX-47TX will vary. One of the latest features of surround back speakers. Before making or changing the connections, switch off the power and disconnect the power cord from the AC outlet. Surround speaker (Left) DIGITAL PCM/2DIGITAL/DTS 2 OUT 1 PHONO...
...305; SELECTABLE L R Surround speaker (Right) Surround back speaker (Left) Surround back speaker (Right) 7 Speaker terminals 1 Twist exposed wire strands tightly together. 2 Loosen speaker terminal and insert exposed wire. 3/8 in Dolby Digital or DTS incorporate these channels. IN AUDIO POWER AMP IN L FRONT L CENTER SUB W. The VSX-47TX will vary. One of the latest features of surround back speakers. Before making or changing the connections, switch off the power and disconnect the power cord from the AC outlet. Surround speaker (Left) DIGITAL PCM/2DIGITAL/DTS 2 OUT 1 PHONO...
Owner's Manual
Page 27
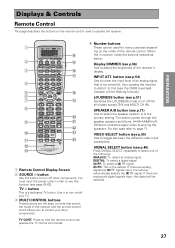
...your other components. SIGNAL SELECT button (see p.71) Use to distort. PREPARATION PREPARATION 1 2 3 4 5 6 7 8 9 0 = ~ SETUP S0URCE TV SYSTEM RECEIVER OFF DVD/LD TV SAT MULTI CONTROL VCR1/ DVR VCR2 VIDEO TV CONT MULTI OPERATION CD CD-R/ TAPE1 TUNER RECEIVER DIMMER INPUT ATT LOUDNESS SPEAKER A/B 1 2 3 4 VIDEO SEL SIGNAL SEL TAPE 2 EFFECT/CH SELL 5 6 7 8 TONE BASS/TREBLE 9 0 - +10 + DISC ENTER SYSTEM SETUP DIRECT ACCESS DISP MODE REMOTE SETUP MENU TUNER EDIT ENTER STATUS EXIT GUIDE RETURN MPX ¶ TUNING - 1 STATION - 4 CHANNEL - Use it to turn on...
...your other components. SIGNAL SELECT button (see p.71) Use to distort. PREPARATION PREPARATION 1 2 3 4 5 6 7 8 9 0 = ~ SETUP S0URCE TV SYSTEM RECEIVER OFF DVD/LD TV SAT MULTI CONTROL VCR1/ DVR VCR2 VIDEO TV CONT MULTI OPERATION CD CD-R/ TAPE1 TUNER RECEIVER DIMMER INPUT ATT LOUDNESS SPEAKER A/B 1 2 3 4 VIDEO SEL SIGNAL SEL TAPE 2 EFFECT/CH SELL 5 6 7 8 TONE BASS/TREBLE 9 0 - +10 + DISC ENTER SYSTEM SETUP DIRECT ACCESS DISP MODE REMOTE SETUP MENU TUNER EDIT ENTER STATUS EXIT GUIDE RETURN MPX ¶ TUNING - 1 STATION - 4 CHANNEL - Use it to turn on...
Owner's Manual
Page 35
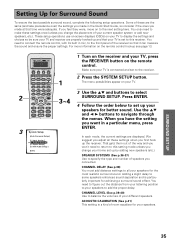
...were, move on your speakers to select SURROUND SETUP. SETUP 2 S0URCE TV SYSTEM RECEIVER OFF DVD/LD TV SAT MULTI CONTROL VCR1/ DVR VCR2 VIDEO TV CONT MULTI OPERATION CD CD-R/ TAPE1 TUNER RECEIVER DIMMER INPUT ATT LOUDNESS SPEAKER A/B 1 2 3 4 VIDEO SEL SIGNAL SEL TAPE 2 EFFECT/CH SELL 5 6 7 8 TONE BASS/TREBLE 9 0 - +10 + DISC ENTER SYSTEM SETUP DIRECT ACCESS DISP MODE REMOTE SETUP MENU TUNER EDIT ENTER STATUS EXIT GUIDE RETURN MPX ¶ TUNING - 1 STATION - 4 CHANNEL - Surround Setup ] [3. Expert Setup ] [4. In each mode, the current settings are the same...
...were, move on your speakers to select SURROUND SETUP. SETUP 2 S0URCE TV SYSTEM RECEIVER OFF DVD/LD TV SAT MULTI CONTROL VCR1/ DVR VCR2 VIDEO TV CONT MULTI OPERATION CD CD-R/ TAPE1 TUNER RECEIVER DIMMER INPUT ATT LOUDNESS SPEAKER A/B 1 2 3 4 VIDEO SEL SIGNAL SEL TAPE 2 EFFECT/CH SELL 5 6 7 8 TONE BASS/TREBLE 9 0 - +10 + DISC ENTER SYSTEM SETUP DIRECT ACCESS DISP MODE REMOTE SETUP MENU TUNER EDIT ENTER STATUS EXIT GUIDE RETURN MPX ¶ TUNING - 1 STATION - 4 CHANNEL - Surround Setup ] [3. Expert Setup ] [4. In each mode, the current settings are the same...

Owner's Manual
Page 36
... not connect surround speakers choose NO. If necessary try different possible settings manually. In this select the size of surround back speakers you have hooked up. In this case, all routed to the subwoofer. 1 36 TONE BASS/TREBLE 9 0 - +10 + DISC ENTER SYSTEM SETUP DIRECT ACCESS DISP MODE REMOTE SETUP MENU TUNER EDIT ENTER STATUS EXIT GUIDE RETURN MPX ¶ TUNING - 1 DTV ON/OFF 8 BAND 3 EXTRA MENU TUNING + ¡ 2.Surround Setup [ Check ] [ 1.Speaker Systems ] [ 2.Channel Delay ] [ 3.Channel Level ] [ 4.Acoustic Cal ] [Return] 1~10 1 SPEAKER SYSTEMS...
... not connect surround speakers choose NO. If necessary try different possible settings manually. In this select the size of surround back speakers you have hooked up. In this case, all routed to the subwoofer. 1 36 TONE BASS/TREBLE 9 0 - +10 + DISC ENTER SYSTEM SETUP DIRECT ACCESS DISP MODE REMOTE SETUP MENU TUNER EDIT ENTER STATUS EXIT GUIDE RETURN MPX ¶ TUNING - 1 DTV ON/OFF 8 BAND 3 EXTRA MENU TUNING + ¡ 2.Surround Setup [ Check ] [ 1.Speaker Systems ] [ 2.Channel Delay ] [ 3.Channel Level ] [ 4.Acoustic Cal ] [Return] 1~10 1 SPEAKER SYSTEMS...
Owner's Manual
Page 75
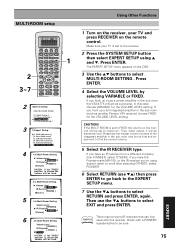
... DVD/LD TV SAT MULTI CONTROL VCR1/ DVR VCR2 VIDEO TV CONT MULTI OPERATION CD CD-R/ TAPE1 TUNER RECEIVER DIMMER INPUT ATT LOUDNESS SPEAKER A/B 1 2 3 4 VIDEO SEL SIGNAL SEL 5 6 TAPE 2 EFFECT/CH SELL 7 8 TONE BASS/TREBLE 9 0 - +10 + DISC ENTER SYSTEM SETUP DIRECT ACCESS DISP MODE REMOTE SETUP MENU TUNER EDIT ENTER STATUS EXIT GUIDE RETURN MPX ¶ TUNING - 1 STATION - 4 CHANNEL - The EXPERT SETUP menu appears on the OSD. 3 Use the 5∞ buttons to FIXED the volume on the remote control. If you hook up a full integrated amplifier in the sub...
... DVD/LD TV SAT MULTI CONTROL VCR1/ DVR VCR2 VIDEO TV CONT MULTI OPERATION CD CD-R/ TAPE1 TUNER RECEIVER DIMMER INPUT ATT LOUDNESS SPEAKER A/B 1 2 3 4 VIDEO SEL SIGNAL SEL 5 6 TAPE 2 EFFECT/CH SELL 7 8 TONE BASS/TREBLE 9 0 - +10 + DISC ENTER SYSTEM SETUP DIRECT ACCESS DISP MODE REMOTE SETUP MENU TUNER EDIT ENTER STATUS EXIT GUIDE RETURN MPX ¶ TUNING - 1 STATION - 4 CHANNEL - The EXPERT SETUP menu appears on the OSD. 3 Use the 5∞ buttons to FIXED the volume on the remote control. If you hook up a full integrated amplifier in the sub...
Owner's Manual
Page 77
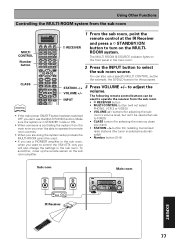
... MULTI CONTROL button (for example, the DVD/LD button) for adjusting the sub- • If the main power ON/OFF button has been switched OFF, you are doing the system setup process the MULTI-ROOM cannot be used. MIDNIGHT TONE TONE BASS/TEREBLE DIGITAL NR CLASS TUNER STATION LISTENING MULTI ROOM & SOURCE CH SELECT CONTROL ON/OFF PHONES SP SYSTEM A/B SIGNAL SELECT VIDEO SELECT TAPE2 MONITOR MULTI CH INPUT (DVD-A/SACD) SETUP MIC DIGITAL IN S-VIDEO VIDEO VIDEO INPUT L AUDIO R AUDIO/VIDEO MULTI-CHANNEL AMPLIFIER VSX-47TX LISTENING MODE SELECTOR MASTER VOLUME IR Receiver...
... MULTI CONTROL button (for example, the DVD/LD button) for adjusting the sub- • If the main power ON/OFF button has been switched OFF, you are doing the system setup process the MULTI-ROOM cannot be used. MIDNIGHT TONE TONE BASS/TEREBLE DIGITAL NR CLASS TUNER STATION LISTENING MULTI ROOM & SOURCE CH SELECT CONTROL ON/OFF PHONES SP SYSTEM A/B SIGNAL SELECT VIDEO SELECT TAPE2 MONITOR MULTI CH INPUT (DVD-A/SACD) SETUP MIC DIGITAL IN S-VIDEO VIDEO VIDEO INPUT L AUDIO R AUDIO/VIDEO MULTI-CHANNEL AMPLIFIER VSX-47TX LISTENING MODE SELECTOR MASTER VOLUME IR Receiver...
Owner's Manual
Page 105
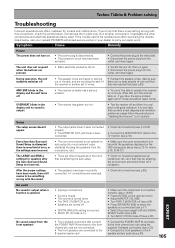
... PIONEER authorized service center or your dealer to select the speakers you have been activated. • Connect the power plug to operate the receiver for household appliances (air conditioner, fan, etc.) that are affecting the auto setup. • Make sure the room environment is some kind of wires. Every time Auto Surround Sound Setup is attempted, there is in "Installing the Receiver" (p.8 ) carefully. Setup The setup screen doesn't appear. • The output jacks haven't been connected...
... PIONEER authorized service center or your dealer to select the speakers you have been activated. • Connect the power plug to operate the receiver for household appliances (air conditioner, fan, etc.) that are affecting the auto setup. • Make sure the room environment is some kind of wires. Every time Auto Surround Sound Setup is attempted, there is in "Installing the Receiver" (p.8 ) carefully. Setup The setup screen doesn't appear. • The output jacks haven't been connected...

Owner's Manual
Page 106
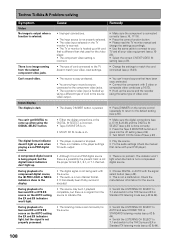
... MULTI CH IN mode has been selected. • The digital output level has been turned down on a CD player or other component equipped with digital output level adjustment capability. • Set SIGNAL SELECT to "AUTO" or according to the type of connections made (see p.45). • Set the digital input settings correctly (see p.12, memo on FRONT BI-AMP 5.1 or the surround back speaker setting is NO. • The surround back speakers aren't connected properly. • The surround back channel is set...
... MULTI CH IN mode has been selected. • The digital output level has been turned down on a CD player or other component equipped with digital output level adjustment capability. • Set SIGNAL SELECT to "AUTO" or according to the type of connections made (see p.45). • Set the digital input settings correctly (see p.12, memo on FRONT BI-AMP 5.1 or the surround back speaker setting is NO. • The surround back speakers aren't connected properly. • The surround back channel is set...
Owner's Manual
Page 108
... video input settings. • Change the settings to match the cord connected (see p.16-23). • The source is copy protected. • You are trying to record a source connected to the component video jacks. • The recorder's video input is hooked up using the SIGNAL SELECT button. Can't record video. During playback of video cord. • The display DIMMER button is pushed. • Either the digital connections or the DIGITAL IN SELECT is incorrect. • Tape 2 MONITOR is on. • MULTI CH IN mode...
... video input settings. • Change the settings to match the cord connected (see p.16-23). • The source is copy protected. • You are trying to record a source connected to the component video jacks. • The recorder's video input is hooked up using the SIGNAL SELECT button. Can't record video. During playback of video cord. • The display DIMMER button is pushed. • Either the digital connections or the DIGITAL IN SELECT is incorrect. • Tape 2 MONITOR is on. • MULTI CH IN mode...


