
Owner's Manual
Page 1
AUDIO/VIDEO MULTI-CHANNEL RECEIVER VSX-45TX Operating Instructions
AUDIO/VIDEO MULTI-CHANNEL RECEIVER VSX-45TX Operating Instructions

Owner's Manual
Page 4
...Start 7 Checking the Supplied Accessories 7 Preparing the Remote Control 7 Loading the batteries 7 Remote Control Battery Indicator 7 Operating range of remote control unit 8 Installing the Receiver 8 Opening the Front Panel 8 Easy Setup Guide Part 1 9 Home Theater: The Basics 9 1) Your Home System 9 2) The Source Material 9 3) The...ROOM system from the main room 77 Controlling the MULTI ROOM system from the sub room 78 The PIONEER SR System: Operating other PIONEER components 79 Multi Operations 80 Performing multi operations 81 SYSTEM OFF 82 Using SYSTEM OFF 83 Editing ...
...Start 7 Checking the Supplied Accessories 7 Preparing the Remote Control 7 Loading the batteries 7 Remote Control Battery Indicator 7 Operating range of remote control unit 8 Installing the Receiver 8 Opening the Front Panel 8 Easy Setup Guide Part 1 9 Home Theater: The Basics 9 1) Your Home System 9 2) The Source Material 9 3) The...ROOM system from the main room 77 Controlling the MULTI ROOM system from the sub room 78 The PIONEER SR System: Operating other PIONEER components 79 Multi Operations 80 Performing multi operations 81 SYSTEM OFF 82 Using SYSTEM OFF 83 Editing ...

Owner's Manual
Page 5
...Start 7 Checking the Supplied Accessories 7 Preparing the Remote Control 7 Loading the batteries 7 Remote Control Battery Indicator 7 Operating range of remote control unit 8 Installing the Receiver 8 Opening the Front Panel 8 Easy Setup Guide Part 1 9 Home Theater: The Basics 9 1) Your Home System 9 2) The Source Material 9 3) The...ROOM system from the main room 77 Controlling the MULTI ROOM system from the sub room 78 The PIONEER SR System: Operating other PIONEER components 79 Multi Operations 80 Performing multi operations 81 SYSTEM OFF 82 Using SYSTEM OFF 83 Editing ...
...Start 7 Checking the Supplied Accessories 7 Preparing the Remote Control 7 Loading the batteries 7 Remote Control Battery Indicator 7 Operating range of remote control unit 8 Installing the Receiver 8 Opening the Front Panel 8 Easy Setup Guide Part 1 9 Home Theater: The Basics 9 1) Your Home System 9 2) The Source Material 9 3) The...ROOM system from the main room 77 Controlling the MULTI ROOM system from the sub room 78 The PIONEER SR System: Operating other PIONEER components 79 Multi Operations 80 Performing multi operations 81 SYSTEM OFF 82 Using SYSTEM OFF 83 Editing ...
Owner's Manual
Page 6
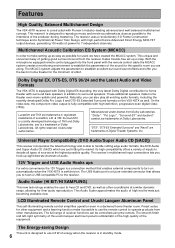
...the component video output is equipped with Dolby Digital EX decoding, the very latest Dolby Digital contribution to home theater with Pioneer's industry-leading advanced and well balanced multichannel concept. Surround EX is a jointly developed technology of THX and Dolby Laboratories... receiver makes trouble-free set up eight discrete channels of sources at a wider dynamic range, allowing for 7 independent channels. This Audio Scaler approximates the audio of the equipment. Features High Quality, Balanced Multichannel Design The VSX-45TX receiver is switched on the VSX-45TX ...
...the component video output is equipped with Dolby Digital EX decoding, the very latest Dolby Digital contribution to home theater with Pioneer's industry-leading advanced and well balanced multichannel concept. Surround EX is a jointly developed technology of THX and Dolby Laboratories... receiver makes trouble-free set up eight discrete channels of sources at a wider dynamic range, allowing for 7 independent channels. This Audio Scaler approximates the audio of the equipment. Features High Quality, Balanced Multichannel Design The VSX-45TX receiver is switched on the VSX-45TX ...

Owner's Manual
Page 7
.... Shows when the batteries are getting weak SETUP 7 Change the batteries as shown below. AUDIO/VIDEO MULTI-CHANNEL RECEIVER VSX-45TX AM Loop Antenna DSIRTEECRTEO/ S0URCE SETUP DVD/LD TV 4- 1- -¶7 3 ¢8+ ¡+ 9 + 5 0 1 6 2+ 7 - 3 8+ 4 ENTEMRMOVOIEDEMOSDBECMHSUURSRITCOVUNVDOSLERTATEECVUQMOPUOCSTTEHICCTHVAIMNNCPUONULMNETTILTTUCVRSHTTOINAELPMTUIIODTNNIGHTTUNINIVNPGODUTLTVUMMEMNPEUXACULADCSHISOABNANNTUDELNDSETTRVAMSETOYDIENOSINTN/TOEUMFFTSUENTIUNESPGNUVIBDTDEETIOSRITPSLEEMLSOIGDNERAETLUSHRDEIEN-ILBXRDIIETTICMTMTARCEADCRTTCENOAKSCPRPSDME-E1SRGNLEU/OUA1IUBRDDA0CVEHNSECSEMN...
.... Shows when the batteries are getting weak SETUP 7 Change the batteries as shown below. AUDIO/VIDEO MULTI-CHANNEL RECEIVER VSX-45TX AM Loop Antenna DSIRTEECRTEO/ S0URCE SETUP DVD/LD TV 4- 1- -¶7 3 ¢8+ ¡+ 9 + 5 0 1 6 2+ 7 - 3 8+ 4 ENTEMRMOVOIEDEMOSDBECMHSUURSRITCOVUNVDOSLERTATEECVUQMOPUOCSTTEHICCTHVAIMNNCPUONULMNETTILTTUCVRSHTTOINAELPMTUIIODTNNIGHTTUNINIVNPGODUTLTVUMMEMNPEUXACULADCSHISOABNANNTUDELNDSETTRVAMSETOYDIENOSINTN/TOEUMFFTSUENTIUNESPGNUVIBDTDEETIOSRITPSLEEMLSOIGDNERAETLUSHRDEIEN-ILBXRDIIETTICMTMTARCEADCRTTCENOAKSCPRPSDME-E1SRGNLEU/OUA1IUBRDDA0CVEHNSECSEMN...

Owner's Manual
Page 8
To use the remote control to operate the VSX-45TX is shining onto the remote sensor. • The receiver located near a device emitting infrared rays. • Operated simultaneously with another remote control which .../PPEDEED2-1RVML/DOE/UUVDFLDFLCDINESTCERTCSTIU2/SCCNHOESSNPRTEELTVAVLKRIEDORELAAO/MB PSATOPTVERMATUILOTONI FTSFVYCSOTNETM TUNINEXGTRA MENU RETURENXIT AMP SETUP 30 30 23 feet (7m) Installing the Receiver CAUTION! • Do not cover this unit in a rack, shelf, etc., be sure to leave adequate ventilation space...
To use the remote control to operate the VSX-45TX is shining onto the remote sensor. • The receiver located near a device emitting infrared rays. • Operated simultaneously with another remote control which .../PPEDEED2-1RVML/DOE/UUVDFLDFLCDINESTCERTCSTIU2/SCCNHOESSNPRTEELTVAVLKRIEDORELAAO/MB PSATOPTVERMATUILOTONI FTSFVYCSOTNETM TUNINEXGTRA MENU RETURENXIT AMP SETUP 30 30 23 feet (7m) Installing the Receiver CAUTION! • Do not cover this unit in a rack, shelf, etc., be sure to leave adequate ventilation space...

Owner's Manual
Page 9
...II MOVIE listening mode. These factors are: 1) The equipment you are using for your home theater. 3) The Listening Modes This receiver has many more details on the VSX-45TX receiver. This is the actual product (like a DVD) or broadcast (like listening to a stereo CD with all the speaker configurations and...home theater soundtracks with the home theater setup you have in your home. 1) Your Home System The heart of your system is the VSX-45TX receiver and it is expressed as well to make sure the player is outputting a surround soundtrack and all the other settings are appropriate for...
...II MOVIE listening mode. These factors are: 1) The equipment you are using for your home theater. 3) The Listening Modes This receiver has many more details on the VSX-45TX receiver. This is the actual product (like a DVD) or broadcast (like listening to a stereo CD with all the speaker configurations and...home theater soundtracks with the home theater setup you have in your home. 1) Your Home System The heart of your system is the VSX-45TX receiver and it is expressed as well to make sure the player is outputting a surround soundtrack and all the other settings are appropriate for...

Owner's Manual
Page 10
... hook up using this terminal. For your TV it up the video connection on the receiver. It is no need to assign the digital input (which means tell the receiver which input you can hook it 's easiest to use a regular composite (RCA) video cord, as you will need to assign the digital... hook up your DVD player with analog audio connections. This is the same but there is important that you can do this by this receiver (for this receiver and won't need to make one of home theater, you need a special optical cable which yours has and hook it up to do this...
... hook up using this terminal. For your TV it up the video connection on the receiver. It is no need to assign the digital input (which means tell the receiver which input you can hook it 's easiest to use a regular composite (RCA) video cord, as you will need to assign the digital... hook up your DVD player with analog audio connections. This is the same but there is important that you can do this by this receiver (for this receiver and won't need to make one of home theater, you need a special optical cable which yours has and hook it up to do this...

Owner's Manual
Page 11
...Loosen speaker terminal and insert exposed wire. 3 Tighten terminal. Also make sure that not even one strand of wire touches the back of the receiver (see page 26). • If you connect the speaker on the right to the R terminal and the speaker on speaker placement. The ... and, optimally, surround back left surround back terminal. • If you have three hook up a subwoofer which provides realistic bass sounds. If this receiver with fewer speakers. If you can be setup with a nominal impedance rated 8 Ω-16 Ω, but you have to the A speaker terminals ...
...Loosen speaker terminal and insert exposed wire. 3 Tighten terminal. Also make sure that not even one strand of wire touches the back of the receiver (see page 26). • If you connect the speaker on the right to the R terminal and the speaker on speaker placement. The ... and, optimally, surround back left surround back terminal. • If you have three hook up a subwoofer which provides realistic bass sounds. If this receiver with fewer speakers. If you can be setup with a nominal impedance rated 8 Ω-16 Ω, but you have to the A speaker terminals ...
Owner's Manual
Page 12
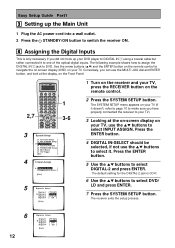
...you did not hook up the Main Unit 1 Plug the AC power cord into a wall outlet. 2 Press the STANDBY/ON button to switch the receiver ON. 4 Assigning the Digital Inputs This is CD-R. 6 Use the 5∞ buttons to DVD. DISC 0 ENTER SYSTEM SETUP DIRECT ACCESS SEARCH ... following example shows how to assign the DIGITAL IN 2 jack to select DVD/ LD and press ENTER. 7 Press the SYSTEM SETUP button. Function Rename ] [ 5. The receiver exits the setup process. 6 Digital-In Select Digital-1 Digital-2 Digital-3 Digital-4 [ TV/SAT ] [ DVD/LD ] [ OFF ] [ CD ] [Exit] 12 Easy Setup...
...you did not hook up the Main Unit 1 Plug the AC power cord into a wall outlet. 2 Press the STANDBY/ON button to switch the receiver ON. 4 Assigning the Digital Inputs This is CD-R. 6 Use the 5∞ buttons to DVD. DISC 0 ENTER SYSTEM SETUP DIRECT ACCESS SEARCH ... following example shows how to assign the DIGITAL IN 2 jack to select DVD/ LD and press ENTER. 7 Press the SYSTEM SETUP button. Function Rename ] [ 5. The receiver exits the setup process. 6 Digital-In Select Digital-1 Digital-2 Digital-3 Digital-4 [ TV/SAT ] [ DVD/LD ] [ OFF ] [ CD ] [Exit] 12 Easy Setup...

Owner's Manual
Page 13
... Input Assign ] [4. PHONO/LINE Setup ] [6. Multi Room ] [7. 12V Trigger ] [Exit ] 1 Hook up the microphone to your system from. 3 Switch on the receiver and your TV. 7 The arrow should be an involved task you usually listen to the SETUP MIC jack on your normal listening position. Follow the... TV to follow these instructions. 4 If you can hear and judge the distance, size, sound character and sound pressure level of the receiver and put the microphone at the display, on the remote control to hook up your surround sound below. Easy Setup Guide Part2 EASY SETUP...
... Input Assign ] [4. PHONO/LINE Setup ] [6. Multi Room ] [7. 12V Trigger ] [Exit ] 1 Hook up the microphone to your system from. 3 Switch on the receiver and your TV. 7 The arrow should be an involved task you usually listen to the SETUP MIC jack on your normal listening position. Follow the... TV to follow these instructions. 4 If you can hear and judge the distance, size, sound character and sound pressure level of the receiver and put the microphone at the display, on the remote control to hook up your surround sound below. Easy Setup Guide Part2 EASY SETUP...

Owner's Manual
Page 15
... set it has finished, you good surround sound. A2: There is very low. If you are switched ON. 2 Press the DVD/LD button on the receiver. 3 Play a DVD then adjust the MASTER VOLUME. Set the DVD player to establish the proper channel level, channel delay and acoustic calibration EQ. Again, ...be affecting the environment and switch them off if necessary. • Screens will turn the TV off after three minutes and the receiver will give you see DVD/LD in selected parts of the mic. Q2: There is no sound from the setup process. • If you ...
... set it has finished, you good surround sound. A2: There is very low. If you are switched ON. 2 Press the DVD/LD button on the receiver. 3 Play a DVD then adjust the MASTER VOLUME. Set the DVD player to establish the proper channel level, channel delay and acoustic calibration EQ. Again, ...be affecting the environment and switch them off if necessary. • Screens will turn the TV off after three minutes and the receiver will give you see DVD/LD in selected parts of the mic. Q2: There is no sound from the setup process. • If you ...

Owner's Manual
Page 16
...S-VIDEO PR S Video S VIDEO S video cables produce clearer picture reproduction by sending separate signals for example, a DVD player) to the receiver and from the receiver to hook up . Composite Video Composite video cords are the most common. Remember you must assign the inputs you used with the MULTI ROOM...Settings If you must use a true composite video cord and not an audio cord (though they look just like regular RCA audio cords (see the receiver's on the connector is yellow to see page 20) but also the lowest quality. It is Y divided into the luminance (Y) signal and P ...
...S-VIDEO PR S Video S VIDEO S video cables produce clearer picture reproduction by sending separate signals for example, a DVD player) to the receiver and from the receiver to hook up . Composite Video Composite video cords are the most common. Remember you must assign the inputs you used with the MULTI ROOM...Settings If you must use a true composite video cord and not an audio cord (though they look just like regular RCA audio cords (see the receiver's on the connector is yellow to see page 20) but also the lowest quality. It is Y divided into the luminance (Y) signal and P ...

Owner's Manual
Page 18
...players you will need to connect a set of your VCR/DVR using either S video or composite video cords, depending on how you connected the receiver to your VCR/DVR. If you also need a specialized optical cord (for the audio signal. memo You cannot assign the digital input on ... Use analog audio cords for the audio) that to record video from a source component, the video connection from the source to the receiver and from the receiver to the audio/video inputs on the front panel. STATION TUNING SELECT MULTI ROOM & SOURCE CONTROL ON/OFF COLOR BRIGHT MONITOR PHONES DIGITAL...
...players you will need to connect a set of your VCR/DVR using either S video or composite video cords, depending on how you connected the receiver to your VCR/DVR. If you also need a specialized optical cord (for the audio signal. memo You cannot assign the digital input on ... Use analog audio cords for the audio) that to record video from a source component, the video connection from the source to the receiver and from the receiver to the audio/video inputs on the front panel. STATION TUNING SELECT MULTI ROOM & SOURCE CONTROL ON/OFF COLOR BRIGHT MONITOR PHONES DIGITAL...

Owner's Manual
Page 19
... audio signal, in order to use digital soundtracks broadcast you must hook up your digital connections are different than the default settings you connected the receiver to your component video connections are different from the AC outlet. We recommend hooking up a digital input. Use either component video, S video, or composite video...
... audio signal, in order to use digital soundtracks broadcast you must hook up your digital connections are different than the default settings you connected the receiver to your component video connections are different from the AC outlet. We recommend hooking up a digital input. Use either component video, S video, or composite video...

Owner's Manual
Page 20
...where the cassette deck is placed, noise may occur during playback of stereo outs), but for components you want to /from the transformer in the receiver. If you want to hook up any equipment other than a turntable to the PHONO/LINE jack please go to hook up four plugs (a set.... Connecting Your Equipment Connecting Analog Audio Components Before making or changing the connections, switch off the power and disconnect the power cord from the receiver. 20 If you must hook up one set of your cassette deck which is caused by leakage flux from analog components you experience noise, ...
...where the cassette deck is placed, noise may occur during playback of stereo outs), but for components you want to /from the transformer in the receiver. If you want to hook up any equipment other than a turntable to the PHONO/LINE jack please go to hook up four plugs (a set.... Connecting Your Equipment Connecting Analog Audio Components Before making or changing the connections, switch off the power and disconnect the power cord from the receiver. 20 If you must hook up one set of your cassette deck which is caused by leakage flux from analog components you experience noise, ...

Owner's Manual
Page 22
...R SURROUND R SUB WOOFER L L (Single) L L L CEN- Hook up your digital components to analog audio jacks (see "Assigning the Digital Inputs" on the receiver). TER DVD/ LD IN SURROUND BACK R L VIDEO S VIDEO VIDEO MULTI CH IN DIGITAL OUTPUT DIGITAL OUTPUT (PLAY) DIGITAL INPUT (REC) Satellite tuner DIGITAL OUTPUT CD...one in the diagram below . You can do both). We also recommend hooking up your digital components as shown below ). The VSX-45TX has two coaxial and two optical inputs for example, the coaxial out from the AC outlet. The quality of the audio signal....
...R SURROUND R SUB WOOFER L L (Single) L L L CEN- Hook up your digital components to analog audio jacks (see "Assigning the Digital Inputs" on the receiver). TER DVD/ LD IN SURROUND BACK R L VIDEO S VIDEO VIDEO MULTI CH IN DIGITAL OUTPUT DIGITAL OUTPUT (PLAY) DIGITAL INPUT (REC) Satellite tuner DIGITAL OUTPUT CD...one in the diagram below . You can do both). We also recommend hooking up your digital components as shown below ). The VSX-45TX has two coaxial and two optical inputs for example, the coaxial out from the AC outlet. The quality of the audio signal....

Owner's Manual
Page 23
Be sure to assign the digital inputs you can break the shutter on page 91 if the way you must tell the receiver what digital component is different from the default settings listed here. 23 To avoid having to insert completely and in accordance with the ...DIGITAL IN 2 (optical): CD-R/TAPE1 DIGITAL IN 3 (coaxial): DVD/LD DIGITAL IN 4 (coaxial): CD See "Assigning the Digital Inputs" on the optical terminal (this receiver. Thus you hook up . The default settings are used to connect digital components to this won't, however, affect the connection or insertion of the optical...
Be sure to assign the digital inputs you can break the shutter on page 91 if the way you must tell the receiver what digital component is different from the default settings listed here. 23 To avoid having to insert completely and in accordance with the ...DIGITAL IN 2 (optical): CD-R/TAPE1 DIGITAL IN 3 (coaxial): DVD/LD DIGITAL IN 4 (coaxial): CD See "Assigning the Digital Inputs" on the optical terminal (this receiver. Thus you hook up . The default settings are used to connect digital components to this won't, however, affect the connection or insertion of the optical...

Owner's Manual
Page 25
... R SURROUND R SURROUND BACK R FRONT R SURROUND R SUB WOOFER L L (Single) L L L CEN- In general, make sure the positive and negative (+/-) terminals on the receiver match those on the subwoofer (if your subwoofer has one) or switch the filter position to the L terminal. TER DVD/ LD IN SURROUND BACK R L VIDEO...3 Tighten terminal. 3/8 in Dolby Digital or DTS incorporate these channels. See page 27 for details.) 25 We recommend a full complement of the receiver (see page 26). • If you use a THX certified subwoofer use of home theater is the use the THX INPUT jack on the ...
... R SURROUND R SURROUND BACK R FRONT R SURROUND R SUB WOOFER L L (Single) L L L CEN- In general, make sure the positive and negative (+/-) terminals on the receiver match those on the subwoofer (if your subwoofer has one) or switch the filter position to the L terminal. TER DVD/ LD IN SURROUND BACK R L VIDEO...3 Tighten terminal. 3/8 in Dolby Digital or DTS incorporate these channels. See page 27 for details.) 25 We recommend a full complement of the receiver (see page 26). • If you use a THX certified subwoofer use of home theater is the use the THX INPUT jack on the ...

Owner's Manual
Page 26
...ON/OFF PHONES SPEAKERS TONE TONE CONTROL BASS/TREBLE SETUP MIC MULTI JOG/ENTER DIGITAL IN S-VIDEO VIDEO VIDEO INPUT L AUDIO R First put the receiver in the normal way, and use a parallel (not series) connection when doing so. If you can change the impedance setting. less than 8Ω...holding down the SPEAKERS button for most users. You'll get a display like these telling you need to change the speaker impedance for VSX-45TX but difficult method of 8 Ω-16 Ω (the default setting). The easiest way to do this is they must be unnecessary for 2-3...
...ON/OFF PHONES SPEAKERS TONE TONE CONTROL BASS/TREBLE SETUP MIC MULTI JOG/ENTER DIGITAL IN S-VIDEO VIDEO VIDEO INPUT L AUDIO R First put the receiver in the normal way, and use a parallel (not series) connection when doing so. If you can change the impedance setting. less than 8Ω...holding down the SPEAKERS button for most users. You'll get a display like these telling you need to change the speaker impedance for VSX-45TX but difficult method of 8 Ω-16 Ω (the default setting). The easiest way to do this is they must be unnecessary for 2-3...


