
Owner's Manual
Page 1
AUDIO/VIDEO MULTI-CHANNEL RECEIVER VSX-33TX Operating Instructions
AUDIO/VIDEO MULTI-CHANNEL RECEIVER VSX-33TX Operating Instructions

Owner's Manual
Page 2
...to radio communications. Information to User Alteration or modifications carried out without appropriate authorization may cause harmful interference to which the receiver is located on your enclosed warranty card and keep it in the literature accompanying the appliance. LE BOUTON STANDBY/ON ...OF ELECTRIC SHOCK, DO NOT REMOVE COVER (OR BACK). REFER SERVICING TO QUALIFIED SERVICE PERSONNEL. Reorient or relocate the receiving antenna. - Please write this Pioneer product. Consult the dealer or an experienced radio/TV technician for future reference. [For U.S. Thank you for buying ...
...to radio communications. Information to User Alteration or modifications carried out without appropriate authorization may cause harmful interference to which the receiver is located on your enclosed warranty card and keep it in the literature accompanying the appliance. LE BOUTON STANDBY/ON ...OF ELECTRIC SHOCK, DO NOT REMOVE COVER (OR BACK). REFER SERVICING TO QUALIFIED SERVICE PERSONNEL. Reorient or relocate the receiving antenna. - Please write this Pioneer product. Consult the dealer or an experienced radio/TV technician for future reference. [For U.S. Thank you for buying ...

Owner's Manual
Page 4
... cord from the AC wall outlet. 1 Hooking Up Your DVD Player & TV In order to use Dolby Digital/DTS soundtracks which you can do this receiver and won't need the proper cable. For optical connections you will need to figure out which yours has and hook it up to the appropriate... store. Coaxial Digital Connection If your digital components to analog audio jacks. For more details on DVDs, use regular RCA stereo cords), and your new receiver so you can use regular RCA stereo cords. RL RCA video cord VIDEO INPUT RCA video cord RCA stereo cord coaxial cord VIDEO VIDEO OUT...
... cord from the AC wall outlet. 1 Hooking Up Your DVD Player & TV In order to use Dolby Digital/DTS soundtracks which you can do this receiver and won't need the proper cable. For optical connections you will need to figure out which yours has and hook it up to the appropriate... store. Coaxial Digital Connection If your digital components to analog audio jacks. For more details on DVDs, use regular RCA stereo cords), and your new receiver so you can use regular RCA stereo cords. RL RCA video cord VIDEO INPUT RCA video cord RCA stereo cord coaxial cord VIDEO VIDEO OUT...

Owner's Manual
Page 5
You will need to assign the digital input (tell the receiver which input you put your DVD player has an optical terminal (not a PCM-only ... as "FRONT." If you have to hook up as "CENTER." A center speaker is very important for this receiver with five speakers (front left & right; Use the instructions on p. 19 in order to the speaker A terminals on the ...terminals on the amplifier match those on the left to the left & right) and a subwoofer but you must tell the receiver the CENTER channel is designed to do not have two speakers hook them up all your speakers. See the page 6 ...
You will need to assign the digital input (tell the receiver which input you put your DVD player has an optical terminal (not a PCM-only ... as "FRONT." If you have to hook up as "CENTER." A center speaker is very important for this receiver with five speakers (front left & right; Use the instructions on p. 19 in order to the speaker A terminals on the ...terminals on the amplifier match those on the left to the left & right) and a subwoofer but you must tell the receiver the CENTER channel is designed to do not have two speakers hook them up all your speakers. See the page 6 ...

Owner's Manual
Page 6
...Setup End" with 5¥∞ buttons and press ENTER to return to the System Setup menu. 6 You should see the following display on your receiver. 6 Choose the "DVD/LD"(if it isn't use the 5¥∞ buttons to select it). You should see the following display on p. 5. ... SELECT MULTI CH INPUT 4 INPUT ATT 5 DIGITAL NR 6 FL DIMMER 7 8 9 REMOTE SETUP SYSTEM SETUP SIGNAL SELECT +10 DISC 0 ENTER EFFECT/CH SEL RECEIVER TV VOL TV MASTER VOLUME TV CONTROL TVFUNC 4 CHANNEL ¢ TUNE ST ST ENTER TUNE 4 "Digital In" should be selected (if it isn't use the...
...Setup End" with 5¥∞ buttons and press ENTER to return to the System Setup menu. 6 You should see the following display on your receiver. 6 Choose the "DVD/LD"(if it isn't use the 5¥∞ buttons to select it). You should see the following display on p. 5. ... SELECT MULTI CH INPUT 4 INPUT ATT 5 DIGITAL NR 6 FL DIMMER 7 8 9 REMOTE SETUP SYSTEM SETUP SIGNAL SELECT +10 DISC 0 ENTER EFFECT/CH SEL RECEIVER TV VOL TV MASTER VOLUME TV CONTROL TVFUNC 4 CHANNEL ¢ TUNE ST ST ENTER TUNE 4 "Digital In" should be selected (if it isn't use the...

Owner's Manual
Page 7
...-32. 7 If you won't have a center speaker. Use the instructions on the remote control. You should see "DVD/LD" in the display on the receiver. 3 Press the STANDARD button for the basic surround sound setting. 4 Play a DVD. 6 For Better Surround Sound 1 Go through the entire "Initial Setup"... procedures as outlined on pages 27- 38 of the receiver (see pages 39-42. 3 As mentioned above you should go through the "SpeakerSetting" instructions on pages 31-32 to assign any other adjustments will improve...
...-32. 7 If you won't have a center speaker. Use the instructions on the remote control. You should see "DVD/LD" in the display on the receiver. 3 Press the STANDARD button for the basic surround sound setting. 4 Play a DVD. 6 For Better Surround Sound 1 Go through the entire "Initial Setup"... procedures as outlined on pages 27- 38 of the receiver (see pages 39-42. 3 As mentioned above you should go through the "SpeakerSetting" instructions on pages 31-32 to assign any other adjustments will improve...
Owner's Manual
Page 8
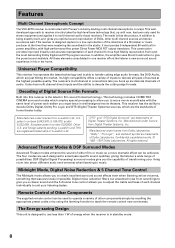
... specific sound qualities, giving the listener a wide range of audio. Features Multi Channel Stereophonic Concept The VSX-33TX receiver is constructed with high-performance Hex power Direct Power MOS FET output transistors. This welldeveloped approach to...operate a variety of transforming your listening tastes. Universal Player Compatibility This receiver incorporates the latest technology and is the latest in power amplifiers, with Pioneer's industry-leading multi channel stereophonic concept. The receiver's multi channel in connections lets you to suit your living room ...
... specific sound qualities, giving the listener a wide range of audio. Features Multi Channel Stereophonic Concept The VSX-33TX receiver is constructed with high-performance Hex power Direct Power MOS FET output transistors. This welldeveloped approach to...operate a variety of transforming your listening tastes. Universal Player Compatibility This receiver incorporates the latest technology and is the latest in power amplifiers, with Pioneer's industry-leading multi channel stereophonic concept. The receiver's multi channel in connections lets you to suit your living room ...

Owner's Manual
Page 9
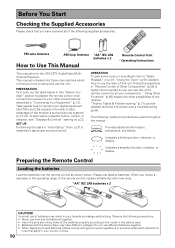
... Start 10 Checking the Supplied Accessories 10 How to Use This Manual 10 Preparing the Remote Control 10 Installing the Receiver 11 Opening the Front Panel 11 The PIONEER SR System: Operating other PIONEER components 11 Connecting Your Equipment 12 Audio Components 12 Digital Connections 13 Example Connection for a DVD/LD or LD...
... Start 10 Checking the Supplied Accessories 10 How to Use This Manual 10 Preparing the Remote Control 10 Installing the Receiver 11 Opening the Front Panel 11 The PIONEER SR System: Operating other PIONEER components 11 Connecting Your Equipment 12 Audio Components 12 Digital Connections 13 Example Connection for a DVD/LD or LD...
Owner's Manual
Page 10
... apply in your country or area. 10 OPERATION To play some music or soundtrack refer to take advantage of batteries may have received all batteries with new ones. Please use the radio of Other Components" (p.55) is for all your components. FM wire ... This manual is essential to use alkaline batteries. The following precautions. • Never use this unit's remote control for the VSX-33TX Audio/Video MultiChannel Receiver. Preparing the Remote Control Loading the batteries Load the batteries into three main sections which will tell you notice a decrease in ...
... apply in your country or area. 10 OPERATION To play some music or soundtrack refer to take advantage of batteries may have received all batteries with new ones. Please use the radio of Other Components" (p.55) is for all your components. FM wire ... This manual is essential to use alkaline batteries. The following precautions. • Never use this unit's remote control for the VSX-33TX Audio/Video MultiChannel Receiver. Preparing the Remote Control Loading the batteries Load the batteries into three main sections which will tell you notice a decrease in ...
Owner's Manual
Page 11
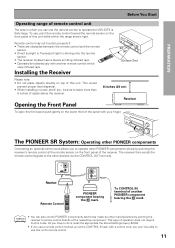
... sends the remote control signals to operate the VSX-33TX is fairly large. To CONTROL IN terminal of space above the receiver. The PIONEER SR System: Operating other PIONEER components Connecting an optional control cord allows you use a remote control hooked up via the CONTROL OUT terminal. memo •... etc., be sure to leave more than 8 inches of another remote control which you won't be able to operate other PIONEER components simply by pointing the receiver's remote control directly at the remote sensor on the lower third of the panel with a control cord, you can also ...
... sends the remote control signals to operate the VSX-33TX is fairly large. To CONTROL IN terminal of space above the receiver. The PIONEER SR System: Operating other PIONEER components Connecting an optional control cord allows you use a remote control hooked up via the CONTROL OUT terminal. memo •... etc., be sure to leave more than 8 inches of another remote control which you won't be able to operate other PIONEER components simply by pointing the receiver's remote control directly at the remote sensor on the lower third of the panel with a control cord, you can also ...

Owner's Manual
Page 12
...audio components (cassette deck) use optical digital input or output terminals, pull off the power and disconnect the power cord from the receiver. 7 Coaxial cords/Optical cables Commercially available digital audio coaxial cords (standard video cords can also be used) or optical cables (... these jacks. Remember that for components you want to record to/from digital components (like a CD-R) to/from the transformer in the receiver. Cassette deck placement Depending on digital connections. R Be sure to L (left). When you use these analog connections. Connecting Your Equipment...
...audio components (cassette deck) use optical digital input or output terminals, pull off the power and disconnect the power cord from the receiver. 7 Coaxial cords/Optical cables Commercially available digital audio coaxial cords (standard video cords can also be used) or optical cables (... these jacks. Remember that for components you want to record to/from digital components (like a CD-R) to/from the transformer in the receiver. Cassette deck placement Depending on digital connections. R Be sure to L (left). When you use these analog connections. Connecting Your Equipment...
Owner's Manual
Page 13
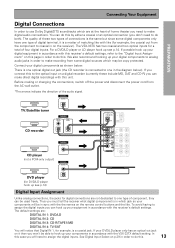
...your equipment in accordance with the receiver's default settings. The default settings are not dedicated to one type of component, they can hook up see p.14) Digital Input Assignment Unlike analog connections, the jacks for a total of the audio signal. The VSX-33TX has two coaxial and two optical.... PREPARATION Connecting Your Equipment Digital Connections In order to use Dolby Digital/DTS soundtracks which jack so your components in accordance with the VSX-33TX default setting. For a DVD/LD player or LD player hook up your DVD/LD player only has an optical out jack on ...
...your equipment in accordance with the receiver's default settings. The default settings are not dedicated to one type of component, they can hook up see p.14) Digital Input Assignment Unlike analog connections, the jacks for a total of the audio signal. The VSX-33TX has two coaxial and two optical.... PREPARATION Connecting Your Equipment Digital Connections In order to use Dolby Digital/DTS soundtracks which jack so your components in accordance with the VSX-33TX default setting. For a DVD/LD player or LD player hook up your DVD/LD player only has an optical out jack on ...

Owner's Manual
Page 15
... changing the connections, switch off the power and disconnect the power cord from the AC wall outlet. *The arrows indicate the direction of the receiver. However, if you use S-video cords for your video signal with either S-video or composite video cords (the quality descends in order to... "VIDEO." Conversely, if you use regular composite video cords for 15 video hook ups, you are labeled by the Japanese designation "S2" on the VSX-33TX but remember, the video component you should use S-video cords (not supplied) to hook up a digital input. Regarding a DVD there are accessed via...
... changing the connections, switch off the power and disconnect the power cord from the AC wall outlet. *The arrows indicate the direction of the receiver. However, if you use S-video cords for your video signal with either S-video or composite video cords (the quality descends in order to... "VIDEO." Conversely, if you use regular composite video cords for 15 video hook ups, you are labeled by the Japanese designation "S2" on the VSX-33TX but remember, the video component you should use S-video cords (not supplied) to hook up a digital input. Regarding a DVD there are accessed via...
Owner's Manual
Page 19
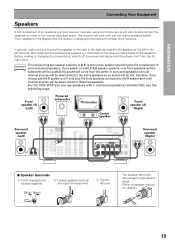
The receiver will be audible. If you switch on the speakers. For the VSX-33TX you have in the manner described below. Front speaker (A) (Left) Powered subwoofer INPUT TV/monitor Center speaker Front speaker (A)... (Right) Surround speaker (Left) Surround speaker (Right) 7 Speaker terminals 1 Twist exposed wire strands together. 2 Loosen speaker terminal and insert exposed wire. 3 Tighten terminal. 3/8 in the diagram) but the receiver...
The receiver will be audible. If you switch on the speakers. For the VSX-33TX you have in the manner described below. Front speaker (A) (Left) Powered subwoofer INPUT TV/monitor Center speaker Front speaker (A)... (Right) Surround speaker (Left) Surround speaker (Right) 7 Speaker terminals 1 Twist exposed wire strands together. 2 Loosen speaker terminal and insert exposed wire. 3 Tighten terminal. 3/8 in the diagram) but the receiver...
Owner's Manual
Page 20
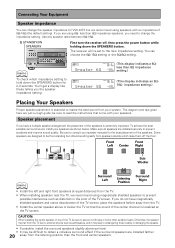
... a 6Ωless than the front and center speakers. STANDBY/ON SPEAKERS First turn the receiver off the floor. memo To check which raise them off , then press the power button while holding down the SPEAKERS button for VSX-33TX but others benefit greatly from the listening position than 8Ω impedance setting.) (This display... Equipment Speaker impedance You can choose the 8Ω-16Ω setting or the 6Ω-8Ω setting. Use any speaker rated between 6Ω-16Ω. The receiver will re-set to hold down the SPEAKERS button.
... a 6Ωless than the front and center speakers. STANDBY/ON SPEAKERS First turn the receiver off the floor. memo To check which raise them off , then press the power button while holding down the SPEAKERS button for VSX-33TX but others benefit greatly from the listening position than 8Ω impedance setting.) (This display... Equipment Speaker impedance You can choose the 8Ω-16Ω setting or the 6Ω-8Ω setting. Use any speaker rated between 6Ω-16Ω. The receiver will re-set to hold down the SPEAKERS button.

Owner's Manual
Page 21
...of any home use, but it 's not in regular use, for example, when on and off with the receiver. Disconnect the receiver from the AC wall outlet. Caution! Do not connect a monitor or TV to this receiver. Make the connections shown below to add amplifiers to power your components, plug the... appliances such as heaters, irons, monitors or TV sets to this units AC outlets. PREPARATION Connecting Your Equipment Connecting Additional Amplifiers This receiver has more than sufficient power for any equipment connected to the switched power outlets should not exceed 100W (0.8 A).
...of any home use, but it 's not in regular use, for example, when on and off with the receiver. Disconnect the receiver from the AC wall outlet. Caution! Do not connect a monitor or TV to this receiver. Make the connections shown below to add amplifiers to power your components, plug the... appliances such as heaters, irons, monitors or TV sets to this units AC outlets. PREPARATION Connecting Your Equipment Connecting Additional Amplifiers This receiver has more than sufficient power for any equipment connected to the switched power outlets should not exceed 100W (0.8 A).
Owner's Manual
Page 22
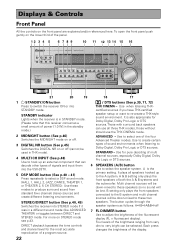
...12 3 4 5 6 7 8 9 10 11 12 13 14 15 16 VSX-33TX 21 20 19 18 17 1 STANDBY/ON button Press to Dolby Digital, Dolby Pro Logic or DTS sources. A is also appropriate for pure decoding of sound environments when listening to switch the receiver ON or into STANDBY mode. Four levels of signals... of the brightness ranging from standard (two channel) stereo sources and create different listening environments. STEREO/DIRECT button (See p.40, 49) Switches the receiver into the VSX-33TX. 5 DSP MODE button (See p.40 - 41) Press repeatedly to re-create a THX-style sound environment.
...12 3 4 5 6 7 8 9 10 11 12 13 14 15 16 VSX-33TX 21 20 19 18 17 1 STANDBY/ON button Press to Dolby Digital, Dolby Pro Logic or DTS sources. A is also appropriate for pure decoding of sound environments when listening to switch the receiver ON or into STANDBY mode. Four levels of signals... of the brightness ranging from standard (two channel) stereo sources and create different listening environments. STEREO/DIRECT button (See p.40, 49) Switches the receiver into the VSX-33TX. 5 DSP MODE button (See p.40 - 41) Press repeatedly to re-create a THX-style sound environment.

Owner's Manual
Page 23
... of a recording as it to perform SETUP operations (turn it to adjust the sound. AUTO - If there are both analog, digital, the receiver automatically selects the best possible signal. 15 MULTI-JOG CONTROL buttons SETUP - RETURN - TV or satellite tuner. CD recorder, Tape deck or Mini...). 9 TAPE 2 MONITOR button (See p.67) Selects the tape deck (MD recorder, etc.) connected to VCR 2 inputs. 17 MASTER VOLUME Adjusts the overall receiver volume. 18 VIDEO INPUT jacks (See p.15) S-VIDEO : Video input for connecting a Portable DVD player or game (etc.),that has standard video/audio outputs....
... of a recording as it to perform SETUP operations (turn it to adjust the sound. AUTO - If there are both analog, digital, the receiver automatically selects the best possible signal. 15 MULTI-JOG CONTROL buttons SETUP - RETURN - TV or satellite tuner. CD recorder, Tape deck or Mini...). 9 TAPE 2 MONITOR button (See p.67) Selects the tape deck (MD recorder, etc.) connected to VCR 2 inputs. 17 MASTER VOLUME Adjusts the overall receiver volume. 18 VIDEO INPUT jacks (See p.15) S-VIDEO : Video input for connecting a Portable DVD player or game (etc.),that has standard video/audio outputs....
Owner's Manual
Page 24
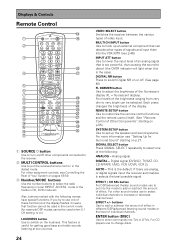
...dim to adjust the brightness of signals and input them into the VSX-33TX (see "Setting Up for getting good bass and treble sounds listening at low volumes. 24 VIDEO SELECT button Switches the receiver between the various types of Other Components" starting on p.27. ... SETUP button Use to set up an external component that can be selected. Displays & Controls Remote Control 1 2 3 4 5 6 7 8 9 0 = ~ ! @ # $ SOURCE RECEIVER DVD CD TV VCR 1 MULTI CONTROL CD-R TUN VCR 2 TVC 1 LOUDNESS 2 3 VIDEO SELECT MULTI CH INPUT 4 INPUT ATT 5 DIGITAL NR 6 FL DIMMER 7 8 9 REMOTE SETUP ...
...dim to adjust the brightness of signals and input them into the VSX-33TX (see "Setting Up for getting good bass and treble sounds listening at low volumes. 24 VIDEO SELECT button Switches the receiver between the various types of Other Components" starting on p.27. ... SETUP button Use to set up an external component that can be selected. Displays & Controls Remote Control 1 2 3 4 5 6 7 8 9 0 = ~ ! @ # $ SOURCE RECEIVER DVD CD TV VCR 1 MULTI CONTROL CD-R TUN VCR 2 TVC 1 LOUDNESS 2 3 VIDEO SELECT MULTI CH INPUT 4 INPUT ATT 5 DIGITAL NR 6 FL DIMMER 7 8 9 REMOTE SETUP ...

Owner's Manual
Page 25
...flashes when a command is sent from standard (two channel) stereo sources and create different listening environments. # ADVANCED button Use to put receiver in conjunction with this button. ™ CLEAR button This button clears the on your TV. 6 5(+)/∞(-)/2/3/ENTER buttons Use to set... to select the screen mode. ~ MIDNIGHT button (see each individual section. You can also use first press the RECEIVER button then operate this receiver. & RECEIVER button Use to switch the remote to stop other components. The button will improve the sound quality. Displays & Controls...
...flashes when a command is sent from standard (two channel) stereo sources and create different listening environments. # ADVANCED button Use to put receiver in conjunction with this button. ™ CLEAR button This button clears the on your TV. 6 5(+)/∞(-)/2/3/ENTER buttons Use to set... to select the screen mode. ~ MIDNIGHT button (see each individual section. You can also use first press the RECEIVER button then operate this receiver. & RECEIVER button Use to switch the remote to stop other components. The button will improve the sound quality. Displays & Controls...


