Owner's Manual
Page 10
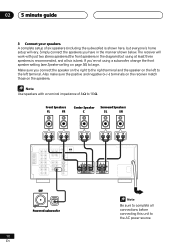
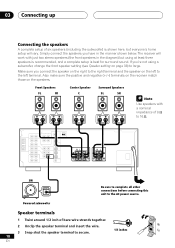
... to 16 Ω. The receiver will vary. Front Speakers FL FR Center Speaker C Surround Speakers SL SR RL RL SW INPUT Powered subwoofer 10 En Be sure to the AC power source. A complete setup of 8 Ω to the left terminal. If you're not using at least three speakers is recommended, and...
... to 16 Ω. The receiver will vary. Front Speakers FL FR Center Speaker C Surround Speakers SL SR RL RL SW INPUT Powered subwoofer 10 En Be sure to the AC power source. A complete setup of 8 Ω to the left terminal. If you're not using at least three speakers is recommended, and...

Owner's Manual
Page 12
... controls for the steps below ). T LOUDNESS TONE QUICK SETUP MULTI JOG MULTI JOG ENTER INPUT SELECTOR MASTER VOLUME DOWN UP R 1 Press RECEIVER to turn the power on the distance of your speaker setup. Cycle between Small, Medium, or Large (see table below . Front Center Surround S 12 ft. 10 ft. 6 ft...
... controls for the steps below ). T LOUDNESS TONE QUICK SETUP MULTI JOG MULTI JOG ENTER INPUT SELECTOR MASTER VOLUME DOWN UP R 1 Press RECEIVER to turn the power on the distance of your speaker setup. Cycle between Small, Medium, or Large (see table below . Front Center Surround S 12 ft. 10 ft. 6 ft...
Owner's Manual
Page 13
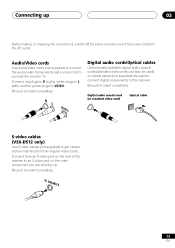
...and a video cord to get clearer picture reproduction than regular video cords. Digital audio coaxial cord (or standard video cord) Optical cable S-video cables (VSX-D512 only) Use S-video cables (not supplied) to connect the monitor TV. Be sure to VIDEO. Connect from the AC outlet. S VIDEO 13...plugs to L (left), and the yellow plugs to insert completely. Connecting up 03 Before making or changing the connections, switch off the power and disconnect the power cord from an S-video jack on the rear of the receiver to an S-video jack on the video component you are used ) or...
...and a video cord to get clearer picture reproduction than regular video cords. Digital audio coaxial cord (or standard video cord) Optical cable S-video cables (VSX-D512 only) Use S-video cables (not supplied) to connect the monitor TV. Be sure to VIDEO. Connect from the AC outlet. S VIDEO 13...plugs to L (left), and the yellow plugs to insert completely. Connecting up 03 Before making or changing the connections, switch off the power and disconnect the power cord from an S-video jack on the rear of the receiver to an S-video jack on the video component you are used ) or...
Owner's Manual
Page 14
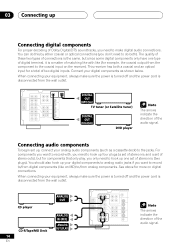
CD player CD-R/Tape/MD Deck 14 En ANALOG OUT ANALOG IN (REC) ANALOG OUT (PLAY) The arrows indicate the... need to hook up one type of two digital inputs. Connect your equipment, always make sure the power is turned off and the power cord is disconnected from the wall outlet. DIGITAL OUT (OPTICAL) TV tuner (or Satellite tuner) DIGITAL...up Connecting digital components For proper decoding of Dolby Digital/DTS soundtracks, you need to make sure the power is turned off and the power cord is a matter of matching like an MD) to/from analog components. Connecting audio components To...
CD player CD-R/Tape/MD Deck 14 En ANALOG OUT ANALOG IN (REC) ANALOG OUT (PLAY) The arrows indicate the... need to hook up one type of two digital inputs. Connect your equipment, always make sure the power is turned off and the power cord is disconnected from the wall outlet. DIGITAL OUT (OPTICAL) TV tuner (or Satellite tuner) DIGITAL...up Connecting digital components For proper decoding of Dolby Digital/DTS soundtracks, you need to make sure the power is turned off and the power cord is a matter of matching like an MD) to/from analog components. Connecting audio components To...
Owner's Manual
Page 15
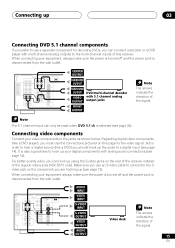
...to a digital input (see page 34). For better quality video, you can only be used when DVD 5.1 ch is selected (see page 14). CENTER OUTPUT SUBWOOFER OUTPUT SURROUND OUTPUT VIDEO OUTPUT DVD/multi-channel decoder with analog audio connections (see page 13). AUDIO INPUT VIDEO INPUT S-...of the receiver instead of the regular video jacks (VSX-D512 only). When connecting your video components to the jacks as shown below. Connecting video components Connect your equipment, always make sure the power is turned off and the power cord is disconnected from the wall outlet. When connecting...
...to a digital input (see page 34). For better quality video, you can only be used when DVD 5.1 ch is selected (see page 14). CENTER OUTPUT SUBWOOFER OUTPUT SURROUND OUTPUT VIDEO OUTPUT DVD/multi-channel decoder with analog audio connections (see page 13). AUDIO INPUT VIDEO INPUT S-...of the receiver instead of the regular video jacks (VSX-D512 only). When connecting your video components to the jacks as shown below. Connecting video components Connect your equipment, always make sure the power is turned off and the power cord is disconnected from the wall outlet. When connecting...
Owner's Manual
Page 18
... vary. If you have in the diagram) but using a subwoofer, change the front speaker setting (see Speaker setting on the left to large. Powered subwoofer Speaker terminals 1 Twist around 1/2 inch of bare wire strands together. ª 2 Unclip the speaker terminal and insert the wire. 1/2 inches... · 3 Snap shut the speaker terminal to the AC power source. Also make sure the positive and negative (+/-) terminals on the receiver match those on the speakers. Simply connect the speakers you 're ...
... vary. If you have in the diagram) but using a subwoofer, change the front speaker setting (see Speaker setting on the left to large. Powered subwoofer Speaker terminals 1 Twist around 1/2 inch of bare wire strands together. ª 2 Unclip the speaker terminal and insert the wire. 1/2 inches... · 3 Snap shut the speaker terminal to the AC power source. Also make sure the positive and negative (+/-) terminals on the receiver match those on the speakers. Simply connect the speakers you 're ...
Owner's Manual
Page 19
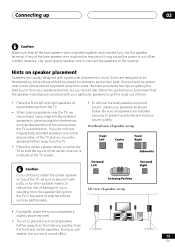
... not have provided a few tips on getting the best sound from your speakers as earthquakes. Some should be sure to secure it may cause the power to prevent accidents and improve sound quality. Use good quality speaker wire to connect the speakers to place the surround speakers further away from the...
... not have provided a few tips on getting the best sound from your speakers as earthquakes. Some should be sure to secure it may cause the power to prevent accidents and improve sound quality. Use good quality speaker wire to connect the speakers to place the surround speakers further away from the...
Owner's Manual
Page 20
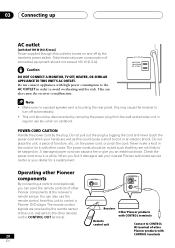
...shock. when on the power cord, or pinch the cord. POWER-CORD CAUTION Handle the power cord by the receiver's power switch. The power cords should be routed such that they are not likely to control a Pioneer DVD player. 03 Connecting up AC outlet [switched 100 W (0.8 A) max] Power supplied through this outlet ... the rear panel, this could cause a short circuit or an electric shock. You can point the remote controls of other Pioneer products with high power consumption to the AC OUTLET in regular use the remote control from this unit, and sent to the other devices via the...
...shock. when on the power cord, or pinch the cord. POWER-CORD CAUTION Handle the power cord by the receiver's power switch. The power cords should be routed such that they are not likely to control a Pioneer DVD player. 03 Connecting up AC outlet [switched 100 W (0.8 A) max] Power supplied through this outlet ... the rear panel, this could cause a short circuit or an electric shock. You can point the remote controls of other Pioneer products with high power consumption to the AC OUTLET in regular use the remote control from this unit, and sent to the other devices via the...
Owner's Manual
Page 22
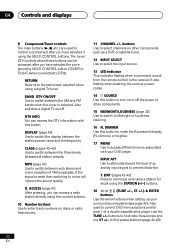
... name and the frequency. INPUT ATT Use to attenuate (lower) the level of FM broadcasts. It also flashes when teaching the receiver preset codes. 14 SOURCE Use this button. T. buttons to find preset stations (page 40-43). 22 En RETURN Returns to the last screen selected when using the ... main buttons (3, 7, etc.) are used to control DVD menus/options and for recall using a digital TV tuner. Also switches a digital TV on/off the power of other components such as a DVR or satellite tuner. 12 INPUT SELECT Use to select the input source. 13 LED indicator This indicator flashes when...
... name and the frequency. INPUT ATT Use to attenuate (lower) the level of FM broadcasts. It also flashes when teaching the receiver preset codes. 14 SOURCE Use this button. T. buttons to find preset stations (page 40-43). 22 En RETURN Returns to the last screen selected when using the ... main buttons (3, 7, etc.) are used to control DVD menus/options and for recall using a digital TV tuner. Also switches a digital TV on/off the power of other components such as a DVR or satellite tuner. 12 INPUT SELECT Use to select the input source. 13 LED indicator This indicator flashes when...
Owner's Manual
Page 25
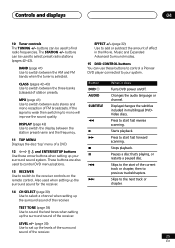
...the three banks (classes) of a DVD. 12 } ] ' ' and ENTER/SETUP buttons Use these buttons to control a Pioneer DVD player connected to set up the surround sound of the receiver. 25 En These buttons are also used when setting up the...select preset radio stations (pages 42-43). Press to start of the receiver. Skips to the next track or chapter. 14 CH SELECT (page 39) Use to select a channel when setting up the surround sound for the receiver. MPX (page... FM broadcasts. Button DVD AUDIO SUBTITLE 1 3 ¡ 7 8 4 ¢ What it does Turns DVD power on the remote control.
...the three banks (classes) of a DVD. 12 } ] ' ' and ENTER/SETUP buttons Use these buttons to control a Pioneer DVD player connected to set up the surround sound of the receiver. 25 En These buttons are also used when setting up the...select preset radio stations (pages 42-43). Press to start of the receiver. Skips to the next track or chapter. 14 CH SELECT (page 39) Use to select a channel when setting up the surround sound for the receiver. MPX (page... FM broadcasts. Button DVD AUDIO SUBTITLE 1 3 ¡ 7 8 4 ¢ What it does Turns DVD power on the remote control.
Owner's Manual
Page 33
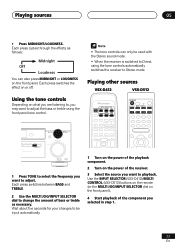
...to Direct, using the front panel tone control. • The tone controls can only be input automatically. 1 Turn on the power of the playback component. 2 Turn on the power of the receiver. 3 Select the source you want to change the amount of the component you may want to adjust the bass... or treble using the tone controls automatically switches the receiver to playback. Use the INPUT SELECTOR (VSX-D412)/MULTI CONTROL (VSX-D512) buttons on the ...
...to Direct, using the front panel tone control. • The tone controls can only be input automatically. 1 Turn on the power of the playback component. 2 Turn on the power of the receiver. 3 Select the source you want to change the amount of the component you may want to adjust the bass... or treble using the tone controls automatically switches the receiver to playback. Use the INPUT SELECTOR (VSX-D412)/MULTI CONTROL (VSX-D512) buttons on the ...
Owner's Manual
Page 35
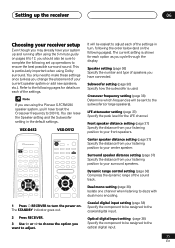
... Speaker setting and the Subwoofer setting in turn the power on the following pages for the LFE channel. Optical digital input setting (page 38) Specify the component to be assigned to the coaxial digital input. If you are using the Pioneer S-FCRW230 speaker system, you'll have to set.... Front speaker distance setting (page 37) Specify the distance from your listening position to your surround speakers. Refer to the following pages). VSX-D412 VSX-D512 It will be easiest to adjust each option as you want to 200 Hz. LFE attenuator setting (page 37) Specify the peak ...
... Speaker setting and the Subwoofer setting in turn the power on the following pages for the LFE channel. Optical digital input setting (page 38) Specify the component to be assigned to the coaxial digital input. If you are using the Pioneer S-FCRW230 speaker system, you'll have to set.... Front speaker distance setting (page 37) Specify the distance from your listening position to your surround speakers. Refer to the following pages). VSX-D412 VSX-D512 It will be easiest to adjust each option as you want to 200 Hz. LFE attenuator setting (page 37) Specify the peak ...
Owner's Manual
Page 43
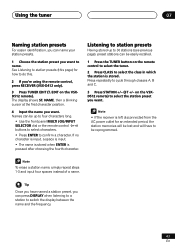
on the VSXD512 remote) to select the station preset you want. • If the receiver is left disconnected from the AC power outlet for how to name. Using the tuner 07 Naming station presets For easier identification, you can be reprogrammed. NAME, then a blinking cursor at the .... 2 Press CLASS to cycle through classes A, B and C. 3 Press STATION +/- (ST +/- See Listening to station presets (this . 2 If you're using the remote control, press RECEIVER (VSX-D412 only). 3 Press TUNER EDIT (T.
on the VSXD512 remote) to select the station preset you want. • If the receiver is left disconnected from the AC power outlet for how to name. Using the tuner 07 Naming station presets For easier identification, you can be reprogrammed. NAME, then a blinking cursor at the .... 2 Press CLASS to cycle through classes A, B and C. 3 Press STATION +/- (ST +/- See Listening to station presets (this . 2 If you're using the remote control, press RECEIVER (VSX-D412 only). 3 Press TUNER EDIT (T.
Owner's Manual
Page 46
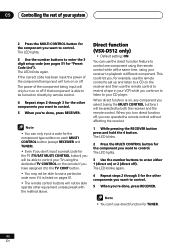
...if that component is able to be turned on directly by both the receiver and the remote control. Direct function (VSX-D512 only) • Default setting: ON You can 't use direct function for the component you 're done...2 Press the MULTI CONTROL button for TUNER. 46 En If the correct code has been input the power of the component being input will only turn on or off ). The LED lights. 3 Use the... number buttons to control. The LED blinks again. The power of the component being input will turn on or off , you want to control one component using...
...if that component is able to be turned on directly by both the receiver and the remote control. Direct function (VSX-D512 only) • Default setting: ON You can 't use direct function for the component you 're done...2 Press the MULTI CONTROL button for TUNER. 46 En If the correct code has been input the power of the component being input will only turn on or off ). The LED lights. 3 Use the... number buttons to control. The LED blinks again. The power of the component being input will turn on or off , you want to control one component using...
Owner's Manual
Page 53
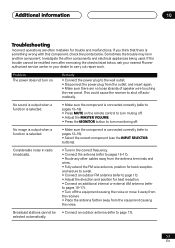
.... • Make sure the component is connected correctly (refer to pages 13-18). • Press MUTE on . Remedy • Connect the power plug to turn on the remote control to turn muting off . If the trouble cannot be • Connect an outdoor antenna (refer to pages ...when a function is selected. • Make sure the component is something wrong with this component, check the points below , ask your nearest Pioneer authorized service center or your dealer to pages 16-17). • Turn off automatically. If you think that there is connected correctly (refer ...
.... • Make sure the component is connected correctly (refer to pages 13-18). • Press MUTE on . Remedy • Connect the power plug to turn on the remote control to turn muting off . If the trouble cannot be • Connect an outdoor antenna (refer to pages ...when a function is selected. • Make sure the component is something wrong with this component, check the points below , ask your nearest Pioneer authorized service center or your dealer to pages 16-17). • Turn off automatically. If you think that there is connected correctly (refer ...
Owner's Manual
Page 54
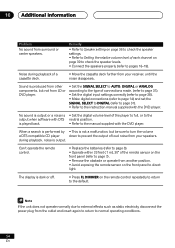
... of connections made. (refer to page 31). • Set the digital input settings correctly (refer to page 38). • Make digital connections (refer to page 14) and set the SIGNAL SELECT to DIGITAL (refer to page 31). • Refer to the instruction manual supplied with DTS neutral position. The display is... to return to normal operating conditions. 54 En If the unit does not operate normally due to external effects such as static electricity disconnect the power plug from surround or center speakers.
... of connections made. (refer to page 31). • Set the digital input settings correctly (refer to page 38). • Make digital connections (refer to page 14) and set the SIGNAL SELECT to DIGITAL (refer to page 31). • Refer to the instruction manual supplied with DTS neutral position. The display is... to return to normal operating conditions. 54 En If the unit does not operate normally due to external effects such as static electricity disconnect the power plug from surround or center speakers.
Owner's Manual
Page 55
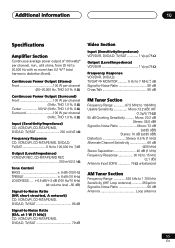
... (Stereo) Front 100 W per channel (20-20,000 Hz, THD 0.2 %, 8 Ω) Continuous Power Output (Surround) Front 100 W per channel (1kHz, THD 1.0 %, 8 Ω) Center 100 W (1kHz, THD 1.0 %, 8 Ω) Surround 100 W per channel, min., at 85 dBf) Distortion Stereo: 0.5...(at 8 ohms, from 20 Hz to 20,000 Hz with no more than 0.2 %** total harmonic distortion (front). Additional information 10 Specifications Amplifier Section Continuous average power output of 100 watts* per channel (1kHz, THD 1.0 %, 8 Ω) Input (Sensitivity/Impedance) CD, VCR/DVR, CD-R/TAPE/MD, DVD/LD, TV/...
... (Stereo) Front 100 W per channel (20-20,000 Hz, THD 0.2 %, 8 Ω) Continuous Power Output (Surround) Front 100 W per channel (1kHz, THD 1.0 %, 8 Ω) Center 100 W (1kHz, THD 1.0 %, 8 Ω) Surround 100 W per channel, min., at 85 dBf) Distortion Stereo: 0.5...(at 8 ohms, from 20 Hz to 20,000 Hz with no more than 0.2 %** total harmonic distortion (front). Additional information 10 Specifications Amplifier Section Continuous average power output of 100 watts* per channel (1kHz, THD 1.0 %, 8 Ω) Input (Sensitivity/Impedance) CD, VCR/DVR, CD-R/TAPE/MD, DVD/LD, TV/...
Owner's Manual
Page 56
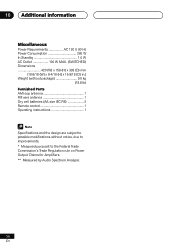
10 Additional information Miscellaneous Power Requirements AC 120 V, 60 Hz Power Consumption 260 W In Standby 1.0 W AC Outlet 100 W MAX. (SWITCHED) Dimensions 420 (W) x 158 (H) x 393 (D) mm (16-9/16 (W) x 6-4/16 (H) x 15-8/16 (D) in.) Weight (without package 9.0 kg (19.8 ... 1 Specifications and the design are subject to possible modifications without notice, due to improvements. * Measured pursuant to the Federal Trade Commission's Trade Regulation rule on Power Output Claims for Amplifiers. ** Measured by Audio Spectrum Analyzer. 56 En
10 Additional information Miscellaneous Power Requirements AC 120 V, 60 Hz Power Consumption 260 W In Standby 1.0 W AC Outlet 100 W MAX. (SWITCHED) Dimensions 420 (W) x 158 (H) x 393 (D) mm (16-9/16 (W) x 6-4/16 (H) x 15-8/16 (D) in.) Weight (without package 9.0 kg (19.8 ... 1 Specifications and the design are subject to possible modifications without notice, due to improvements. * Measured pursuant to the Federal Trade Commission's Trade Regulation rule on Power Output Claims for Amplifiers. ** Measured by Audio Spectrum Analyzer. 56 En


