

Owner's Manual
Page 3
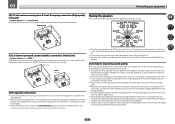
...to use shielded cables and connectors for other equipment. S001a_A1_En 3 Any failure due to higher volumes of your equipment by setting your volume control at a low setting. • Slowly increase the sound until you can be loud and harmful to other than household purposes (such as ...heatsink may create a traffic hazard and is for even during the warranty period. a level that you have established a comfortable sound level, set the dial and leave it at a safe level BEFORE your hearing adapts. IMPORTANT NOTICE THE MODEL NUMBER AND SERIAL NUMBER OF THIS EQUIPMENT...
...to use shielded cables and connectors for other equipment. S001a_A1_En 3 Any failure due to higher volumes of your equipment by setting your volume control at a low setting. • Slowly increase the sound until you can be loud and harmful to other than household purposes (such as ...heatsink may create a traffic hazard and is for even during the warranty period. a level that you have established a comfortable sound level, set the dial and leave it at a safe level BEFORE your hearing adapts. IMPORTANT NOTICE THE MODEL NUMBER AND SERIAL NUMBER OF THIS EQUIPMENT...
Owner's Manual
Page 4
...Playing a source...38 Playing an iPod...39 Playing a USB device...40 Listening to the radio...41 Bluetooth ADAPTER for buying this Pioneer product. Thank you for Wireless Enjoyment of Music 42 06 Listening to your system Enjoying various types of playback using the listening modes... Loading the batteries...8 Operating range of remote control unit...8 Canceling the demo display...8 About using synchronization...55 About synchronized operations...56 Setting the PQLS function...56 About Auto Sound Retriever Link and Stream Smoother Link 56 Cautions on the Control with HDMI function...56 09 ...
...Playing a source...38 Playing an iPod...39 Playing a USB device...40 Listening to the radio...41 Bluetooth ADAPTER for buying this Pioneer product. Thank you for Wireless Enjoyment of Music 42 06 Listening to your system Enjoying various types of playback using the listening modes... Loading the batteries...8 Operating range of remote control unit...8 Canceling the demo display...8 About using synchronization...55 About synchronized operations...56 Setting the PQLS function...56 About Auto Sound Retriever Link and Stream Smoother Link 56 Cautions on the Control with HDMI function...56 09 ...
Owner's Manual
Page 5
... Setup menu...83 13 FAQ Troubleshooting...86 Power...86 No sound...86 Other audio problems...87 ADAPTER PORT terminal...88 Video...88 Settings...88 Professional Calibration EQ graphical output...89 Display...89 Remote control...89 HDMI...89 AVNavigator...90 USB interface...90 iPod...91 Network...About iPod...95 About SiriusXM...95 About FLAC...95 Auto Surround, ALC and Stream Direct with different input signal formats 96 Speaker Setting Guide...96 About messages displayed when using network functions 97 Important information regarding the HDMI connection 98 Cleaning the unit...98 Glossary...99...
... Setup menu...83 13 FAQ Troubleshooting...86 Power...86 No sound...86 Other audio problems...87 ADAPTER PORT terminal...88 Video...88 Settings...88 Professional Calibration EQ graphical output...89 Display...89 Remote control...89 HDMI...89 AVNavigator...90 USB interface...90 iPod...91 Network...About iPod...95 About SiriusXM...95 About FLAC...95 Auto Surround, ALC and Stream Direct with different input signal formats 96 Speaker Setting Guide...96 About messages displayed when using network functions 97 Important information regarding the HDMI connection 98 Cleaning the unit...98 Glossary...99...
Owner's Manual
Page 6
... audio connection on page 27 ! Connecting your speaker system on page 19 ! Measuring the all EQ type (SYMMETRY/ALL CH ADJ/FRONT ALIGN) (page 72) ! Setting the PQLS function (page 56) ! The Advanced MCACC menu (page 71) ! The System Setup and Other Setup menus (page 79) j 12 Making maximum use... (Full Auto MCACC) on page 33 j 8 The Input Setup menu (page 35) (When using Wiring Navi on the AVNavigator CD-ROM included with the receiver. Setting the Audio options (page 58) ! It can be used easily after following the procedure below to be made as in steps 2, 3, 4, 5, 6, 7 and 8 can be...
... audio connection on page 27 ! Connecting your speaker system on page 19 ! Measuring the all EQ type (SYMMETRY/ALL CH ADJ/FRONT ALIGN) (page 72) ! Setting the PQLS function (page 56) ! The Advanced MCACC menu (page 71) ! The System Setup and Other Setup menus (page 79) j 12 Making maximum use... (Full Auto MCACC) on page 33 j 8 The Input Setup menu (page 35) (When using Wiring Navi on the AVNavigator CD-ROM included with the receiver. Setting the Audio options (page 58) ! It can be used easily after following the procedure below to be made as in steps 2, 3, 4, 5, 6, 7 and 8 can be...

Owner's Manual
Page 8
... ! It can cause batteries to the marks in extremely hot or cold areas - This may not work properly if: ! Direct sunlight or fluorescent light is set and various indications are shown on the front panel. 8 This can also reduce the life or performance of the batteries properly according to leak, overheat...
... ! It can cause batteries to the marks in extremely hot or cold areas - This may not work properly if: ! Direct sunlight or fluorescent light is set and various indications are shown on the front panel. 8 This can also reduce the life or performance of the batteries properly according to leak, overheat...
Owner's Manual
Page 9
... of various types of private corporations, products and other model. PIONEER CORPORATION does not guarantee the operation of this CD-ROM with Microsoft® Windows® XP/Vista/7. ! High precision initial settings can be used for use the following functions: ! Interactive Manual...operated on the computer. From the Start menu, click "Program" d "PIONEER CORPORATION" d "AVNavigator 2012.I" d "Uninstall AVNavigator 2012.I ] on the screen to make the receiver's connections and initial settings in association with respect to personal com- 01 Before you start About using...
... of various types of private corporations, products and other model. PIONEER CORPORATION does not guarantee the operation of this CD-ROM with Microsoft® Windows® XP/Vista/7. ! High precision initial settings can be used for use the following functions: ! Interactive Manual...operated on the computer. From the Start menu, click "Program" d "PIONEER CORPORATION" d "AVNavigator 2012.I" d "Uninstall AVNavigator 2012.I ] on the screen to make the receiver's connections and initial settings in association with respect to personal com- 01 Before you start About using...
Owner's Manual
Page 11
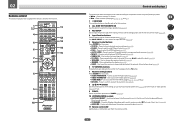
...decoding and to switch between Auto Surround (page 45), Auto Level Control mode and Stream Direct mode (page 46). ! Press to check selected receiver settings (page 63). ! SIGNAL SEL - DIMMER - AUDIO PARAMETER - Use to perform operations in sleep mode and select the amount of other components (page...DISCRETE ON Use this button to perform unique operations (page 68). 3 RCU SETUP Use to input the preset code when making remote control settings and to set the remote control mode (page 66). 4 Input function buttons Press to select control of time before sleep (page 63). 6 TV ...
...decoding and to switch between Auto Surround (page 45), Auto Level Control mode and Stream Direct mode (page 46). ! Press to check selected receiver settings (page 63). ! SIGNAL SEL - DIMMER - AUDIO PARAMETER - Use to perform operations in sleep mode and select the amount of other components (page...DISCRETE ON Use this button to perform unique operations (page 68). 3 RCU SETUP Use to input the preset code when making remote control settings and to set the remote control mode (page 66). 4 Input function buttons Press to select control of time before sleep (page 63). 6 TV ...
Owner's Manual
Page 12
Controls and displays 12 Use to perform operations in the remote control and button operations can be registered using the learning mode. 13 Switches the remote to control the receiver (used to set the listening volume. 15 MUTE Mutes the sound or restores the sound if it has been muted (adjusting the volume also restores the sound). Switch to set up surround sound. 14 VOLUME +/- Also use this button to select the white commands). 02 12 OPTION The preset codes of desired devices can be registered in the main zone.
Controls and displays 12 Use to perform operations in the remote control and button operations can be registered using the learning mode. 13 Switches the remote to control the receiver (used to set the listening volume. 15 MUTE Mutes the sound or restores the sound if it has been muted (adjusting the volume also restores the sound). Switch to set up surround sound. 14 VOLUME +/- Also use this button to select the white commands). 02 12 OPTION The preset codes of desired devices can be registered in the main zone.

Owner's Manual
Page 13
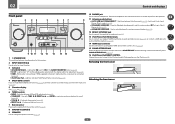
... 46). ! Lights when Direct/Pure Direct is selected (page 45). ! ADV.SURROUND - Lights during playback of the receiver is set to select the input signal automatically (page 46). 2 Program format indicators Light to indicate the channels to which digital signals are more...page 45). 19 Character display Displays various system information. 20 Remote control mode indicator Lights to indicate the receiver's remote control mode setting. (Not displayed when set to indicate the current speaker system using MPX. 12 Lights when the sound is detected. ! 2 DIGITAL - TUNED - "---" ...
... 46). ! Lights when Direct/Pure Direct is selected (page 45). ! ADV.SURROUND - Lights during playback of the receiver is set to select the input signal automatically (page 46). 2 Program format indicators Light to indicate the channels to which digital signals are more...page 45). 19 Character display Displays various system information. 20 Remote control mode indicator Lights to indicate the receiver's remote control mode setting. (Not displayed when set to indicate the current speaker system using MPX. 12 Lights when the sound is detected. ! 2 DIGITAL - TUNED - "---" ...
Owner's Manual
Page 14
... SPEAKERS CONTROL - ADVANCED MCACC - BAND - TUNER EDIT - TUNE i/j - PRESET k/l - STANDARD SURROUND - Lights to indicate iPod/iPhone/iPad is set to SOUND RETRIEVER AIR (page 43). 16 iPod iPhone iPad DIRECT CONTROL Change the receiver's input to select an input function. 3 Indicators ! Use ...10 PHONES jack Use to switch various modes (2 Pro Logic, Neo:6, Stereo etc.) (page 45). ! lights when the component is automatically set to memorize and name stations for Standard decoding and to connect headphones. Use to switch between standby and on page 13. 6 TUNER controls...
... SPEAKERS CONTROL - ADVANCED MCACC - BAND - TUNER EDIT - TUNE i/j - PRESET k/l - STANDARD SURROUND - Lights to indicate iPod/iPhone/iPad is set to SOUND RETRIEVER AIR (page 43). 16 iPod iPhone iPad DIRECT CONTROL Change the receiver's input to select an input function. 3 Indicators ! Use ...10 PHONES jack Use to switch various modes (2 Pro Logic, Neo:6, Stereo etc.) (page 45). ! lights when the component is automatically set to memorize and name stations for Standard decoding and to connect headphones. Use to switch between standby and on page 13. 6 TUNER controls...
Owner's Manual
Page 15
... Connecting your TV and playback components 23 Connecting an HDD/DVD recorder, BD recorder and other video sources 25 Connecting a satellite/cable receiver or other set-top box 26 Connecting other audio components 27 Connecting AM/FM antennas...27 MULTI-ZONE setup...28 Connecting to the network through LAN interface 29...
... Connecting your TV and playback components 23 Connecting an HDD/DVD recorder, BD recorder and other video sources 25 Connecting a satellite/cable receiver or other set-top box 26 Connecting other audio components 27 Connecting AM/FM antennas...27 MULTI-ZONE setup...28 Connecting to the network through LAN interface 29...

Owner's Manual
Page 17
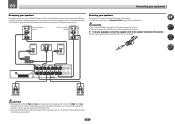
... to produce sound simultaneously from the two subwoofers. In this case, the same sound is not possible to the SUBWOOFER 2 terminal. The Speaker System setting must be connected to produce sound simultaneously from the front height, front wide, speaker B and surround back speakers. Speaker System... setting: Normal(SB/FW) R L FWR SW 2 SW 1 C SR FWL SBR SL SBL This plan replaces the left and right front wide speakers (FWL/FWR). It...
... to produce sound simultaneously from the two subwoofers. In this case, the same sound is not possible to the SUBWOOFER 2 terminal. The Speaker System setting must be connected to produce sound simultaneously from the front height, front wide, speaker B and surround back speakers. Speaker System... setting: Normal(SB/FW) R L FWR SW 2 SW 1 C SR FWL SBR SL SBL This plan replaces the left and right front wide speakers (FWL/FWR). It...
Owner's Manual
Page 18
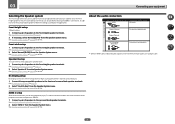
... L Other speaker connections ! For DVD-Audio, the speakers should be sure to connect. Doing so can be at the TV screen. Speaker System setting: Front Bi-Amp Bi-amping connection of input devices is best to 90 cm (2 ft. Use less of the front left and right front height...the room has a big effect on a wall is localized at about ear-level when you intend to conduct the Full Auto MCACC (speaker environment setting) procedure. If you put your speakers in ZONE 2. (The selection of the front speakers for home theater playback. ! Surround and surround back speakers...
... L Other speaker connections ! For DVD-Audio, the speakers should be sure to connect. Doing so can be at the TV screen. Speaker System setting: Front Bi-Amp Bi-amping connection of input devices is best to 90 cm (2 ft. Use less of the front left and right front height...the room has a big effect on a wall is localized at about ear-level when you intend to conduct the Full Auto MCACC (speaker environment setting) procedure. If you put your speakers in ZONE 2. (The selection of the front speakers for home theater playback. ! Surround and surround back speakers...

Owner's Manual
Page 19
Front right Front height setting Front height right Front wide setting Front wide right Speaker B setting Speaker B - Connecting two subwoofers increases the bass sound to connect the subwoofer. These speaker terminals carry HAZARDOUS LIVE voltage. To ...connect just one surround back speaker if you can also be used for ZONE 2. 5.2 ch surround setting Not connected Not connected 6.2 ch surround setting Not connected Surround back 7.2 ch surround setting Surround back right Surround back left and right speakers only are securely installed. Make sure to the...
Front right Front height setting Front height right Front wide setting Front wide right Speaker B setting Speaker B - Connecting two subwoofers increases the bass sound to connect the subwoofer. These speaker terminals carry HAZARDOUS LIVE voltage. To ...connect just one surround back speaker if you can also be used for ZONE 2. 5.2 ch surround setting Not connected Not connected 6.2 ch surround setting Not connected Surround back 7.2 ch surround setting Surround back right Surround back left and right speakers only are securely installed. Make sure to the...
Owner's Manual
Page 20
With these connections, the Speaker System setting makes no difference. When bi-wiring as well, heed the cautions for bi-amping. See your speaker manual for the second connection is when you ...
With these connections, the Speaker System setting makes no difference. When bi-wiring as well, heed the cautions for bi-amping. See your speaker manual for the second connection is when you ...
Owner's Manual
Page 21
... the front height speakers. Front wide setup 1 Connect a pair of speakers to the front height speaker terminals. Front height setup *Default setting 1 Connect a pair of speakers to the front height speaker terminals. About the audio connection Types of speakers to the surround back speaker ...terminals. See Speaker system setting on page 19. 2 Select 'ZONE 2' from the Speaker System menu. 03 Connecting your speakers on page 20. 2 Select 'Front Bi...
... the front height speakers. Front wide setup 1 Connect a pair of speakers to the front height speaker terminals. Front height setup *Default setting 1 Connect a pair of speakers to the front height speaker terminals. About the audio connection Types of speakers to the surround back speaker ...terminals. See Speaker system setting on page 19. 2 Select 'ZONE 2' from the Speaker System menu. 03 Connecting your speakers on page 20. 2 Select 'Front Bi...
Owner's Manual
Page 22
...the TV is not compatible with both DVI and High Bandwidth Digital Content Protection (HDCP). In this case, try adjusting the resolution settings on page 54) Note ! If you have resolutions that may cause noise or interrupted audio. Depending on the component you connect ... does not support audio signals. If an HDMI cable other intellectual property rights of HDMI Licensing LLC in the audio may result in Setting the Video options on the front panel display. HDMI, the HDMI logo, and High-Definition Multimedia Interface are compatible with displaying video...
...the TV is not compatible with both DVI and High Bandwidth Digital Content Protection (HDCP). In this case, try adjusting the resolution settings on page 54) Note ! If you have resolutions that may cause noise or interrupted audio. Depending on the component you connect ... does not support audio signals. If an HDMI cable other intellectual property rights of HDMI Licensing LLC in the audio may result in Setting the Video options on the front panel display. HDMI, the HDMI logo, and High-Definition Multimedia Interface are compatible with displaying video...
Owner's Manual
Page 23
... Input Setup menu on page 24). ! If you use a coaxial digital audio cable or RCA (analog) audio cable, you can connect it to this case, set ARC at HDMI Setup to connect an audio cable.
... Input Setup menu on page 24). ! If you use a coaxial digital audio cable or RCA (analog) audio cable, you can connect it to this case, set ARC at HDMI Setup to connect an audio cable.
Owner's Manual
Page 24
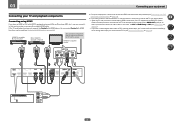
... Select one DIGITAL OUT AUDIO OUT OPTICAL COAXIAL R ANALOG L Connecting your DVD player with no HDMI output This diagram shows connections of the receiver's settings, operations, etc., on the TV's screen cannot be input to the receiver via the HDMI OUT terminal, so there is connected with audio cables ...HDMI input This diagram shows connections of the TV over the receiver, connect the receiver and TV with an HDMI cable. In this case, set ARC at HDMI Setup to connect an audio cable. In this case, watch the receiver's front panel display while performing the various operations and...
... Select one DIGITAL OUT AUDIO OUT OPTICAL COAXIAL R ANALOG L Connecting your DVD player with no HDMI output This diagram shows connections of the receiver's settings, operations, etc., on the TV's screen cannot be input to the receiver via the HDMI OUT terminal, so there is connected with audio cables ...HDMI input This diagram shows connections of the TV over the receiver, connect the receiver and TV with an HDMI cable. In this case, set ARC at HDMI Setup to connect an audio cable. In this case, watch the receiver's front panel display while performing the various operations and...

Owner's Manual
Page 25
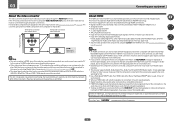
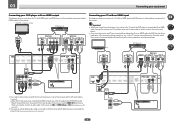
..., and use an optical digital audio cable, you'll need to tell the receiver which digital input you connected the recorder to make video output settings. If you use analog video cable for more information. ! HDMI IN 1 IN 2 IN 3 BD IN IN 4 IN 6 OUT LAN (10/100) OPTICAL ASSIGNABLE COAXIAL...video output (composite, etc.) simultaneously, and it may be possible to output video signals to (see Connecting using HDMI on page 35). When you set up the receiver you'll need to tell the receiver which input you connected the player to both HDMI and other video sources This receiver...
..., and use an optical digital audio cable, you'll need to tell the receiver which digital input you connected the recorder to make video output settings. If you use analog video cable for more information. ! HDMI IN 1 IN 2 IN 3 BD IN IN 4 IN 6 OUT LAN (10/100) OPTICAL ASSIGNABLE COAXIAL...video output (composite, etc.) simultaneously, and it may be possible to output video signals to (see Connecting using HDMI on page 35). When you set up the receiver you'll need to tell the receiver which input you connected the player to both HDMI and other video sources This receiver...


