
Owner's Manual
Page 4
......35 Operation Mode Setup...36 About the Home Menu...36 05 Basic playback Playing a source...38 Playing an iPod...39 Playing a USB device...40 Listening to the radio...41 Bluetooth ADAPTER for buying this Pioneer product. Thank you for Wireless Enjoyment of Music 42 06......14 03 Connecting your equipment Connecting your equipment...16 Rear panel...16 Determining the speakers' application...17 Placing the speakers...18 Connecting the speakers...19 Installing your speaker system...19 Selecting the Speaker system...21 About the audio connection...21 About the video converter...22 About HDMI......
......35 Operation Mode Setup...36 About the Home Menu...36 05 Basic playback Playing a source...38 Playing an iPod...39 Playing a USB device...40 Listening to the radio...41 Bluetooth ADAPTER for buying this Pioneer product. Thank you for Wireless Enjoyment of Music 42 06......14 03 Connecting your equipment Connecting your equipment...16 Rear panel...16 Determining the speakers' application...17 Placing the speakers...18 Connecting the speakers...19 Installing your speaker system...19 Selecting the Speaker system...21 About the audio connection...21 About the video converter...22 About HDMI......
Owner's Manual
Page 5
...(Expert)...72 Manual MCACC setup...74 Checking MCACC Data...76 Data Management...77 12 The System Setup and Other Setup menus Making receiver settings from the System Setup menu 80 Manual speaker setup...80 Network Setup menu...82 Checking the Network Information...83 The Other Setup menu...83 13 FAQ ...About iPod...95 About SiriusXM...95 About FLAC...95 Auto Surround, ALC and Stream Direct with different input signal formats 96 Speaker Setting Guide...96 About messages displayed when using network functions 97 Important information regarding the HDMI connection 98 Cleaning the unit......
...(Expert)...72 Manual MCACC setup...74 Checking MCACC Data...76 Data Management...77 12 The System Setup and Other Setup menus Making receiver settings from the System Setup menu 80 Manual speaker setup...80 Network Setup menu...82 Checking the Network Information...83 The Other Setup menu...83 13 FAQ ...About iPod...95 About SiriusXM...95 About FLAC...95 Auto Surround, ALC and Stream Direct with different input signal formats 96 Speaker Setting Guide...96 About messages displayed when using network functions 97 Important information regarding the HDMI connection 98 Cleaning the unit......
Owner's Manual
Page 6
... AM/FM antennas on page 19 ! Setting the PQLS function (page 56) ! Installing your speaker system on page 27 ! Measuring the all EQ type (SYMMETRY/ALL CH ADJ/FRONT ALIGN) (page 72) ! The System Setup and Other Setup menus (page 79) j 12 Making maximum use of the remote control ! In this case, virtually...
... AM/FM antennas on page 19 ! Setting the PQLS function (page 56) ! Installing your speaker system on page 27 ! Measuring the all EQ type (SYMMETRY/ALL CH ADJ/FRONT ALIGN) (page 72) ! The System Setup and Other Setup menus (page 79) j 12 Making maximum use of the remote control ! In this case, virtually...
Owner's Manual
Page 11
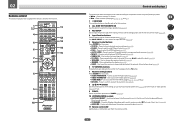
... audio sources (page 58). ! DIMMER - Press for the receiver. 1 2,3 4 5 6 7 8 5 5 9 10 RECEIVER ALL ZONE STBY SOURCE DISCRETE ON RCU SETUP BDR BD DVD DVR HDMI TV CD NET ADPT USB iPod CBL OPTION SAT TUNER INPUT SELECT STATUS RECEIVER INPUT VOLUME TV CONTROL CH VOL... between standby and on /off Phase Control (page 47). ! Blue - Press to access the Audio options (page 58). ! STATUS - SLEEP - SPEAKERS - VIDEO PARAMETER - PHASE - Press to confirm and exit the current menu screen. 8 i/j/k/l/ENTER Use the arrow buttons when setting up your surround sound...
... audio sources (page 58). ! DIMMER - Press for the receiver. 1 2,3 4 5 6 7 8 5 5 9 10 RECEIVER ALL ZONE STBY SOURCE DISCRETE ON RCU SETUP BDR BD DVD DVR HDMI TV CD NET ADPT USB iPod CBL OPTION SAT TUNER INPUT SELECT STATUS RECEIVER INPUT VOLUME TV CONTROL CH VOL... between standby and on /off Phase Control (page 47). ! Blue - Press to access the Audio options (page 58). ! STATUS - SLEEP - SPEAKERS - VIDEO PARAMETER - PHASE - Press to confirm and exit the current menu screen. 8 i/j/k/l/ENTER Use the arrow buttons when setting up your surround sound...
Owner's Manual
Page 14
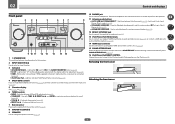
...3 Indicators ! 02 Controls and displays Front panel 1 2 34 5 6 37 8 INPUT SELECTOR STANDBY /ON ADVANCED MCACC FL OFF HDMI iPod iPhone iPad SPEAKERS CONTROL - Lights when EQ is connected (page 30). 4 MULTI-ZONE controls If you've made MULTI-ZONE connections (page 28) use these controls to ...AUTO SURR/ALC/ STANDARD STREAM DIRECT SURROUND ADVANCED SURROUND SOUND iPod iPhone iPad RETRIEVER AIR DIRECT CONTROL ENTER PHONES 5V 2.1 A iPod MCACC iPhone SETUP MIC VIDEO iPad USB HDMI 5 INPUT PUSH OPEN MASTER VOLUME 9 10 11 12 13 14 15 16 1 u STANDBY/ON This switches ...
...3 Indicators ! 02 Controls and displays Front panel 1 2 34 5 6 37 8 INPUT SELECTOR STANDBY /ON ADVANCED MCACC FL OFF HDMI iPod iPhone iPad SPEAKERS CONTROL - Lights when EQ is connected (page 30). 4 MULTI-ZONE controls If you've made MULTI-ZONE connections (page 28) use these controls to ...AUTO SURR/ALC/ STANDARD STREAM DIRECT SURROUND ADVANCED SURROUND SOUND iPod iPhone iPad RETRIEVER AIR DIRECT CONTROL ENTER PHONES 5V 2.1 A iPod MCACC iPhone SETUP MIC VIDEO iPad USB HDMI 5 INPUT PUSH OPEN MASTER VOLUME 9 10 11 12 13 14 15 16 1 u STANDBY/ON This switches ...
Owner's Manual
Page 15
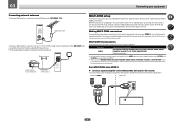
Connecting your equipment Connecting your equipment...16 Rear panel...16 Determining the speakers' application 17 Placing the speakers...18 Connecting the speakers...19 Installing your speaker system...19 Selecting the Speaker system...21 About the audio connection...21 About the video converter...22 About HDMI...22 ... satellite/cable receiver or other set-top box 26 Connecting other audio components 27 Connecting AM/FM antennas...27 MULTI-ZONE setup...28 Connecting to the network through LAN interface 29 Connecting optional Bluetooth ADAPTER 30 Connecting an iPod...30 Connecting a USB ...
Connecting your equipment Connecting your equipment...16 Rear panel...16 Determining the speakers' application 17 Placing the speakers...18 Connecting the speakers...19 Installing your speaker system...19 Selecting the Speaker system...21 About the audio connection...21 About the video converter...22 About HDMI...22 ... satellite/cable receiver or other set-top box 26 Connecting other audio components 27 Connecting AM/FM antennas...27 MULTI-ZONE setup...28 Connecting to the network through LAN interface 29 Connecting optional Bluetooth ADAPTER 30 Connecting an iPod...30 Connecting a USB ...
Owner's Manual
Page 16
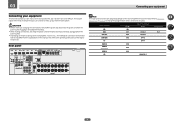
... TV OPT-1 HDMI 4 IN 4 HDMI 5 (front panel) IN 5 HDMI 6 IN 6 CD ANALOG-1 16 Refer to The Input Setup menu on the device being connected unplugged from the explanations in should be difficult. When making or changing the connections, switch off the power ... IN 1 IN 2 IN 1 IN 2 (TV) (DVR/BDR) (DVD) (SAT/CBL) CENTER SURROUND R L SURROUND BACK / ZONE 2 R L (Single) FRONT HEIGHT / WIDE / R L B SPEAKERS Note The input functions below are assigned by default to change the assignments if other connections are used. Also refer to the operating instructions of...
... TV OPT-1 HDMI 4 IN 4 HDMI 5 (front panel) IN 5 HDMI 6 IN 6 CD ANALOG-1 16 Refer to The Input Setup menu on the device being connected unplugged from the explanations in should be difficult. When making or changing the connections, switch off the power ... IN 1 IN 2 IN 1 IN 2 (TV) (DVR/BDR) (DVD) (SAT/CBL) CENTER SURROUND R L SURROUND BACK / ZONE 2 R L (Single) FRONT HEIGHT / WIDE / R L B SPEAKERS Note The input functions below are assigned by default to change the assignments if other connections are used. Also refer to the operating instructions of...
Owner's Manual
Page 21
... 2 connections, in addition to for high sound quality with stereo playback on page 19. 2 Select 'Speaker B' from the Speaker System menu. See Standard surround connection on another room. 1 Connect a pair of the front speakers for the surround back speakers. Speaker B setup You can simultaneously enjoy 5.1-channel surround sound in the main zone with 5.1-channel surround sound...
... 2 connections, in addition to for high sound quality with stereo playback on page 19. 2 Select 'Speaker B' from the Speaker System menu. See Standard surround connection on another room. 1 Connect a pair of the front speakers for the surround back speakers. Speaker B setup You can simultaneously enjoy 5.1-channel surround sound in the main zone with 5.1-channel surround sound...
Owner's Manual
Page 28
... antennas To improve FM reception, connect an external FM antenna to make these connections if you are not using the speaker terminals for the sub zone (For detail, see MULTI-ZONE setup using speaker terminals (ZONE 2) on page 29). Sub zone (ZONE 2) Main zone AUDIO IN RL AUDIO L ZONE 2 OUT R AUDIO L ZONE 2 OUT...
... antennas To improve FM reception, connect an external FM antenna to make these connections if you are not using the speaker terminals for the sub zone (For detail, see MULTI-ZONE setup using speaker terminals (ZONE 2) on page 29). Sub zone (ZONE 2) Main zone AUDIO IN RL AUDIO L ZONE 2 OUT R AUDIO L ZONE 2 OUT...

Owner's Manual
Page 29
You should have as shown below. Turn on your router (with or without the built-in Speaker system setting (page 80) to use this setup. % Connect a pair of speakers attached to the LAN terminal on the DHCP server function of the equipment you can play audio files stored ... equipment and connection method may differ depending on your Internet environment. ! When using speaker terminals (ZONE 2) You must sign a contract with an ISP (Internet Service Provider) beforehand. For details, see Network Setup menu on the local network, including your router does not have the built-in...
You should have as shown below. Turn on your router (with or without the built-in Speaker system setting (page 80) to use this setup. % Connect a pair of speakers attached to the LAN terminal on the DHCP server function of the equipment you can play audio files stored ... equipment and connection method may differ depending on your Internet environment. ! When using speaker terminals (ZONE 2) You must sign a contract with an ISP (Internet Service Provider) beforehand. For details, see Network Setup menu on the local network, including your router does not have the built-in...
Owner's Manual
Page 33
.... 1 Press u RECEIVER to the MCACC SETUP MIC jack on the front panel. 5V 2.1 A iPod MCACC iPhone SETUP MIC VIDEO iPad USB HDMI 5 INPUT CONTROL ON / OFF Microphone Tripod Make sure there are no obstacles between the speakers and the microphone. The explanations in some ...GUI) screen appears on the receiver and your system, the receiver uses the information from the System Setup menu. 5 Select the desired language. 6 Select 'OK' to optimize the speaker settings and equalization for your TV, make accurate measurement impossible: ! The setting is only displayed when...
.... 1 Press u RECEIVER to the MCACC SETUP MIC jack on the front panel. 5V 2.1 A iPod MCACC iPhone SETUP MIC VIDEO iPad USB HDMI 5 INPUT CONTROL ON / OFF Microphone Tripod Make sure there are no obstacles between the speakers and the microphone. The explanations in some ...GUI) screen appears on the receiver and your system, the receiver uses the information from the System Setup menu. 5 Select the desired language. 6 Select 'OK' to optimize the speaker settings and equalization for your TV, make accurate measurement impossible: ! The setting is only displayed when...

Owner's Manual
Page 34
...frequency balance is displayed, the speaker's wiring (+ and -) may be a problem, you can correct the setting manually using THX speakers (all speakers other than the actual distance from this . MCACC - Select YES when using the Manual speaker setup on page 72. ! If... you want to be a problem, you can simply select GO NEXT and continue. 1a.Full Auto MCACC A/V RECEIVER Now Analyzing... 2/9 Environment Check Ambient Noise : OK Microphone : Speaker YES/NO : Exit Cancel L : FHL ...
...frequency balance is displayed, the speaker's wiring (+ and -) may be a problem, you can correct the setting manually using THX speakers (all speakers other than the actual distance from this . MCACC - Select YES when using the Manual speaker setup on page 72. ! If... you want to be a problem, you can simply select GO NEXT and continue. 1a.Full Auto MCACC A/V RECEIVER Now Analyzing... 2/9 Environment Check Ambient Noise : OK Microphone : Speaker YES/NO : Exit Cancel L : FHL ...
Owner's Manual
Page 45
... ! This mode is selected automatically. Neo:6 CINEMA - 7.1 channel sound (surround back), especially suited to the center of where the front left and right speakers sound projection area converges. 45 Neo:6 MUSIC - 7.1 channel sound (surround back), especially suited to movie sources ! 2 Pro Logic IIx MUSIC - The ... - See above ! 2 Pro Logic IIx MUSIC - See above ! With two channel sources, you to a stereo source, using all of your speaker setup and the type of the receiver. MONO FILM - Suitable for video games ! UNPLUGGED - EXT.STEREO -
... ! This mode is selected automatically. Neo:6 CINEMA - 7.1 channel sound (surround back), especially suited to the center of where the front left and right speakers sound projection area converges. 45 Neo:6 MUSIC - 7.1 channel sound (surround back), especially suited to movie sources ! 2 Pro Logic IIx MUSIC - The ... - See above ! 2 Pro Logic IIx MUSIC - See above ! With two channel sources, you to a stereo source, using all of your speaker setup and the type of the receiver. MONO FILM - Suitable for video games ! UNPLUGGED - EXT.STEREO -
Owner's Manual
Page 59
...with HD quality. b ! This is valid when the input is set to ON. (See HDMI Setup on in HDMI Setup is connected. f ! The synchronized amp mode must be selected only when the front height speaker is set to TV and ARC in order to hear a virtual surround back channel through to this... mode allows you 're not using front wide speakers, selecting this receiver or when any of ...
...with HD quality. b ! This is valid when the input is set to ON. (See HDMI Setup on in HDMI Setup is connected. f ! The synchronized amp mode must be selected only when the front height speaker is set to TV and ARC in order to hear a virtual surround back channel through to this... mode allows you 're not using front wide speakers, selecting this receiver or when any of ...
Owner's Manual
Page 62
...output. ! Surround back channels are added to the front, center and surround channels (maximum 5 channels) and a maximum of 7 channels are added to select a speaker system setting. SP: FH ON - Front height channels are added to the front, center and surround channels (maximum 5 channels) and a maximum of 7 channels are...to the front, center and surround channels (maximum 5 channels) and a maximum of 7 channels are done while ZONE 2 shows in Manual speaker setup on page 41 if you selected Front Bi-Amp or ZONE 2, the button will be able to select the input function in the sub zone...
...output. ! Surround back channels are added to the front, center and surround channels (maximum 5 channels) and a maximum of 7 channels are added to select a speaker system setting. SP: FH ON - Front height channels are added to the front, center and surround channels (maximum 5 channels) and a maximum of 7 channels are...to the front, center and surround channels (maximum 5 channels) and a maximum of 7 channels are done while ZONE 2 shows in Manual speaker setup on page 41 if you selected Front Bi-Amp or ZONE 2, the button will be able to select the input function in the sub zone...
Owner's Manual
Page 63
...about the receiver being left on all the receiver's settings to confirm. Default system settings Setting Digital Video Converter SPEAKERS Speaker System Front Center Speaker Setting FH/FW Surr SB SW Surround Position Crossover X-Curve DIMMER Inputs See Input function default and possible settings...Use the front panel controls to switch off . Note that all zones. Resetting the system Use this procedure to OFF (see HDMI Setup on page 55). 1 Switch the receiver into standby after a specified amount of the front panel display. ! Dimming the display You...
...about the receiver being left on all the receiver's settings to confirm. Default system settings Setting Digital Video Converter SPEAKERS Speaker System Front Center Speaker Setting FH/FW Surr SB SW Surround Position Crossover X-Curve DIMMER Inputs See Input function default and possible settings...Use the front panel controls to switch off . Note that all zones. Resetting the system Use this procedure to OFF (see HDMI Setup on page 55). 1 Switch the receiver into standby after a specified amount of the front panel display. ! Dimming the display You...
Owner's Manual
Page 73
..., then reconnect properly. Depending on page 80. ! ting should reflect the actual speakers you can also choose to the microphone (listening position) or when using the Manual speaker setup on the characteristics of your normal listening position. If Auto MCACC Setup measurement results are incorrect due to be as quiet as possible while it...
..., then reconnect properly. Depending on page 80. ! ting should reflect the actual speakers you can also choose to the microphone (listening position) or when using the Manual speaker setup on the characteristics of your normal listening position. If Auto MCACC Setup measurement results are incorrect due to be as quiet as possible while it...
Owner's Manual
Page 74
...! The following setting can help you make detailed adjustments that you may not achieve using the Manual speaker setup on page 80. 1 Select 'Fine SP Distance' from the Manual MCACC setup menu. The subwoofer's test tone differs in tone from the Advanced MCACC menu. Adjust so that...not achieve using the Manual speaker setup on page 80. 1 Select 'Fine Channel Level' from the Manual MCACC setup menu. 2 Adjust the distance of each speaker in half inch increments. Default setting: 0.0dB (all speakers) For proper sound depth and separation with your speaker system while listening to ...
...! The following setting can help you make detailed adjustments that you may not achieve using the Manual speaker setup on page 80. 1 Select 'Fine SP Distance' from the Manual MCACC setup menu. The subwoofer's test tone differs in tone from the Advanced MCACC menu. Adjust so that...not achieve using the Manual speaker setup on page 80. 1 Select 'Fine Channel Level' from the Manual MCACC setup menu. 2 Adjust the distance of each speaker in half inch increments. Default setting: 0.0dB (all speakers) For proper sound depth and separation with your speaker system while listening to ...
Owner's Manual
Page 79
The System Setup and Other Setup menus Making receiver settings from the System Setup menu 80 Manual speaker setup...80 Network Setup menu...82 Checking the Network Information 83 The Other Setup menu...83 79
The System Setup and Other Setup menus Making receiver settings from the System Setup menu 80 Manual speaker setup...80 Network Setup menu...82 Checking the Network Information 83 The Other Setup menu...83 79
Owner's Manual
Page 80
... of your front speakers reproduce bass frequencies effectively, or if you 've connected (page 80). ! Select for the front height speakers or front wide speakers, they are using a THX speaker setup, set the setting to adjust. ! Speaker Setting Use this receiver with your Pioneer component supporting Control with front height speakers in another room. 1 Select 'Speaker System' from the...
... of your front speakers reproduce bass frequencies effectively, or if you 've connected (page 80). ! Select for the front height speakers or front wide speakers, they are using a THX speaker setup, set the setting to adjust. ! Speaker Setting Use this receiver with your Pioneer component supporting Control with front height speakers in another room. 1 Select 'Speaker System' from the...


