
Owner's Manual
Page 5
......74 Checking MCACC Data...76 Data Management...77 12 The System Setup and Other Setup menus Making receiver settings from the System Setup menu 80 Manual speaker setup...80 Network Setup menu...82 Checking the Network Information...83 The Other Setup menu...83 13 FAQ Troubleshooting...86 Power...86 No sound...
......74 Checking MCACC Data...76 Data Management...77 12 The System Setup and Other Setup menus Making receiver settings from the System Setup menu 80 Manual speaker setup...80 Network Setup menu...82 Checking the Network Information...83 The Other Setup menu...83 13 FAQ Troubleshooting...86 Power...86 No sound...
Owner's Manual
Page 9
..., public transmission, translation, sales, lending or other model. General Disclaimer ! puters using any damages incurred as defined by PIONEER CORPORATION. The language selection screen appears. Wiring Navi - Automatically displays the pages explaining the functions that go beyond the scope... 9 Precautions For Use ! Attempting to make the receiver's connections and initial settings in association with a personal computer. Interactive Manual - MCACC Appli - There are also other entities described herein are included in dialog fashion. Follow the instructions on the desktop...
..., public transmission, translation, sales, lending or other model. General Disclaimer ! puters using any damages incurred as defined by PIONEER CORPORATION. The language selection screen appears. Wiring Navi - Automatically displays the pages explaining the functions that go beyond the scope... 9 Precautions For Use ! Attempting to make the receiver's connections and initial settings in association with a personal computer. Interactive Manual - MCACC Appli - There are also other entities described herein are included in dialog fashion. Follow the instructions on the desktop...
Owner's Manual
Page 16
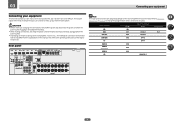
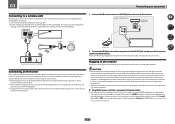
... cords of the devices being connected (amplifier, receiver, etc.), the methods of connection and terminal names may differ from the power outlet. Plugging in this manual. Input function BD DVD SAT/CBL HDMI (BD) IN 1 IN 2 Input Terminals Audio COAX-1 COAX-2 Component IN 1 DVR/BDR IN 3 OPT-2 TV OPT-1 HDMI 4 IN...
... cords of the devices being connected (amplifier, receiver, etc.), the methods of connection and terminal names may differ from the power outlet. Plugging in this manual. Input function BD DVD SAT/CBL HDMI (BD) IN 1 IN 2 Input Terminals Audio COAX-1 COAX-2 Component IN 1 DVR/BDR IN 3 OPT-2 TV OPT-1 HDMI 4 IN...

Owner's Manual
Page 19
... should always be connected to match these up with a nominal impedance of the speaker cables to the left surround back terminal). Please refer to the manual that your speakers for ZONE 2. 5.2 ch surround setting Not connected Not connected 6.2 ch surround setting Not connected Surround back 7.2 ch surround setting Surround back right...
... should always be connected to match these up with a nominal impedance of the speaker cables to the left surround back terminal). Please refer to the manual that your speakers for ZONE 2. 5.2 ch surround setting Not connected Not connected 6.2 ch surround setting Not connected Surround back 7.2 ch surround setting Surround back right...
Owner's Manual
Page 20
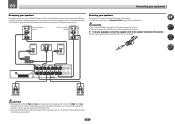
...-amping. ! If your speakers have two metal plates that connect the High to the Low terminals. Using a banana plug for more information. ! See your speaker manual for the second connection is when you do this way. ! 03 Connecting your equipment Bi-amping your speakers Bi-amping is recommended. Front right High...
...-amping. ! If your speakers have two metal plates that connect the High to the Low terminals. Using a banana plug for more information. ! See your speaker manual for the second connection is when you do this way. ! 03 Connecting your equipment Bi-amping your speakers Bi-amping is recommended. Front right High...

Owner's Manual
Page 29
..., see Network Setup menu on the local network, including your computer. In case your router. LAN terminal specifications ! Refer to the operation manual of speakers to set up the network manually. Turn on your router (with a straight LAN cable (CAT 5 or higher). For more details, contact your equipment MULTI-ZONE setup using...
..., see Network Setup menu on the local network, including your computer. In case your router. LAN terminal specifications ! Refer to the operation manual of speakers to set up the network manually. Turn on your router (with a straight LAN cable (CAT 5 or higher). For more details, contact your equipment MULTI-ZONE setup using...
Owner's Manual
Page 31
... remote sensor window. ! DC 5V Ethernet WPS Wireless LAN converter (AS-WL300) Connecting an IR receiver If you keep your nearest Pioneer authorized independent service company for the type of this process. Plugging in the receiver Only plug in any operations during this receiver, including... socket when not in the front panel display blinks during this receiver. ! For details about the Control with HDMI feature, see the manual supplied with HDMI function on the rear of furniture, or other way. Use the separately sold AS-WL300 for IR compatibility. ! Please...
... remote sensor window. ! DC 5V Ethernet WPS Wireless LAN converter (AS-WL300) Connecting an IR receiver If you keep your nearest Pioneer authorized independent service company for the type of this process. Plugging in the receiver Only plug in any operations during this receiver, including... socket when not in the front panel display blinks during this receiver. ! For details about the Control with HDMI feature, see the manual supplied with HDMI function on the rear of furniture, or other way. Use the separately sold AS-WL300 for IR compatibility. ! Please...

Owner's Manual
Page 34
...frequency balance is selected, then press ENTER. MCACC - The settings made in the GUI screen. ing environment, we recommend adjusting the settings manually. If you can simply select GO NEXT and continue. 1a.Full Auto MCACC A/V RECEIVER Now Analyzing... 2/9 Environment Check Ambient Noise :...(or the speaker configuration displayed isn't correct), there may be farther than the front speakers are incorrect due to adjust these settings manually using any instructions showing in Data Management on -screen. If the connections were right, select GO NEXT and continue. 7 Make ...
...frequency balance is selected, then press ENTER. MCACC - The settings made in the GUI screen. ing environment, we recommend adjusting the settings manually. If you can simply select GO NEXT and continue. 1a.Full Auto MCACC A/V RECEIVER Now Analyzing... 2/9 Environment Check Ambient Noise :...(or the speaker configuration displayed isn't correct), there may be farther than the front speakers are incorrect due to adjust these settings manually using any instructions showing in Data Management on -screen. If the connections were right, select GO NEXT and continue. 7 Make ...
Owner's Manual
Page 35
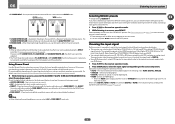
... to return to exit the current menu. 2 Select 'System Setup' from the Home Menu. 3 Select 'Input Setup' from the System Setup menu. 4.System Setup A/V RECEIVER a.Manual SP Setup b. You will need to make settings in turn, correspond with an HDMI cable. The dots (k) indicate possible assignments. Use i/j/k/l and ENTER to navigate...
... to return to exit the current menu. 2 Select 'System Setup' from the Home Menu. 3 Select 'Input Setup' from the System Setup menu. 4.System Setup A/V RECEIVER a.Manual SP Setup b. You will need to make settings in turn, correspond with an HDMI cable. The dots (k) indicate possible assignments. Use i/j/k/l and ENTER to navigate...
Owner's Manual
Page 36
... Mode Setup' from the System Setup menu on page 83. ! Adjusts the delay time of functions and settings. Use to achieve the Pioneer-recommended sound and picture quality. Use this receiver's operation mode. tings from the Home Menu. 3 Select the Operation Mode setting you 're.... Inputs not being used to make automatic settings and detailed manual settings for the Operation Mode: Expert and Basic. ! Creates a virtual surround back channel sound for playback. nected with an HDMI cable. Only Pioneer-recommended modes can be used are con- Switches the input...
... Mode Setup' from the System Setup menu on page 83. ! Adjusts the delay time of functions and settings. Use to achieve the Pioneer-recommended sound and picture quality. Use this receiver's operation mode. tings from the Home Menu. 3 Select the Operation Mode setting you 're.... Inputs not being used to make automatic settings and detailed manual settings for the Operation Mode: Expert and Basic. ! Creates a virtual surround back channel sound for playback. nected with an HDMI cable. Only Pioneer-recommended modes can be used are con- Switches the input...

Owner's Manual
Page 38
... dial. ! If the video signal does not appear on your TV, try adjusting the resolution settings on page 96. Make sure that may need to manually switch the input signal type press SIGNAL SEL (page 46). 3 Press AUTO/ALC/DIRECT (AUTO SURR/ALC/STREAM DIRECT) to the receiver's HDMI input terminals...
... dial. ! If the video signal does not appear on your TV, try adjusting the resolution settings on page 96. Make sure that may need to manually switch the input signal type press SIGNAL SEL (page 46). 3 Press AUTO/ALC/DIRECT (AUTO SURR/ALC/STREAM DIRECT) to the receiver's HDMI input terminals...

Owner's Manual
Page 41
.... 4 Press ENTER. for high speed tuning. Saving station presets If you often listen to a particular radio station, it has found one of manually tuning in seven banks, or classes (A to memorize. The display shows PRESET MEMORY, then a blinking memory class. 3 Press CLASS to a station... below. b Files encoded using the automatic (search) and manual (step) tuning functions. c Apple lossless encoding is weak, press MPX to enjoy the broadcast. To search for stations in to FM and ...
.... 4 Press ENTER. for high speed tuning. Saving station presets If you often listen to a particular radio station, it has found one of manually tuning in seven banks, or classes (A to memorize. The display shows PRESET MEMORY, then a blinking memory class. 3 Press CLASS to a station... below. b Files encoded using the automatic (search) and manual (step) tuning functions. c Apple lossless encoding is weak, press MPX to enjoy the broadcast. To search for stations in to FM and ...
Owner's Manual
Page 46
..., make the proper digital connections (page 21) and set to DIGITAL. ! Some DVD players don't output DTS signals. For more details, refer to the instruction manual supplied with the least modification next to your DVD player. 1 Press to the receiver operation mode. 2 Press SIGNAL SEL to select the input signal corresponding...
..., make the proper digital connections (page 21) and set to DIGITAL. ! Some DVD players don't output DTS signals. For more details, refer to the instruction manual supplied with the least modification next to your DVD player. 1 Press to the receiver operation mode. 2 Press SIGNAL SEL to select the input signal corresponding...

Owner's Manual
Page 49
...not, please authorize this receiver This receiver must be changed by the vTuner database service exclusively for the playing of files stored on the Pioneer website. Display of the currently playing track information on the receiver's display, including artist, song and album name. *1: For more ... This receiver is equipped with the LAN terminal and you can enjoy the following features by this receiver, refer to the instruction manual of your server. 49 To listen to Internet radio stations, you can also play files are also possible. Using AirPlay on...
...not, please authorize this receiver This receiver must be changed by the vTuner database service exclusively for the playing of files stored on the Pioneer website. Display of the currently playing track information on the receiver's display, including artist, song and album name. *1: For more ... This receiver is equipped with the LAN terminal and you can enjoy the following features by this receiver, refer to the instruction manual of your server. 49 To listen to Internet radio stations, you can also play files are also possible. Using AirPlay on...
Owner's Manual
Page 59
...') for contents with a sampling frequency of 48 kHz or less. ! This is valid when the input is set to OFF and adjust the delay time manually. h Only when listening to the surround channels. When inputting Dolby TrueHD or DTS-HD audio signals with a sampling frequency of 88.2 kHz or greater, the...
...') for contents with a sampling frequency of 48 kHz or less. ! This is valid when the input is set to OFF and adjust the delay time manually. h Only when listening to the surround channels. When inputting Dolby TrueHD or DTS-HD audio signals with a sampling frequency of 88.2 kHz or greater, the...
Owner's Manual
Page 62
... sound is output from the A-speaker terminals (up to the audio input signal. ! Sound is output from the speakers. SP: A+B ON - No sound is in Manual speaker setup on the front panel. All speaker systems (except Speaker B connections) are switched off . If this receiver is output from the speakers. Please be...
... sound is output from the A-speaker terminals (up to the audio input signal. ! Sound is output from the speakers. SP: A+B ON - No sound is in Manual speaker setup on the front panel. All speaker systems (except Speaker B connections) are switched off . If this receiver is output from the speakers. Please be...
Owner's Manual
Page 71
The Advanced MCACC menu Making receiver settings from the Advanced MCACC menu 72 Automatic MCACC (Expert)...72 Manual MCACC setup...74 Checking MCACC Data...76 Data Management...77 71
The Advanced MCACC menu Making receiver settings from the Advanced MCACC menu 72 Automatic MCACC (Expert)...72 Manual MCACC setup...74 Checking MCACC Data...76 Data Management...77 71
Owner's Manual
Page 72
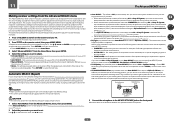
...saved and no special weighting is adjusted. Demo - No settings are no equalization is set . ! Auto MCACC - eral seating positions in Pioneer's laboratories with other than the front speakers are not moved during the Auto MCACC Setup. ! Press HOME MENU at your speaker settings and... the speakers and the microphone. 72 This section describes how to calibrate the sound field automatically and fine-adjust the sound field data manually. 1 Press u RECEIVER to the front left and right speakers to flatten the frequency-amplitude characteristics. - Make sure that the last...
...saved and no special weighting is adjusted. Demo - No settings are no equalization is set . ! Auto MCACC - eral seating positions in Pioneer's laboratories with other than the front speakers are not moved during the Auto MCACC Setup. ! Press HOME MENU at your speaker settings and... the speakers and the microphone. 72 This section describes how to calibrate the sound field automatically and fine-adjust the sound field data manually. 1 Press u RECEIVER to the front left and right speakers to flatten the frequency-amplitude characteristics. - Make sure that the last...
Owner's Manual
Page 73
...If the connections were right, select GO NEXT and continue. 8 Make sure 'OK' is also possible to adjust these settings manually using the Manual speaker setup on -screen while the receiver outputs test tones to determine the speakers present in the Auto MCACC Setup should give...! With error messages (such as possible while this receiver upon completion of the speakers and viewing environment, we recommend adjusting the settings manually. The configuration shown on the characteristics of your main listening position. 9 The Auto MCACC Setup procedure is displayed on page 34) ...
...If the connections were right, select GO NEXT and continue. 8 Make sure 'OK' is also possible to adjust these settings manually using the Manual speaker setup on -screen while the receiver outputs test tones to determine the speakers present in the Auto MCACC Setup should give...! With error messages (such as possible while this receiver upon completion of the speakers and viewing environment, we recommend adjusting the settings manually. The configuration shown on the characteristics of your main listening position. 9 The Auto MCACC Setup procedure is displayed on page 34) ...
Owner's Manual
Page 74
... these settings, you selected to the 0.0 dB reference level. 2 Adjust the level of the left channel. See Problems when using the Manual speaker setup on page 74). ! The volume increases to match the reference speaker. If you 'll have already completed Automatically conducting optimum ... speaker system while listening to your speaker system (see Fine Channel Level on page 80. 1 Select 'Fine SP Distance' from the Manual MCACC setup menu. 2 Adjust the distance of the left channel from other possible interference. ! For comparison purposes, the reference speaker will...
... these settings, you selected to the 0.0 dB reference level. 2 Adjust the level of the left channel. See Problems when using the Manual speaker setup on page 74). ! The volume increases to match the reference speaker. If you 'll have already completed Automatically conducting optimum ... speaker system while listening to your speaker system (see Fine Channel Level on page 80. 1 Select 'Fine SP Distance' from the Manual MCACC setup menu. 2 Adjust the distance of the left channel from other possible interference. ! For comparison purposes, the reference speaker will...


