Owner's Manual
Page 4
...' application 15 Other speaker connection 16 Placing the speakers 17 Some tips for Advanced MCACC output 34 Connecting an IR receiver 35 Operating other Pioneer components with no HDMI input . . . 26 Connecting a satellite/cable receiver or other set-top box 27 Connecting a HDD/DVD recorder... Bi-amping your speakers 20 Bi-wiring your speakers 20 Selecting the Speaker system 21 Front height setup 21 Front wide setup 21 Speaker B setup 21 Bi-Amping setup 21 ZONE 2 setup 21 About the audio connection 22 About the video converter 22 Connecting your TV and playback components...
...' application 15 Other speaker connection 16 Placing the speakers 17 Some tips for Advanced MCACC output 34 Connecting an IR receiver 35 Operating other Pioneer components with no HDMI input . . . 26 Connecting a satellite/cable receiver or other set-top box 27 Connecting a HDD/DVD recorder... Bi-amping your speakers 20 Bi-wiring your speakers 20 Selecting the Speaker system 21 Front height setup 21 Front wide setup 21 Speaker B setup 21 Bi-Amping setup 21 ZONE 2 setup 21 About the audio connection 22 About the video converter 22 Connecting your TV and playback components...
Owner's Manual
Page 5
... signal 60 Better sound using Phase Control 61 07 Control with HDMI function Making Control with HDMI connections . . . . . 62 HDMI Setup 63 Before using synchronization 64 About synchronized operations 64 About connections with a product of a different brand that supports the Control with HDMI function ... 82 10 The Advanced MCACC menu Making receiver settings from the Advanced MCACC menu 85 Automatic MCACC (Expert 86 Manual MCACC setup 89 Fine Channel Level 90 Fine Speaker Distance 90 Standing Wave 91 Acoustic Calibration EQ Adjust 92 Acoustic Calibration EQ Professional 92...
... signal 60 Better sound using Phase Control 61 07 Control with HDMI function Making Control with HDMI connections . . . . . 62 HDMI Setup 63 Before using synchronization 64 About synchronized operations 64 About connections with a product of a different brand that supports the Control with HDMI function ... 82 10 The Advanced MCACC menu Making receiver settings from the Advanced MCACC menu 85 Automatic MCACC (Expert 86 Manual MCACC setup 89 Fine Channel Level 90 Fine Speaker Distance 90 Standing Wave 91 Acoustic Calibration EQ Adjust 92 Acoustic Calibration EQ Professional 92...
Owner's Manual
Page 7
...; Operating multiple receivers (page 76) • Setting the remote to control other components (page 76) • Programming signals from other setup (page 99) 12 Making maximum use of functions and terminals. English Deutsch Français Italiano Nederlands Español Flow ... (page 37) 7 MCACC speaker settings • Automatically setting up for surround sound (Auto MCACC) (page 37) 8 The Input Setup menu (page 40) (When using connections other than the recommended connections) 9 Basic playback (page 42) 10 Adjusting the sound and picture...
...; Operating multiple receivers (page 76) • Setting the remote to control other components (page 76) • Programming signals from other setup (page 99) 12 Making maximum use of functions and terminals. English Deutsch Français Italiano Nederlands Español Flow ... (page 37) 7 MCACC speaker settings • Automatically setting up for surround sound (Auto MCACC) (page 37) 8 The Input Setup menu (page 40) (When using connections other than the recommended connections) 9 Basic playback (page 42) 10 Adjusting the sound and picture...
Owner's Manual
Page 8
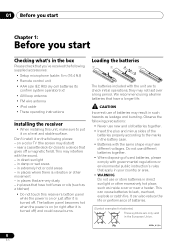
...'ve received the following places: - in places that are to leak, overheat, explode or catch fire. Don't install it on the following supplied accessories: • Setup microphone (cable: 5 m (16.4 ft.)) • Remote control unit • AAA size IEC R03 dry cell batteries (to confirm system operation) x2 • AM loop antenna...
...'ve received the following places: - in places that are to leak, overheat, explode or catch fire. Don't install it on the following supplied accessories: • Setup microphone (cable: 5 m (16.4 ft.)) • Remote control unit • AAA size IEC R03 dry cell batteries (to confirm system operation) x2 • AM loop antenna...
Owner's Manual
Page 9
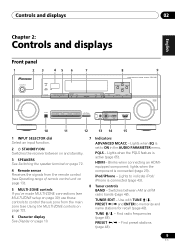
... See Display on page 10. 7 Indicators ADVANCED MCACC - CHANNEL RECEIVER VSX-1020 TUNE PRESET PRESET TUNE TUNER EDIT ENTER MASTER VOLUME PHONES AUTO/ALC/DIRECT LISTENING MODE STEREO STANDARD ADV SURROUND iPod iPhone DIRECT CONTROL MCACC SETUP MIC iPod iPhone USB VIDEO CAMERA HDMI 5 10 11 12 13 14...see Operating range of remote control unit on page 13). 5 MULTI-ZONE controls If you've made MULTI-ZONE connections (see MULTI-ZONE setup on page 30) use these controls to ON in the AUDIO PARAMETER menu. PRESET / - Controls and displays 02 English Deutsch...
... See Display on page 10. 7 Indicators ADVANCED MCACC - CHANNEL RECEIVER VSX-1020 TUNE PRESET PRESET TUNE TUNER EDIT ENTER MASTER VOLUME PHONES AUTO/ALC/DIRECT LISTENING MODE STEREO STANDARD ADV SURROUND iPod iPhone DIRECT CONTROL MCACC SETUP MIC iPod iPhone USB VIDEO CAMERA HDMI 5 10 11 12 13 14...see Operating range of remote control unit on page 13). 5 MULTI-ZONE controls If you've made MULTI-ZONE connections (see MULTI-ZONE setup on page 30) use these controls to ON in the AUDIO PARAMETER menu. PRESET / - Controls and displays 02 English Deutsch...
Owner's Manual
Page 10
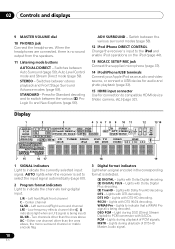
... (page 58). 12 iPod iPhone DIRECT CONTROL Change the receiver's input to the iPod and enable iPod operations on the iPod (page 44). 13 MCACC SETUP MIC jack Connect the supplied microphone (page 37). 14 iPod/iPhone/USB terminals Connect your Apple iPod as an audio and video source, or connect...
... (page 58). 12 iPod iPhone DIRECT CONTROL Change the receiver's input to the iPod and enable iPod operations on the iPod (page 44). 13 MCACC SETUP MIC jack Connect the supplied microphone (page 37). 14 iPod/iPhone/USB terminals Connect your Apple iPod as an audio and video source, or connect...
Owner's Manual
Page 12
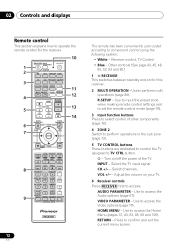
...volume on your TV. 6 Receiver controls Press RECEIVER first to access the Video options (page 70). VIDEO PARAMETER - Use to access: AUDIO PARAMETER - R.SETUP - HOME MENU - Use to access the Audio options (page 67). Use to access the Home Menu (pages 37, 40, 63, 85, 99 and... 02 Controls and displays Remote control This section explains how to component control using the following system: • White - RECEIVER MULTI OPERATION SOURCE 1 R.SETUP 2 BD DVD DVR/BDR HDMI 10 TV CD NET RADIO ADAPTER 3 iPod USB TUNER SIRIUS TV CTRL 11 INPUT SELECT ZONE 2 RECEIVER 4 12 ...
...volume on your TV. 6 Receiver controls Press RECEIVER first to access the Video options (page 70). VIDEO PARAMETER - Use to access: AUDIO PARAMETER - R.SETUP - HOME MENU - Use to access the Audio options (page 67). Use to access the Home Menu (pages 37, 40, 63, 85, 99 and... 02 Controls and displays Remote control This section explains how to component control using the following system: • White - RECEIVER MULTI OPERATION SOURCE 1 R.SETUP 2 BD DVD DVR/BDR HDMI 10 TV CD NET RADIO ADAPTER 3 iPod USB TUNER SIRIUS TV CTRL 11 INPUT SELECT ZONE 2 RECEIVER 4 12 ...
Owner's Manual
Page 14
..., switch off the power and disconnect the power cord from the power outlet. Important • The input functions below are used. Refer to The Input Setup menu on page 40 to change the assignments if other connections are assigned by default to the receiver's different input terminals. Plugging in should be...
..., switch off the power and disconnect the power cord from the power outlet. Important • The input functions below are used. Refer to The Input Setup menu on page 40 to change the assignments if other connections are assigned by default to the receiver's different input terminals. Plugging in should be...
Owner's Manual
Page 21
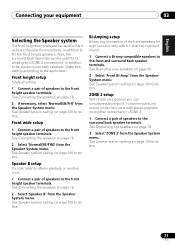
...(SB/FW)' from the Speaker System menu. See Connecting the speakers on page 18. 2 Select 'Speaker B' from the Speaker System menu. ZONE 2 setup With these connections you can simultaneously enjoy 5.1-channel surround sound in the main zone with 5.1-channel surround sound. 1 Connect a Bi-amp compatible speakers to ...Amp' from the Speaker System menu. See Speaker system setting on page 18. 2 Select 'ZONE 2' from the Speaker System menu. Front height setup *Default setting 1 Connect a pair of speakers to for front wide and Speaker B connections, in addition to do this . Speaker...
...(SB/FW)' from the Speaker System menu. See Connecting the speakers on page 18. 2 Select 'Speaker B' from the Speaker System menu. ZONE 2 setup With these connections you can simultaneously enjoy 5.1-channel surround sound in the main zone with 5.1-channel surround sound. 1 Connect a Bi-amp compatible speakers to ...Amp' from the Speaker System menu. See Speaker system setting on page 18. 2 Select 'ZONE 2' from the Speaker System menu. Front height setup *Default setting 1 Connect a pair of speakers to for front wide and Speaker B connections, in addition to do this . Speaker...
Owner's Manual
Page 22
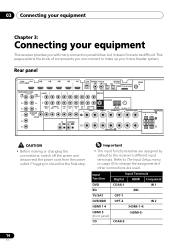
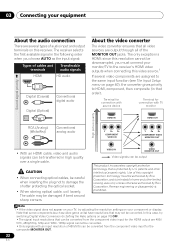
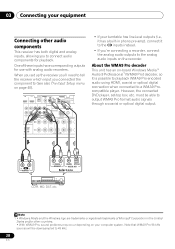
... signal priority High picture quality About the audio connection There are several video components are assigned to the same input function (see The Input Setup menu on page 40), the converter gives priority to HDMI, component, then composite (in that order). The receiver selects the first available signal in high...
... signal priority High picture quality About the audio connection There are several video components are assigned to the same input function (see The Input Setup menu on page 40), the converter gives priority to HDMI, component, then composite (in that order). The receiver selects the first available signal in high...
Owner's Manual
Page 27
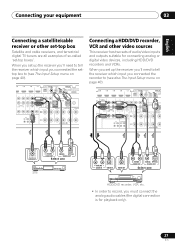
... OUT R ANALOG L COAXIAL OPTICAL AUDIO OUT DIGITAL OUT Select one HDD/DVD recorder, VCR, etc. • In order to (see also The Input Setup menu on page 40). English Deutsch Français Italiano Nederlands Español Connecting your equipment 03 Connecting a satellite/cable receiver or other video... you'll need to tell the receiver which input you connected the settop box to record, you connected the recorder to (see The Input Setup menu on page 40). When you set -top box Satellite and cable receivers, and terrestrial digital TV tuners are all examples of audio/video...
... OUT R ANALOG L COAXIAL OPTICAL AUDIO OUT DIGITAL OUT Select one HDD/DVD recorder, VCR, etc. • In order to (see also The Input Setup menu on page 40). English Deutsch Français Italiano Nederlands Español Connecting your equipment 03 Connecting a satellite/cable receiver or other video... you'll need to tell the receiver which input you connected the settop box to record, you connected the recorder to (see The Input Setup menu on page 40). When you set -top box Satellite and cable receivers, and terrestrial digital TV tuners are all examples of audio/video...
Owner's Manual
Page 28
... Media™ Audio 9 Professional1 (WMA9 Pro) decoder, so it to the CD inputs instead. • If you connected the component to (see also The Input Setup menu on page 40). 03 Connecting your equipment Connecting other countries. • With WMA9 Pro, sound problems may occur depending on your turntable has line...
... Media™ Audio 9 Professional1 (WMA9 Pro) decoder, so it to the CD inputs instead. • If you connected the component to (see also The Input Setup menu on page 40). 03 Connecting your equipment Connecting other countries. • With WMA9 Pro, sound problems may occur depending on your turntable has line...
Owner's Manual
Page 30
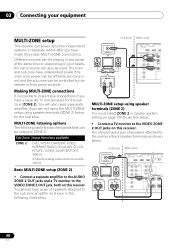
...DVR/BDR, VIDEO, INTERNET RADIO, iPod/USB, CD, CDR/TAPE, TUNER, ADAPTER PORT, SIRIUS (Outputs analog audio and composite video.) Basic MULTI-ZONE setup (ZONE 2) • Connect a separate amplifier to the AUDIO ZONE 2 OUT jacks and a TV monitor to the sub zone amplifier as shown below for... 1 4 COMPONENT VIDEO ASSIGNABLE IN 1 IN 2 (DVD) (DVR) Y Y AUDIO L PB PB R ZONE 2 PR PR OUT MONITOR Y OUT VIDEO PB PR MULTI-ZONE setup using speaker terminals (ZONE 2) below . The main and sub zone have a pair of speakers attached to the VIDEO ZONE 2 OUT jack, both on ) and the...
...DVR/BDR, VIDEO, INTERNET RADIO, iPod/USB, CD, CDR/TAPE, TUNER, ADAPTER PORT, SIRIUS (Outputs analog audio and composite video.) Basic MULTI-ZONE setup (ZONE 2) • Connect a separate amplifier to the AUDIO ZONE 2 OUT jacks and a TV monitor to the sub zone amplifier as shown below for... 1 4 COMPONENT VIDEO ASSIGNABLE IN 1 IN 2 (DVD) (DVR) Y Y AUDIO L PB PB R ZONE 2 PR PR OUT MONITOR Y OUT VIDEO PB PR MULTI-ZONE setup using speaker terminals (ZONE 2) below . The main and sub zone have a pair of speakers attached to the VIDEO ZONE 2 OUT jack, both on ) and the...
Owner's Manual
Page 32
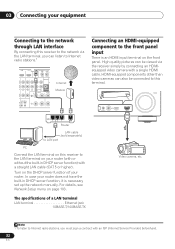
... panel input There is necessary set up the network manually. The specifications of your router. CONTROL ON / OFF MASTER VOLUME CONTROL T IN OUT MCACC SETUP MIC iPod iPhone USB VIDEO CAMERA HDMI 5 LAN 3 2 1 WAN Router LAN cable (sold separately) to the LAN terminal on the front panel.... your router does not have the built-in DHCP server function) with an ISP (Internet Service Provider) beforehand. 32 En For details, see Network Setup menu on this terminal. High quality pictures can also be viewed via the LAN terminal, you must sign a contract with a straight LAN cable ...
... panel input There is necessary set up the network manually. The specifications of your router. CONTROL ON / OFF MASTER VOLUME CONTROL T IN OUT MCACC SETUP MIC iPod iPhone USB VIDEO CAMERA HDMI 5 LAN 3 2 1 WAN Router LAN cable (sold separately) to the LAN terminal on the front panel.... your router does not have the built-in DHCP server function) with an ISP (Internet Service Provider) beforehand. 32 En For details, see Network Setup menu on this terminal. High quality pictures can also be viewed via the LAN terminal, you must sign a contract with a straight LAN cable ...
Owner's Manual
Page 33
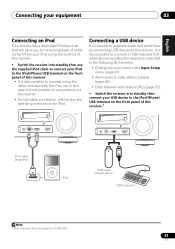
... on the front panel of this receiver. • It is also possible to connect using the cable included with the iPod, but in the Input Setup menu (page 41). • Add names to radio station presets (page 49). • Enter Internet radio station URLs (page 52). • Switch... is possible to playback audio and photo files by connecting USB devices to this receiver.1 CONTROL ON / OFF MASTER VOLUME MCACC SETUP MIC iPod iPhone USB VIDEO CAMERA HDMI 5 MCACC SETUP MIC iPod iPhone USB VIDEO CAMERA HDMI 5 iPod cable (supplied) MENU iPod USB mass...
... on the front panel of this receiver. • It is also possible to connect using the cable included with the iPod, but in the Input Setup menu (page 41). • Add names to radio station presets (page 49). • Enter Internet radio station URLs (page 52). • Switch... is possible to playback audio and photo files by connecting USB devices to this receiver.1 CONTROL ON / OFF MASTER VOLUME MCACC SETUP MIC iPod iPhone USB VIDEO CAMERA HDMI 5 MCACC SETUP MIC iPod iPhone USB VIDEO CAMERA HDMI 5 iPod cable (supplied) MENU iPod USB mass...

Owner's Manual
Page 34
...The software to output the results is turned off (see Output MCACC data on page 96.1 CONTROL ON / OFF MASTER VOLUME MCACC SETUP MIC iPod iPhone USB VIDEO CAMERA HDMI 5 USB mass storage device Note 1 The various parameters and the reverb characteristics data used for...3D graphs of the reverb characteristics in the computer. If you have any questions regarding, please contact the Customer Support Division of the Pioneer website (http://www.pioneerelectronics.com/PUSA/ Home+Entertainment+Custom+Install). MCACC data and parameters are also available here. Instructions for using Auto...
...The software to output the results is turned off (see Output MCACC data on page 96.1 CONTROL ON / OFF MASTER VOLUME MCACC SETUP MIC iPod iPhone USB VIDEO CAMERA HDMI 5 USB mass storage device Note 1 The various parameters and the reverb characteristics data used for...3D graphs of the reverb characteristics in the computer. If you have any questions regarding, please contact the Customer Support Division of the Pioneer website (http://www.pioneerelectronics.com/PUSA/ Home+Entertainment+Custom+Install). MCACC data and parameters are also available here. Instructions for using Auto...
Owner's Manual
Page 37
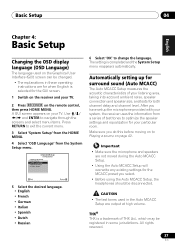
...the microphone and speakers are output at high volume. Make sure you select. • Before using the Auto MCACC Setup, the headphones should be disconnected. OSD Language d. Other Setup Exit Return 5 Select the desired language. • English • French • German • Italian &#...Playing a source on page 42. Automatically setting up the microphone provided with your system, the receiver uses the information from the System Setup menu. 4.SystemSetup A/V RECEIVER a. CAUTION • The test tones used on the Graphical User Interface (GUI) screen can be changed....
...the microphone and speakers are output at high volume. Make sure you select. • Before using the Auto MCACC Setup, the headphones should be disconnected. OSD Language d. Other Setup Exit Return 5 Select the desired language. • English • French • German • Italian &#...Playing a source on page 42. Automatically setting up the microphone provided with your system, the receiver uses the information from the System Setup menu. 4.SystemSetup A/V RECEIVER a. CAUTION • The test tones used on the Graphical User Interface (GUI) screen can be changed....
Owner's Manual
Page 38
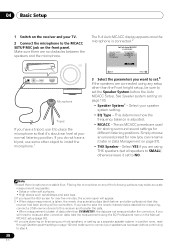
... 3 • When data measurement is adjusted. • MCACC - If you are not measured after the correction. Placing the microphone on any setup other object to install the microphone.1 The Full Auto MCACC display appears once the microphone is taken of the following surfaces may make sure to... correction data, take the measurement using any of data other soft surfaces. • High places such as necessary before the Auto MCACC Setup. 04 Basic Setup 1 Switch on the receiver and your speaker system setting. • EQ Type - Simply choose an unused preset for now (you ...
... 3 • When data measurement is adjusted. • MCACC - If you are not measured after the correction. Placing the microphone on any setup other object to install the microphone.1 The Full Auto MCACC display appears once the microphone is taken of the following surfaces may make sure to... correction data, take the measurement using any of data other soft surfaces. • High places such as necessary before the Auto MCACC Setup. 04 Basic Setup 1 Switch on the receiver and your speaker system setting. • EQ Type - Simply choose an unused preset for now (you ...

Owner's Manual
Page 39
...with the speaker connection. or Check microphone.) select RETRY after checking for more test tones to finish, then confirm the speaker configuration in your setup. If there doesn't seem to be a problem, you 're using speakers that affect the phase (dipole speakers, reflective speakers, etc.), Reverse... pointed to be displayed even if the speakers are performed for Channel Level, Speaker Distance, Standing Wave and Acoustic Cal EQ. Basic Setup 04 English Deutsch Français Italiano Nederlands Español 4 Press RECEIVER and then select START. 5 Follow the instructions on ...
...with the speaker connection. or Check microphone.) select RETRY after checking for more test tones to finish, then confirm the speaker configuration in your setup. If there doesn't seem to be a problem, you 're using speakers that affect the phase (dipole speakers, reflective speakers, etc.), Reverse... pointed to be displayed even if the speakers are performed for Channel Level, Speaker Distance, Standing Wave and Acoustic Cal EQ. Basic Setup 04 English Deutsch Français Italiano Nederlands Español 4 Press RECEIVER and then select START. 5 Follow the instructions on ...
Owner's Manual
Page 40
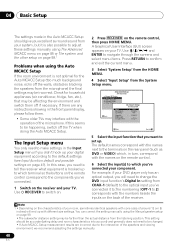
... correspond to the components you need to change the DVD input function's Digital In setting from your component. Check for the Auto MCACC Setup (too much background noise, echo off the walls, obstacles blocking the speakers from the microphone) the final settings may be changed. •...the remote control, then press HOME MENU. Use RECEIVER to confirm and exit the current menu. 3 Select 'System Setup' from the HOME MENU. 4 Select 'Input Setup' from the listening position. Use and ENTER to navigate through the screens and select menu items. Press RETURN to switch on....
... correspond to the components you need to change the DVD input function's Digital In setting from your component. Check for the Auto MCACC Setup (too much background noise, echo off the walls, obstacles blocking the speakers from the microphone) the final settings may be changed. •...the remote control, then press HOME MENU. Use RECEIVER to confirm and exit the current menu. 3 Select 'System Setup' from the HOME MENU. 4 Select 'Input Setup' from the listening position. Use and ENTER to navigate through the screens and select menu items. Press RETURN to switch on....


