Owner's Manual
Page 12
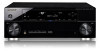
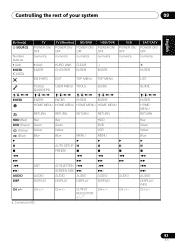
... RECEIVER 12 En The remote has been conveniently color-coded according to confirm and exit the current menu screen. R.SETUP - RETURN - Press to component control using the following system: • White - 02 Controls and displays Remote control This section explains how to operate the remote control for this receiver. 2 MULTI OPERATION - Use...
... RECEIVER 12 En The remote has been conveniently color-coded according to confirm and exit the current menu screen. R.SETUP - RETURN - Press to component control using the following system: • White - 02 Controls and displays Remote control This section explains how to operate the remote control for this receiver. 2 MULTI OPERATION - Use...

Owner's Manual
Page 34
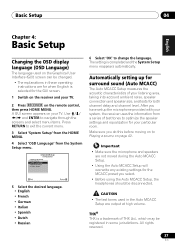
...questions regarding, please contact the Customer Support Division of the Pioneer website (http://www.pioneerelectronics.com/PUSA/ Home+Entertainment+Custom+Install). 03 Connecting your listening room (before and after calibration) can also be checked on a computer screen. Instructions for display on page 96.1 CONTROL ON / OFF MASTER VOLUME ... a computer, the data is turned off (see Output MCACC data on the computer are transferred from the support area of Pioneer. MCACC data and parameters are not cleared when the power is imported via the MCACC software in the computer.
...questions regarding, please contact the Customer Support Division of the Pioneer website (http://www.pioneerelectronics.com/PUSA/ Home+Entertainment+Custom+Install). 03 Connecting your listening room (before and after calibration) can also be checked on a computer screen. Instructions for display on page 96.1 CONTROL ON / OFF MASTER VOLUME ... a computer, the data is turned off (see Output MCACC data on the computer are transferred from the support area of Pioneer. MCACC data and parameters are not cleared when the power is imported via the MCACC software in the computer.
Owner's Manual
Page 37
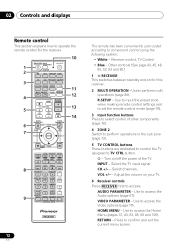
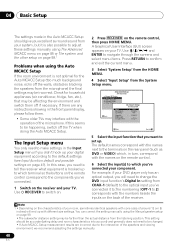
...8226; Russian 6 Select 'OK' to Playing a source on to change the language. CAUTION • The test tones used on the Graphical User Interface (GUI) screen can be disconnected. All rights reserved. 37 En The setting is completed and the System Setup menu reappears automatically. Make sure you select. • Before...Network Setup e. Manual SP Setup b. Basic Setup 04 English Deutsch Français Italiano Nederlands Español Chapter 4: Basic Setup Changing the OSD display language (OSD Language) The language used in the Auto MCACC Setup are output at high volume. A GUI...
...8226; Russian 6 Select 'OK' to Playing a source on to change the language. CAUTION • The test tones used on the Graphical User Interface (GUI) screen can be disconnected. All rights reserved. 37 En The setting is completed and the System Setup menu reappears automatically. Make sure you select. • Before...Network Setup e. Manual SP Setup b. Basic Setup 04 English Deutsch Français Italiano Nederlands Español Chapter 4: Basic Setup Changing the OSD display language (OSD Language) The language used in the Auto MCACC Setup are output at high volume. A GUI...
Owner's Manual
Page 38
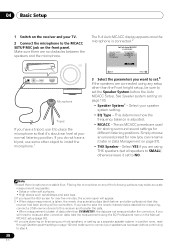
...the microphone on a stable floor. If you do not have a tripod, use some other object to install the microphone.1 The Full Auto MCACC display appears once the microphone is connected.2 1a.Full Auto MCACC A/V RECEIVER Speaker System EQ Type MCACC THX Speaker : Normal(SB/FH) : SYMMETRY ...: M1.MEMORY 1 : NO START Exit Return 3 Select the parameters you leave the GUI screen for different listening positions. Note 1 Install the microphone on any setup other than the Front height setup, be overwritten. If you will appear. 3...
...the microphone on a stable floor. If you do not have a tripod, use some other object to install the microphone.1 The Full Auto MCACC display appears once the microphone is connected.2 1a.Full Auto MCACC A/V RECEIVER Speaker System EQ Type MCACC THX Speaker : Normal(SB/FH) : SYMMETRY ...: M1.MEMORY 1 : NO START Exit Return 3 Select the parameters you leave the GUI screen for different listening positions. Note 1 Install the microphone on any setup other than the Front height setup, be overwritten. If you will appear. 3...

Owner's Manual
Page 39
..., make sure it 's doing this.1 If no operations are properly connected. 3 You can also choose to view the settings from this is displayed on-screen while the receiver outputs test tones to be a problem, you see Problems when using the Auto MCACC Setup on this , perform the Full ... noise! After this . 39 En or Check microphone.) select RETRY after checking for 10 seconds while the speaker configuration check screen is displayed, the speaker's wiring (+ and -) may be displayed even if the speakers are performed for ambient noise (see an ERR message (or the speaker configuration...
..., make sure it 's doing this.1 If no operations are properly connected. 3 You can also choose to view the settings from this is displayed on-screen while the receiver outputs test tones to be a problem, you see Problems when using the Auto MCACC Setup on this , perform the Full ... noise! After this . 39 En or Check microphone.) select RETRY after checking for 10 seconds while the speaker configuration check screen is displayed, the speaker's wiring (+ and -) may be displayed even if the speakers are performed for ambient noise (see an ERR message (or the speaker configuration...
Owner's Manual
Page 40
... switch them . • Some older TVs may be farther than the actual distance from the listening position. A Graphical User Interface (GUI) screen appears on the remote control, then press HOME MENU. 04 Basic Setup The settings made in the Auto MCACC Setup should be accurate (taking ...Input Setup c. In this seems to be changed. • If Auto MCACC Setup measurement results are any instructions showing in the front panel display, please follow them off the walls, obstacles blocking the speakers from the microphone) the final settings may be incorrect. The default names correspond ...
... switch them . • Some older TVs may be farther than the actual distance from the listening position. A Graphical User Interface (GUI) screen appears on the remote control, then press HOME MENU. 04 Basic Setup The settings made in the Auto MCACC Setup should be accurate (taking ...Input Setup c. In this seems to be changed. • If Auto MCACC Setup measurement results are any instructions showing in the front panel display, please follow them off the walls, obstacles blocking the speakers from the microphone) the final settings may be incorrect. The default names correspond ...
Owner's Manual
Page 43
...receiver. Loading appears in Setting the Audio options on the receiver and your component or display. When the display shows iPod top menu you can take advantage of the GUI screen of your TV connected to playback from your iPod using the INPUT SELECTOR dial on ...however, that characters other than alphanumeric letters and numbers cannot be displayed and will be displayed on the iPod itself, without using this receiver, and we recommend switching the equalizer off before connecting. • Pioneer cannot under any circumstances accept responsibility for any direct or indirect loss...
...receiver. Loading appears in Setting the Audio options on the receiver and your component or display. When the display shows iPod top menu you can take advantage of the GUI screen of your TV connected to playback from your iPod using the INPUT SELECTOR dial on ...however, that characters other than alphanumeric letters and numbers cannot be displayed and will be displayed on the iPod itself, without using this receiver, and we recommend switching the equalizer off before connecting. • Pioneer cannot under any circumstances accept responsibility for any direct or indirect loss...
Owner's Manual
Page 44
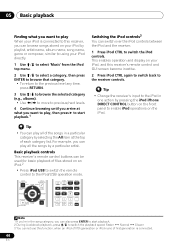
...iPod by playlist, artist name, album name, song name, genre or composer, similar to using your iPod, and this receiver's remote control and GUI screen become inactive. 2 Press iPod CTRL again to switch back to the receiver controls. Tip • You can switch over the iPod controls between the... enable iPod operations on an iPod.2 • Press iPod USB to switch the remote control to the iPod/USB operation mode. This enables operation and display on your iPod directly. 1 Use / to select 'Music' from the iPod top menu. 2 Use / to select a category, then ...
...iPod by playlist, artist name, album name, song name, genre or composer, similar to using your iPod, and this receiver's remote control and GUI screen become inactive. 2 Press iPod CTRL again to switch back to the receiver controls. Tip • You can switch over the iPod controls between the... enable iPod operations on an iPod.2 • Press iPod USB to switch the remote control to the iPod/USB operation mode. This enables operation and display on your iPod directly. 1 Use / to select 'Music' from the iPod top menu. 2 Use / to select a category, then ...

Owner's Manual
Page 45
...device is possible to the iPod/USB operation mode. It is not possible to connect this unit to a personal computer for USB playback. • Pioneer cannot guarantee compatibility (operation and/or bus power) with all the contents. 5 Note that characters that folder. • To return to the previous...• Playback stops when the last song in a USB memory device is selected in the sub zone. Try following the points below ) is displayed in the GUI screen as #. 6 • If the file selected cannot be used for USB power. AUDIO PARAMETER LIST VIDEO PARAMETER TUNE TOOLS TOP MENU BAND ...
...device is possible to the iPod/USB operation mode. It is not possible to connect this unit to a personal computer for USB playback. • Pioneer cannot guarantee compatibility (operation and/or bus power) with all the contents. 5 Note that characters that folder. • To return to the previous...• Playback stops when the last song in a USB memory device is selected in the sub zone. Try following the points below ) is displayed in the GUI screen as #. 6 • If the file selected cannot be used for USB power. AUDIO PARAMETER LIST VIDEO PARAMETER TUNE TOOLS TOP MENU BAND ...
Owner's Manual
Page 46
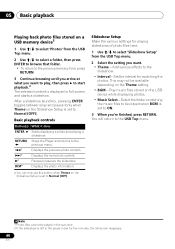
... set to Normal (OFF)). This may not be played in the sub zone. 2 If the slideshow is left in full screen and starts a slideshow. Displays the previous photo content. After a slideshow launches, pressing ENTER toggles between play , then press to start playback.2... The selected content is displayed in the pause mode for five minutes, the list screen reappears. 46 En Displays the photo information. Basic playback controls Button(s) What it does ENTER, Starts displaying a photo and playing a slideshow. Add various effects to the...
... set to Normal (OFF)). This may not be played in the sub zone. 2 If the slideshow is left in full screen and starts a slideshow. Displays the previous photo content. After a slideshow launches, pressing ENTER toggles between play , then press to start playback.2... The selected content is displayed in the pause mode for five minutes, the list screen reappears. 46 En Displays the photo information. Basic playback controls Button(s) What it does ENTER, Starts displaying a photo and playing a slideshow. Add various effects to the...
Owner's Manual
Page 51
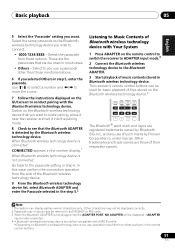
... only. Use / to select a number and / to move the cursor. 7 Follow the instructions displayed on the GUI screen to conduct pairing with Your System 1 Press ADAPTER on the Bluetooth wireless technology device.4 HDD PGM MEMORY MENU DVD PHASE CTRL...select Bluetooth ADAPTER and enter the Passcode selected in Bluetooth wireless technology device. These are the passcodes that the Bluetooth ADAPTER is detected by Pioneer Corporation is not plugged into the pairing mode. 8 Check to the Bluetooth ADAPTER. 3 Start playback of music contents stored in the ...
... only. Use / to select a number and / to move the cursor. 7 Follow the instructions displayed on the GUI screen to conduct pairing with Your System 1 Press ADAPTER on the Bluetooth wireless technology device.4 HDD PGM MEMORY MENU DVD PHASE CTRL...select Bluetooth ADAPTER and enter the Passcode selected in Bluetooth wireless technology device. These are the passcodes that the Bluetooth ADAPTER is detected by Pioneer Corporation is not plugged into the pairing mode. 8 Check to the Bluetooth ADAPTER. 3 Start playback of music contents stored in the ...

Owner's Manual
Page 52
... lets you use that case, preset the stations again yourself. 1 Press NET RADIO to switch to the Internet radio input.2 The Internet Radio list screen is displayed. 2 Use / to select the Internet radio station to 24 stations. Important • Before listening to Internet radio, you need to ... function is selected in the world, as long as by private individuals while others are programmed in the main zone. 3 When the list screen is displayed from anywhere in the sub zone. Press / to onto this receiver you wish to listen to scroll up to play back,...
... lets you use that case, preset the stations again yourself. 1 Press NET RADIO to switch to the Internet radio input.2 The Internet Radio list screen is displayed. 2 Use / to select the Internet radio station to 24 stations. Important • Before listening to Internet radio, you need to ... function is selected in the world, as long as by private individuals while others are programmed in the main zone. 3 When the list screen is displayed from anywhere in the sub zone. Press / to onto this receiver you wish to listen to scroll up to play back,...

Owner's Manual
Page 53
...containing up . 1 Turn on the computer and launch the Internet browser. 2 In the address bar on the computer screen You can be displayed on the screen of a computer that is connected to your most trusted sources. The entered information will be transmitted to the URL designated ...from your Sirius-Ready receiver. Programming on the browser, enter the IP address assigned to program, then press 'Update'. Pioneer Internet...
...containing up . 1 Turn on the computer and launch the Internet browser. 2 In the address bar on the computer screen You can be displayed on the screen of a computer that is connected to your most trusted sources. The entered information will be transmitted to the URL designated ...from your Sirius-Ready receiver. Programming on the browser, enter the IP address assigned to program, then press 'Update'. Pioneer Internet...
Owner's Manual
Page 54
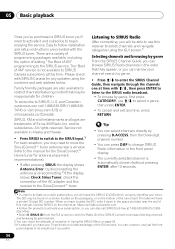
... Inc. The label will be found on a sticker located on the packaging, or on to take advantage of the GUI screens. You can, however, use just the front panel display to do everything if you will need the SIRIUS ID (SID) which uniquely identifies your channel search by genre. •... to the SiriusConnect™ tuner. 05 Basic playback Once you've purchased a SIRIUS tuner you'll need to activate it down in the front panel display. • The currently selected channel is not available to SIRIUS Canada subscribers at 1-888-539-SIRIUS (1-888539-7474). • Select 0 (SIRIUS ID) ...
... Inc. The label will be found on a sticker located on the packaging, or on to take advantage of the GUI screens. You can, however, use just the front panel display to do everything if you will need the SIRIUS ID (SID) which uniquely identifies your channel search by genre. •... to the SiriusConnect™ tuner. 05 Basic playback Once you've purchased a SIRIUS tuner you'll need to activate it down in the front panel display. • The currently selected channel is not available to SIRIUS Canada subscribers at 1-888-539-SIRIUS (1-888539-7474). • Select 0 (SIRIUS ID) ...
Owner's Manual
Page 64
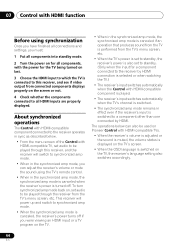
... finished all connections and settings, you must: 1 Put all components into standby mode. 2 Turn the power on for all HDMI inputs are properly displayed. 07 Control with HDMI function Before using the TV's remote control. • When in the synchronized amp mode, the synchronized amp mode is canceled...synchronized amp mode is turned off if you can also be used on Pioneer Control with HDMI-compatible TVs. • When the receiver's volume is adjusted or the sound is muted, the volume status is displayed on the TV's screen. • When the OSD language is switched on the TV. •...
... finished all connections and settings, you must: 1 Put all components into standby mode. 2 Turn the power on for all HDMI inputs are properly displayed. 07 Control with HDMI function Before using the TV's remote control. • When in the synchronized amp mode, the synchronized amp mode is canceled...synchronized amp mode is turned off if you can also be used on Pioneer Control with HDMI-compatible TVs. • When the receiver's volume is adjusted or the sound is muted, the volume status is displayed on the TV's screen. • When the OSD language is switched on the TV. •...
Owner's Manual
Page 74
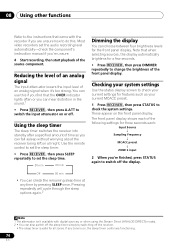
... the receiver. • The sleep timer is on all zones. These appear on or off. You can use this . The front panel display shows each of the following settings for a few seconds. • Press RECEIVER , then press DIMMER repeatedly to change the brightness of the source... distortion in the sound.1 • Press RECEIVER , then press A.ATT to switch the input attenuator on the front panel display. Checking your system settings Use the status display screen to check your current MCACC preset. 1 Press RECEIVER , then press STATUS to check the system settings. Using the sleep...
... the receiver. • The sleep timer is on all zones. These appear on or off. You can use this . The front panel display shows each of the following settings for a few seconds. • Press RECEIVER , then press DIMMER repeatedly to change the brightness of the source... distortion in the sound.1 • Press RECEIVER , then press A.ATT to switch the input attenuator on the front panel display. Checking your system settings Use the status display screen to check your current MCACC preset. 1 Press RECEIVER , then press STATUS to check the system settings. Using the sleep...
Owner's Manual
Page 83
...MENU - AUTO SETUP FREEZE - - AV SELECTION SCREEN SIZE AUDIO AUDIO DISPLAY DISPLAY RETURN HDD DVD VCR MENU AUDIO DISPLAY - OUTPUT RESOLUTION +/-a CH+/- CH +/- Controls for BD. English Deutsch Français Italiano Nederlands Español... ENTER - ENTER EXIT/INFO EXIT TOP MENU TOP MENU - GUIDE ENTER HOME/ MENU RETURN Red Green Yellow Blue AUDIO DISPLAY/ INFO CH+/- 83 En Yellow - GUIDE/EPG ENTER ENTER ENTER ENTER - RETURN HDD (Red) DVD (Green) (Yellow) (...
...MENU - AUTO SETUP FREEZE - - AV SELECTION SCREEN SIZE AUDIO AUDIO DISPLAY DISPLAY RETURN HDD DVD VCR MENU AUDIO DISPLAY - OUTPUT RESOLUTION +/-a CH+/- CH +/- Controls for BD. English Deutsch Français Italiano Nederlands Español... ENTER - ENTER EXIT/INFO EXIT TOP MENU TOP MENU - GUIDE ENTER HOME/ MENU RETURN Red Green Yellow Blue AUDIO DISPLAY/ INFO CH+/- 83 En Yellow - GUIDE/EPG ENTER ENTER ENTER ENTER - RETURN HDD (Red) DVD (Green) (Yellow) (...

Owner's Manual
Page 86
... a sofa, or playing a video game close to this receiver and transfer the data. • When measurement is selected. If the Advanced MCACC screen is not displayed, refer to Making receiver settings from the Auto MCACC menu (step 2). 4 • When data measurement is taken (after selecting ALL or Keep ... • Using the Auto MCACC Setup will overwrite any existing settings for surround sound (Auto MCACC) on page 37, you select.3 • The screen saver will need to set . • Auto MCACC - The default is adjusted. 10 The Advanced MCACC menu Automatic MCACC (Expert) If your setup...
... a sofa, or playing a video game close to this receiver and transfer the data. • When measurement is selected. If the Advanced MCACC screen is not displayed, refer to Making receiver settings from the Auto MCACC menu (step 2). 4 • When data measurement is taken (after selecting ALL or Keep ... • Using the Auto MCACC Setup will overwrite any existing settings for surround sound (Auto MCACC) on page 37, you select.3 • The screen saver will need to set . • Auto MCACC - The default is adjusted. 10 The Advanced MCACC menu Automatic MCACC (Expert) If your setup...

Owner's Manual
Page 88
...you can simply select GO NEXT and continue. 7 If necessary, confirm the speaker configuration in incorrect speaker settings. 2 This screen is being displayed, the Auto MCACC Setup will end up with different size settings. If no operations are performed for 10 seconds while the speaker...you excellent surround sound from your setup. A progress report is completed and the Advanced MCACC menu reappears automatically. After this is displayed on -screen while the receiver outputs test tones to determine the speakers present in step 2), you see Problems when using the Manual MCACC ...
...you can simply select GO NEXT and continue. 7 If necessary, confirm the speaker configuration in incorrect speaker settings. 2 This screen is being displayed, the Auto MCACC Setup will end up with different size settings. If no operations are performed for 10 seconds while the speaker...you excellent surround sound from your setup. A progress report is completed and the Advanced MCACC menu reappears automatically. After this is displayed on -screen while the receiver outputs test tones to determine the speakers present in step 2), you see Problems when using the Manual MCACC ...
Owner's Manual
Page 89
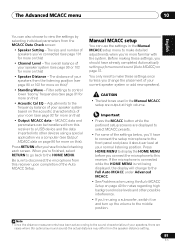
... front panel and place it on and turn up for more on this receiver. Important • Press the MCACC button while the pertinent setup screens are displayed to select MCACC presets. • For some of your speaker system based on this receiver to a USB device and the data imported into...you should have to connect the setup microphone to the HOME MENU. If the microphone is connected while the HOME MENU is not being displayed, the display will change the placement of the Auto MCACC Setup. The Advanced MCACC menu 10 English Deutsch Français Italiano Nederlands Español...
... front panel and place it on and turn up for more on this receiver. Important • Press the MCACC button while the pertinent setup screens are displayed to select MCACC presets. • For some of your speaker system based on this receiver to a USB device and the data imported into...you should have to connect the setup microphone to the HOME MENU. If the microphone is connected while the HOME MENU is not being displayed, the display will change the placement of the Auto MCACC Setup. The Advanced MCACC menu 10 English Deutsch Français Italiano Nederlands Español...


