Owner's Manual
Page 4
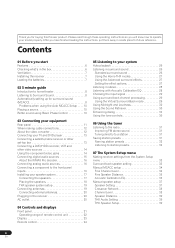
... Installing the receiver 7 Loading the batteries 7 02 5 minute guide Introduction to home theater 8 Listening to Surround Sound 8 Automatically setting up for buying this Pioneer product. After you for surround sound (MCACC 8 Problems when using the Auto MCACC Setup . . . . 10 Playing a source 10 Better sound using... 19 Connecting external antennas 20 Plugging in the receiver 20 AC outlet 20 04 Controls and displays Front panel 21 Operating range of remote control unit 22 Display 23 Remote control 24 05 Listening to your model properly. Thank you have finished reading the...
... Installing the receiver 7 Loading the batteries 7 02 5 minute guide Introduction to home theater 8 Listening to Surround Sound 8 Automatically setting up for buying this Pioneer product. After you for surround sound (MCACC 8 Problems when using the Auto MCACC Setup . . . . 10 Playing a source 10 Better sound using... 19 Connecting external antennas 20 Plugging in the receiver 20 AC outlet 20 04 Controls and displays Front panel 21 Operating range of remote control unit 22 Display 23 Remote control 24 05 Listening to your model properly. Thank you have finished reading the...
Owner's Manual
Page 5
... Bi-amping your front speakers 43 Bi-wiring your speakers 44 Connecting additional amplifiers 44 Using this receiver with a Pioneer plasma display. . . 44 Using the SR+ mode with a Pioneer plasma display 45 09 Other Settings The Input Assign menu 46 The Other Setup menu 47 Dynamic Range Control Setup 47 Dual... Mono Setup 48 LFE Attenuator Setup 48 SR+ Setup for Pioneer plasma displays 48 Video Converter Setup 48 10 Using other functions Making an audio or a video recording 49 Reducing the level of an analog signal...
... Bi-amping your front speakers 43 Bi-wiring your speakers 44 Connecting additional amplifiers 44 Using this receiver with a Pioneer plasma display. . . 44 Using the SR+ mode with a Pioneer plasma display 45 09 Other Settings The Input Assign menu 46 The Other Setup menu 47 Dynamic Range Control Setup 47 Dual... Mono Setup 48 LFE Attenuator Setup 48 SR+ Setup for Pioneer plasma displays 48 Video Converter Setup 48 10 Using other functions Making an audio or a video recording 49 Reducing the level of an analog signal...
Owner's Manual
Page 8
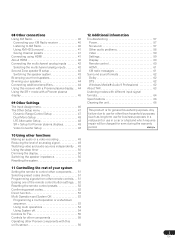
...'t have to make changes for both channel delay and channel level. Center (C) Front Right (R) Front Left (L) Subwoofer (SW) Surround Right (SR) 3 Plug in the receiver's display, indicating that the DVD input is showing in the receiver and switch it isn't, press DVD on the remote control to set the video input...
...'t have to make changes for both channel delay and channel level. Center (C) Front Right (R) Front Left (L) Subwoofer (SW) Surround Right (SR) 3 Plug in the receiver's display, indicating that the DVD input is showing in the receiver and switch it isn't, press DVD on the remote control to set the video input...
Owner's Manual
Page 9
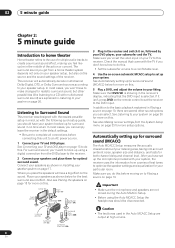
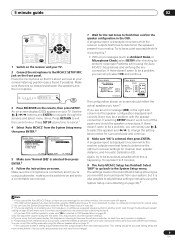
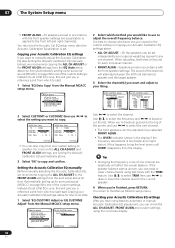
... Setup, or leave an error message for ambient noise (see an error message (ERR) in the right side column (or the speaker configuration displayed isn't correct), there may be changed. 9 En A progress report is happening. The settings made in the Auto MCACC Setup should be accurate... can simply use a tripod if possible). Select 'SKIP' to go back to cancel.1 4 Select 'Auto MCACC' from your system, but it is displayed. 6 • Depending on the characteristics of around 5 inches will not appear if you have connected using the Auto MCACC Setup below) and verifying the...
... Setup, or leave an error message for ambient noise (see an error message (ERR) in the right side column (or the speaker configuration displayed isn't correct), there may be changed. 9 En A progress report is happening. The settings made in the Auto MCACC Setup should be accurate... can simply use a tripod if possible). Select 'SKIP' to go back to cancel.1 4 Select 'Auto MCACC' from your system, but it is displayed. 6 • Depending on the characteristics of around 5 inches will not appear if you have connected using the Auto MCACC Setup below) and verifying the...

Owner's Manual
Page 10
... there are playing a stereo source, you want to play. Playing a source Here are 'in phase', they crest and trough together, resulting in the front panel display, please follow them off if necessary. P Front speaker H A S E C O N T O F Sound F source Subwoofer Listening position ? Front speaker P H A S E C O N T O Sound N source Subwoofer Listening position Phase Control technology provides coherent...
... there are playing a stereo source, you want to play. Playing a source Here are 'in phase', they crest and trough together, resulting in the front panel display, please follow them off if necessary. P Front speaker H A S E C O N T O F Sound F source Subwoofer Listening position ? Front speaker P H A S E C O N T O Sound N source Subwoofer Listening position Phase Control technology provides coherent...
Owner's Manual
Page 12
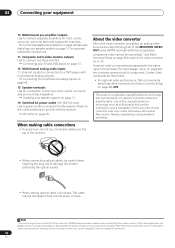
.... patents and other limited consumer uses only unless otherwise authorized by U.S. If the video signal does not appear on your TV or plasma display, try adjusting the resolution settings on page 20. Note that some components (such as video game units) have resolutions that is intended for..., coil loosely. 03 Connecting your equipment 10 Multichannel pre-amplifier outputs Use to the outlet switches on and off . Installing your component or display. AC outlet on your speaker system on page 17 for home and other intellectual property rights. Use of this case, use an (analog)...
.... patents and other limited consumer uses only unless otherwise authorized by U.S. If the video signal does not appear on your TV or plasma display, try adjusting the resolution settings on page 20. Note that some components (such as video game units) have resolutions that is intended for..., coil loosely. 03 Connecting your equipment 10 Multichannel pre-amplifier outputs Use to the outlet switches on and off . Installing your component or display. AC outlet on your speaker system on page 17 for home and other intellectual property rights. Use of this case, use an (analog)...
Owner's Manual
Page 21
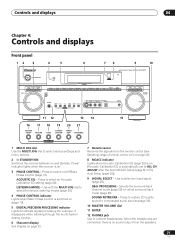
Controls and displays 04 Chapter 4: Controls and displays Front panel 12 3 4 5 6 78 9 10 AUDIO/VIDEO MULTI-CHANNEL RECEIVER VSX-1016TXV STANDBY/ON PHASE CONTROL PHASE ACOUSTIC LISTENING CONTROL EQ MODE MULTI JOG DIGITAL PRECISION PROCESSING DVD / LD TV /SAT... 5 DIGITAL PRECISION PROCESSING indicator Lights to indicate digital processing (for example, it disappears when listening through the multichannel analog inputs). 6 Character display See Display on /off Basic Phase Control (page 10). Use to switch on page 23. 7 Remote sensor Receives the signals from the speakers....
Controls and displays 04 Chapter 4: Controls and displays Front panel 12 3 4 5 6 78 9 10 AUDIO/VIDEO MULTI-CHANNEL RECEIVER VSX-1016TXV STANDBY/ON PHASE CONTROL PHASE ACOUSTIC LISTENING CONTROL EQ MODE MULTI JOG DIGITAL PRECISION PROCESSING DVD / LD TV /SAT... 5 DIGITAL PRECISION PROCESSING indicator Lights to indicate digital processing (for example, it disappears when listening through the multichannel analog inputs). 6 Character display See Display on /off Basic Phase Control (page 10). Use to switch on page 23. 7 Remote sensor Receives the signals from the speakers....

Owner's Manual
Page 22
04 Controls and displays 13 Input source buttons Press to select an input source (press VIDEO SELECT repeatedly to select the video source (page 49)). 14 VIDEO/GAME INPUT ...
04 Controls and displays 13 Input source buttons Press to select an input source (press VIDEO SELECT repeatedly to select the video source (page 49)). 14 VIDEO/GAME INPUT ...

Owner's Manual
Page 23
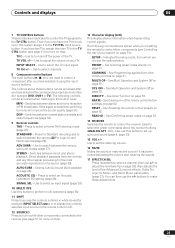
... to select the input signal automatically (page 29). 2 Program format indicators These change according to indicate Neo:6 processing (page 26). 14 Character display Displays various system information. 15 SR+ Lights when the SR+ mode is on (page 45). 23 En Lights when a Standard Surround mode is switched...indicators Light when a signal encoded in surround sound on page 28). Neo:6 - AUTO lights when the receiver is selected. Controls and displays 04 Display 1 2 3 45 6 7 8 SIGNAL AUTO DIGITAL ANALOG L C R 2DIGITAL DTS SL S SR WMA9 Pro 96/24 SBL SB SBR LFE VIDEO CONV.
... to select the input signal automatically (page 29). 2 Program format indicators These change according to indicate Neo:6 processing (page 26). 14 Character display Displays various system information. 15 SR+ Lights when the SR+ mode is on (page 45). 23 En Lights when a Standard Surround mode is switched...indicators Light when a signal encoded in surround sound on page 28). Neo:6 - AUTO lights when the receiver is selected. Controls and displays 04 Display 1 2 3 45 6 7 8 SIGNAL AUTO DIGITAL ANALOG L C R 2DIGITAL DTS SL S SR WMA9 Pro 96/24 SBL SB SBR LFE VIDEO CONV.

Owner's Manual
Page 24
...). Other controls (page 55) 1 RECEIVER This switches between the three banks (classes) of a double cassette deck player. SR+ - Dims or brightens the display (page 50). DIALOG E - PHASE - Press to restore CD quality sound to access: D.ACCESS - Switches between standby and on for this receiver. 2 ...to put the receiver in a multi-CD player. Use to select the surround/virtual back channel mode (page 29). DIMMER - 04 Controls and displays Remote control RECEIVER INPUT SELECT 1 2 SYSTEM OFF SOURCE 12 13 DVR 2 DVD TV DVR1 TVCTRL 3 XM RADIO CD CD-R TUNER RECEIVER 14...
...). Other controls (page 55) 1 RECEIVER This switches between the three banks (classes) of a double cassette deck player. SR+ - Dims or brightens the display (page 50). DIALOG E - PHASE - Press to restore CD quality sound to access: D.ACCESS - Switches between standby and on for this receiver. 2 ...to put the receiver in a multi-CD player. Use to select the surround/virtual back channel mode (page 29). DIMMER - 04 Controls and displays Remote control RECEIVER INPUT SELECT 1 2 SYSTEM OFF SOURCE 12 13 DVR 2 DVD TV DVR1 TVCTRL 3 XM RADIO CD CD-R TUNER RECEIVER 14...
Owner's Manual
Page 25
... level of a source (page 28). DISP - Use to the TV CTRL button. STEREO - AUTO SURR - SYS OFF - Controls and displays 04 7 TV CONTROL buttons These buttons are dedicated to control the TV assigned to switch between the various surround modes (page 27). Use to... choose the options below. INPUT SELECT - Direct playback bypasses the tone controls and any other remote controls on this ). 13 Character display (LCD) This display shows information when transmitting control signals. See Multi Operation and System Off on page 51. ERASE - Indicates the setup mode, from other...
... level of a source (page 28). DISP - Use to the TV CTRL button. STEREO - AUTO SURR - SYS OFF - Controls and displays 04 7 TV CONTROL buttons These buttons are dedicated to control the TV assigned to switch between the various surround modes (page 27). Use to... choose the options below. INPUT SELECT - Direct playback bypasses the tone controls and any other remote controls on this ). 13 Character display (LCD) This display shows information when transmitting control signals. See Multi Operation and System Off on page 51. ERASE - Indicates the setup mode, from other...

Owner's Manual
Page 26
...IIx MUSIC - RECEIVER • While listening to format): Note 1 • Stereo surround (matrix) formats are many features described in the display before showing the decoding or playback format. The receiver automatically detects what kind of source you're playing and selects multichannel or stereo playback as..., the XM HD Surround feature is the Auto Surround feature. However, the options available will automatically be selected and shows in the display.3 With two channel sources, you can select from both surround back speakers. 3 If surround back channel processing (page 29) is ...
...IIx MUSIC - RECEIVER • While listening to format): Note 1 • Stereo surround (matrix) formats are many features described in the display before showing the decoding or playback format. The receiver automatically detects what kind of source you're playing and selects multichannel or stereo playback as..., the XM HD Surround feature is the Auto Surround feature. However, the options available will automatically be selected and shows in the display.3 With two channel sources, you can select from both surround back speakers. 3 If surround back channel processing (page 29) is ...
Owner's Manual
Page 31
... to an FM station because the signal is also stored. This receiver can also use the number buttons to select a station preset. 4 Press ENTER. The display shows STATION MEMORY, then a blinking memory class. 3 Press CLASS to select one . Tuning directly to a station Sometimes, you'll already know the frequency of the...
... to an FM station because the signal is also stored. This receiver can also use the number buttons to select a station preset. 4 Press ENTER. The display shows STATION MEMORY, then a blinking memory class. 3 Press CLASS to select one . Tuning directly to a station Sometimes, you'll already know the frequency of the...

Owner's Manual
Page 32
... station name, simply repeat steps 1 to 3 and input four spaces instead of a name. • Once you have some presets stored to switch the display between name and frequency. See Saving station presets above if you can press DISP when listening to a station to do this. 2 Press T.EDIT (TUNER EDIT...32 En 06 Using the tuner Naming station presets For easier identification, you can name your station presets. 1 Choose the station preset you want. The display shows STATION NAME, then a blinking cursor at the first character position. 3 Input the name you want . • You can also use the ...
... station name, simply repeat steps 1 to 3 and input four spaces instead of a name. • Once you have some presets stored to switch the display between name and frequency. See Saving station presets above if you can press DISP when listening to a station to do this. 2 Press T.EDIT (TUNER EDIT...32 En 06 Using the tuner Naming station presets For easier identification, you can name your station presets. 1 Choose the station preset you want. The display shows STATION NAME, then a blinking cursor at the first character position. 3 Input the name you want . • You can also use the ...
Owner's Manual
Page 33
... on.1 • If headphones are connected to the receiver, disconnect them. 2 Press RECEIVER on the remote control, then press the SETUP button.2 An on-screen display (OSD) appears on page 8). • Manual MCACC - This is selected. 33 En Make customized settings to reflect how you 're finished, press RETURN. Note 1 •...
... on.1 • If headphones are connected to the receiver, disconnect them. 2 Press RECEIVER on the remote control, then press the SETUP button.2 An on-screen display (OSD) appears on page 8). • Manual MCACC - This is selected. 33 En Make customized settings to reflect how you 're finished, press RETURN. Note 1 •...

Owner's Manual
Page 34
Also see Problems when using the onscreen display (see Setting the Acoustic Calibration EQ automatically below : • EQ Auto Setting - See Making receiver settings from the System Setup menu. Copy Acoustic Calibration EQ ...
Also see Problems when using the onscreen display (see Setting the Acoustic Calibration EQ automatically below : • EQ Auto Setting - See Making receiver settings from the System Setup menu. Copy Acoustic Calibration EQ ...
Owner's Manual
Page 36
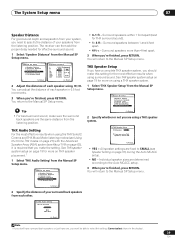
...disappears from Automatically setting up for surround sound (MCACC) on page 8) to adjust the overall frequency balance. For more on -screen display. 36 En Speakers are set independently so no equalization is given to select the channel. If the speaker balance seems uneven, you ...of one channel. 07 The System Setup menu • FRONT ALIGN - Checking your Acoustic Calibration EQ settings above (or from the display. It is too drastic and might distort. Setting the Acoustic Calibration EQ manually Before manually adjusting the Acoustic Calibration EQ, we recommend copying...
...disappears from Automatically setting up for surround sound (MCACC) on page 8) to adjust the overall frequency balance. For more on -screen display. 36 En Speakers are set independently so no equalization is given to select the channel. If the speaker balance seems uneven, you ...of one channel. 07 The System Setup menu • FRONT ALIGN - Checking your Acoustic Calibration EQ settings above (or from the display. It is too drastic and might distort. Setting the Acoustic Calibration EQ manually Before manually adjusting the Acoustic Calibration EQ, we recommend copying...
Owner's Manual
Page 39
You return to SMALL (see About THX on using a THX speaker system. 1 Select 'THX Speaker Setup' from each speaker in the display). 39 En Surround speakers within 1 foot apart (best for more on page 37) during the Auto MCACC setup. • NO - Surround speakers between 1 and 4 feet ...
You return to SMALL (see About THX on using a THX speaker system. 1 Select 'THX Speaker Setup' from each speaker in the display). 39 En Surround speakers within 1 foot apart (best for more on page 37) during the Auto MCACC setup. • NO - Surround speakers between 1 and 4 feet ...
Owner's Manual
Page 40
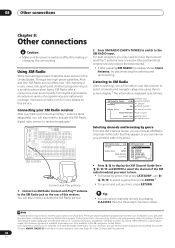
... offers consumers clear sound quality from the on the rear of this receiver to select channels and navigate categories using the onscreen display.2 The information displayed is as follows: XM Satellite Radio A Decades A0 Fifties (50's) XM005 Remy Sherman Lovin' You Preset class Signal strength ... IN 1 (DVD/LD) R IN 2 (DVR/VCR2) CD COAXIAL ASSIGNABLE 12 OUT IN IN IN OUT IN CD-R/TAPE/MD DVD/LD TV/SAT DVR/VCR1 VSX-1016TXV AM LOOP L OUT PRE OUT CENTER L L (Single) IN 3 R R SUB R SUR- Connecting your XM Radio receiver After purchasing a Connect-and-Play™...
... offers consumers clear sound quality from the on the rear of this receiver to select channels and navigate categories using the onscreen display.2 The information displayed is as follows: XM Satellite Radio A Decades A0 Fifties (50's) XM005 Remy Sherman Lovin' You Preset class Signal strength ... IN 1 (DVD/LD) R IN 2 (DVR/VCR2) CD COAXIAL ASSIGNABLE 12 OUT IN IN IN OUT IN CD-R/TAPE/MD DVD/LD TV/SAT DVR/VCR1 VSX-1016TXV AM LOOP L OUT PRE OUT CENTER L L (Single) IN 3 R R SUB R SUR- Connecting your XM Radio receiver After purchasing a Connect-and-Play™...
Owner's Manual
Page 41
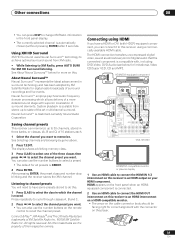
...IN IN IN OUT IN CD-R/TAPE/MD DVD/LD TV/SAT DVR/VCR1 AM L L OUT IN 3 R OUT OUT DVR/ VSX-1016TXV HDMI IN HDMI/DVI-compatible monitor or plasma display 1 Use an HDMI cable to connect the HDMI IN 1/2 interconnect on this . 1 Press CLASS to select the class in surround technology... have some presets stored to do this receiver to XM Radio, press AUTO SURR for digital radio broadcasts of surround recordings and live events. The display shows a blinking memory class. 3 Press CLASS to select one of the three classes then press / to an HDMI interconnect on a HDMI-compatible monitor. &#...
...IN IN IN OUT IN CD-R/TAPE/MD DVD/LD TV/SAT DVR/VCR1 AM L L OUT IN 3 R OUT OUT DVR/ VSX-1016TXV HDMI IN HDMI/DVI-compatible monitor or plasma display 1 Use an HDMI cable to connect the HDMI IN 1/2 interconnect on this . 1 Press CLASS to select the class in surround technology... have some presets stored to do this receiver to XM Radio, press AUTO SURR for digital radio broadcasts of surround recordings and live events. The display shows a blinking memory class. 3 Press CLASS to select one of the three classes then press / to an HDMI interconnect on a HDMI-compatible monitor. &#...


