
Operating Instructions
Page 2
... the equipment and receiver. - D8-10-2_En This Class B digital apparatus complies with Canadian ICES-003. Wash hands after handling D36-P4_A_En This product contains mercury. PREVENT ELECTRIC SHOCK DO NOT USE THIS (POLARIZED) PLUG WITH AN EXTENSION CORD. Connect the equipment into an outlet on this material may invalidate the user's right to operate the equipment. Cet...
... the equipment and receiver. - D8-10-2_En This Class B digital apparatus complies with Canadian ICES-003. Wash hands after handling D36-P4_A_En This product contains mercury. PREVENT ELECTRIC SHOCK DO NOT USE THIS (POLARIZED) PLUG WITH AN EXTENSION CORD. Connect the equipment into an outlet on this material may invalidate the user's right to operate the equipment. Cet...
Operating Instructions
Page 3
... be cleaned only with a three-wire grounding type plug, a plug having one blade wider than the other), it from heat sources such as to your home, consult your obsolete outlet. ACCESSORIES - VENTILATION - The appliance should be sure the service technician has used to connect the unit to replace your product dealer or local power company. REPLACEMENT PARTS - If you are required, be...
... be cleaned only with a three-wire grounding type plug, a plug having one blade wider than the other), it from heat sources such as to your home, consult your obsolete outlet. ACCESSORIES - VENTILATION - The appliance should be sure the service technician has used to connect the unit to replace your product dealer or local power company. REPLACEMENT PARTS - If you are required, be...

Operating Instructions
Page 4
...time your new sound equipment will be stepped on the power cord, or pinch the cord. Taking a minute to do this now will help to higher volumes of your protection. We Want You Listening For A Lifetime Used wisely, your hearing "comfort level" adapts to prevent hearing damage or loss in a car or ship) and which requires repair... all, we want you 've just purchased is for your equipment by the plug. Never make a knot in the cord or tie it there. K041_En Downloaded from traffic 50 Light traffic, normal conversation, quiet office 60 Air conditioner at 20 feet, sewing machine...
...time your new sound equipment will be stepped on the power cord, or pinch the cord. Taking a minute to do this now will help to higher volumes of your protection. We Want You Listening For A Lifetime Used wisely, your hearing "comfort level" adapts to prevent hearing damage or loss in a car or ship) and which requires repair... all, we want you 've just purchased is for your equipment by the plug. Never make a knot in the cord or tie it there. K041_En Downloaded from traffic 50 Light traffic, normal conversation, quiet office 60 Air conditioner at 20 feet, sewing machine...
Operating Instructions
Page 5
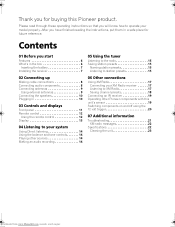
...03 Controls and displays Front panel 11 Remote control 12 Using the remote control 12 Display 13 04 Listening to station presets 15 06 Other connections Using XM Radio 17 Connecting your model properly. Please read through these operating instructions so that you start Features 6 What's in the box 6 Inserting the battery 7 Installing the receiver 7 02 Connecting up Making cable connections 8 Connecting audio components 8 Connecting antennas 9 Using external antennas 9 Connecting the speakers 10 Plugging in a safe place for buying this unit's sensor 19 Switching components...
...03 Controls and displays Front panel 11 Remote control 12 Using the remote control 12 Display 13 04 Listening to station presets 15 06 Other connections Using XM Radio 17 Connecting your model properly. Please read through these operating instructions so that you start Features 6 What's in the box 6 Inserting the battery 7 Installing the receiver 7 02 Connecting up Making cable connections 8 Connecting audio components 8 Connecting antennas 9 Using external antennas 9 Connecting the speakers 10 Plugging in a safe place for buying this unit's sensor 19 Switching components...
Operating Instructions
Page 6
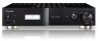
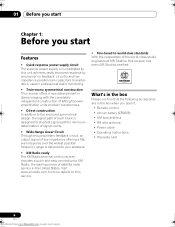
... at AIR Studios, this receiver provides a quick and easy connection to XM Radio, the leading provier of satellite radio service in the United States. 01 Before you start Chapter 1: Before you open it. • Remote control • Lithium battery (CR2025) • AM loop antenna • FM wire antenna • Power cable • Operating instructions • Warranty card 6 En Downloaded from www.Manualslib.com manuals search engine
... at AIR Studios, this receiver provides a quick and easy connection to XM Radio, the leading provier of satellite radio service in the United States. 01 Before you start Chapter 1: Before you open it. • Remote control • Lithium battery (CR2025) • AM loop antenna • FM wire antenna • Power cable • Operating instructions • Warranty card 6 En Downloaded from www.Manualslib.com manuals search engine

Operating Instructions
Page 8
... audio player) to the AUX inputs in this receiver. Use a stereo RCA phono cable as shown in the U.S. L 2 R IN OUT REC PLAY AUDIO IN/OUT 1 OUT R L AUDIO OUT D6 Connecting audio components The number and kind of connections depends on this unit may cause a humming noise from the speakers. 3 Turntable FM UNBAL 75 AM LOOP ANTENNA XM IN IR CONTROL OUT IN OUT SIGNAL GND L L 12V TRIGGER REC PLAY OUT IN TAPE AUX1...
... audio player) to the AUX inputs in this receiver. Use a stereo RCA phono cable as shown in the U.S. L 2 R IN OUT REC PLAY AUDIO IN/OUT 1 OUT R L AUDIO OUT D6 Connecting audio components The number and kind of connections depends on this unit may cause a humming noise from the speakers. 3 Turntable FM UNBAL 75 AM LOOP ANTENNA XM IN IR CONTROL OUT IN OUT SIGNAL GND L L 12V TRIGGER REC PLAY OUT IN TAPE AUX1...

Operating Instructions
Page 9
... AUX inputs instead. b 3 Fix the AM loop antenna to the stand. b) before clipping the loop to the attached stand. To fix the stand to the TAPE outputs (OUT) on the tape deck to the antenna, bend in phono pre-amp), connect it to the AM antenna terminal without disconnecting the supplied AM loop antenna. Then connect the audio inputs on this receiver. To improve reception and sound quality, connect external antennas (see Using external antennas...
... AUX inputs instead. b 3 Fix the AM loop antenna to the stand. b) before clipping the loop to the attached stand. To fix the stand to the TAPE outputs (OUT) on the tape deck to the antenna, bend in phono pre-amp), connect it to the AM antenna terminal without disconnecting the supplied AM loop antenna. Then connect the audio inputs on this receiver. To improve reception and sound quality, connect external antennas (see Using external antennas...

Operating Instructions
Page 10
... AC power source. You can use either bare wire connections or banana plugs to do this may cause the receiver to turn off automatically. Connections for details on the rear panel of insulator stripped from www.Manualslib.com manuals search engine You can use is firmly clamped (fig. Bare wire connections Make sure that came with about 3/8 inch of the receiver, then plug into a power outlet. 10 En Downloaded...
... AC power source. You can use either bare wire connections or banana plugs to do this may cause the receiver to turn off automatically. Connections for details on the rear panel of insulator stripped from www.Manualslib.com manuals search engine You can use is firmly clamped (fig. Bare wire connections Make sure that came with about 3/8 inch of the receiver, then plug into a power outlet. 10 En Downloaded...

Operating Instructions
Page 11
Controls and displays 03 Chapter 3: Controls and displays Front panel 1 2 3 POWER STANDBY OFF ON PHONES 4 5 6 DIRECT INPUT SELECTOR VOLUME STEREO RECEIVER A6 7 8 1 POWER OFF ON 2 STANDBY indicator 3 Character display (page 13) 4 DIRECT Press to switch the Direct listening feature on or off (page 14). 5 INPUT SELECTOR dial Selects an input source. 6 MASTER VOLUME 7 Remote sensor 8 PHONES jack Use to connect headphones (when connected, there is no sound output from the speakers). 11 En Downloaded from www.Manualslib.com manuals search engine
Controls and displays 03 Chapter 3: Controls and displays Front panel 1 2 3 POWER STANDBY OFF ON PHONES 4 5 6 DIRECT INPUT SELECTOR VOLUME STEREO RECEIVER A6 7 8 1 POWER OFF ON 2 STANDBY indicator 3 Character display (page 13) 4 DIRECT Press to switch the Direct listening feature on or off (page 14). 5 INPUT SELECTOR dial Selects an input source. 6 MASTER VOLUME 7 Remote sensor 8 PHONES jack Use to connect headphones (when connected, there is no sound output from the speakers). 11 En Downloaded from www.Manualslib.com manuals search engine
Operating Instructions
Page 12
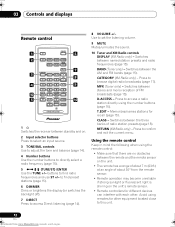
... fluorescent light is shining on . 2 Input selector buttons Press to select an input source. 3 TONE/BAL controls Use to adjust the tone and balance (page 14). 4 Number buttons Use the number buttons to directly select a radio frequency (page 15). 5 TUNE/ST) /ENTER Use the TUNE +/- to access a radio station directly using remotes for recall (page 15). Use to confirm and exit the current menu. Switches between the AM and FM bands (page 15). CATEGORY (XM Radio only) - Switches between stereo and mono reception of radio station presets (page...
... fluorescent light is shining on . 2 Input selector buttons Press to select an input source. 3 TONE/BAL controls Use to adjust the tone and balance (page 14). 4 Number buttons Use the number buttons to directly select a radio frequency (page 15). 5 TUNE/ST) /ENTER Use the TUNE +/- to access a radio station directly using remotes for recall (page 15). Use to confirm and exit the current menu. Switches between the AM and FM bands (page 15). CATEGORY (XM Radio only) - Switches between stereo and mono reception of radio station presets (page...

Operating Instructions
Page 13
.... 3 Master volume level 4 FM - Lights when FM broadcasts are received. 5 XM - KHz - Lights when a broadcast is being received in the operating range of the remote. MONO - Lights when low-range tone adjustment is used to select mono mode. 2 Tone control indicators TREBLE - Lights when AM broadcasts are received. BASS - AM - Lights when XM radio broadcasts are received. 6 Character display Displays various system information. 7 MHz - STEREO - Lights when an AM frequency is displayed. Lights when an FM frequency is displayed. 13 En Downloaded from www.Manualslib.com manuals search...
.... 3 Master volume level 4 FM - Lights when FM broadcasts are received. 5 XM - KHz - Lights when a broadcast is being received in the operating range of the remote. MONO - Lights when low-range tone adjustment is used to select mono mode. 2 Tone control indicators TREBLE - Lights when AM broadcasts are received. BASS - AM - Lights when XM radio broadcasts are received. 6 Character display Displays various system information. 7 MHz - STEREO - Lights when an AM frequency is displayed. Lights when an FM frequency is displayed. 13 En Downloaded from www.Manualslib.com manuals search...
Operating Instructions
Page 14
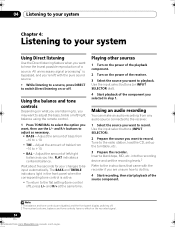
... device and set the recording levels.2 Refer to the instructions that came with the pure sound source. • While listening to a source, press DIRECT to switch Direct listening on the recorded signal. 14 En Downloaded from -10 to the radio station, load the CD, set up the turntable, etc. 3 Prepare the recorder. and R/+ buttons to the flat setting (tone control off . Adjust the amount of the source component. Use the input select buttons (INPUT SELECTOR). 2 Prepare...
... device and set the recording levels.2 Refer to the instructions that came with the pure sound source. • While listening to a source, press DIRECT to switch Direct listening on the recorded signal. 14 En Downloaded from -10 to the radio station, load the CD, set up the turntable, etc. 3 Prepare the recorder. and R/+ buttons to the flat setting (tone control off . Adjust the amount of the source component. Use the input select buttons (INPUT SELECTOR). 2 Prepare...
Operating Instructions
Page 15
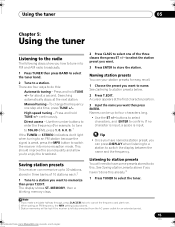
... TUNE +/- Use the number buttons to enter the frequency (For example, to tune to 106.00 (FM), press 1, 0, 6, 0, 0).1 If the TUNED or STEREO indicators don't light when tuning to an FM station because the signal is weak, press the MPX button to do this already.3 1 Press TUNER to enjoy the broadcast. Press and hold TUNE +/- There are four ways to switch the receiver into mono reception mode. to select...
... TUNE +/- Use the number buttons to enter the frequency (For example, to tune to 106.00 (FM), press 1, 0, 6, 0, 0).1 If the TUNED or STEREO indicators don't light when tuning to an FM station because the signal is weak, press the MPX button to do this already.3 1 Press TUNER to enjoy the broadcast. Press and hold TUNE +/- There are four ways to switch the receiver into mono reception mode. to select...
Operating Instructions
Page 17
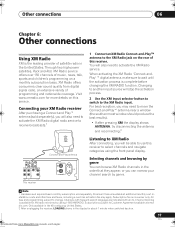
... activate the XM Radio digital radio service to receive broadcasts.1 XM IN IR CONTROL OUT IN OUT SIGNAL GND L L R R AUX2 CD PHONO This receiver Connect-and-Play antenna AC IN L SPEAKER 1 Connect an XM Radio Connect-and-Play™ antenna to the XM Radio jack on the rear of music, news, talk, sports and children's programming on a monthly subscription basis. Channel blocking is available for more details on . 17 En Downloaded from digital signal radio, an extensive variety...
... activate the XM Radio digital radio service to receive broadcasts.1 XM IN IR CONTROL OUT IN OUT SIGNAL GND L L R R AUX2 CD PHONO This receiver Connect-and-Play antenna AC IN L SPEAKER 1 Connect an XM Radio Connect-and-Play™ antenna to the XM Radio jack on the rear of music, news, talk, sports and children's programming on a monthly subscription basis. Channel blocking is available for more details on . 17 En Downloaded from digital signal radio, an extensive variety...

Operating Instructions
Page 18
... channel presets This receiver can press DISPLAY to change XM Radio information in the front panel display. 1 Press CLASS to select the class in three banks, or classes, (A, B and C) of 10 stations each. 1 Select the channel you want to memorize. You can also use the number buttons to select a preset. • The default for all presets is stored. The display shows a blinking memory class. 3 Press CLASS to select one of the Connect-and-Play antenna...
... channel presets This receiver can press DISPLAY to change XM Radio information in the front panel display. 1 Press CLASS to select the class in three banks, or classes, (A, B and C) of 10 stations each. 1 Select the channel you want to memorize. You can also use the number buttons to select a preset. • The default for all presets is stored. The display shows a blinking memory class. 3 Press CLASS to select one of the Connect-and-Play antenna...
Operating Instructions
Page 19
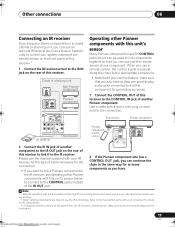
.... • If using two remote controls (at least one set of one component. Use a cable with your component to the IR receiver, see the manual supplied with a mono mini-plug on the rear of another Pioneer component. XM IN IR CONTROL OUT IN OUT This receiver Pioneer component SIGNAL GND R R AUX1 AUX2 IR receiver L MM/MC CD L PHONO This receiver Pioneer component remote control IR CONTROL OUT OUT SIGNAL GND L CONTROL IN OUT 2 Connect the IR IN jack of another component for the...
.... • If using two remote controls (at least one set of one component. Use a cable with your component to the IR receiver, see the manual supplied with a mono mini-plug on the rear of another Pioneer component. XM IN IR CONTROL OUT IN OUT This receiver Pioneer component SIGNAL GND R R AUX1 AUX2 IR receiver L MM/MC CD L PHONO This receiver Pioneer component remote control IR CONTROL OUT OUT SIGNAL GND L CONTROL IN OUT 2 Connect the IR IN jack of another component for the...

Operating Instructions
Page 20
... you turn the power to a connected component on, the power to the 12V trigger of this receiver to this receiver is also turned on. Use a cable with a mono mini-plug on each end for the connection. This receiver will have no effect in any case). 20 En Downloaded from www.Manualslib.com manuals search engine 06 Other connections Switching components on and off using the 12 volt trigger You can connect components...
... you turn the power to a connected component on, the power to the 12V trigger of this receiver to this receiver is also turned on. Use a cable with a mono mini-plug on each end for the connection. This receiver will have no effect in any case). 20 En Downloaded from www.Manualslib.com manuals search engine 06 Other connections Switching components on and off using the 12 volt trigger You can connect components...

Operating Instructions
Page 21
... nearest Pioneer authorized service center or your receiver, until the noise disappears. No sound is output when a function is selected. • Make sure the component is switched on the remote control to a wall (or connect an outdoor FM antenna). • Connect an additional internal or external AM antenna (page 9). • Turn off . Additional information 07 Chapter 7: Additional information Troubleshooting Incorrect operations are no loose strands of speaker wire touching the rear panel. Considerable...
... nearest Pioneer authorized service center or your receiver, until the noise disappears. No sound is output when a function is selected. • Make sure the component is switched on the remote control to a wall (or connect an outdoor FM antenna). • Connect an additional internal or external AM antenna (page 9). • Turn off . Additional information 07 Chapter 7: Additional information Troubleshooting Incorrect operations are no loose strands of speaker wire touching the rear panel. Considerable...
Operating Instructions
Page 22
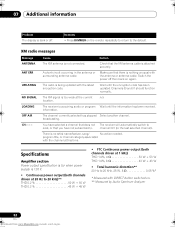
... with DIRECT button switched on. ** Measured by Audio Spectrum Analyzer 22 En Downloaded from www.Manualslib.com manuals search engine A short-circuit occurring in the antenna or surrounding antenna cable. Wait until the information has been received. information. channel 001 (or the last selected channel). XM radio messages Message ANTENNA Cause The XM antenna is too weak at the current n/a location. The XM signal is not connected. broadcasting. Specifications Amplifier section Power output specification...
... with DIRECT button switched on. ** Measured by Audio Spectrum Analyzer 22 En Downloaded from www.Manualslib.com manuals search engine A short-circuit occurring in the antenna or surrounding antenna cable. Wait until the information has been received. information. channel 001 (or the last selected channel). XM radio messages Message ANTENNA Cause The XM antenna is too weak at the current n/a location. The XM signal is not connected. broadcasting. Specifications Amplifier section Power output specification...

Operating Instructions
Page 23
...; Output (Level/Impedance) TAPE REC 200 mV/1 kΩ • Tone control Bass 10 dB (100 Hz) Treble 10 dB (10 kHz) • Signal-to-Noise Ratio CD, TAPE, AUX (200 mV input 103 dB PHONO (MM, 5 mV input 80 dB • FM Tuner Section Frequency Range 87.5 MHz to 108 MHz Usable Sensitivity Mono:13.2 dBf, IHF (1.3 µV/ 75 Ω) 50 dB Quieting Sensitivity Mono: 20.2 dB Stereo...
...; Output (Level/Impedance) TAPE REC 200 mV/1 kΩ • Tone control Bass 10 dB (100 Hz) Treble 10 dB (10 kHz) • Signal-to-Noise Ratio CD, TAPE, AUX (200 mV input 103 dB PHONO (MM, 5 mV input 80 dB • FM Tuner Section Frequency Range 87.5 MHz to 108 MHz Usable Sensitivity Mono:13.2 dBf, IHF (1.3 µV/ 75 Ω) 50 dB Quieting Sensitivity Mono: 20.2 dB Stereo...


