Owner's Manual
Page 5
... antenna 29 FM wire antenna 29 Connecting external antennas 29 Plugging in the receiver 29 04 Controls and displays Front panel 30 Operating range of remote control unit 31 Display 32 Remote control 33 05 Listening to your model properly. After you have finished reading the instructions, ...Advanced surround effects 36 Listening in a safe place for buying this Pioneer product. Please read through these operating instructions so you will know how to station presets 42 07 The Advanced MCACC menu Making receiver settings from the Advanced MCACC menu 43 Automatic MCACC (Expert 44...
... antenna 29 FM wire antenna 29 Connecting external antennas 29 Plugging in the receiver 29 04 Controls and displays Front panel 30 Operating range of remote control unit 31 Display 32 Remote control 33 05 Listening to your model properly. After you have finished reading the instructions, ...Advanced surround effects 36 Listening in a safe place for buying this Pioneer product. Please read through these operating instructions so you will know how to station presets 42 07 The Advanced MCACC menu Making receiver settings from the Advanced MCACC menu 43 Automatic MCACC (Expert 44...
Owner's Manual
Page 7
... Controls for TVs 106 Controls for other components 107 Operating other Pioneer components with different input signal formats. . . . 133 Specifications 134 Cleaning the unit 135 Our philosophy 135 Features 135 7 En 14 Controlling the rest of your system Setting the remote to control other components . . . . 102 Selecting preset codes directly 102 Programming...
... Controls for TVs 106 Controls for other components 107 Operating other Pioneer components with different input signal formats. . . . 133 Specifications 134 Cleaning the unit 135 Our philosophy 135 Features 135 7 En 14 Controlling the rest of your system Setting the remote to control other components . . . . 102 Selecting preset codes directly 102 Programming...

Owner's Manual
Page 8
...Before you start Chapter 1: Before you start Checking what's in the box Please check that you've received the following supplied accessories: • Setup microphone (cable: 5 m (16.4 ft.)) • Remote control unit • AA/IEC R6P dry cell batteries x2 • AM loop antenna •... FM wire antenna • Warranty card • These operating instructions Installing the receiver • When installing this receiver's bottom panel while the power is on the ...
...Before you start Chapter 1: Before you start Checking what's in the box Please check that you've received the following supplied accessories: • Setup microphone (cable: 5 m (16.4 ft.)) • Remote control unit • AA/IEC R6P dry cell batteries x2 • AM loop antenna •... FM wire antenna • Warranty card • These operating instructions Installing the receiver • When installing this receiver's bottom panel while the power is on the ...

Owner's Manual
Page 9
.... See Listening to your speaker setup, but other sound options you can turn on page 26. When you get from the DVD player to the receiver. 2 Connect your TV to this . • Set the subwoofer volume to a comfortable level. 4 Use the on page 20 to your speaker setup. The surround ..., DTS, or Dolby Surround sources according to set the video input on page 35. Where you can select. If it isn't, press DVD on the remote control to your system on your speakers and place them for more setup options. This receiver will have a big effect on page 89. 9 En
.... See Listening to your speaker setup, but other sound options you can turn on page 26. When you get from the DVD player to the receiver. 2 Connect your TV to this . • Set the subwoofer volume to a comfortable level. 4 Use the on page 20 to your speaker setup. The surround ..., DTS, or Dolby Surround sources according to set the video input on page 35. Where you can select. If it isn't, press DVD on the remote control to your system on your speakers and place them for more setup options. This receiver will have a big effect on page 89. 9 En

Owner's Manual
Page 10
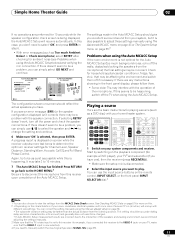
... distance, and tests for the test tones to finish, then confirm the speaker configuration in the OSD. Place the microphone so that the remote control's operation selector switch is selected. Make sure the microphone is connected, and if you're using the Auto MCACC Setup, the headphones... MENU T.EDIT ST CATEGORY HOME MENU iPod CTRL TUNE RETURN The Full Auto MCACC display appears once the microphone is connected.1 1a.Full Auto MCACC A/V RECEIVER Surr Back System : Normal Save SYMMETRY to : M1.MEMORY 1 START Exit Return 3 Make sure 'Normal' is selected,2 select an MCACC preset3, then...
... distance, and tests for the test tones to finish, then confirm the speaker configuration in the OSD. Place the microphone so that the remote control's operation selector switch is selected. Make sure the microphone is connected, and if you're using the Auto MCACC Setup, the headphones... MENU T.EDIT ST CATEGORY HOME MENU iPod CTRL TUNE RETURN The Full Auto MCACC display appears once the microphone is connected.1 1a.Full Auto MCACC A/V RECEIVER Surr Back System : Normal Save SYMMETRY to : M1.MEMORY 1 START Exit Return 3 Make sure 'Normal' is selected,2 select an MCACC preset3, then...
Owner's Manual
Page 11
...(air conditioner, fridge, fan, etc.), that the VIDEO 1 input is disconnected. 2 Select the input source you don't need to determine the optimum receiver settings for ambient noise (see an error message (ERR) (or the speaker configuration displayed isn't correct), there may take 3 to change the setting ...SURR BD MENU SIGNAL SEL SLEEP DIMMER AUDIO SR+ SBch MCACC DISP A.ATT GENRE HDMI OUT 1 Switch on -screen while the receiver outputs more on the remote control, INPUT SELECT, or the front panel INPUT SELECTOR dial.4 Note 1 You can correct the setting manually using the Auto MCACC ...
...(air conditioner, fridge, fan, etc.), that the VIDEO 1 input is disconnected. 2 Select the input source you don't need to determine the optimum receiver settings for ambient noise (see an error message (ERR) (or the speaker configuration displayed isn't correct), there may take 3 to change the setting ...SURR BD MENU SIGNAL SEL SLEEP DIMMER AUDIO SR+ SBch MCACC DISP A.ATT GENRE HDMI OUT 1 Switch on -screen while the receiver outputs more on the remote control, INPUT SELECT, or the front panel INPUT SELECTOR dial.4 Note 1 You can correct the setting manually using the Auto MCACC ...
Owner's Manual
Page 15
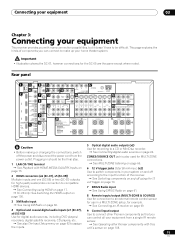
... power and disconnect the power cord from a single IR remote sensor. See Operating other Pioneer components with HOME MEDIA GALLERY inputs on page 73. 2 HDMI connectors (x6 (SC-07), x5 (SC-05)) Multiple inputs and one (SC-05) or two (SC-07) outputs for high-quality audio/video connection to compatible...-ZONE & SOURCE) Use for connection to an external remote control sensor for use in a MULTI-ZONE setup, for example. See Connecting an IR receiver on page 69. 4 Optical and coaxial digital audio inputs (x7 (SC-07), x6 (SC-05)) Use for MULTI-ZONE connections. See MULTI...
... power and disconnect the power cord from a single IR remote sensor. See Operating other Pioneer components with HOME MEDIA GALLERY inputs on page 73. 2 HDMI connectors (x6 (SC-07), x5 (SC-05)) Multiple inputs and one (SC-05) or two (SC-07) outputs for high-quality audio/video connection to compatible...-ZONE & SOURCE) Use for connection to an external remote control sensor for use in a MULTI-ZONE setup, for example. See Connecting an IR receiver on page 69. 4 Optical and coaxial digital audio inputs (x7 (SC-07), x6 (SC-05)) Use for MULTI-ZONE connections. See MULTI...
Owner's Manual
Page 18
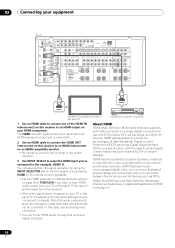
...the remote control repeatedly. • Set the HDMI parameter in one connector (instead of the HDMI IN interconnects on this receiver to an HDMI output on page 96 to THROUGH if you 've connected to connect one of several cables and connectors), and communication between the AV source and AV devices... or registered trademarks of High Bandwidth Digital Content Protection (HDCP) as well as Digital Visual Interface (DVI) in Setting the Audio options on your equipment SC-07 LAN(10/100) XM IN HDMI COAXIAL ASSIGNABLE IN 1 (DVD) BD IN IN 2 (CD) IN 3 (DVR2) IN 1 IN 1 (TV/SAT) IN 2 IN...
...the remote control repeatedly. • Set the HDMI parameter in one connector (instead of the HDMI IN interconnects on this receiver to an HDMI output on page 96 to THROUGH if you 've connected to connect one of several cables and connectors), and communication between the AV source and AV devices... or registered trademarks of High Bandwidth Digital Content Protection (HDCP) as well as Digital Visual Interface (DVI) in Setting the Audio options on your equipment SC-07 LAN(10/100) XM IN HDMI COAXIAL ASSIGNABLE IN 1 (DVD) BD IN IN 2 (CD) IN 3 (DVR2) IN 1 IN 1 (TV/SAT) IN 2 IN...

Owner's Manual
Page 25
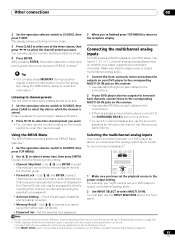
Connect using INPUT SELECT (remote) or the INPUT SELECTOR dial (front panel) to select ...the recorder. This input also has a grounding terminal that most turntables require. ATTENTION: ENCEINTE D'IMPEDANCE DE 6Ω - 16Ω . SC-07 LAN(10/100) XM IN HDMI COAXIAL ASSIGNABLE IN 1 (DVD) BD IN IN 2 (CD) IN 3 (DVR2) IN 1... a built-in phono pre-amp), connect it to the ground terminal on this receiver. • If your equipment 03 Connecting analog audio sources This receiver features five stereo audio-only inputs. L (Single) SELECTABLE SEE INSTRUCTION MANUAL SELECTABLE ...
Connect using INPUT SELECT (remote) or the INPUT SELECTOR dial (front panel) to select ...the recorder. This input also has a grounding terminal that most turntables require. ATTENTION: ENCEINTE D'IMPEDANCE DE 6Ω - 16Ω . SC-07 LAN(10/100) XM IN HDMI COAXIAL ASSIGNABLE IN 1 (DVD) BD IN IN 2 (CD) IN 3 (DVR2) IN 1... a built-in phono pre-amp), connect it to the ground terminal on this receiver. • If your equipment 03 Connecting analog audio sources This receiver features five stereo audio-only inputs. L (Single) SELECTABLE SEE INSTRUCTION MANUAL SELECTABLE ...

Owner's Manual
Page 30
... upscaled (page 17)). Lights when one of the Selecting MCACC presets on page 38 is connected (page 17). 4 Remote sensor Receives the signals from the remote control (see Setting the Audio options on page 32. HDMI indicator - Blinks when connecting an HDMIequipped component; lights when ... standby. 04 Controls and displays Chapter 4: Controls and displays Front panel Illustration shows the SC-07 front panel. 12 34 5 INPUT SELECTOR STANDBY/ON PHASE CONTROL ADVANCED MCACC DIGITAL VIDEO SCALER HDMI 6 SC-07 MASTER VOLUME 8 9 10 11 12 13 14 15 AUDIO PARAMETER (TUNE) VIDEO...
... upscaled (page 17)). Lights when one of the Selecting MCACC presets on page 38 is connected (page 17). 4 Remote sensor Receives the signals from the remote control (see Setting the Audio options on page 32. HDMI indicator - Blinks when connecting an HDMIequipped component; lights when ... standby. 04 Controls and displays Chapter 4: Controls and displays Front panel Illustration shows the SC-07 front panel. 12 34 5 INPUT SELECTOR STANDBY/ON PHASE CONTROL ADVANCED MCACC DIGITAL VIDEO SCALER HDMI 6 SC-07 MASTER VOLUME 8 9 10 11 12 13 14 15 AUDIO PARAMETER (TUNE) VIDEO...

Owner's Manual
Page 31
... 55). 17 RETURN Press to switch between the remote control and the receiver's remote sensor. • Direct sunlight or fluorescent light is shining onto the remote sensor. • The receiver is located near a device that is emitting infrared rays. • The receiver is no sound output from the main zone (...see Using the MULTIZONE controls on page 66) use ST / to find preset stations (page 42). 11 TUNER EDIT Use with another infrared remote control unit. 13 Listening mode buttons ...
... 55). 17 RETURN Press to switch between the remote control and the receiver's remote sensor. • Direct sunlight or fluorescent light is shining onto the remote sensor. • The receiver is located near a device that is emitting infrared rays. • The receiver is no sound output from the main zone (...see Using the MULTIZONE controls on page 66) use ST / to find preset stations (page 42). 11 TUNER EDIT Use with another infrared remote control unit. 13 Listening mode buttons ...
Owner's Manual
Page 33
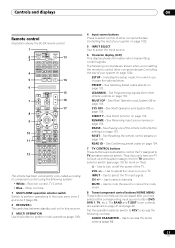
... to the TV operation selector switch (see page 102 for this receiver. 3 MULTI OPERATION Use this ). - See Multi Operation and System Off on page 41 and page 42. See Resetting the remote control presets on page 104. 7 TV CONTROL buttons These buttons ...SELECT Use to select control of your system on /off the power of the remote control button settings on page 102): SETUP - MUTE - Controls and displays 04 Remote control Illustration shows the SC-07 remote control. 1 RECEIVER MAIN SOURCE 2 ZONE2 3 3 MULTI OPERATION DVD BD DVR1 DVR2 VIDEO1 VIDEO2 VIDEO3...
... to the TV operation selector switch (see page 102 for this receiver. 3 MULTI OPERATION Use this ). - See Multi Operation and System Off on page 41 and page 42. See Resetting the remote control presets on page 104. 7 TV CONTROL buttons These buttons ...SELECT Use to select control of your system on /off the power of the remote control button settings on page 102): SETUP - MUTE - Controls and displays 04 Remote control Illustration shows the SC-07 remote control. 1 RECEIVER MAIN SOURCE 2 ZONE2 3 3 MULTI OPERATION DVD BD DVR1 DVR2 VIDEO1 VIDEO2 VIDEO3...

Owner's Manual
Page 34
... genre of the source currently being played back (this feature is available only when a Pioneer DVD recorder supporting HDMI Control is connected to select closed captioning with DTV). 9 TUNE/ST.../ to find radio frequencies and use this ). 14 Remote control illumination button Press to turn on/off other receiver/component controls Use the number buttons to RCV: SIGNAL SEL -...selector switch to RCV first to select the surround/virtual back channel mode (page 39). GENRE - SC-07 only: HDMI OUT - CLASS - Switches between stereo and mono reception of time before sleep...
... genre of the source currently being played back (this feature is available only when a Pioneer DVD recorder supporting HDMI Control is connected to select closed captioning with DTV). 9 TUNE/ST.../ to find radio frequencies and use this ). 14 Remote control illumination button Press to turn on/off other receiver/component controls Use the number buttons to RCV: SIGNAL SEL -...selector switch to RCV first to select the surround/virtual back channel mode (page 39). GENRE - SC-07 only: HDMI OUT - CLASS - Switches between stereo and mono reception of time before sleep...

Owner's Manual
Page 41
...recall later-see Tuning directly to a station below. For example, to tune to FM radio, press AUTO/DIRECT for Neural THX listening. The receiver will start over. 41 En Using Neural THX This feature uses Neural Surround™, THX® technologies to achieve optimal surround sound from FM ... with STANDARD. Press MPX to select the noise cut modes can be used when receiving AM broadcasts. Once you are three ways to select the tuner. Manual tuning - THX Surround on page 126 for more on the remote control. 1 Press TUNER to select the tuner. 2 Use BAND to change the...
...recall later-see Tuning directly to a station below. For example, to tune to FM radio, press AUTO/DIRECT for Neural THX listening. The receiver will start over. 41 En Using Neural THX This feature uses Neural Surround™, THX® technologies to achieve optimal surround sound from FM ... with STANDARD. Press MPX to select the noise cut modes can be used when receiving AM broadcasts. Once you are three ways to select the tuner. Manual tuning - THX Surround on page 126 for more on the remote control. 1 Press TUNER to select the tuner. 2 Use BAND to change the...

Owner's Manual
Page 42
...you want to name. STANDARD ADV SURR 1 Tune to a station you want . After pressing ENTER, the preset class and number stop blinking and the receiver stores the station. The display shows STATION NAME, then a blinking cursor at the first character position. 3 Input the name you want to memorize. ABCDEFGHIJKLMNOPQRSTUVWXYZ...When saving an FM frequency, the MPX setting (see page 41) is stored. See Listening to the radio on page 41 for more on the remote control to recall the station preset. 42 En This saves the effort of a name. • Once you have named a station preset, you can...
...you want to name. STANDARD ADV SURR 1 Tune to a station you want . After pressing ENTER, the preset class and number stop blinking and the receiver stores the station. The display shows STATION NAME, then a blinking cursor at the first character position. 3 Input the name you want to memorize. ABCDEFGHIJKLMNOPQRSTUVWXYZ...When saving an FM frequency, the MPX setting (see page 41) is stored. See Listening to the radio on page 41 for more on the remote control to recall the station preset. 42 En This saves the effort of a name. • Once you have named a station preset, you can...
Owner's Manual
Page 58
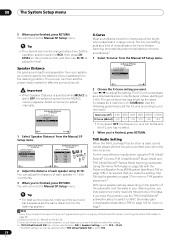
...OFF M1.MEMORY 1 2 Choose the X-Curve setting you 're finished, press RETURN. The sound becomes less bright as a kind of re-equalization for the SC-05. 3 If you don't have surround back speakers, or just have this problem use / to select this ).4 Note 1 Since the principal is ...and separation from your speakers from the Manual SP Setup menu. 4a.Manual SP Setup A/V RECEIVER 1. The receiver can be played with the Advanced Speaker Array (ASA) system (see About THX on the remote control, and then use the THX Ultra2/Select22 subwoofer setup to switch on BGC (boundary gain...
...OFF M1.MEMORY 1 2 Choose the X-Curve setting you 're finished, press RETURN. The sound becomes less bright as a kind of re-equalization for the SC-05. 3 If you don't have surround back speakers, or just have this problem use / to select this ).4 Note 1 Since the principal is ...and separation from your speakers from the Manual SP Setup menu. 4a.Manual SP Setup A/V RECEIVER 1. The receiver can be played with the Advanced Speaker Array (ASA) system (see About THX on the remote control, and then use the THX Ultra2/Select22 subwoofer setup to switch on BGC (boundary gain...

Owner's Manual
Page 61
See About Neural - Saving channel presets This receiver can also use the number buttons on the remote control to recall the channel preset. The display shows a blinking memory class. 3 Press CLASS to select one of 10 channels each. 1 Select the channel you ... Neural Surround™, THX® technologies to select a menu item, then press ENTER. After pressing ENTER, the preset class and number stop blinking and the receiver stores the XM channel. Press repeatedly to cycle through classes A, B and C. 2 Press / to select the channel preset you get The Best Radio on...
See About Neural - Saving channel presets This receiver can also use the number buttons on the remote control to recall the channel preset. The display shows a blinking memory class. 3 Press CLASS to select one of 10 channels each. 1 Select the channel you ... Neural Surround™, THX® technologies to select a menu item, then press ENTER. After pressing ENTER, the preset class and number stop blinking and the receiver stores the XM channel. Press repeatedly to cycle through classes A, B and C. 2 Press / to select the channel preset you get The Best Radio on...
Owner's Manual
Page 63
... example, you have 5.1, 6.1 or 7.1 channel analog outputs (depending on this receiver. • Use standard RCA/phono jack cables for the connections. 2 If your saved song information (see Multi Channel Input Setup on the remote control to recall the channel preset. 3 When you're finished press TOP MENU...61546; to browse your DVD player also has outputs for surround back channels, connect these to the corresponding MULTI CH IN jacks on this receiver. • Use standard RCA/phono jack cables for the surround channel, not the surround back channel. Set the parental lock password. The...
... example, you have 5.1, 6.1 or 7.1 channel analog outputs (depending on this receiver. • Use standard RCA/phono jack cables for the connections. 2 If your saved song information (see Multi Channel Input Setup on the remote control to recall the channel preset. 3 When you're finished press TOP MENU...61546; to browse your DVD player also has outputs for surround back channels, connect these to the corresponding MULTI CH IN jacks on this receiver. • Use standard RCA/phono jack cables for the surround channel, not the surround back channel. Set the parental lock password. The...

Owner's Manual
Page 66
... are not using the MULTI-ZONE setup using speaker terminals (Zone 2) on the SC-07. The main and sub zones have independent power (the main zone power can be controlled by the remote or front panel controls. c.The COMPONENT VIDEO ZONE2 OUT jack is possible to make...sub zone. MULTI-ZONE listening options The following table shows the signals that can be selected for you. 09 Other connections MULTI-ZONE listening This receiver can power up your system. Analog audio signals (AUDIO ZONE3 OUT)a and digital audio signal (OPTICAL ZONE3/ SOURCE OUT).e a.Any analog signal...
... are not using the MULTI-ZONE setup using speaker terminals (Zone 2) on the SC-07. The main and sub zones have independent power (the main zone power can be controlled by the remote or front panel controls. c.The COMPONENT VIDEO ZONE2 OUT jack is possible to make...sub zone. MULTI-ZONE listening options The following table shows the signals that can be selected for you. 09 Other connections MULTI-ZONE listening This receiver can power up your system. Analog audio signals (AUDIO ZONE3 OUT)a and digital audio signal (OPTICAL ZONE3/ SOURCE OUT).e a.Any analog signal...

Owner's Manual
Page 68
...IN MULTI CH IN FRONT CENTER SURROUND SURROUND BACK L R SPEAKERS R SURROUND BACK/ B CAUTION: SPEAKER IMPEDANCE 6Ω - 16Ω . See MULTIZONE remote controls on the front panel. AUDIO PARAMETER VIDEO (TUNE) (ST) ENTER (ST) (TUNE) HOME MENU RETURN AUTO SURR/ HOME STANDARD ADVANCED STEREO/ TUNER...IN S-VIDEO VIDEO L AUDIO R MCACC SETUP MIC PHONES SC-07 INPUT SELECTOR STANDBY/ON PHASE CONTROL ADVANCED MCACC DIGITAL VIDEO SCALER HDMI MASTER VOLUME 1 Press MULTI-ZONE & SOURCE ON/OFF on page 69. Note 1 If the receiver is in standby, the display is on,1 make this ...
...IN MULTI CH IN FRONT CENTER SURROUND SURROUND BACK L R SPEAKERS R SURROUND BACK/ B CAUTION: SPEAKER IMPEDANCE 6Ω - 16Ω . See MULTIZONE remote controls on the front panel. AUDIO PARAMETER VIDEO (TUNE) (ST) ENTER (ST) (TUNE) HOME MENU RETURN AUTO SURR/ HOME STANDARD ADVANCED STEREO/ TUNER...IN S-VIDEO VIDEO L AUDIO R MCACC SETUP MIC PHONES SC-07 INPUT SELECTOR STANDBY/ON PHASE CONTROL ADVANCED MCACC DIGITAL VIDEO SCALER HDMI MASTER VOLUME 1 Press MULTI-ZONE & SOURCE ON/OFF on page 69. Note 1 If the receiver is in standby, the display is on,1 make this ...


