

Owner's Manual
Page 4
... Accessories 12 04 Part Names 14 Plasma display 14 Remote control unit 16 05 Preparation 17 Installing the plasma display 17 Moving the plasma display 17 Attaching the Pioneer stand 17 Installing the Pioneer speaker 19 Preventing the plasma display from that shown in the explanatory...Activating the Parental Control 44 Setting the voluntary movie rating system (MPAA 44 Setting the TV ratings 44 Setting the TV Parental Guidelines (TV Guidelines 45 Blocking Not Rated TV programs ........ 45 Canadian rating systems 45 Setting Canadian English ratings ....... 46 Setting Canadian French...
... Accessories 12 04 Part Names 14 Plasma display 14 Remote control unit 16 05 Preparation 17 Installing the plasma display 17 Moving the plasma display 17 Attaching the Pioneer stand 17 Installing the Pioneer speaker 19 Preventing the plasma display from that shown in the explanatory...Activating the Parental Control 44 Setting the voluntary movie rating system (MPAA 44 Setting the TV ratings 44 Setting the TV Parental Guidelines (TV Guidelines 45 Blocking Not Rated TV programs ........ 45 Canadian rating systems 45 Setting Canadian English ratings ....... 46 Setting Canadian French...

Owner's Manual
Page 10
... and other openings in your home, consult your safety and prolong the service life of the product. The plasma display weighs about 66.7 kg (147.0 lbs.) for the PRO-150FD (including the stand and speaker) and about 45.1 kg (99.4 lbs.) for built-in a wet basement. 8. 02 Safety Precautions ...on a cart, it . This product is made of objects and liquids-Never insert an object into the product. The optical characteristics of the plasma display to direct sunlight for example, by broken glass pieces in discoloration or warp. 25. Do not use can result in the product, and...
... and other openings in your home, consult your safety and prolong the service life of the product. The plasma display weighs about 66.7 kg (147.0 lbs.) for the PRO-150FD (including the stand and speaker) and about 45.1 kg (99.4 lbs.) for built-in a wet basement. 8. 02 Safety Precautions ...on a cart, it . This product is made of objects and liquids-Never insert an object into the product. The optical characteristics of the plasma display to direct sunlight for example, by broken glass pieces in discoloration or warp. 25. Do not use can result in the product, and...
Owner's Manual
Page 15
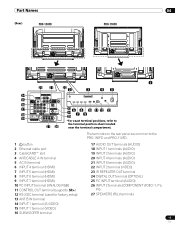
... 2 terminal (VIDEO) 23 IR REPEATER OUT terminal 24 DIGITAL OUT terminal (OPTICAL) 25 PC INPUT terminal (AUDIO) 26 INPUT 2 terminals (COMPONENT VIDEO: Y, PB, PR) 27 SPEAKERS (R/L) terminals 15 En The terminals on the rear panel are common to 27 26 the terminal position sheet located near the terminal compartment.
... 2 terminal (VIDEO) 23 IR REPEATER OUT terminal 24 DIGITAL OUT terminal (OPTICAL) 25 PC INPUT terminal (AUDIO) 26 INPUT 2 terminals (COMPONENT VIDEO: Y, PB, PR) 27 SPEAKERS (R/L) terminals 15 En The terminals on the rear panel are common to 27 26 the terminal position sheet located near the terminal compartment.

Owner's Manual
Page 19
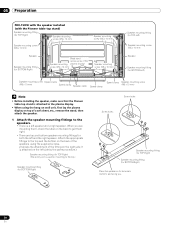
...speaker with the plasma display lying flat on to the mounting fittings. Plasma display 3 Replace the plasma display to the speaker system resulting from input overload, please observe the following precautions: • Do not use the speaker with anything other than the plasma display. For speaker installation, see Installing the Pioneer speaker...using a screwdriver. Doing so might damage the plasma display panel or its ports or result in warping of the plasma display other than the stand insertion slots. Installing the Pioneer speaker Insert the stand into any screws other than ...
...speaker with the plasma display lying flat on to the mounting fittings. Plasma display 3 Replace the plasma display to the speaker system resulting from input overload, please observe the following precautions: • Do not use the speaker with anything other than the plasma display. For speaker installation, see Installing the Pioneer speaker...using a screwdriver. Doing so might damage the plasma display panel or its ports or result in warping of the plasma display other than the stand insertion slots. Installing the Pioneer speaker Insert the stand into any screws other than ...
Owner's Manual
Page 20
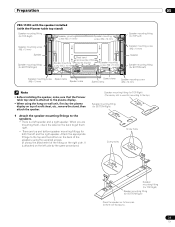
... PRO-150FD with the speaker installed (with the Pioneer table top stand) Speaker mounting fitting (for TOP-Right) Speaker mounting screw (M5 x 10 mm) Speaker mounting screw (M5 x 10 mm) Speaker mounting screw (M5 x 10 mm) Speaker Speaker mounting fitting (for BOTTOM-Right) Bead band (accessories of the Speaker mounting plasma display) screw (M5 x 10 mm) Speaker mounting screw (M5 x 10...
... PRO-150FD with the speaker installed (with the Pioneer table top stand) Speaker mounting fitting (for TOP-Right) Speaker mounting screw (M5 x 10 mm) Speaker mounting screw (M5 x 10 mm) Speaker mounting screw (M5 x 10 mm) Speaker Speaker mounting fitting (for BOTTOM-Right) Bead band (accessories of the Speaker mounting plasma display) screw (M5 x 10 mm) Speaker mounting screw (M5 x 10...
Owner's Manual
Page 21
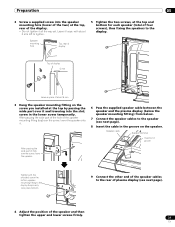
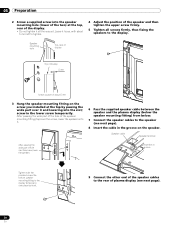
... the display. Leave it . 6 Pass the supplied speaker cable between the speaker and the plasma display (below the speaker mounting fitting) from below. 7 Connect the speaker cables to the rear of plasma display (see next page). 4 Adjust the position of the speaker mounting fitting (top) over the screw, lower the speaker. Top of display 5 mm Leave a space of...
... the display. Leave it . 6 Pass the supplied speaker cable between the speaker and the plasma display (below the speaker mounting fitting) from below. 7 Connect the speaker cables to the rear of plasma display (see next page). 4 Adjust the position of the speaker mounting fitting (top) over the screw, lower the speaker. Top of display 5 mm Leave a space of...

Owner's Manual
Page 22
...to the terminals by an exposed lead wire, excessive load may be applied to the polarity of the plasma display speaker terminals, that is touching the speaker terminal, you insert the speaker cable too far so that the insulation is , cable (Gray) to terminals...Incorrect connections of the speaker cable to the right or left of plasma display. 05 Preparation speaker cables Connecting the speaker cables to the speaker. Gray Black Gray Connecting the speaker cables to the rear of the plasma display terminals with respect to the plasma display, resulting in ...
...to the terminals by an exposed lead wire, excessive load may be applied to the polarity of the plasma display speaker terminals, that is touching the speaker terminal, you insert the speaker cable too far so that the insulation is , cable (Gray) to terminals...Incorrect connections of the speaker cable to the right or left of plasma display. 05 Preparation speaker cables Connecting the speaker cables to the speaker. Gray Black Gray Connecting the speaker cables to the rear of the plasma display terminals with respect to the plasma display, resulting in ...
Owner's Manual
Page 23
... PRO-110FD with the speaker installed (with the Pioneer table top stand) Speaker mounting fitting (for TOP-Right) Speaker mounting screw (M5 x 10 mm) Speaker mounting screw (M5 x 10 mm) Speaker mounting screw (M5 x 10 mm) Speaker Speaker mounting fitting (for BOTTOM-Right) Speaker mounting screw (M5 x 10 mm) Bead band (accessories of the plasma display) Speaker mounting screw (M5 x 10...
... PRO-110FD with the speaker installed (with the Pioneer table top stand) Speaker mounting fitting (for TOP-Right) Speaker mounting screw (M5 x 10 mm) Speaker mounting screw (M5 x 10 mm) Speaker mounting screw (M5 x 10 mm) Speaker Speaker mounting fitting (for BOTTOM-Right) Speaker mounting screw (M5 x 10 mm) Bead band (accessories of the plasma display) Speaker mounting screw (M5 x 10...
Owner's Manual
Page 24
... passing the wide part of the hole of the speaker mounting fitting (top) over the screw, lower the speaker onto it. 6 Pass the supplied speaker cable between the speaker and the plasma display (below the speaker mounting fitting) from below. 7 Connect the speaker cables to the rear of plasma display (see next page). 8 Insert the cable in the...
... passing the wide part of the hole of the speaker mounting fitting (top) over the screw, lower the speaker onto it. 6 Pass the supplied speaker cable between the speaker and the plasma display (below the speaker mounting fitting) from below. 7 Connect the speaker cables to the rear of plasma display (see next page). 8 Insert the cable in the...

Owner's Manual
Page 25
...by slightly tugging on the cable after making connections. Speaker terminal • Check if the end of the speaker cables are securely connected to the terminals by an exposed lead wire, excessive load may be applied to the plasma display, resulting in sound dropouts or noise. •...result in interrupted operation or malfunction. • Incorrect connections of the speaker cable to the right or left of the plasma display terminals with respect to the polarity of the plasma display speaker terminals, that is touching the speaker terminal, you may not get any sound. Preparation 05...
...by slightly tugging on the cable after making connections. Speaker terminal • Check if the end of the speaker cables are securely connected to the terminals by an exposed lead wire, excessive load may be applied to the plasma display, resulting in sound dropouts or noise. •...result in interrupted operation or malfunction. • Incorrect connections of the speaker cable to the right or left of the plasma display terminals with respect to the polarity of the plasma display speaker terminals, that is touching the speaker terminal, you may not get any sound. Preparation 05...
Owner's Manual
Page 27
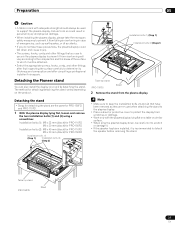
...8226; Steps for PRO-150FD and PRO-110FD. 1 With the plasma display lying flat, loosen and remove the two installation bolts (1) and (2) using a screwdriver. Table top stand (PRO-150FD) Sheet 27 En Detaching the Pioneer stand You can also install the display on the product. Note...and (2) that you do so could fall down , be careful not to scratch or damage it. • If the speaker has been installed, it is recommended to detach the speaker before removing the stand. The method for PRO-150FD Installation bolts (1) (Step 1) Installation bolts (2) (Step 2) Installation bolts...
...8226; Steps for PRO-150FD and PRO-110FD. 1 With the plasma display lying flat, loosen and remove the two installation bolts (1) and (2) using a screwdriver. Table top stand (PRO-150FD) Sheet 27 En Detaching the Pioneer stand You can also install the display on the product. Note...and (2) that you do so could fall down , be careful not to scratch or damage it. • If the speaker has been installed, it is recommended to detach the speaker before removing the stand. The method for PRO-150FD Installation bolts (1) (Step 1) Installation bolts (2) (Step 2) Installation bolts...

Owner's Manual
Page 28
... careful not to insert the support columns of the stand into the plasma display so that an arrow with the plasma display lying flat on page 19. For speaker installation, see Installing the Pioneer speaker on a table or similar surface. • When lying the plasma display down, be careful not to scratch or damage it. •...
... careful not to insert the support columns of the stand into the plasma display so that an arrow with the plasma display lying flat on page 19. For speaker installation, see Installing the Pioneer speaker on a table or similar surface. • When lying the plasma display down, be careful not to scratch or damage it. •...
Owner's Manual
Page 30
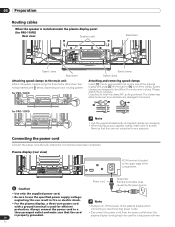
... of [1] to the main unit Attach the speed clamps using the three holes (60 inches: four holes) marked with a ground terminal is installed under the plasma display panel (for PRO-110FD) Rear view Speaker cable Bead band Speed clamp Bead band Attaching speed clamps to lock the clamp.... neglecting this can result in place. 05 Preparation Routing cables When the speaker is used for a long period of the plasma display when connecting or disconnecting power cords. • Disconnect the power cord from the power outlet when the...
... of [1] to the main unit Attach the speed clamps using the three holes (60 inches: four holes) marked with a ground terminal is installed under the plasma display panel (for PRO-110FD) Rear view Speaker cable Bead band Speed clamp Bead band Attaching speed clamps to lock the clamp.... neglecting this can result in place. 05 Preparation Routing cables When the speaker is used for a long period of the plasma display when connecting or disconnecting power cords. • Disconnect the power cord from the power outlet when the...

Owner's Manual
Page 74
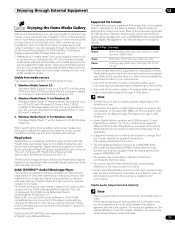
...Note • When using the digital audio output terminal (optical), you may result in high quality. Try muting the speakers on the rear of the plasma display to the audio input terminals on your AV receiver does not have a digital audio input terminal (optical), you...audiovisual equipment. Using an optical digital cable, connect an AV receiver to the digital audio output terminal (optical) on the plasma display; This allows audio such as digital TV broadcasting to be connected. • Audio signals synchronized with the surround function to a subwoofer. Connecting an AV receiver 4 ...
...Note • When using the digital audio output terminal (optical), you may result in high quality. Try muting the speakers on the rear of the plasma display to the audio input terminals on your AV receiver does not have a digital audio input terminal (optical), you...audiovisual equipment. Using an optical digital cable, connect an AV receiver to the digital audio output terminal (optical) on the plasma display; This allows audio such as digital TV broadcasting to be connected. • Audio signals synchronized with the surround function to a subwoofer. Connecting an AV receiver 4 ...
Owner's Manual
Page 77
...table, some functions may not be able to find digital media stores and devices that work depending on the Home Media Gallery. Visit the Pioneer website for example, Windows Media Connect, Windows Media Player that has a media sharing function, and DLNA compliant servers. Digital Living provides ...Digital Rights Management 10), may not work together. network in the USA and other updated information. When a PC running on the plasma display. Try muting the speakers on the plasma display to this delay. of them are trademarks and/or service marks cause delays between the...
...table, some functions may not be able to find digital media stores and devices that work depending on the Home Media Gallery. Visit the Pioneer website for example, Windows Media Connect, Windows Media Player that has a media sharing function, and DLNA compliant servers. Digital Living provides ...Digital Rights Management 10), may not work together. network in the USA and other updated information. When a PC running on the plasma display. Try muting the speakers on the plasma display to this delay. of them are trademarks and/or service marks cause delays between the...
Owner's Manual
Page 109
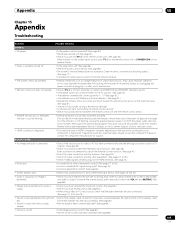
... Pioneer Authorized Independent Service Company, or the Customer Support Division (see back cover). • HDMI connection irregularity. • This plasma ...speaker cable connections have selected "Picture Off" for support. If the indicator is deactivated; Clean the vents, or remove any button other components correct? (See pages 71 to watch a TV channel. (See page 33.) • Check if you have been activated. With this plasma...? (See page 75.) • Is picture adjustment correct? (See page 60.) • Screen appears dark. • Check if any obstacles exist between...
... Pioneer Authorized Independent Service Company, or the Customer Support Division (see back cover). • HDMI connection irregularity. • This plasma ...speaker cable connections have selected "Picture Off" for support. If the indicator is deactivated; Clean the vents, or remove any button other components correct? (See pages 71 to watch a TV channel. (See page 33.) • Check if you have been activated. With this plasma...? (See page 75.) • Is picture adjustment correct? (See page 60.) • Screen appears dark. • Check if any obstacles exist between...
Owner's Manual
Page 112
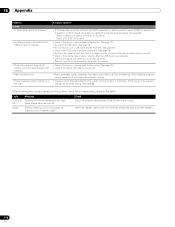
In addition, try the TV-Guide setup again by performing the following error codes appear on the sides. Code SD04 and SD11 Message Powering off . Is there a short in speaker cable? Check the speaker cable connections between the plasma display and the speakers. 112 En Select "ANT B IN" on ...service(s)" on . • Panel generated sounds, examples: Fan motor noise, Electrical Circuit Humming / Glass Panel buzzing are normal operation of the plasma display is high. Some signals may require to change the AV mode setting. (See page 68.) If the following procedure (see page 39):...
In addition, try the TV-Guide setup again by performing the following error codes appear on the sides. Code SD04 and SD11 Message Powering off . Is there a short in speaker cable? Check the speaker cable connections between the plasma display and the speakers. 112 En Select "ANT B IN" on ...service(s)" on . • Panel generated sounds, examples: Fan motor noise, Electrical Circuit Humming / Glass Panel buzzing are normal operation of the plasma display is high. Some signals may require to change the AV mode setting. (See page 68.) If the following procedure (see page 39):...
Owner's Manual
Page 123
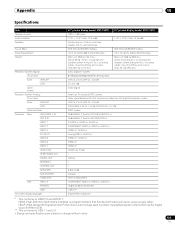
...INPUT 2 INPUT 4 PC INPUT INPUT 5 INPUT 6 INPUT 7 AUDIO OUT IR REPEATER OUT DIGITAL OUT ETHERNET CONTROL OUT SPEAKERS SUB WOOFER CableCARD Side INPUT 3 PHONES USB On-screen display languages 60" plasma display model: PRO-150FD 1920 × 1080 pixels 17 W + 17 W (1 kHz, 10 %, 6 Ω)...SRS/SRS TruBass 120 V AC, 60 Hz, 446 W (26 W Standby) Main unit: 38.8 kg (85.5 lbs.) Stand: 2.5 kg (5.5 lbs.) (including bolts) Speaker system: 3.8 kg (8.4 lbs.) (including cables, mounting fittings and screws) Total: 45.1 kg (99.4 lbs.) American TV standard NTSC system Video signal detection ...
...INPUT 2 INPUT 4 PC INPUT INPUT 5 INPUT 6 INPUT 7 AUDIO OUT IR REPEATER OUT DIGITAL OUT ETHERNET CONTROL OUT SPEAKERS SUB WOOFER CableCARD Side INPUT 3 PHONES USB On-screen display languages 60" plasma display model: PRO-150FD 1920 × 1080 pixels 17 W + 17 W (1 kHz, 10 %, 6 Ω)...SRS/SRS TruBass 120 V AC, 60 Hz, 446 W (26 W Standby) Main unit: 38.8 kg (85.5 lbs.) Stand: 2.5 kg (5.5 lbs.) (including bolts) Speaker system: 3.8 kg (8.4 lbs.) (including cables, mounting fittings and screws) Total: 45.1 kg (99.4 lbs.) American TV standard NTSC system Video signal detection ...


