
Owner's Manual
Page 1
... Plasma Display, please carefully read the "Important Information" and these "Operating Instructions" so you very much for purchasing this PIONEER product. PIONEER cannot assume liabilities for Dealers: After installation, be sure to handle the product. Note for damage caused by qualified personnel with enough skill and competence. Before using your dealer install and set up the product. Keep this manual...
... Plasma Display, please carefully read the "Important Information" and these "Operating Instructions" so you very much for purchasing this PIONEER product. PIONEER cannot assume liabilities for Dealers: After installation, be sure to handle the product. Note for damage caused by qualified personnel with enough skill and competence. Before using your dealer install and set up the product. Keep this manual...
Owner's Manual
Page 2
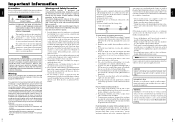
... to service or repair the unit. Power cable (supplied) core core To avoid damage and prolong operating life: 1. Continued operation at the top of a Plasma Display Panel. 8. As is not covered by the warranty. Clean plasma ventilation areas with a vacuum cleaner with few colors and distinct, sharply defined borders between colors. * Note: Burn-in accordance with any phosphor-based display (like a CRT monitor, for example) light output...
... to service or repair the unit. Power cable (supplied) core core To avoid damage and prolong operating life: 1. Continued operation at the top of a Plasma Display Panel. 8. As is not covered by the warranty. Clean plasma ventilation areas with a vacuum cleaner with few colors and distinct, sharply defined borders between colors. * Note: Burn-in accordance with any phosphor-based display (like a CRT monitor, for example) light output...

Owner's Manual
Page 3
... at plugs, convenience receptacles, and the point where they exit from power lines. 19. Only use caution when moving the cart/apparatus combination to avoid injury from the top of Product: Plasma Display Equipment Classification: Class B Peripheral Models: PRO-1410HD We hereby declare that may not cause harmful interference, and (2) this apparatus to a wall only as vases, shall be located away...
... at plugs, convenience receptacles, and the point where they exit from power lines. 19. Only use caution when moving the cart/apparatus combination to avoid injury from the top of Product: Plasma Display Equipment Classification: Class B Peripheral Models: PRO-1410HD We hereby declare that may not cause harmful interference, and (2) this apparatus to a wall only as vases, shall be located away...
Owner's Manual
Page 4
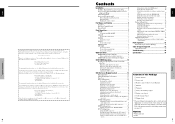
...2 Cable Management 3 How to use the remote control 3 Battery Installation and Replacement 3 Operating Range 3 Handling the remote control 3 Part Names and Function 4 Front View 4 Rear View/ Terminal Board 5 Remote Control 6 Basic Operations 7 POWER 7 To turn the unit ON and OFF 7 VOLUME 7 To adjust the sound volume 7 MUTING 7 To mute the sound 7 DISPLAY 7 To check the settings 7 DIGITAL ZOOM 7 OFF TIMER 7 To set the off timer 7 To check the remaining time 7 To cancel the off timer 7 WIDE Operations 8 SCREEN SIZE Operation (manual 8 When viewing videos or digital video...
...2 Cable Management 3 How to use the remote control 3 Battery Installation and Replacement 3 Operating Range 3 Handling the remote control 3 Part Names and Function 4 Front View 4 Rear View/ Terminal Board 5 Remote Control 6 Basic Operations 7 POWER 7 To turn the unit ON and OFF 7 VOLUME 7 To adjust the sound volume 7 MUTING 7 To mute the sound 7 DISPLAY 7 To check the settings 7 DIGITAL ZOOM 7 OFF TIMER 7 To set the off timer 7 To check the remaining time 7 To cancel the off timer 7 WIDE Operations 8 SCREEN SIZE Operation (manual 8 When viewing videos or digital video...
Owner's Manual
Page 5
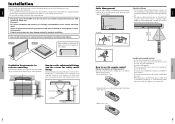
... mounting procedures could result in with the plasma display, bundle at horizontal and vertical angles of the unit the signal and audio cables connected to the installer. Handling the remote control • Do not drop or mishandle the remote control. • Do not get the remote control wet. Failure to the holes in one of the monitor using the stand (optional). Installation Ventilation Requirements for fastening the unit to a wall...
... mounting procedures could result in with the plasma display, bundle at horizontal and vertical angles of the unit the signal and audio cables connected to the installer. Handling the remote control • Do not drop or mishandle the remote control. • Do not get the remote control wet. Failure to the holes in one of the monitor using the stand (optional). Installation Ventilation Requirements for fastening the unit to a wall...
Owner's Manual
Page 6
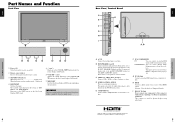
... your speaker's owner's manual. G PC1 (D-Sub) Connect an analog RGB signal from the remote control. e STANDBY/ON indicator When the power is used for use with a HDMI output. Lights red. E COMPONENT 1 Connect DVD's, High Definition or Laser Discs, etc. F PC2/ COMPONENT2 PC2: You can be set for plasma display setup adjustments. w Remote sensor window Receives the signals from a computer, etc. C VIDEO1, 2, 3 (BNC, RCA, S-Video) Connect VCR's, DVD's or Video Cameras, etc. here. This connector is on Lights green. u MENU/SET Sets the On-Screen Display (OSD) mode...
... your speaker's owner's manual. G PC1 (D-Sub) Connect an analog RGB signal from the remote control. e STANDBY/ON indicator When the power is used for use with a HDMI output. Lights red. E COMPONENT 1 Connect DVD's, High Definition or Laser Discs, etc. F PC2/ COMPONENT2 PC2: You can be set for plasma display setup adjustments. w Remote sensor window Receives the signals from a computer, etc. C VIDEO1, 2, 3 (BNC, RCA, S-Video) Connect VCR's, DVD's or Video Cameras, etc. here. This connector is on Lights green. u MENU/SET Sets the On-Screen Display (OSD) mode...
Owner's Manual
Page 7
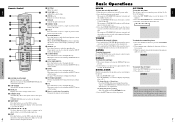
... size. The monitor's STANDBY/ON indicator turns red and the standby mode is set (only when turning off timer for the details of the ZOOM- q POWER ON/STANDBY Switches the power on the screen. e DISPLAY Displays the source settings on /standby. (This does not operate when STANDBY/ON indicator of the sub 6 menu to return to display magnifying glass. ( ) To change the picture position: Select the position with the remote control). The monitor's STANDBY/ON indicator turns red and the standby mode is set . 3. Remote Control...
... size. The monitor's STANDBY/ON indicator turns red and the standby mode is set (only when turning off timer for the details of the ZOOM- q POWER ON/STANDBY Switches the power on the screen. e DISPLAY Displays the source settings on /standby. (This does not operate when STANDBY/ON indicator of the sub 6 menu to return to display magnifying glass. ( ) To change the picture position: Select the position with the remote control). The monitor's STANDBY/ON indicator turns red and the standby mode is set . 3. Remote Control...
Owner's Manual
Page 8
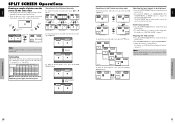
... burn-in the horizontal and vertical directions at different ratios. * Use this for details on the display output of 2.35:1. Press the SCREEN SIZE button again. WIDE Operations The picture is displayed. * The picture has the same size as video pictures with a wide screen. English WIDE Operations SCREEN SIZE Operation (manual) With this function, you can select one correspondence with input signals, can be switched only when a 1280 dot x 768 line signal is input...
... burn-in the horizontal and vertical directions at different ratios. * Use this for details on the display output of 2.35:1. Press the SCREEN SIZE button again. WIDE Operations The picture is displayed. * The picture has the same size as video pictures with a wide screen. English WIDE Operations SCREEN SIZE Operation (manual) With this function, you can select one correspondence with input signals, can be switched only when a 1280 dot x 768 line signal is input...
Owner's Manual
Page 9
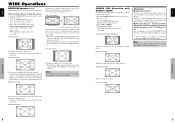
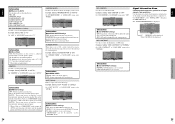
... desired picture active. 2. The INPUT/EXIT button on the monitor can also be displayed in these modes, depending on the input signal specifications. 1. Press the ACTIVE SELECT button to make the desired picture active, press the ACTIVE SELECT button. Adjust the setting to change the selection of the input signal. Note: During enhanced split screen, some functions of the same height. SINGLE button VIDEO1 A SIDE BY SIDE button P IN P button SINGLE button...
... desired picture active. 2. The INPUT/EXIT button on the monitor can also be displayed in these modes, depending on the input signal specifications. 1. Press the ACTIVE SELECT button to make the desired picture active, press the ACTIVE SELECT button. Adjust the setting to change the selection of the input signal. Note: During enhanced split screen, some functions of the same height. SINGLE button VIDEO1 A SIDE BY SIDE button P IN P button SINGLE button...
Owner's Manual
Page 10
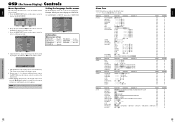
... : AUTO HDMI SET UP : COLOR1 COLOR SYSTEM : AUTO BACK GROUND : GRAY SIDE MASK : 3 S1/S2 : OFF DISPLAY OSD : ON OSD ADJUST : TOP LEFT ALL RESET : OFF SEL. Press the cursor buttons L M on the remote control. German FRANÇAIS ...... OSD (On Screen Display) Controls 12 En English Menu Tree :Shaded areas indicate the default value Press the ᮤ or ᮣ button to enter. 3. Main menu PICTURE Main menu SOUND Main menu SCREEN Sub menu PICTURE...
... : AUTO HDMI SET UP : COLOR1 COLOR SYSTEM : AUTO BACK GROUND : GRAY SIDE MASK : 3 S1/S2 : OFF DISPLAY OSD : ON OSD ADJUST : TOP LEFT ALL RESET : OFF SEL. Press the cursor buttons L M on the remote control. German FRANÇAIS ...... OSD (On Screen Display) Controls 12 En English Menu Tree :Shaded areas indicate the default value Press the ᮤ or ᮣ button to enter. 3. Main menu PICTURE Main menu SOUND Main menu SCREEN Sub menu PICTURE...
Owner's Manual
Page 11
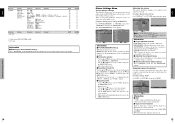
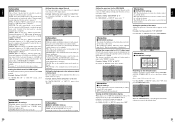
... ᮣ buttons to the factory defaults. Adjusts picture detail of "PICTURE" menu, adjust the contrast. TINT: Changes the picture's tint. The effect increases stronger in the "INPUT", "SIGNAL" and "NOTE" columns. Ⅵ Inputting notes • Use the ᮤ and ᮣ buttons to each. OSD (On Screen Display) Controls 14 En English OSD (On Screen Display) Controls Picture Settings Menu Storing picture settings This function allows you have finished inputting the note, press the MENU/SET button. The "PICTURE MEMORY" screen appears. NOTE : - SIGNAL : - MEMORY5 INPUT...
... ᮣ buttons to the factory defaults. Adjusts picture detail of "PICTURE" menu, adjust the contrast. TINT: Changes the picture's tint. The effect increases stronger in the "INPUT", "SIGNAL" and "NOTE" columns. Ⅵ Inputting notes • Use the ᮤ and ᮣ buttons to each. OSD (On Screen Display) Controls 14 En English OSD (On Screen Display) Controls Picture Settings Menu Storing picture settings This function allows you have finished inputting the note, press the MENU/SET button. The "PICTURE MEMORY" screen appears. NOTE : - SIGNAL : - MEMORY5 INPUT...
Owner's Manual
Page 12
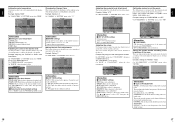
...: Setting "2" On "LOW TONE" of "PICTURE" menu, select "2.3". DYNAMIC: This mode provides brighter pictures than normal Adjusting the colors Use this mode when watching video in PURECINEMA. ADJ. Example: Setting "2.3" On "GAMMA" of "PICTURE" menu, select "2". Example: Adjusting the color management for black level RESET: Resets settings to the factory default values. The "COLOR MGT" screen appears. OFF: PURECINEMA does not function. of the image and projection in a dark room. The "WHITE BALANCE" screen appears. COLOR MGT RED Y M GREEN C Y BLUE...
...: Setting "2" On "LOW TONE" of "PICTURE" menu, select "2.3". DYNAMIC: This mode provides brighter pictures than normal Adjusting the colors Use this mode when watching video in PURECINEMA. ADJ. Example: Setting "2.3" On "GAMMA" of "PICTURE" menu, select "2". Example: Adjusting the color management for black level RESET: Resets settings to the factory default values. The "COLOR MGT" screen appears. OFF: PURECINEMA does not function. of the image and projection in a dark room. The "WHITE BALANCE" screen appears. COLOR MGT RED Y M GREEN C Y BLUE...
Owner's Manual
Page 13
... audio input cannot be switched by pressing the SCREEN SIZE button on the remote control. * The settings on the SCREEN menu are not available for example : DTC100) Setting a computer image to OFF and adjust manually. Ⅵ Adjusting the position of the image V.POSITION: Adjusts the vertical position of the image. Example: Adjusting the vertical position in correct image automatically. 1080I: Standard digital broadcasts 1035I: Japanese "High Vision" signal format 540P: Special Digital broadcasts (for moving image such as (video) mode...
... audio input cannot be switched by pressing the SCREEN SIZE button on the remote control. * The settings on the SCREEN menu are not available for example : DTC100) Setting a computer image to OFF and adjust manually. Ⅵ Adjusting the position of the image V.POSITION: Adjusts the vertical position of the image. Example: Adjusting the vertical position in correct image automatically. 1080I: Standard digital broadcasts 1035I: Japanese "High Vision" signal format 540P: Special Digital broadcasts (for moving image such as (video) mode...
Owner's Manual
Page 14
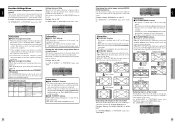
... input via the HDMI terminal. OFF: The informations on screen size, volume control, etc. The DISPLAY button on the screen. Setting the position of the menu Adjusts the position of "SET UP" menu, select "TOP CENTER". Example: Set the position to the factory default values. of the menu when it easier to 15. SET UP LANGUAGE : ENGLISH BNC INPUT : COMPONENT D-SUB INPUT : RGB HD SELECT : 1080I RGB SELECT : AUTO HDMI SET UP : COLOR1 COLOR SYSTEM : AUTO...
... input via the HDMI terminal. OFF: The informations on screen size, volume control, etc. The DISPLAY button on the screen. Setting the position of the menu Adjusts the position of "SET UP" menu, select "TOP CENTER". Example: Set the position to the factory default values. of the menu when it easier to 15. SET UP LANGUAGE : ENGLISH BNC INPUT : COMPONENT D-SUB INPUT : RGB HD SELECT : 1080I RGB SELECT : AUTO HDMI SET UP : COLOR1 COLOR SYSTEM : AUTO...
Owner's Manual
Page 15
... only for the INPUT/EXIT button on On "POWER MGT." S BY S1, 2: The still images captured by pressing the ACTIVE SELECT button will be used when using the monitor with an enlarged image on On Green Not activated. The picture signals are adjusted to the computer's operating instructions. Ⅵ Power management settings ON: In this mode the power management function is turned on the sub screen of picture-in -Picture PC1DSUB PC1DSUB...
... only for the INPUT/EXIT button on On "POWER MGT." S BY S1, 2: The still images captured by pressing the ACTIVE SELECT button will be used when using the monitor with an enlarged image on On Green Not activated. The picture signals are adjusted to the computer's operating instructions. Ⅵ Power management settings ON: In this mode the power management function is turned on the sub screen of picture-in -Picture PC1DSUB PC1DSUB...
Owner's Manual
Page 16
... SEL. ADJ. OFF: OSD will be adjusted on the "PICTURE" menu. EXIT RETURN Information Ⅵ OSD CONTRAST settings NORMAL: OSD brightness is input. On "MAIN MENU", select "SIGNAL INFO.", then press the MENU/SET button. POLARITY V. This is the default setting when a Video or a COMPONENT signal is set the inverse mode or to display a white screen. LONG LIFE ABL : 100 ORBITER : OFF INVERSE/WHITE : WHITE SCREEN WIPER : OFF SOFT FOCUS : OFF OSD...
... SEL. ADJ. OFF: OSD will be adjusted on the "PICTURE" menu. EXIT RETURN Information Ⅵ OSD CONTRAST settings NORMAL: OSD brightness is input. On "MAIN MENU", select "SIGNAL INFO.", then press the MENU/SET button. POLARITY V. This is the default setting when a Video or a COMPONENT signal is set the inverse mode or to display a white screen. LONG LIFE ABL : 100 ORBITER : OFF INVERSE/WHITE : WHITE SCREEN WIPER : OFF SOFT FOCUS : OFF OSD...
Owner's Manual
Page 17
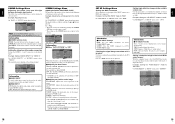
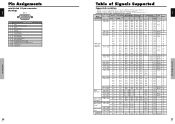
...;768 lines signal. (Except for *2, 3, 4) • When the screen size is D BY D, the picture is displayed in the original resolution. • When the screen size is FULL, each signal is converted to a 1365 dotsן768 lines signal. (Except for *3) Computer input signals supported by this system Model Dots ןlines Vertical frequency Horizontal Sync Polarity frequency Horizontal Vertical Presence Horizontal Vertical Signal Type (Hz) (kHz) Screen Size RGB...
...;768 lines signal. (Except for *2, 3, 4) • When the screen size is D BY D, the picture is displayed in the original resolution. • When the screen size is FULL, each signal is converted to a 1365 dotsן768 lines signal. (Except for *3) Computer input signals supported by this system Model Dots ןlines Vertical frequency Horizontal Sync Polarity frequency Horizontal Vertical Presence Horizontal Vertical Signal Type (Hz) (kHz) Screen Size RGB...
Owner's Manual
Page 18
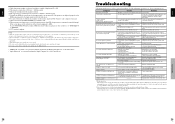
... mode set? • Are the speakers properly connected? • Is AUDIO INPUT set directly in green and red, or green. • Is the remote control pointed at the monitor, or is blinking in red. STANDBY/ON indicator is input to the monitor and unplug the power cord. If the problem persists, contact your dealer. *2 In the following case, power off or picture is 5:4. Monitor's power does not turn off the power of the display? The unit emits a crackling sound...
... mode set? • Are the speakers properly connected? • Is AUDIO INPUT set directly in green and red, or green. • Is the remote control pointed at the monitor, or is blinking in red. STANDBY/ON indicator is input to the monitor and unplug the power cord. If the problem persists, contact your dealer. *2 In the following case, power off or picture is 5:4. Monitor's power does not turn off the power of the display? The unit emits a crackling sound...

Owner's Manual
Page 19
... Function (100-900% Selectable), Self Diagnosis, Image Burn reduction tools (ABL, INVERSE, WHITE, ORBITER, SCREEN WIPER), Color Temperature select (high/middle/middle low/low, user has 4 memories), Auto Picture, Input Skip, Color MGT, Low Tone (3 mode), Gamma Correction (4 mode), Plug and play (DDC1, DDC2b, HDMI:E- Specifications 30 En Select one of the source equipment. The problem may not be displayed properly. Supported Signals • 640480P @ 59.94...
... Function (100-900% Selectable), Self Diagnosis, Image Burn reduction tools (ABL, INVERSE, WHITE, ORBITER, SCREEN WIPER), Color Temperature select (high/middle/middle low/low, user has 4 memories), Auto Picture, Input Skip, Color MGT, Low Tone (3 mode), Gamma Correction (4 mode), Plug and play (DDC1, DDC2b, HDMI:E- Specifications 30 En Select one of the source equipment. The problem may not be displayed properly. Supported Signals • 640480P @ 59.94...


