Owner's Manual
Page 5
... image 68 The Schedule Options menu 55 Connecting a VCR 68 Changing setup options 55 Displaying a VCR image 68 Changing the System Settings 55 Using HDMI Input 69 Changing the Channel Display Connecting HDMI equipment 69 settings 56 Enjoying a game console or watching Changing the Default Options 57 camcorder images 70 11...
... image 68 The Schedule Options menu 55 Connecting a VCR 68 Changing setup options 55 Displaying a VCR image 68 Changing the System Settings 55 Using HDMI Input 69 Changing the Channel Display Connecting HDMI equipment 69 settings 56 Enjoying a game console or watching Changing the Default Options 57 camcorder images 70 11...
Owner's Manual
Page 14
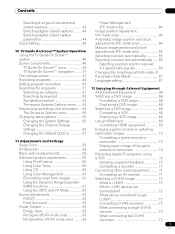
...PC CARD SLOT Y CB / PB CR / PR COMPONENT VIDEO EJECT S-VIDEO VIDEO INPUT 4 L AUDIO R PC ANALOG RGB PC 4 56 7 8 9 1 POWER ON indicator 2 STANDBY indicator 3 REC TIMER indicator 4 STANDBY/ON button 5 TV GUIDE button* 6 INPUT button (ENTER button*) 7 VOLUME UP/DOWN buttons (UP/DOWN buttons*) 8 CHANNEL UP... 9 PC CARD slot 10 11 12 13 14 15 10 EJECT button 11 INPUT 4 terminals (COMPONENT VIDEO: Y, CB/PB, CR/PR) 12 INPUT 4 terminal (S-VIDEO) 13 INPUT 4 terminal (VIDEO) 14 INPUT 4/PC terminals (AUDIO) 15 PC INPUT terminal (ANALOG RGB) The buttons with asterisks (*) can operate the TV Guide ...
...PC CARD SLOT Y CB / PB CR / PR COMPONENT VIDEO EJECT S-VIDEO VIDEO INPUT 4 L AUDIO R PC ANALOG RGB PC 4 56 7 8 9 1 POWER ON indicator 2 STANDBY indicator 3 REC TIMER indicator 4 STANDBY/ON button 5 TV GUIDE button* 6 INPUT button (ENTER button*) 7 VOLUME UP/DOWN buttons (UP/DOWN buttons*) 8 CHANNEL UP... 9 PC CARD slot 10 11 12 13 14 15 10 EJECT button 11 INPUT 4 terminals (COMPONENT VIDEO: Y, CB/PB, CR/PR) 12 INPUT 4 terminal (S-VIDEO) 13 INPUT 4 terminal (VIDEO) 14 INPUT 4/PC terminals (AUDIO) 15 PC INPUT terminal (ANALOG RGB) The buttons with asterisks (*) can operate the TV Guide ...

Owner's Manual
Page 15
...-L OPTICAL DIGITAL OUT SUB WOOFER Cable CARD I N OUT CONTROL ANT B IN SERVICE ONLY R-AUDIO-L VIDEO S-VIDEO INPUT 1 Y CB / PB COMPONENT VIDEO CR / PR INPUT 1 INPUT 3 HDMI BLACK WHITE SYSTEM CABLE AC IN 17 9 10 11 12 13 14 1516 18 19 20 21 1 ANT...used for factory setup) 13 INPUT 2 terminals (AUDIO) 22 23 24 25 14 INPUT 1 terminals (AUDIO) 15 INPUT 2 terminal (VIDEO) 16 INPUT 1 terminal (VIDEO) 17 INPUT 2 terminal (S-VIDEO) 18 INPUT 1 terminal (S-VIDEO) 19 INPUT 3 terminals (AUDIO) 20 INPUT 3 terminals (COMPONENT VIDEO: Y, CB/PB, CR/PR) 21 INPUT 1 terminals (COMPONENT VIDEO:...
...-L OPTICAL DIGITAL OUT SUB WOOFER Cable CARD I N OUT CONTROL ANT B IN SERVICE ONLY R-AUDIO-L VIDEO S-VIDEO INPUT 1 Y CB / PB COMPONENT VIDEO CR / PR INPUT 1 INPUT 3 HDMI BLACK WHITE SYSTEM CABLE AC IN 17 9 10 11 12 13 14 1516 18 19 20 21 1 ANT...used for factory setup) 13 INPUT 2 terminals (AUDIO) 22 23 24 25 14 INPUT 1 terminals (AUDIO) 15 INPUT 2 terminal (VIDEO) 16 INPUT 1 terminal (VIDEO) 17 INPUT 2 terminal (S-VIDEO) 18 INPUT 1 terminal (S-VIDEO) 19 INPUT 3 terminals (AUDIO) 20 INPUT 3 terminals (COMPONENT VIDEO: Y, CB/PB, CR/PR) 21 INPUT 1 terminals (COMPONENT VIDEO:...
Owner's Manual
Page 16
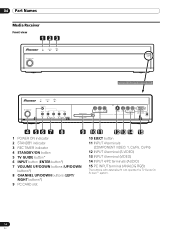
... mode. 27 DISPLAY: Displays the channel information. 2 Transmission confirmation LED 28 SCREEN SIZE: Selects the screen size. 3 INPUT: Selects an input source of the Plasma 29 SLEEP: Sets the sleep timer. The lighting will light. Display. (INPUT 1, INPUT 2, INPUT 3, INPUT 4, PC, 30 AV SELECTION: Selects audio and video settings. i.LINK) (AV mode: STANDARD, DYNAMIC, MOVIE, GAME...
... mode. 27 DISPLAY: Displays the channel information. 2 Transmission confirmation LED 28 SCREEN SIZE: Selects the screen size. 3 INPUT: Selects an input source of the Plasma 29 SLEEP: Sets the sleep timer. The lighting will light. Display. (INPUT 1, INPUT 2, INPUT 3, INPUT 4, PC, 30 AV SELECTION: Selects audio and video settings. i.LINK) (AV mode: STANDARD, DYNAMIC, MOVIE, GAME...

Owner's Manual
Page 19
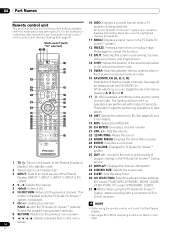
... the Plasma Display Plasma Display (rear view) SYSTEM CABLE WHITE BLACK SYSTEM CABLE WHITE BLACK (BLACK) For details on optional PIONEER speaker installation, refer to the instruction manual that came with the speaker. (WHITE) Connecting the system cable to the Media Receiver... (rear view) MONITOR OUT ANT/ CABLE A IN INPUT 2 G-LINK INPUT 3 S400 (TS) R-AUDIO-L OPTICAL DIGITAL OUT SUB WOOFER Cable CARD I N OUT CONTROL ANT B IN SERVICE ONLY R-AUDIO-L VIDEO S-VIDEO INPUT 1 Y CB / PB COMPONENT VIDEO CR / PR INPUT 1 INPUT 3 HDMI BLACK WHITE SYSTEM CABLE System cable (BLACK)...
... the Plasma Display Plasma Display (rear view) SYSTEM CABLE WHITE BLACK SYSTEM CABLE WHITE BLACK (BLACK) For details on optional PIONEER speaker installation, refer to the instruction manual that came with the speaker. (WHITE) Connecting the system cable to the Media Receiver... (rear view) MONITOR OUT ANT/ CABLE A IN INPUT 2 G-LINK INPUT 3 S400 (TS) R-AUDIO-L OPTICAL DIGITAL OUT SUB WOOFER Cable CARD I N OUT CONTROL ANT B IN SERVICE ONLY R-AUDIO-L VIDEO S-VIDEO INPUT 1 Y CB / PB COMPONENT VIDEO CR / PR INPUT 1 INPUT 3 HDMI BLACK WHITE SYSTEM CABLE System cable (BLACK)...
Owner's Manual
Page 20
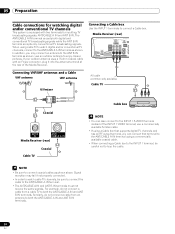
...IN terminals. 20 En Similarly, do not connect a cable from an antenna to connect a Cable box. Signal reception may connect an antenna to the INPUT 1 S-VIDEO terminal instead of the Media Receiver. For example, do not connect a cable from a cable TV to the ANT/CABLE A IN terminal.... • The ANT/CABLE A IN and ANT B IN terminals must not receive the same signals. 05 Preparation Cable connections for inputting TV broadcasting signals: ANT/CABLE A IN and ANT B IN. use a commercially available S-Video cable. • If using a Cable box that terminal...
...IN terminals. 20 En Similarly, do not connect a cable from an antenna to connect a Cable box. Signal reception may connect an antenna to the INPUT 1 S-VIDEO terminal instead of the Media Receiver. For example, do not connect a cable from a cable TV to the ANT/CABLE A IN terminal.... • The ANT/CABLE A IN and ANT B IN terminals must not receive the same signals. 05 Preparation Cable connections for inputting TV broadcasting signals: ANT/CABLE A IN and ANT B IN. use a commercially available S-Video cable. • If using a Cable box that terminal...
Owner's Manual
Page 23
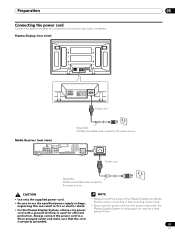
... efficient • Always turn off the power of time. protection. Media Receiver (rear view) MONITOR OUT ANT/ CABLE A IN INPUT 2 G-LINK INPUT 3 S400 (TS) R-AUDIO-L OPTICAL DIGITAL OUT SUB WOOFER Cable CARD I N OUT CONTROL ANT B IN SERVICE ONLY R-AUDIO-L VIDEO S-VIDEO... INPUT 1 Y CB / PB COMPONENT VIDEO CR / PR INPUT 1 INPUT 3 HDMI BLACK WHITE SYSTEM CABLE AC IN AC IN Power cord Noise filter Partially eliminates noise caused by the power source. ...
... efficient • Always turn off the power of time. protection. Media Receiver (rear view) MONITOR OUT ANT/ CABLE A IN INPUT 2 G-LINK INPUT 3 S400 (TS) R-AUDIO-L OPTICAL DIGITAL OUT SUB WOOFER Cable CARD I N OUT CONTROL ANT B IN SERVICE ONLY R-AUDIO-L VIDEO S-VIDEO... INPUT 1 Y CB / PB COMPONENT VIDEO CR / PR INPUT 1 INPUT 3 HDMI BLACK WHITE SYSTEM CABLE AC IN AC IN Power cord Noise filter Partially eliminates noise caused by the power source. ...

Owner's Manual
Page 26
...conditions, you cannot tune in emergency situations. on the remote control unit. • Press CH RETURN to switch the currently tuned channel to the antenna input terminals on the Media Receiver (page 20). To select subchannels, also use the • (dot) button. For the procedure, see emergency alert ... number, you may press CH ENTER to 9. Media Receiver (front view) STANDBY/ON REC ON STANDBY TIMER TV GUIDE ENTER DOWN UP LEFT RIGHT INPUT DOWN UP VOLUME DOWN UP CHANNEL HOM PC CHANNEL UP/DOWN Channel banner 12:33pm DTV 2 • 1002.102 A XXXXXXXXXX 12:30pm - 2:...
...conditions, you cannot tune in emergency situations. on the remote control unit. • Press CH RETURN to switch the currently tuned channel to the antenna input terminals on the Media Receiver (page 20). To select subchannels, also use the • (dot) button. For the procedure, see emergency alert ... number, you may press CH ENTER to 9. Media Receiver (front view) STANDBY/ON REC ON STANDBY TIMER TV GUIDE ENTER DOWN UP LEFT RIGHT INPUT DOWN UP VOLUME DOWN UP CHANNEL HOM PC CHANNEL UP/DOWN Channel banner 12:33pm DTV 2 • 1002.102 A XXXXXXXXXX 12:30pm - 2:...
Owner's Manual
Page 27
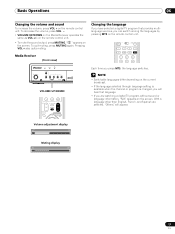
... output, press MUTING. Pressing VOL + also quits muting. Media Receiver (front view) STANDBY/ON REC ON STANDBY TIMER TV GUIDE ENTER DOWN UP LEFT RIGHT INPUT DOWN UP VOLUME DOWN UP CHANNEL HOM PC VOLUME UP/DOWN Each time you can switch among the languages by pressing MTS on the screen...
... output, press MUTING. Pressing VOL + also quits muting. Media Receiver (front view) STANDBY/ON REC ON STANDBY TIMER TV GUIDE ENTER DOWN UP LEFT RIGHT INPUT DOWN UP VOLUME DOWN UP CHANNEL HOM PC VOLUME UP/DOWN Each time you can switch among the languages by pressing MTS on the screen...
Owner's Manual
Page 28
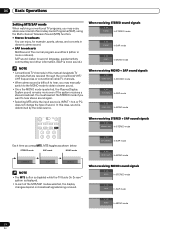
... while the TV Guide On Screen™ system is difficult to hear, you want to hear stereo sound again. • Selecting MTS while the input source is INPUT 1 to obtain clearer sound. • Once the MONO mode is determined by the video source. 06 Basic Operations Setting MTS/SAP mode When watching...
... while the TV Guide On Screen™ system is difficult to hear, you want to hear stereo sound again. • Selecting MTS while the input source is INPUT 1 to obtain clearer sound. • Once the MONO mode is determined by the video source. 06 Basic Operations Setting MTS/SAP mode When watching...

Owner's Manual
Page 29
... included in broadcast signals. • If you press SPLIT, the display mode is switched among 2-screen, picture-in -picture 1 Station name 2 Current time 3 Channel number 4 Input (Ant. Pressing INFO again causes the banner to appear. Using the POD service If you have watched digital and/or High Definition TV channels over...
... included in broadcast signals. • If you press SPLIT, the display mode is switched among 2-screen, picture-in -picture 1 Station name 2 Current time 3 Channel number 4 Input (Ant. Pressing INFO again causes the banner to appear. Using the POD service If you have watched digital and/or High Definition TV channels over...
Owner's Manual
Page 30
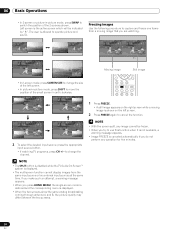
Freezing images Use the following procedure to capture and freeze one frame from the same input source or two external input sources at the same time. Moving image Still image • In 2-screen mode, press SCREEN SIZE to change the channel. NOTE • The ... function cannot display images from a moving image is shown on the left screen. • In picture-in anti-clockwise. 2 To select the desired input source, press the appropriate input source button. • If watching TV programs, press CH +/- NOTE • With the screen split, any image cannot be indicated by " "....
Freezing images Use the following procedure to capture and freeze one frame from the same input source or two external input sources at the same time. Moving image Still image • In 2-screen mode, press SCREEN SIZE to change the channel. NOTE • The ... function cannot display images from a moving image is shown on the left screen. • In picture-in anti-clockwise. 2 To select the desired input source, press the appropriate input source button. • If watching TV programs, press CH +/- NOTE • With the screen split, any image cannot be indicated by " "....

Owner's Manual
Page 32
... setup. 07 TV Guide On Screen™ System Setup Reminder Screen If you previously skipped Guide setup, you see the ZIP Code screen. • You input numbers by either • pressing the number keys or • pressing / to display a number, and then / to move to another field. • Press ...of your TV. Screen 2: Enter ZIP or Postal Code • If you selected USA in Screen 1, you see the Postal Code screen. • You input numbers by either pressing the number keys or pressing / to display a number and then / to move to another field. • Press ENTER to watching TV...
... setup. 07 TV Guide On Screen™ System Setup Reminder Screen If you previously skipped Guide setup, you see the ZIP Code screen. • You input numbers by either • pressing the number keys or • pressing / to display a number, and then / to move to another field. • Press ...of your TV. Screen 2: Enter ZIP or Postal Code • If you selected USA in Screen 1, you see the Postal Code screen. • You input numbers by either pressing the number keys or pressing / to display a number and then / to move to another field. • Press ENTER to watching TV...

Owner's Manual
Page 33
... you have a Cable Box? • If you select "Yes", you see Screen 5. • If you select "No", you see Screen 12. Screen 5: Which TV Guide input is properly installed. • Press ENTER to the cable box. Screen 8: Cable Box Brand Name • Press / to select a cable box brand. • Press ENTER...
... you have a Cable Box? • If you select "Yes", you see Screen 5. • If you select "No", you see Screen 12. Screen 5: Which TV Guide input is properly installed. • Press ENTER to the cable box. Screen 8: Cable Box Brand Name • Press / to select a cable box brand. • Press ENTER...

Owner's Manual
Page 37
...the screen. Menu Setup Menu Setup Menu Configuration AV mode menus Home Menu Picture Item AV Selection Contrast Brightness Color Tint Sharpness Pro Adjust Reset Sound Treble Bass Balance Reset FOCUS Front Surround Power Control Energy Save No Signal off No Operation off Sleep Timer Option... Position Auto Size 4:3 Mode Side Mask HDMI Input Monitor Out Digital Audio Out Language Tuner Setup Parental Control Favorites Channel Setup Closed Captions i.LINK Setup Clock Home Gallery 08 Page...
...the screen. Menu Setup Menu Setup Menu Configuration AV mode menus Home Menu Picture Item AV Selection Contrast Brightness Color Tint Sharpness Pro Adjust Reset Sound Treble Bass Balance Reset FOCUS Front Surround Power Control Energy Save No Signal off No Operation off Sleep Timer Option... Position Auto Size 4:3 Mode Side Mask HDMI Input Monitor Out Digital Audio Out Language Tuner Setup Parental Control Favorites Channel Setup Closed Captions i.LINK Setup Clock Home Gallery 08 Page...
Owner's Manual
Page 43
... Plasma Display shows nothing but a message. Closed caption allows you to change parameters such as subtitles on the currently selected input source. Press ENTER. Please Input Your Password. • The above password entry screen will be registered. ( / then ENTER) Favorites Favorites A Favorites .... Digital closed caption decoder. B) xxxxxxxxxxxxxxxxxxxxx xxxxxxxxxxxxxxxxxxxxx xxxxxxxxxxxxxxxxxxxxx Enter Disable Parental Control Enter your 4-digit password. Input 1 - 4: Enter your 4-digit password. Tuner Setup 09 Temporarily deactivating the Parental Control When the...
... Plasma Display shows nothing but a message. Closed caption allows you to change parameters such as subtitles on the currently selected input source. Press ENTER. Please Input Your Password. • The above password entry screen will be registered. ( / then ENTER) Favorites Favorites A Favorites .... Digital closed caption decoder. B) xxxxxxxxxxxxxxxxxxxxx xxxxxxxxxxxxxxxxxxxxx xxxxxxxxxxxxxxxxxxxxx Enter Disable Parental Control Enter your 4-digit password. Input 1 - 4: Enter your 4-digit password. Tuner Setup 09 Temporarily deactivating the Parental Control When the...

Owner's Manual
Page 53
...("HDTV", for example) then you'll only see programs in that category that also match the keyword. 6 Highlight "enter keyword" and press ENTER. 7 Input the keyword for the search. 2 Press to move to the search category bar, then press / to select "ALPHABETICAL". • Highlight characters by pressing /... / / , then pressing ENTER to input them. • The keyword you input is stored so that you can use it again whenever you need it. 8 Select "DONE" to start the search. 9 Highlight a ...
...("HDTV", for example) then you'll only see programs in that category that also match the keyword. 6 Highlight "enter keyword" and press ENTER. 7 Input the keyword for the search. 2 Press to move to the search category bar, then press / to select "ALPHABETICAL". • Highlight characters by pressing /... / / , then pressing ENTER to input them. • The keyword you input is stored so that you can use it again whenever you need it. 8 Select "DONE" to start the search. 9 Highlight a ...

Owner's Manual
Page 54
... at the top of the screen. • tune to the Remind Options menu. • cancel - goes to channel / watch now - Use the number buttons to input information. • If a highlighted field has arrows on any day it airs on the same channel at the same time2. • Weekly reminder (every week...
... at the top of the screen. • tune to the Remind Options menu. • cancel - goes to channel / watch now - Use the number buttons to input information. • If a highlighted field has arrows on any day it airs on the same channel at the same time2. • Weekly reminder (every week...
Owner's Manual
Page 58
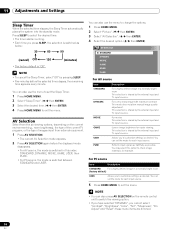
...you press SLEEP, the selection is switched as desired. Lowers image brightness for each input source. This selection is "Off". Allows you cannot select "Contrast", "Brightness", "Color", "Tint", "Sharpness", "Pro Adjust" and "Reset"; For PC source Item Description STANDARD For a highly defined image..., DYNAMIC, MOVIE, GAME, USER, then PURE. • For PC source, the mode is shared by the external input and TV input sources. 11 Adjustments and Settings Adjustments and Settings Sleep Timer When the selected time elapses, the Sleep Timer automatically places the...
...you press SLEEP, the selection is switched as desired. Lowers image brightness for each input source. This selection is "Off". Allows you cannot select "Contrast", "Brightness", "Color", "Tint", "Sharpness", "Pro Adjust" and "Reset"; For PC source Item Description STANDARD For a highly defined image..., DYNAMIC, MOVIE, GAME, USER, then PURE. • For PC source, the mode is shared by the external input and TV input sources. 11 Adjustments and Settings Adjustments and Settings Sleep Timer When the selected time elapses, the Sleep Timer automatically places the...

Owner's Manual
Page 60
NOTE • "Standard" is not selectable when 480p or 720p@60Hz signals are input. 11 Adjustments and Settings Advanced picture adjustments The Plasma Display System provides various advanced functions for highdefinition picture quality.... ADV Produces smooth and quality moving images (film specific) by converting to step 7. Using PureCinema 1 Press HOME MENU. 2 Select "Picture". ( / then ENTER) 3 Select "Pro Adjust". ( / then ENTER) 4 Select "PureCinema". ( / then ENTER) 5 Select the desired parameter. ( / then ENTER) • For the selectable parameters, see the ...
NOTE • "Standard" is not selectable when 480p or 720p@60Hz signals are input. 11 Adjustments and Settings Advanced picture adjustments The Plasma Display System provides various advanced functions for highdefinition picture quality.... ADV Produces smooth and quality moving images (film specific) by converting to step 7. Using PureCinema 1 Press HOME MENU. 2 Select "Picture". ( / then ENTER) 3 Select "Pro Adjust". ( / then ENTER) 4 Select "PureCinema". ( / then ENTER) 5 Select the desired parameter. ( / then ENTER) • For the selectable parameters, see the ...

