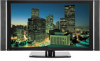
Owner's Manual
Page 4
...Installing the Plasma Display 17 Installing the Media Receiver 17 Preventing the Plasma Display from that shown in a safe place for buying this Pioneer product. However the method of the remote control unit 22 Cautions regarding the remote control unit 22 Connecting the power cord 23 Routing ...cables 24 09 Tuner Setup Setting up TV channels 38 Using Auto Channel Preset 38 Setting up TV channels manually ....... 38 Checking signal strength 38 Checking the CableCARD™ ID 38 Parental Control 39 Changing the password 39 Clearing the password 40 ...
...Installing the Plasma Display 17 Installing the Media Receiver 17 Preventing the Plasma Display from that shown in a safe place for buying this Pioneer product. However the method of the remote control unit 22 Cautions regarding the remote control unit 22 Connecting the power cord 23 Routing ...cables 24 09 Tuner Setup Setting up TV channels 38 Using Auto Channel Preset 38 Setting up TV channels manually ....... 38 Checking signal strength 38 Checking the CableCARD™ ID 38 Parental Control 39 Changing the password 39 Clearing the password 40 ...
Owner's Manual
Page 5
... 46 TV Guide On Screen™ navigation ....... 47 The Listings screen 47 Recording programs 48 Setting program reminders 50 Manual image position and clock adjustments (PC mode only 65 Selecting a screen size manually 65 Selecting a screen size automatically ..... 66 Selecting a screen size for received 4:3 aspect ratio signals 66 Changing the brightness at...
... 46 TV Guide On Screen™ navigation ....... 47 The Listings screen 47 Recording programs 48 Setting program reminders 50 Manual image position and clock adjustments (PC mode only 65 Selecting a screen size manually 65 Selecting a screen size automatically ..... 66 Selecting a screen size for received 4:3 aspect ratio signals 66 Changing the brightness at...
Owner's Manual
Page 10
...the operating instructions. The optical characteristics of the Plasma Display to the product. The Plasma Display weighs about 31.8 kg (70.1 lbs.) for the PRO-506PU and about 25.8 kg (56.9 lbs.) for a long period of the product. 02 Safety Precautions Safety Precautions Electricity is not designed for... checks-Upon completion of glass. If you to perform many useful functions, but it . Repair-If any of power supply used in this manual in serious personal injuries as well as described in discoloration or warp. 25. When the product does not operate properly as damage to a strong...
...the operating instructions. The optical characteristics of the Plasma Display to the product. The Plasma Display weighs about 31.8 kg (70.1 lbs.) for the PRO-506PU and about 25.8 kg (56.9 lbs.) for a long period of the product. 02 Safety Precautions Safety Precautions Electricity is not designed for... checks-Upon completion of glass. If you to perform many useful functions, but it . Repair-If any of power supply used in this manual in serious personal injuries as well as described in discoloration or warp. 25. When the product does not operate properly as damage to a strong...

Owner's Manual
Page 11
...or equivalent items). See the side view above. • Be careful not to use the supplied bolts. • For details, see the instruction manual that results from the mounting surface of the Plasma Display. • Be sure to install the Plasma Display on a flat surface because it contains glass... median lines. • Use M8 screws, which go 12 to 18 mm (0.5 to 0.7 inches) in depth from the use the optional PIONEER mounting products. • PIONEER shall not be liable for any items such as the optional stand. When using the optional stand, brackets, or equivalent items • Ask ...
...or equivalent items). See the side view above. • Be careful not to use the supplied bolts. • For details, see the instruction manual that results from the mounting surface of the Plasma Display. • Be sure to install the Plasma Display on a flat surface because it contains glass... median lines. • Use M8 screws, which go 12 to 18 mm (0.5 to 0.7 inches) in depth from the use the optional PIONEER mounting products. • PIONEER shall not be liable for any items such as the optional stand. When using the optional stand, brackets, or equivalent items • Ask ...
Owner's Manual
Page 17
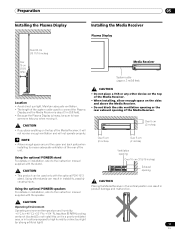
Using the optional PIONEER stand For details on installation, refer to the instruction manual supplied with the speaker. CAUTION • If...not place a VCR or any other stands can result in product damage and malfunction. Using the optional PIONEER speakers For details on installation, refer to have someone help you place anything on the sides and ...about 3 m (9.8 feet). • Because the Plasma Display is heavy, be sure to the instruction manual supplied with the optional PDK-1013 stand. Preparation Preparation Installing the Plasma Display 05 Installing the Media Receiver...
Using the optional PIONEER stand For details on installation, refer to the instruction manual supplied with the speaker. CAUTION • If...not place a VCR or any other stands can result in product damage and malfunction. Using the optional PIONEER speakers For details on installation, refer to have someone help you place anything on the sides and ...about 3 m (9.8 feet). • Because the Plasma Display is heavy, be sure to the instruction manual supplied with the optional PDK-1013 stand. Preparation Preparation Installing the Plasma Display 05 Installing the Media Receiver...

Owner's Manual
Page 19
... cable to the Plasma Display Plasma Display (rear view) SYSTEM CABLE WHITE BLACK SYSTEM CABLE WHITE BLACK (BLACK) For details on optional PIONEER speaker installation, refer to the instruction manual that came with the speaker. (WHITE) Connecting the system cable to the Media Receiver Media Receiver (rear view) MONITOR OUT ANT/ CABLE...
... cable to the Plasma Display Plasma Display (rear view) SYSTEM CABLE WHITE BLACK SYSTEM CABLE WHITE BLACK (BLACK) For details on optional PIONEER speaker installation, refer to the instruction manual that came with the speaker. (WHITE) Connecting the system cable to the Media Receiver Media Receiver (rear view) MONITOR OUT ANT/ CABLE...
Owner's Manual
Page 25
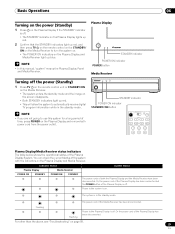
... the Plasma Display and Media Receiver. You can check the current status of the Plasma Display has been disconnected. Flashing Flashing Power to use this manual, "system" means the Plasma Display Panel and Media Receiver. The power cord of the Plasma Display System. STANDBY/ON REC ON STANDBY TIMER STANDBY indicator...
... the Plasma Display and Media Receiver. You can check the current status of the Plasma Display has been disconnected. Flashing Flashing Power to use this manual, "system" means the Plasma Display Panel and Media Receiver. The power cord of the Plasma Display System. STANDBY/ON REC ON STANDBY TIMER STANDBY indicator...
Owner's Manual
Page 28
...1 to hear stereo sound again. • Selecting MTS while the input source is displayed. • In each of sound. In this manual designate TV channels that are received through the conventional VHF/ UHF frequencies or conventional cable TV channels. • When stereo sound is difficult to... hear, you may manually switch to the MONO mode to second language, supplementary commentary and other information. (SAP is determined by the video source. 06 Basic ...
...1 to hear stereo sound again. • Selecting MTS while the input source is displayed. • In each of sound. In this manual designate TV channels that are received through the conventional VHF/ UHF frequencies or conventional cable TV channels. • When stereo sound is difficult to... hear, you may manually switch to the MONO mode to second language, supplementary commentary and other information. (SAP is determined by the video source. 06 Basic ...
Owner's Manual
Page 31
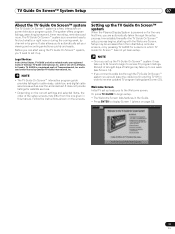
... you can start using the TV Guide On Screen™ system, you'll need to begin setup. • The Welcome Screen lists features in this manual. and/or one given in the Guide. • Press ENTER to receive TV program listings. NOTE • Once you to find out what's on the...
... you can start using the TV Guide On Screen™ system, you'll need to begin setup. • The Welcome Screen lists features in this manual. and/or one given in the Guide. • Press ENTER to receive TV program listings. NOTE • Once you to find out what's on the...

Owner's Manual
Page 37
...exit the menu. Menu Setup Menu Setup Menu Configuration AV mode menus Home Menu Picture Item AV Selection Contrast Brightness Color Tint Sharpness Pro Adjust Reset Sound Treble Bass Balance Reset FOCUS Front Surround Power Control Energy Save No Signal off No Operation off Sleep Timer Option... 62 Reset 62 FOCUS 63 Front Surround 63 Power Control Energy Save 63 Power Management 64 Sleep Timer 58 Option Auto Setup 64 Manual Setup 65 Menu operations The following describes the typical procedure for setting up the menus. For the actual procedures, see the appropriate ...
...exit the menu. Menu Setup Menu Setup Menu Configuration AV mode menus Home Menu Picture Item AV Selection Contrast Brightness Color Tint Sharpness Pro Adjust Reset Sound Treble Bass Balance Reset FOCUS Front Surround Power Control Energy Save No Signal off No Operation off Sleep Timer Option... 62 Reset 62 FOCUS 63 Front Surround 63 Power Control Energy Save 63 Power Management 64 Sleep Timer 58 Option Auto Setup 64 Manual Setup 65 Menu operations The following describes the typical procedure for setting up the menus. For the actual procedures, see the appropriate ...
Owner's Manual
Page 38
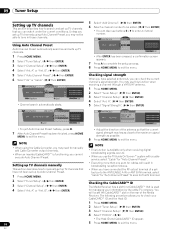
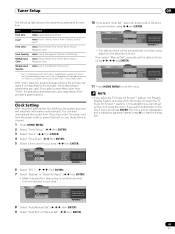
..., press D. 7 After Auto Channel Preset has been finished, press HOME MENU to enter a channel number. Setting up TV channels manually This section describes how to manually set up TV channels that have not been set up TV channels that you can watch under the current conditions. B". ( / then... is functioning, you have connected the RF output terminal of the Media Receiver. A" or "Ant. Preset Cable Ant. You may need to manually add Cable Converter output channels. • When an inserted CableCARD™ is used for a CableCARD™ that the current signal strength reaches ...
..., press D. 7 After Auto Channel Preset has been finished, press HOME MENU to enter a channel number. Setting up TV channels manually This section describes how to manually set up TV channels that have not been set up TV channels that you can watch under the current conditions. B". ( / then... is functioning, you have connected the RF output terminal of the Media Receiver. A" or "Ant. Preset Cable Ant. You may need to manually add Cable Converter output channels. • When an inserted CableCARD™ is used for a CableCARD™ that the current signal strength reaches ...
Owner's Manual
Page 45
...Apply Current Time: 9:56 pm EDT Monday 05/17/04 xxxxxxxxxxxxxxxxxxxxx xxxxxxxxxxxxxxxxxxxxx xxxxxxxxxxxxxxxxxxxxx Home Menu Exit 8 Select "Auto/Manual Set". ( , / , then ENTER) 9 Select "Auto Set" or "Manual Set". ( / then ENTER) 45 En if not specified by the provider are used regardless of the provider...select parameters other than "Auto", the selected parameters are used . in your area. ( / then ENTER) 10 If you select "Manual Set", manually set the correct time. Clock Time Zone Time Zone Atlantic Eastern Central Mountain Current Time: 9:55 pm EDT Monday 05/17/04 ...
...Apply Current Time: 9:56 pm EDT Monday 05/17/04 xxxxxxxxxxxxxxxxxxxxx xxxxxxxxxxxxxxxxxxxxx xxxxxxxxxxxxxxxxxxxxx Home Menu Exit 8 Select "Auto/Manual Set". ( , / , then ENTER) 9 Select "Auto Set" or "Manual Set". ( / then ENTER) 45 En if not specified by the provider are used regardless of the provider...select parameters other than "Auto", the selected parameters are used . in your area. ( / then ENTER) 10 If you select "Manual Set", manually set the correct time. Clock Time Zone Time Zone Atlantic Eastern Central Mountain Current Time: 9:55 pm EDT Monday 05/17/04 ...
Owner's Manual
Page 46
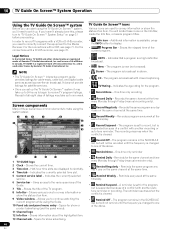
... time. 3 Time slot - Shows the title of an item. 9 Video window - Reminds for the same channel and time every Monday through Friday (manual recording only). • Record Regularly - Reminds the same program any day it airs on the same channel at the time every Monday through Friday... (manual reminder only). • Remind Regularly - In order to record TV programs with closed captioning. • TV Rating - Indicates the age rating ...
... time. 3 Time slot - Shows the title of an item. 9 Video window - Reminds for the same channel and time every Monday through Friday (manual recording only). • Record Regularly - Reminds the same program any day it airs on the same channel at the time every Monday through Friday... (manual reminder only). • Remind Regularly - In order to record TV programs with closed captioning. • TV Rating - Indicates the age rating ...

Owner's Manual
Page 54
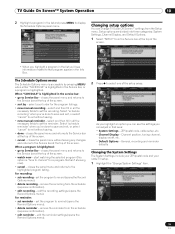
... 9:00 to the midway point of the original schedule. For example, up to 9:15 for the same channel and time every Monday through Friday (manual reminder only) • Regularly - For example, up to 9:30 program. 54 En Scheduling recordings and reminders From the Schedule area you can review... Episode Options menu From the Episode Options menu you can select: • go to channel / watch now - goes to cycle through Friday (manual recording only) • Regularly - The program is set for the program, but will still appear if the program starts any option to highlight ...
... 9:00 to the midway point of the original schedule. For example, up to 9:15 for the same channel and time every Monday through Friday (manual reminder only) • Regularly - For example, up to 9:30 program. 54 En Scheduling recordings and reminders From the Schedule area you can review... Episode Options menu From the Episode Options menu you can select: • go to channel / watch now - goes to cycle through Friday (manual recording only) • Regularly - The program is set for the program, but will still appear if the program starts any option to highlight ...
Owner's Manual
Page 55
...Options menu). • delete reminder - When "SCHEDULE" is highlighted in all the necessary fields to channel" for the program listings. • new manual recording - select a sort order for a program that area: • System Settings - select and then fill in the Service bar, or a program... is "tune to set the reminder. closes the panel menu and returns to exit without saving. • new manual reminder - start watching the selected program (this option is highlighted. remove the recording from the schedule (requires confirmation). • edit reminder ...
...Options menu). • delete reminder - When "SCHEDULE" is highlighted in all the necessary fields to channel" for the program listings. • new manual recording - select a sort order for a program that area: • System Settings - select and then fill in the Service bar, or a program... is "tune to set the reminder. closes the panel menu and returns to exit without saving. • new manual reminder - start watching the selected program (this option is highlighted. remove the recording from the schedule (requires confirmation). • edit reminder ...
Owner's Manual
Page 58
... time. • The timer starts counting. • Each time you cannot select "Contrast", "Brightness", "Color", "Tint", "Sharpness", "Pro Adjust" and "Reset"; For a very sharp image with maximum contrast This mode does not allow manual image quality adjustment. Lowers image brightness for each input source. 5 Press HOME MENU to exit the menu. For...
... time. • The timer starts counting. • Each time you cannot select "Contrast", "Brightness", "Color", "Tint", "Sharpness", "Pro Adjust" and "Reset"; For a very sharp image with maximum contrast This mode does not allow manual image quality adjustment. Lowers image brightness for each input source. 5 Press HOME MENU to exit the menu. For...

Owner's Manual
Page 60
...tone Mid-High Intermediate tone between High and Mid Mid Natural tone Mid-Low Intermediate tone between Mid and Low Low White with reddish tone Manual Color temperature adjusted to your preference 7 Select an item to be adjusted. ( / then ENTER) 8 Select the desired level. (..., then recreates each still film frame for optimizing the picture quality. Using PureCinema 1 Press HOME MENU. 2 Select "Picture". ( / then ENTER) 3 Select "Pro Adjust". ( / then ENTER) 4 Select "PureCinema". ( / then ENTER) 5 Select the desired parameter. ( / then ENTER) • For the selectable ...
...tone Mid-High Intermediate tone between High and Mid Mid Natural tone Mid-Low Intermediate tone between Mid and Low Low White with reddish tone Manual Color temperature adjusted to your preference 7 Select an item to be adjusted. ( / then ENTER) 8 Select the desired level. (..., then recreates each still film frame for optimizing the picture quality. Using PureCinema 1 Press HOME MENU. 2 Select "Picture". ( / then ENTER) 3 Select "Pro Adjust". ( / then ENTER) 4 Select "PureCinema". ( / then ENTER) 5 Select the desired parameter. ( / then ENTER) • For the selectable ...
Owner's Manual
Page 64
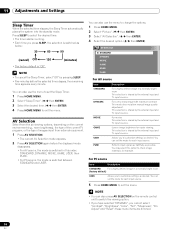
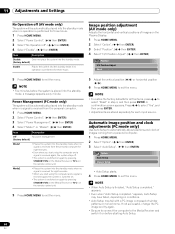
... standby mode when no signal is received from a personal computer. 1 Press HOME MENU. 2 Select "Option". ( / then ENTER) 3 Select "Auto Setup". ( / then ENTER) Option Auto Setup Manual Setup • Auto Setup starts. 4 Press HOME MENU to select "Reset" in step 4, and then press ENTER.
... standby mode when no signal is received from a personal computer. 1 Press HOME MENU. 2 Select "Option". ( / then ENTER) 3 Select "Auto Setup". ( / then ENTER) Option Auto Setup Manual Setup • Auto Setup starts. 4 Press HOME MENU to select "Reset" in step 4, and then press ENTER.
Owner's Manual
Page 65
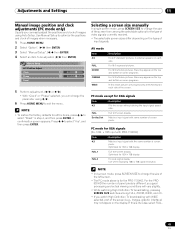
...Reset" in step 4, and then press ENTER. For 16:9 letterbox pictures. PC mode for XGA signals (Ex. 1024 × 768 input with PRO-1130HD) Item 4:3 Description Matches input signal with the same number of screen pixels. If this mode pictures are progressively stretched toward each side. PC mode ...side of panel pixels is the case, select FULL. 65 En NOTE • To restore the factory defaults for the PRO-1130HD. Adjustments and Settings 11 Manual image position and clock adjustments (PC mode only) Usually you can change the parameter using Auto Setup. Selecting a screen size...
...Reset" in step 4, and then press ENTER. For 16:9 letterbox pictures. PC mode for XGA signals (Ex. 1024 × 768 input with PRO-1130HD) Item 4:3 Description Matches input signal with the same number of screen pixels. If this mode pictures are progressively stretched toward each side. PC mode ...side of panel pixels is the case, select FULL. 65 En NOTE • To restore the factory defaults for the PRO-1130HD. Adjustments and Settings 11 Manual image position and clock adjustments (PC mode only) Usually you can change the parameter using Auto Setup. Selecting a screen size...
Owner's Manual
Page 66
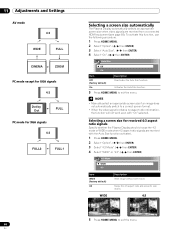
NOTE • Manually select an appropriate screen size if an image does not automatically switch to exit the menu. WIDE 4:3 5 Press HOME MENU to a correct screen format. • ...
NOTE • Manually select an appropriate screen size if an image does not automatically switch to exit the menu. WIDE 4:3 5 Press HOME MENU to a correct screen format. • ...


