Owner's Manual
Page 4
... the Plasma Display 17 Installing the Media Receiver 17 Preventing the Plasma Display from that shown in a safe place for buying this Pioneer product. Please read through these operating instructions so you have finished reading the instructions, put them away in the explanatory drawings. However...power cord 23 Routing cables 24 09 Tuner Setup Setting up TV channels 38 Using Auto Channel Preset 38 Setting up TV channels manually ....... 38 Checking signal strength 38 Checking the CableCARD™ ID 38 Parental Control 39 Changing the password 39 Clearing the password ...
... the Plasma Display 17 Installing the Media Receiver 17 Preventing the Plasma Display from that shown in a safe place for buying this Pioneer product. Please read through these operating instructions so you have finished reading the instructions, put them away in the explanatory drawings. However...power cord 23 Routing cables 24 09 Tuner Setup Setting up TV channels 38 Using Auto Channel Preset 38 Setting up TV channels manually ....... 38 Checking signal strength 38 Checking the CableCARD™ ID 38 Parental Control 39 Changing the password 39 Clearing the password ...
Owner's Manual
Page 5
... 46 TV Guide On Screen™ navigation ....... 47 The Listings screen 47 Recording programs 48 Setting program reminders 50 Manual image position and clock adjustments (PC mode only 65 Selecting a screen size manually 65 Selecting a screen size automatically ..... 66 Selecting a screen size for received 4:3 aspect ratio signals 66 Changing the brightness at...
... 46 TV Guide On Screen™ navigation ....... 47 The Listings screen 47 Recording programs 48 Setting program reminders 50 Manual image position and clock adjustments (PC mode only 65 Selecting a screen size manually 65 Selecting a screen size automatically ..... 66 Selecting a screen size for received 4:3 aspect ratio signals 66 Changing the brightness at...
Owner's Manual
Page 10
... e. f. Use of the product. The screen may be moved with utmost care. The Plasma Display weighs about 31.8 kg (70.1 lbs.) for the PRO-506PU and about 25.8 kg (56.9 lbs.) for ventilation. Because it has small depth and is unstable, unpack, carry, and install the product with ...one more person at the plugs 10 and product. Follow instructions-All operating instructions must be broken, resulting in this manual in your home, consult your product, please read and understood before installing the speakers. 23. To clean the product, use attachments not ...
... e. f. Use of the product. The screen may be moved with utmost care. The Plasma Display weighs about 31.8 kg (70.1 lbs.) for the PRO-506PU and about 25.8 kg (56.9 lbs.) for ventilation. Because it has small depth and is unstable, unpack, carry, and install the product with ...one more person at the plugs 10 and product. Follow instructions-All operating instructions must be broken, resulting in this manual in your home, consult your product, please read and understood before installing the speakers. 23. To clean the product, use attachments not ...

Owner's Manual
Page 11
...items • Consult your dealer to perform the installation. • Be sure to use the supplied bolts. • For details, see the instruction manual that results from the stand, with the optional stand (or equivalent items). See the side view above. • Be careful not to block the... Display to install the Plasma Display on a flat surface because it contains glass. • The screw holes other than the optional PIONEER products. 11 En Safety Precautions 02 Installation Precautions Observe the following six mounting holes can be used only for the specified products.
...items • Consult your dealer to perform the installation. • Be sure to use the supplied bolts. • For details, see the instruction manual that results from the stand, with the optional stand (or equivalent items). See the side view above. • Be careful not to block the... Display to install the Plasma Display on a flat surface because it contains glass. • The screw holes other than the optional PIONEER products. 11 En Safety Precautions 02 Installation Precautions Observe the following six mounting holes can be used only for the specified products.
Owner's Manual
Page 17
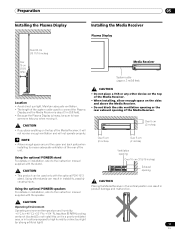
... TIMER PULL OPEN System cable (approx. 3 m/9.8 feet) Location • Avoid direct sunlight. Using the optional PIONEER stand For details on installation, refer to the instruction manual supplied with the speaker. STANDBY/ON CAUTION • Do not place a VCR or any other stands can result...Over 5 cm (2 inches) Ventilation opening Over 10 cm (3 15/16 inches) Exhaust opening of the Media Receiver, it . Using the optional PIONEER speakers For details on the top of the Media Receiver. Maintain adequate ventilation. • The length of the unit. NOTE • Allow enough ...
... TIMER PULL OPEN System cable (approx. 3 m/9.8 feet) Location • Avoid direct sunlight. Using the optional PIONEER stand For details on installation, refer to the instruction manual supplied with the speaker. STANDBY/ON CAUTION • Do not place a VCR or any other stands can result...Over 5 cm (2 inches) Ventilation opening Over 10 cm (3 15/16 inches) Exhaust opening of the Media Receiver, it . Using the optional PIONEER speakers For details on the top of the Media Receiver. Maintain adequate ventilation. • The length of the unit. NOTE • Allow enough ...

Owner's Manual
Page 19
... cable to the Plasma Display Plasma Display (rear view) SYSTEM CABLE WHITE BLACK SYSTEM CABLE WHITE BLACK (BLACK) For details on optional PIONEER speaker installation, refer to the instruction manual that came with the speaker. (WHITE) Connecting the system cable to the Media Receiver Media Receiver (rear view) MONITOR OUT ANT/ CABLE...
... cable to the Plasma Display Plasma Display (rear view) SYSTEM CABLE WHITE BLACK SYSTEM CABLE WHITE BLACK (BLACK) For details on optional PIONEER speaker installation, refer to the instruction manual that came with the speaker. (WHITE) Connecting the system cable to the Media Receiver Media Receiver (rear view) MONITOR OUT ANT/ CABLE...
Owner's Manual
Page 25
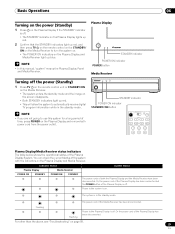
... mode and the image on the screen disappears. • Both STANDBY indicators light up blue. NOTE • If you are not going to use this manual, "system" means the Plasma Display Panel and Media Receiver. For other than the above, see "Troubleshooting" on the Plasma Display and remove both the Plasma...
... mode and the image on the screen disappears. • Both STANDBY indicators light up blue. NOTE • If you are not going to use this manual, "system" means the Plasma Display Panel and Media Receiver. For other than the above, see "Troubleshooting" on the Plasma Display and remove both the Plasma...
Owner's Manual
Page 28
...) In SAP mode A 125 MONO (SAP) In MONO mode When receiving STEREO + SAP sound signals A 125 STEREO (SAP) In STEREO mode Each time you may manually switch to the MONO mode to 4 or PC does not change the type of the MTS/SAP modes selected, the display changes depend on broadcast... mode When receiving MONO sound signals A 125 MONO In STEREO mode A 125 MAIN In SAP mode A 125 MONO In MONO mode 28 En In this manual designate TV channels that are received through the conventional VHF/ UHF frequencies or conventional cable TV channels. • When stereo sound is difficult to hear...
...) In SAP mode A 125 MONO (SAP) In MONO mode When receiving STEREO + SAP sound signals A 125 STEREO (SAP) In STEREO mode Each time you may manually switch to the MONO mode to 4 or PC does not change the type of the MTS/SAP modes selected, the display changes depend on broadcast... mode When receiving MONO sound signals A 125 MONO In STEREO mode A 125 MAIN In SAP mode A 125 MONO In MONO mode 28 En In this manual designate TV channels that are received through the conventional VHF/ UHF frequencies or conventional cable TV channels. • When stereo sound is difficult to hear...
Owner's Manual
Page 31
... are registered marks of its affiliates. Setting up . Or press TV GUIDE to begin to begin setup. • The Welcome Screen lists features in this manual. Welcome Screen Initial TV set your viewing and recording selections quickly and easily. and/or one given in the Guide. • Press ENTER to set...
... are registered marks of its affiliates. Setting up . Or press TV GUIDE to begin to begin setup. • The Welcome Screen lists features in this manual. Welcome Screen Initial TV set your viewing and recording selections quickly and easily. and/or one given in the Guide. • Press ENTER to set...

Owner's Manual
Page 37
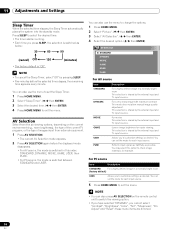
.... 37 En Menu Setup Menu Setup Menu Configuration AV mode menus Home Menu Picture Item AV Selection Contrast Brightness Color Tint Sharpness Pro Adjust Reset Sound Treble Bass Balance Reset FOCUS Front Surround Power Control Energy Save No Signal off No Operation off Sleep Timer Option...Balance 62 Reset 62 FOCUS 63 Front Surround 63 Power Control Energy Save 63 Power Management 64 Sleep Timer 58 Option Auto Setup 64 Manual Setup 65 Menu operations The following describes the typical procedure for setting up the menus. NOTE • You can return to select ...
.... 37 En Menu Setup Menu Setup Menu Configuration AV mode menus Home Menu Picture Item AV Selection Contrast Brightness Color Tint Sharpness Pro Adjust Reset Sound Treble Bass Balance Reset FOCUS Front Surround Power Control Energy Save No Signal off No Operation off Sleep Timer Option...Balance 62 Reset 62 FOCUS 63 Front Surround 63 Power Control Energy Save 63 Power Management 64 Sleep Timer 58 Option Auto Setup 64 Manual Setup 65 Menu operations The following describes the typical procedure for setting up the menus. NOTE • You can return to select ...
Owner's Manual
Page 38
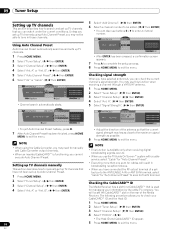
...". ( / then ENTER) 6 Select "Air" or "Cable". ( / then ENTER) Channel Setup Ant. Preset Cable Ant. You may need to manually add Cable Converter output channels. • When an inserted CableCARD™ is used for the IN terminal. The following procedure allows you to check your.... 2 Select "Tuner Setup". ( / then ENTER) 3 Select "Channel Setup". ( / then ENTER) 4 Select "Ant. Setting up TV channels manually This section describes how to manually set up TV channels that have selected antenna A, you can watch under the current conditions. A Auto Ch. A". ( / then ENTER) 5 Select ...
...". ( / then ENTER) 6 Select "Air" or "Cable". ( / then ENTER) Channel Setup Ant. Preset Cable Ant. You may need to manually add Cable Converter output channels. • When an inserted CableCARD™ is used for the IN terminal. The following procedure allows you to check your.... 2 Select "Tuner Setup". ( / then ENTER) 3 Select "Channel Setup". ( / then ENTER) 4 Select "Ant. Setting up TV channels manually This section describes how to manually set up TV channels that have selected antenna A, you can watch under the current conditions. A Auto Ch. A". ( / then ENTER) 5 Select ...
Owner's Manual
Page 45
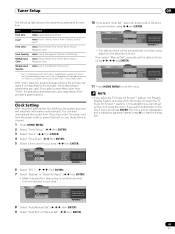
...Apply Current Time: 9:56 pm EDT Monday 05/17/04 xxxxxxxxxxxxxxxxxxxxx xxxxxxxxxxxxxxxxxxxxx xxxxxxxxxxxxxxxxxxxxx Home Menu Exit 8 Select "Auto/Manual Set". ( , / , then ENTER) 9 Select "Auto Set" or "Manual Set". ( / then ENTER) 45 En Tuner Setup 09 The following table shows the parameters selectable for Clock ...the bolded default parameters are used regardless of the provider's specifications. if not specified by the provider are used . Clock Auto/Manual Set Auto/Manual Set •Manual Set Date and Time 3 4 3 /17/04 11:58pm 5 6 Current Time: 11:58 pm PDT Monday 05/17/...
...Apply Current Time: 9:56 pm EDT Monday 05/17/04 xxxxxxxxxxxxxxxxxxxxx xxxxxxxxxxxxxxxxxxxxx xxxxxxxxxxxxxxxxxxxxx Home Menu Exit 8 Select "Auto/Manual Set". ( , / , then ENTER) 9 Select "Auto Set" or "Manual Set". ( / then ENTER) 45 En Tuner Setup 09 The following table shows the parameters selectable for Clock ...the bolded default parameters are used regardless of the provider's specifications. if not specified by the provider are used . Clock Auto/Manual Set Auto/Manual Set •Manual Set Date and Time 3 4 3 /17/04 11:58pm 5 6 Current Time: 11:58 pm PDT Monday 05/17/...
Owner's Manual
Page 46
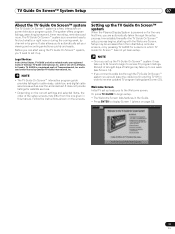
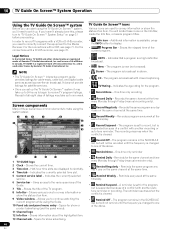
... to begin to set up the TV Guide On Screen™ system it airs on the same channel at the time every Monday through Friday (manual reminder only). • Remind Regularly - Shows the current time. 3 Time slot - 10 TV Guide On Screen™ System Operation TV Guide On ... menu entry - If you to record, but will not remind until the frequency is set for the same channel and time every Monday through Friday (manual recording only). • Record Regularly - For the connections with a D-VHS recorder, see page 71. Shows the elapsed time of the TV program. 8 Info ...
... to begin to set up the TV Guide On Screen™ system it airs on the same channel at the time every Monday through Friday (manual reminder only). • Remind Regularly - Shows the current time. 3 Time slot - 10 TV Guide On Screen™ System Operation TV Guide On ... menu entry - If you to record, but will not remind until the frequency is set for the same channel and time every Monday through Friday (manual recording only). • Record Regularly - For the connections with a D-VHS recorder, see page 71. Shows the elapsed time of the TV program. 8 Info ...

Owner's Manual
Page 54
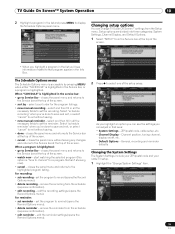
Use the number buttons to input information. • If a highlighted field has arrows on either side, press / to cycle through Friday (manual recording only) • Regularly - The recording resumes when the conflict is cleared. • Off: The program remains in the SCHEDULE list, but will...is changed to one of the above . • Once only reminder • Daily Reminds for the same channel and time every Monday through Friday (manual reminder only) • Regularly - For example, up to the midway point of the original schedule. closes the panel menu and returns to the Remind ...
Use the number buttons to input information. • If a highlighted field has arrows on either side, press / to cycle through Friday (manual recording only) • Regularly - The recording resumes when the conflict is cleared. • Off: The program remains in the SCHEDULE list, but will...is changed to one of the above . • Once only reminder • Daily Reminds for the same channel and time every Monday through Friday (manual reminder only) • Regularly - For example, up to the midway point of the original schedule. closes the panel menu and returns to the Remind ...
Owner's Manual
Page 55
... go to exit without saving any changes and returns to the highlighted program listing. set the program to channel" for the program listings. • new manual recording - ZIP/postal code, cable setup, etc. • Channel Display - When "SCHEDULE" is "tune to record (opens the Record Options menu)....of the screen. • sort by pressing MENU when either "SCHEDULE" is highlighted: • go to exit without saving. • new manual reminder - TV Guide On Screen™ System Operation 10 2 Highlight a program in the list and press MENU to set the reminder. Changing ...
... go to exit without saving any changes and returns to the highlighted program listing. set the program to channel" for the program listings. • new manual recording - ZIP/postal code, cable setup, etc. • Channel Display - When "SCHEDULE" is "tune to record (opens the Record Options menu)....of the screen. • sort by pressing MENU when either "SCHEDULE" is highlighted: • go to exit without saving. • new manual reminder - TV Guide On Screen™ System Operation 10 2 Highlight a program in the list and press MENU to set the reminder. Changing ...
Owner's Manual
Page 58
... is switched in this option to customize settings as desired. For a very sharp image with maximum contrast This mode does not allow manual image quality adjustment. You may select this order; AV Selection Select from the six viewing options, depending on the remote control unit to... to select the desired time. • The timer starts counting. • Each time you cannot select "Contrast", "Brightness", "Color", "Tint", "Sharpness", "Pro Adjust" and "Reset"; This selection is "Off". You can also use the menu to exit the menu. these menu items are dimmed. 58 En NOTE...
... is switched in this option to customize settings as desired. For a very sharp image with maximum contrast This mode does not allow manual image quality adjustment. You may select this order; AV Selection Select from the six viewing options, depending on the remote control unit to... to select the desired time. • The timer starts counting. • Each time you cannot select "Contrast", "Brightness", "Color", "Tint", "Sharpness", "Pro Adjust" and "Reset"; This selection is "Off". You can also use the menu to exit the menu. these menu items are dimmed. 58 En NOTE...

Owner's Manual
Page 60
...; If you have selected a desired parameter in a better white balance. Using PureCinema 1 Press HOME MENU. 2 Select "Picture". ( / then ENTER) 3 Select "Pro Adjust". ( / then ENTER) 4 Select "PureCinema". ( / then ENTER) 5 Select the desired parameter. ( / then ENTER) • For the selectable parameters,...frames per second. Selections Off Deactivates the PureCinema. Color Temp Adjusts the color temperature, resulting in this , select "Manual" first and then press and hold ENTER for optimizing the picture quality. PureCinema Automatically detects a film-based source (originally...
...; If you have selected a desired parameter in a better white balance. Using PureCinema 1 Press HOME MENU. 2 Select "Picture". ( / then ENTER) 3 Select "Pro Adjust". ( / then ENTER) 4 Select "PureCinema". ( / then ENTER) 5 Select the desired parameter. ( / then ENTER) • For the selectable parameters,...frames per second. Selections Off Deactivates the PureCinema. Color Temp Adjusts the color temperature, resulting in this , select "Manual" first and then press and hold ENTER for optimizing the picture quality. PureCinema Automatically detects a film-based source (originally...
Owner's Manual
Page 64
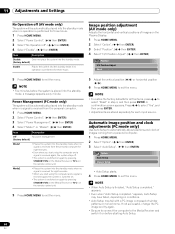
... standby mode when no signal is received from a personal computer. 1 Press HOME MENU. 2 Select "Option". ( / then ENTER) 3 Select "Auto Setup". ( / then ENTER) Option Auto Setup Manual Setup • Auto Setup starts. 4 Press HOME MENU to exit the menu. NOTE • To restore the factory defaults for eight seconds. • When you...
... standby mode when no signal is received from a personal computer. 1 Press HOME MENU. 2 Select "Option". ( / then ENTER) 3 Select "Auto Setup". ( / then ENTER) Option Auto Setup Manual Setup • Auto Setup starts. 4 Press HOME MENU to exit the menu. NOTE • To restore the factory defaults for eight seconds. • When you...
Owner's Manual
Page 65
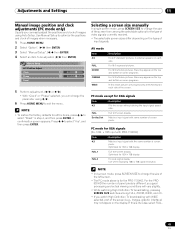
A confirmation screen appears. For 16:9 squeezed pictures. NOTE • To restore the factory defaults for the PRO-1130HD. Press / to select "Reset" in step 4, and then press ENTER. FULL Full 16:9 screen display Dot by Dot Matches input signal ... SIZE switches among the selectable options for XGA signals (Ex. 1024 × 768 input with PRO-1130HD) Item 4:3 Description Matches input signal with same number of screen pixels. Adjustments and Settings 11 Manual image position and clock adjustments (PC mode only) Usually you can easily adjust the positions and clock...
A confirmation screen appears. For 16:9 squeezed pictures. NOTE • To restore the factory defaults for the PRO-1130HD. Press / to select "Reset" in step 4, and then press ENTER. FULL Full 16:9 screen display Dot by Dot Matches input signal ... SIZE switches among the selectable options for XGA signals (Ex. 1024 × 768 input with PRO-1130HD) Item 4:3 Description Matches input signal with same number of screen pixels. Adjustments and Settings 11 Manual image position and clock adjustments (PC mode only) Usually you can easily adjust the positions and clock...
Owner's Manual
Page 66
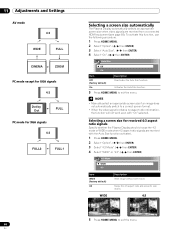
... "Auto Size". ( / then ENTER) 4 Select "On". ( / then ENTER) Auto Size Off On Item Off (factory default) On Description Deactivates the Auto Size function. NOTE • Manually select an appropriate screen size if an image does not automatically switch to a correct screen format. • When the video signal contains no aspect ratio...
... "Auto Size". ( / then ENTER) 4 Select "On". ( / then ENTER) Auto Size Off On Item Off (factory default) On Description Deactivates the Auto Size function. NOTE • Manually select an appropriate screen size if an image does not automatically switch to a correct screen format. • When the video signal contains no aspect ratio...


