
Owner's Manual
Page 3
This exclusive series of Elite KURO monitors does just that make the Elite KURO monitor one of the finest in the world and immerse you to enter a new world of -the-art design and meticulous engineering to make this ... particular tastes and to Know Your Flat Panel Display 7 1.2.1 Control Buttons and More on the Flat Panel Display 7 1.2.2 Operating the Remote Control ...8 1.2.3 Buttons on purchasing a Pioneer Elite KURO monitor. We are proud to incorporate this philosophy of exceptional quality, state-of seeing and hearing like never before. Please spend some time reading through...
This exclusive series of Elite KURO monitors does just that make the Elite KURO monitor one of the finest in the world and immerse you to enter a new world of -the-art design and meticulous engineering to make this ... particular tastes and to Know Your Flat Panel Display 7 1.2.1 Control Buttons and More on the Flat Panel Display 7 1.2.2 Operating the Remote Control ...8 1.2.3 Buttons on purchasing a Pioneer Elite KURO monitor. We are proud to incorporate this philosophy of exceptional quality, state-of seeing and hearing like never before. Please spend some time reading through...
Owner's Manual
Page 4
...a Manufacturer Code 47 6.1.4 Clear Added Manufacturer Codes from the Remote Control 48 6.1.5 Control a Pioneer Receiver ...48 6.1.6 Control a Cable (CBL) or Satellite (SAT) System 49 6.1.7 Control a Video Cassette Recorder (VCR) ...50 6.1.8 Control a DVD Player/DVR Recorder/BD Player 51 6.2 Apply Settings for Other Equipment...52...AV System...58 6.4.2 Control a Recorder ...59 6.4.3 Control a Player...59 6.4.4 Add an AV Amp or a BD Player...60 6.5 Specific KURO LINK Commands ...61 6.5.1 Play Source Sound Using an HDMI Command 61 6.5.2 Turn OFF the Power With an HDMI Command 61 6.5.3 Turn ON...
...a Manufacturer Code 47 6.1.4 Clear Added Manufacturer Codes from the Remote Control 48 6.1.5 Control a Pioneer Receiver ...48 6.1.6 Control a Cable (CBL) or Satellite (SAT) System 49 6.1.7 Control a Video Cassette Recorder (VCR) ...50 6.1.8 Control a DVD Player/DVR Recorder/BD Player 51 6.2 Apply Settings for Other Equipment...52...AV System...58 6.4.2 Control a Recorder ...59 6.4.3 Control a Player...59 6.4.4 Add an AV Amp or a BD Player...60 6.5 Specific KURO LINK Commands ...61 6.5.1 Play Source Sound Using an HDMI Command 61 6.5.2 Turn OFF the Power With an HDMI Command 61 6.5.3 Turn ON...
Owner's Manual
Page 10
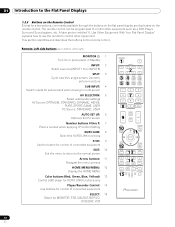
...Source: STANDARD, USER AUTO SET UP: 6 Optimize the PC screen Number buttons 0 thru 9: 7 Enter a number when applying IP Control Setting KURO LINK: 8 Select the KURO LINK functions P/CH: 9 Use the button for control of connected equipment EXIT: 10 Exit the menu to return to the normal screen Arrow ... the menu screens HOME MENU/MENU: 12 Display the HOME MENU Color buttons (Red, Green, Blue, Yellow): 13 Control a BD player for KURO LINK functions only Player/Recorder Control: 14 Use buttons for control of connected equipment SELECT: 15 Select for a few options, commands available through the...
...Source: STANDARD, USER AUTO SET UP: 6 Optimize the PC screen Number buttons 0 thru 9: 7 Enter a number when applying IP Control Setting KURO LINK: 8 Select the KURO LINK functions P/CH: 9 Use the button for control of connected equipment EXIT: 10 Exit the menu to return to the normal screen Arrow ... the menu screens HOME MENU/MENU: 12 Display the HOME MENU Color buttons (Red, Green, Blue, Yellow): 13 Control a BD player for KURO LINK functions only Player/Recorder Control: 14 Use buttons for control of connected equipment SELECT: 15 Select for a few options, commands available through the...
Owner's Manual
Page 11
... the preset code to right) MONITOR INPUT 1 2 3 16 4 5 6 7 8 SUB PIP 17 18 SPLIT INPUT SWAP SHIFT AV AUTO SCREEN 19 20 SELECTION SETUP FREEZE SIZE 1 2 3 4 5 6 7 8 9 KURO LINK 0 21CH ENTER 22 DISPLAY INFO 23 P/CH MUTING 24 EXIT TOP MENU GUIDE USER MENU 25 TOOLS 26ENTER HOME MENU RETURN 27 MENU ONDEMAND...
... the preset code to right) MONITOR INPUT 1 2 3 16 4 5 6 7 8 SUB PIP 17 18 SPLIT INPUT SWAP SHIFT AV AUTO SCREEN 19 20 SELECTION SETUP FREEZE SIZE 1 2 3 4 5 6 7 8 9 KURO LINK 0 21CH ENTER 22 DISPLAY INFO 23 P/CH MUTING 24 EXIT TOP MENU GUIDE USER MENU 25 TOOLS 26ENTER HOME MENU RETURN 27 MENU ONDEMAND...
Owner's Manual
Page 23
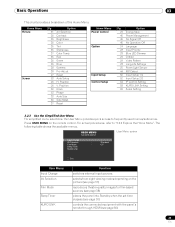
...38 27 53 26 26 53 53 33 36 37 Option AV Selection Contrast Brightness Color Tint Sharpness Color Temp Red Green Blue Gamma Pro Adjust Reset Auto Setup H. For actual procedures, refer to frequently used menus/submenus. Basic Operations 03 This chart provides a breakdown of ...Input Priority Blue LED Dimmer Orbiter Video Pattern Long Life Settings Room Light Sensor PIP Detect Input Setup 1/2 Input Setup 2/2 IP Control Setting KURO LINK Setting Serial Setting 3.2.3 Use the Simplified User Menu For simplified menu selections, the User Menu provides quick access to "3.2.2 Explore the ...
...38 27 53 26 26 53 53 33 36 37 Option AV Selection Contrast Brightness Color Tint Sharpness Color Temp Red Green Blue Gamma Pro Adjust Reset Auto Setup H. For actual procedures, refer to frequently used menus/submenus. Basic Operations 03 This chart provides a breakdown of ...Input Priority Blue LED Dimmer Orbiter Video Pattern Long Life Settings Room Light Sensor PIP Detect Input Setup 1/2 Input Setup 2/2 IP Control Setting KURO LINK Setting Serial Setting 3.2.3 Use the Simplified User Menu For simplified menu selections, the User Menu provides quick access to "3.2.2 Explore the ...
Owner's Manual
Page 49
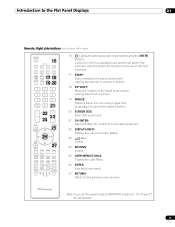
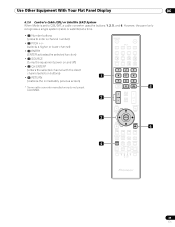
... to CBL/SAT, a cable converter uses the buttons 1, 2, 5, and 6. MONITOR INPUT 1 2 3 4 5 6 7 8 SUB PIP SPLIT INPUT SWAP SHIFT AV AUTO SCREEN SELECTION SET UP FREEZE SIZE 1 2 3 1 4 5 6 7 8 9 KURO LINK 0 CH ENTER 5 DISPLAY INFO 2 P/CH MUTING EXIT USER MENU TOP MENU GUIDE TOOLS 3 ENTER HOME MENU MENU RETURN 6 ONDEMAND FAVORITE SOURCE 4 DVD/HDD RECEIVER...
... to CBL/SAT, a cable converter uses the buttons 1, 2, 5, and 6. MONITOR INPUT 1 2 3 4 5 6 7 8 SUB PIP SPLIT INPUT SWAP SHIFT AV AUTO SCREEN SELECTION SET UP FREEZE SIZE 1 2 3 1 4 5 6 7 8 9 KURO LINK 0 CH ENTER 5 DISPLAY INFO 2 P/CH MUTING EXIT USER MENU TOP MENU GUIDE TOOLS 3 ENTER HOME MENU MENU RETURN 6 ONDEMAND FAVORITE SOURCE 4 DVD/HDD RECEIVER...
Owner's Manual
Page 50
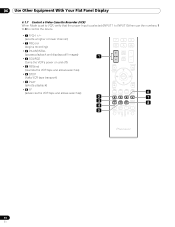
... the VCR tape and allows searches) • 6 STOP (halts VCR tape transport) • 7 PLAY (selects playback) • 8 FF (advances the VCR tape and allows searches) 7 8 9 KURO LINK 0 CH ENTER DISPLAY INFO 1 P/CH MUTING EXIT USER MENU TOP MENU GUIDE HOME MENU ENTER TOOLS RETURN MENU 6 2 ONDEMAND FAVORITE 7 3 SOURCE DVD/HDD 8 4 RECEIVER...
... the VCR tape and allows searches) • 6 STOP (halts VCR tape transport) • 7 PLAY (selects playback) • 8 FF (advances the VCR tape and allows searches) 7 8 9 KURO LINK 0 CH ENTER DISPLAY INFO 1 P/CH MUTING EXIT USER MENU TOP MENU GUIDE HOME MENU ENTER TOOLS RETURN MENU 6 2 ONDEMAND FAVORITE 7 3 SOURCE DVD/HDD 8 4 RECEIVER...
Owner's Manual
Page 51
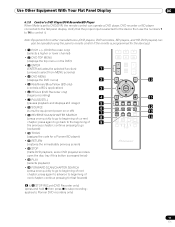
Verify that the proper Input is selected for a Pioneer BD player) • 11 RETURN (restores the immediately previous screen) • 12 STOP (halts DVD playback, some ... players) can operate a DVD player, DVD recorder or BD player connected to control it. continue pressing for fast forward) 7 8 9 KURO LINK 0 CH ENTER P/CH DISPLAY INFO MUTING EXIT TOP MENU GUIDE HOME MENU MENU USER MENU TOOLS ENTER RETURN ONDEMAND FAVORITE SOURCE DVD/HDD...for the device then use the numbers 1 to 14 to the flat panel display. press again to advance to Pioneer DVD recorders only) 51 En
Verify that the proper Input is selected for a Pioneer BD player) • 11 RETURN (restores the immediately previous screen) • 12 STOP (halts DVD playback, some ... players) can operate a DVD player, DVD recorder or BD player connected to control it. continue pressing for fast forward) 7 8 9 KURO LINK 0 CH ENTER P/CH DISPLAY INFO MUTING EXIT TOP MENU GUIDE HOME MENU MENU USER MENU TOOLS ENTER RETURN ONDEMAND FAVORITE SOURCE DVD/HDD...for the device then use the numbers 1 to 14 to the flat panel display. press again to advance to Pioneer DVD recorders only) 51 En
Owner's Manual
Page 54
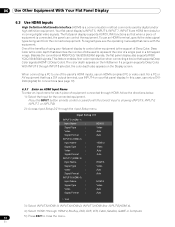
... 4 on your flat panel display to one of the panel's HDMI inputs, use an HDMI-compliant PC or video card. The flat panel display supports KURO LINK functions so that describes the number of a single pixel in a bitmapped image. This feature enables finer color reproduction when connecting a device that came with...
... 4 on your flat panel display to one of the panel's HDMI inputs, use an HDMI-compliant PC or video card. The flat panel display supports KURO LINK functions so that describes the number of a single pixel in a bitmapped image. This feature enables finer color reproduction when connecting a device that came with...
Owner's Manual
Page 56
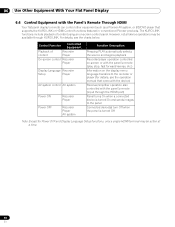
For details, see the operation manual that supports the KURO LINK or HDMI Control functions featured in conventional Pioneer products. The KURO LINK functions include playback of content Recorder Player On-screen control Recorder Player Display Language Recorder Setup Player AV system ... Flat Panel Display 6.4 Control Equipment with the Panel's Remote Through HDMI Your flat panel display's remote can control other equipment such as a Pioneer AV system, or BD/DVD player that came with the device) Receiver/amplifier operation also controlled with the panel's remote (play, stop, ...
For details, see the operation manual that supports the KURO LINK or HDMI Control functions featured in conventional Pioneer products. The KURO LINK functions include playback of content Recorder Player On-screen control Recorder Player Display Language Recorder Setup Player AV system ... Flat Panel Display 6.4 Control Equipment with the Panel's Remote Through HDMI Your flat panel display's remote can control other equipment such as a Pioneer AV system, or BD/DVD player that came with the device) Receiver/amplifier operation also controlled with the panel's remote (play, stop, ...
Owner's Manual
Page 57
... Color buttons (Red, Green, Blue, Yellow) (controls a BD player) 7 • 5 TOOLS (assigns the code for a connected Pioneer AV system, recorder, or player, use the panel's KURO LINK menu. Use the arrow buttons to open. Option Disc Navigator Timer REC (DVR) Timer REC List (DVR) Stop REC (DVR...recorder's program guide displays the recorder's timer recording list stops the recorder from the main menu. To select and use the various KURO LINK functions for a Pioneer BD player) 4 • 6 ENTER (activates the selected function) • 7 RETURN (returns to the previous menu screen...
... Color buttons (Red, Green, Blue, Yellow) (controls a BD player) 7 • 5 TOOLS (assigns the code for a connected Pioneer AV system, recorder, or player, use the panel's KURO LINK menu. Use the arrow buttons to open. Option Disc Navigator Timer REC (DVR) Timer REC List (DVR) Stop REC (DVR...recorder's program guide displays the recorder's timer recording list stops the recorder from the main menu. To select and use the various KURO LINK functions for a Pioneer BD player) 4 • 6 ENTER (activates the selected function) • 7 RETURN (returns to the previous menu screen...
Owner's Manual
Page 58
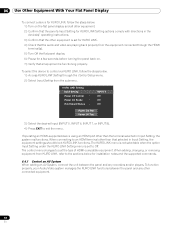
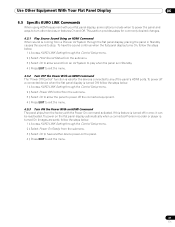
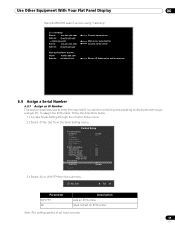
...menu. 2 ) Select Input Setting from the submenu. 06 Use Other Equipment With Your Flat Panel Display To connect a device for KURO LINK, follow the steps below. 1 ) Access KURO LINK Setting through the HDMI terminal(s). 5 ) Turn Off the flat panel display. 6 ) Pause for a few seconds before turning... the panel back on the flat panel display and all equipment is functioning properly. KURO LINK Setting Input Setting : Power Off Control : Power On Ready : Hold Sound Status : INPUT 5 Off Off Off Power On Test Power Off ...
...menu. 2 ) Select Input Setting from the submenu. 06 Use Other Equipment With Your Flat Panel Display To connect a device for KURO LINK, follow the steps below. 1 ) Access KURO LINK Setting through the HDMI terminal(s). 5 ) Turn Off the flat panel display. 6 ) Pause for a few seconds before turning... the panel back on the flat panel display and all equipment is functioning properly. KURO LINK Setting Input Setting : Power Off Control : Power On Ready : Hold Sound Status : INPUT 5 Off Off Off Power On Test Power Off ...
Owner's Manual
Page 59
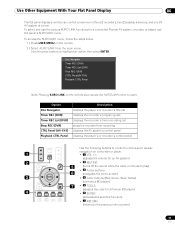
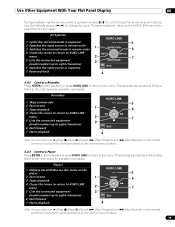
... the menu. INPUT+ 2 7 3 SURROUND- Refer to eight characters) 6 Switches the input source in reverse order 4 Closes the screen to return to KURO LINK menu 5 Lists the connected equipment (model number/up to the chart below for available commands. AV Systems 1 Cycles the surround mode in sequence 2 ... the remote control to conduct the same operations as the control menu buttons. 6.4.3 Control a Player Press ENTER to start playback or press KURO LINK to return to conduct the same operations as the control menu buttons. 59 En Use Other Equipment With Your Flat Panel Display 06 ...
... the menu. INPUT+ 2 7 3 SURROUND- Refer to eight characters) 6 Switches the input source in reverse order 4 Closes the screen to return to KURO LINK menu 5 Lists the connected equipment (model number/up to the chart below for available commands. AV Systems 1 Cycles the surround mode in sequence 2 ... the remote control to conduct the same operations as the control menu buttons. 6.4.3 Control a Player Press ENTER to start playback or press KURO LINK to return to conduct the same operations as the control menu buttons. 59 En Use Other Equipment With Your Flat Panel Display 06 ...
Owner's Manual
Page 61
... Play Source Sound Using an HDMI Command When sound is turned Off, follow the steps below. 1 ) Access KURO LINK Setting through the Control Setup menu. 2 ) Select Power Off Control from a Pioneer AV System through the flat panel display, placing the panel in error, it can be reactivated. To have another... 3 ) Select On to allow the panel to any of the panel's HDMI ports. To power on the flat panel display automatically when a connected Pioneer recorder or player is turned off the connected equipment. 4 ) Press EXIT to exit the menu. 6.5.3 Turn ON the Power With an HDMI Command The...
... Play Source Sound Using an HDMI Command When sound is turned Off, follow the steps below. 1 ) Access KURO LINK Setting through the Control Setup menu. 2 ) Select Power Off Control from a Pioneer AV System through the flat panel display, placing the panel in error, it can be reactivated. To have another... 3 ) Select On to allow the panel to any of the panel's HDMI ports. To power on the flat panel display automatically when a connected Pioneer recorder or player is turned off the connected equipment. 4 ) Press EXIT to exit the menu. 6.5.3 Turn ON the Power With an HDMI Command The...
Owner's Manual
Page 62
...perform. 06 Use Other Equipment With Your Flat Panel Display 6.5.4 Test the Power Control (On/Off) Your flat panel display provides the KURO LINK option to test whether equipment connected to Recognize a Game Console." A list containing all testing is complete. Connect equipment only to... terminals that the Power On/Off control function is helpful when controlling Pioneer equipment from the list. 5 ) Press EXIT to operate the connected equipment via an HDMI port can power up. This function is working...
...perform. 06 Use Other Equipment With Your Flat Panel Display 6.5.4 Test the Power Control (On/Off) Your flat panel display provides the KURO LINK option to test whether equipment connected to Recognize a Game Console." A list containing all testing is complete. Connect equipment only to... terminals that the Power On/Off control function is helpful when controlling Pioneer equipment from the list. 5 ) Press EXIT to operate the connected equipment via an HDMI port can power up. This function is working...

Owner's Manual
Page 64
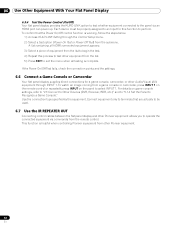
... you select On, an IP Address is Disable. Control Setup IP Control Setting IP Control DHCP IP Address Subnet Mask Default Gateway MAC Address LED KURO LINK Setting Input Setting Power Off Control Power On Ready Hold Sound Status Power On Test Power Off Test Serial Setting ID No. If the...
... you select On, an IP Address is Disable. Control Setup IP Control Setting IP Control DHCP IP Address Subnet Mask Default Gateway MAC Address LED KURO LINK Setting Input Setting Power Off Control Power On Ready Hold Sound Status Power On Test Power Off Test Serial Setting ID No. If the...
Owner's Manual
Page 67
... Option setting Energy save : Standard Set Power management : Off Set No signal off : Disable Set No operation off : Disable Set Room light sensor : Off Set KURO LINK setting Input Setting : Off Set Power off control : Off Set Power on ready : Off Set Hold sound status : Off Set Note: While operating on...
... Option setting Energy save : Standard Set Power management : Off Set No signal off : Disable Set No operation off : Disable Set Room light sensor : Off Set KURO LINK setting Input Setting : Off Set Power off control : Off Set Power on ready : Off Set Hold sound status : Off Set Note: While operating on...
Owner's Manual
Page 69
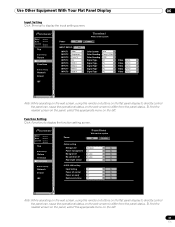
... describes how to all input sources. 69 En Control Setup IP Control Setting IP Control : DHCP : IP Address Subnet Mask Default Gateway MAC Address LED : KURO LINK Setting Input Setting : Power Off Control : Power On Ready : Hold Sound Status : Power On Test Power Off Test Serial Setting ID No.Set : Baud...
... describes how to all input sources. 69 En Control Setup IP Control Setting IP Control : DHCP : IP Address Subnet Mask Default Gateway MAC Address LED : KURO LINK Setting Input Setting : Power Off Control : Power On Ready : Hold Sound Status : Power On Test Power Off Test Serial Setting ID No.Set : Baud...
Owner's Manual
Page 78
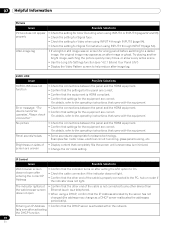
... that came with the equipment. • Check the connections between the panel and the HDMI equipment. • Confirm that settings for plasma technology. fails even after -image or ghost. The indicator lights but the web browser screen does not open after entering the correct IP... IP Address allocated by the server has not changed (the address may appear as a DHCP server reallocates the addresses periodically). KURO LINK Issue KURO LINK does not function Error message: "The device cannot be operated. Try playing another bright image, switching the picture quickly many...
... that came with the equipment. • Check the connections between the panel and the HDMI equipment. • Confirm that settings for plasma technology. fails even after -image or ghost. The indicator lights but the web browser screen does not open after entering the correct IP... IP Address allocated by the server has not changed (the address may appear as a DHCP server reallocates the addresses periodically). KURO LINK Issue KURO LINK does not function Error message: "The device cannot be operated. Try playing another bright image, switching the picture quickly many...

Owner's Manual
Page 105
... 35, 51 H HD Wide Mode 36 HDMI Input 54 HDMI port 56 HDMI terminal 18, 54 HOME MENU 10 I Input 10 Installation 12, 80 K KURO LINK 54, 56 KURO LINK Setting 58 L Language 24, 56 Long Life Settings 28, 76, 82 M MOVIE 10, 27, 31 multi-screen 43, 44 O OPTIMUM 10, 31...
... 35, 51 H HD Wide Mode 36 HDMI Input 54 HDMI port 56 HDMI terminal 18, 54 HOME MENU 10 I Input 10 Installation 12, 80 K KURO LINK 54, 56 KURO LINK Setting 58 L Language 24, 56 Long Life Settings 28, 76, 82 M MOVIE 10, 27, 31 multi-screen 43, 44 O OPTIMUM 10, 31...