Owner's Manual
Page 3
... 2.2.3 Mount the Flat Panel Display ...15 2.3 Connect to Other Devices (DVR, Receiver, BDR, etc 17 2.4 Connect the Power Cord to the Panel...19 2.5 Route then Bundle the Power Cord and Cables ...19 3 Basic Operations...21 3.1 Turn the Flat Panel Display ON / OFF ...21 3.2 Program Your Flat Panel Display...22 3.2.1 Choose an Input Source ...22 3.2.2 Explore the Home Menu ...22 3.2.3 Use the Simplified User Menu ...23 3.2.4 Assign a Language...24 4 Basic Picture Adjustment...25 4.1 Adjust the Picture Quality ...25 4.1.1 Adjust the Picture for Your Room Lighting...
... 2.2.3 Mount the Flat Panel Display ...15 2.3 Connect to Other Devices (DVR, Receiver, BDR, etc 17 2.4 Connect the Power Cord to the Panel...19 2.5 Route then Bundle the Power Cord and Cables ...19 3 Basic Operations...21 3.1 Turn the Flat Panel Display ON / OFF ...21 3.2 Program Your Flat Panel Display...22 3.2.1 Choose an Input Source ...22 3.2.2 Explore the Home Menu ...22 3.2.3 Use the Simplified User Menu ...23 3.2.4 Assign a Language...24 4 Basic Picture Adjustment...25 4.1 Adjust the Picture Quality ...25 4.1.1 Adjust the Picture for Your Room Lighting...
Owner's Manual
Page 4
... the HDMI Input Type ...55 6.3.3 Specify a Digital HDMI Signal Type ...55 6.4 Control Equipment with the Panel's Remote Through HDMI 56 6.4.1 Control an AV System...58 6.4.2 Control a Recorder ...59 6.4.3 Control a Player...59 6.4.4 Add an AV Amp or a BD Player...60 6.5 Specific KURO LINK Commands ...61 6.5.1 Play Source Sound Using an HDMI Command 61 6.5.2 Turn OFF the Power With an HDMI Command 61 6.5.3 Turn ON the Power With an HDMI Command...61 6.5.4 Test the Power Control (On/Off) ...62 6.6 Connect a Game Console...
... the HDMI Input Type ...55 6.3.3 Specify a Digital HDMI Signal Type ...55 6.4 Control Equipment with the Panel's Remote Through HDMI 56 6.4.1 Control an AV System...58 6.4.2 Control a Recorder ...59 6.4.3 Control a Player...59 6.4.4 Add an AV Amp or a BD Player...60 6.5 Specific KURO LINK Commands ...61 6.5.1 Play Source Sound Using an HDMI Command 61 6.5.2 Turn OFF the Power With an HDMI Command 61 6.5.3 Turn ON the Power With an HDMI Command...61 6.5.4 Test the Power Control (On/Off) ...62 6.6 Connect a Game Console...

Owner's Manual
Page 6
... for Remote (2) Cleaning Cloth Power Cord (2 m/6.6 feet) Cable Clamps (4) Operating Instructions Certificate of this manual. 1.1 Flat Panel Display Shipment Checklist In addition to the flat panel display, there are several accessories included to the Flat Panel Displays The Pioneer Flat Panel Display models include the 60-inch PRO-141FD and the 50-inch PRO-101FD (screen sizes measured diagonally). Service contact information is listed on the back of Authenticity Certificate Glossary Warranty Card Specifications Sheet 6 En You will need a Philips screwdriver if removing or...
... for Remote (2) Cleaning Cloth Power Cord (2 m/6.6 feet) Cable Clamps (4) Operating Instructions Certificate of this manual. 1.1 Flat Panel Display Shipment Checklist In addition to the flat panel display, there are several accessories included to the Flat Panel Displays The Pioneer Flat Panel Display models include the 60-inch PRO-141FD and the 50-inch PRO-101FD (screen sizes measured diagonally). Service contact information is listed on the back of Authenticity Certificate Glossary Warranty Card Specifications Sheet 6 En You will need a Philips screwdriver if removing or...
Owner's Manual
Page 10
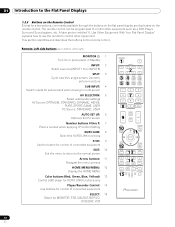
... the remote control. 01 Introduction to the Flat Panel Displays 1.2.3 Buttons on the Remote Control Except for MONITOR, STB, CBL/SAT, BDP/LD, DVD/DVR, VCR MONITOR 1 INPUT 1 5 3SPLIT AV 5SELECTION 2 3 2 6 7 SUB 4INPUT SWAP AUTO 6SET UP FREEZE 4 8 PIP SHIFT SCREEN SIZE 1 2 3 7 4 5 6 7 8 9 8KURO LINK 0 CH ENTER 9P/CH DISPLAY INFO MUTING EXIT 10 TOP MENU GUIDE USER MENU 11 TOOLS ENTER HOME MENU 12 MENU 13 ONDEMAND FAVORITE 14 SOURCE RETURN DVD/HDD RECEIVER VOL INPUT SELECT...
... the remote control. 01 Introduction to the Flat Panel Displays 1.2.3 Buttons on the Remote Control Except for MONITOR, STB, CBL/SAT, BDP/LD, DVD/DVR, VCR MONITOR 1 INPUT 1 5 3SPLIT AV 5SELECTION 2 3 2 6 7 SUB 4INPUT SWAP AUTO 6SET UP FREEZE 4 8 PIP SHIFT SCREEN SIZE 1 2 3 7 4 5 6 7 8 9 8KURO LINK 0 CH ENTER 9P/CH DISPLAY INFO MUTING EXIT 10 TOP MENU GUIDE USER MENU 11 TOOLS ENTER HOME MENU 12 MENU 13 ONDEMAND FAVORITE 14 SOURCE RETURN DVD/HDD RECEIVER VOL INPUT SELECT...
Owner's Manual
Page 11
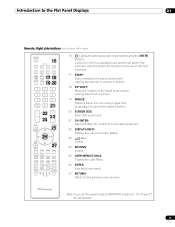
... PIP 17 18 SPLIT INPUT SWAP SHIFT AV AUTO SCREEN 19 20 SELECTION SETUP FREEZE SIZE 1 2 3 4 5 6 7 8 9 KURO LINK 0 21CH ENTER 22 DISPLAY INFO 23 P/CH MUTING 24 EXIT TOP MENU GUIDE USER MENU 25 TOOLS 26ENTER HOME MENU RETURN 27 MENU ONDEMAND FAVORITE SOURCE DVD/HDD RECEIVER VOL INPUT SELECT BDP EDIT/LEARN MONITOR STB LD VCR CBL DVD SAT DVR 16 :Lights all buttons (except arrow buttons and the ENTER button) Lights turn off...
... PIP 17 18 SPLIT INPUT SWAP SHIFT AV AUTO SCREEN 19 20 SELECTION SETUP FREEZE SIZE 1 2 3 4 5 6 7 8 9 KURO LINK 0 21CH ENTER 22 DISPLAY INFO 23 P/CH MUTING 24 EXIT TOP MENU GUIDE USER MENU 25 TOOLS 26ENTER HOME MENU RETURN 27 MENU ONDEMAND FAVORITE SOURCE DVD/HDD RECEIVER VOL INPUT SELECT BDP EDIT/LEARN MONITOR STB LD VCR CBL DVD SAT DVR 16 :Lights all buttons (except arrow buttons and the ENTER button) Lights turn off...
Owner's Manual
Page 17
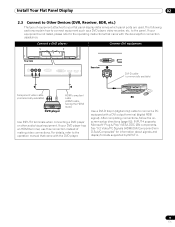
INPUT 4 supports Microsoft "Plug & Play" (VESA DDC 2B) components. If your flat panel display determines which panel ports are used. to connect equipment such as a DVD player, video recorder, etc. If your DVD player has an HDMI terminal, use this connection instead of equipment attached to your equipment is not listed, please refer to the operating instructions that came with a DVI output terminal (digital RGB signal). PC Use a DVI-D 24-pin (digital only) cable to connect a PC equipped with the device(s) for...
INPUT 4 supports Microsoft "Plug & Play" (VESA DDC 2B) components. If your flat panel display determines which panel ports are used. to connect equipment such as a DVD player, video recorder, etc. If your DVD player has an HDMI terminal, use this connection instead of equipment attached to your equipment is not listed, please refer to the operating instructions that came with a DVI output terminal (digital RGB signal). PC Use a DVI-D 24-pin (digital only) cable to connect a PC equipped with the device(s) for...
Owner's Manual
Page 19
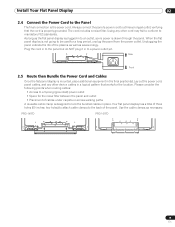
... inches: two holes) to attach cable clamps to the panel but do NOT plug it in the final position(s). PRO-141FD PRO-101FD 19 En As long as necessary. Plug the cord in to the back of the plasma as well as saves energy. Use the cable clamps as the flat panel display is plugged in to an outlet, some power is mounted, place additional equipment in to lock...
... inches: two holes) to attach cable clamps to the panel but do NOT plug it in the final position(s). PRO-141FD PRO-101FD 19 En As long as necessary. Plug the cord in to the back of the plasma as well as saves energy. Use the cable clamps as the flat panel display is plugged in to an outlet, some power is mounted, place additional equipment in to lock...
Owner's Manual
Page 21
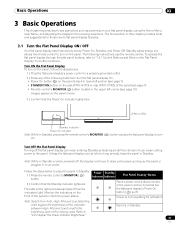
... of the following instructions use the remote control. Standby saves energy but waiting for long periods, leave the panel in Standby "4.2.2 Adjust the Power Indicator Brightness." 21 En The following buttons to turn the flat panel display On. • Power On button (a) on the panel's back in lower-left section (see page 7) • STANDBY/ON button on the side (PRO-141FD) or rear (PRO-101FD) of the panel (see page 7) • Remote control's MONITOR (a) button located in the upper...
... of the following instructions use the remote control. Standby saves energy but waiting for long periods, leave the panel in Standby "4.2.2 Adjust the Power Indicator Brightness." 21 En The following buttons to turn the flat panel display On. • Power On button (a) on the panel's back in lower-left section (see page 7) • STANDBY/ON button on the side (PRO-141FD) or rear (PRO-101FD) of the panel (see page 7) • Remote control's MONITOR (a) button located in the upper...
Owner's Manual
Page 22
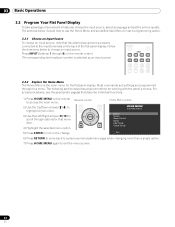
... corresponding terminal/port number is the main menu for working with the panel's menus. MONITOR INPUT 1 2 3 4 5 6 7 8 SUB PIP SPLIT INPUT SWAP SHIFT AV AUTO SCREEN SELECTION SET UP FREEZE SIZE 3.2.2 Explore the Home Menu The Home Menu is selected as an input source. MENU 5) Press ENTER to exit the menu screen. 22 En USER MENU TOOLS RETURN Home Menu screen HOME MENU FLAT PANEL DISPLAY Picture Screen Power Control Option Input Setup Control Setup Exit 6) Press RETURN to move back to a previous menu/submenu page when changing more...
... corresponding terminal/port number is the main menu for working with the panel's menus. MONITOR INPUT 1 2 3 4 5 6 7 8 SUB PIP SPLIT INPUT SWAP SHIFT AV AUTO SCREEN SELECTION SET UP FREEZE SIZE 3.2.2 Explore the Home Menu The Home Menu is selected as an input source. MENU 5) Press ENTER to exit the menu screen. 22 En USER MENU TOOLS RETURN Home Menu screen HOME MENU FLAT PANEL DISPLAY Picture Screen Power Control Option Input Setup Control Setup Exit 6) Press RETURN to move back to a previous menu/submenu page when changing more...
Owner's Manual
Page 23
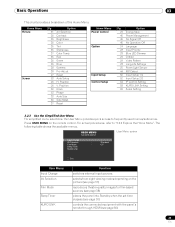
... Timer KURO LINK : Standard : Off Exit User Menu Input Change AV Selection Film Mode Sleep Timer KURO LINK Function switches external input sources selects from eight viewing modes depending on the remote control. Home Menu Picture Screen Pg 31 35 35 35 35 35 37 35 35 35 38 38 27 53 26 26 53 53 33 36 37 Option AV Selection Contrast Brightness Color Tint Sharpness Color Temp Red Green Blue Gamma Pro Adjust Reset Auto Setup...
... Timer KURO LINK : Standard : Off Exit User Menu Input Change AV Selection Film Mode Sleep Timer KURO LINK Function switches external input sources selects from eight viewing modes depending on the remote control. Home Menu Picture Screen Pg 31 35 35 35 35 35 37 35 35 35 38 38 27 53 26 26 53 53 33 36 37 Option AV Selection Contrast Brightness Color Tint Sharpness Color Temp Red Green Blue Gamma Pro Adjust Reset Auto Setup...
Owner's Manual
Page 34
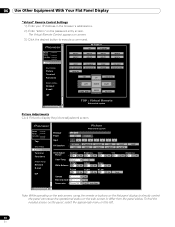
... Masks, refer to "5.3.1 Adjust for Screen Masking (black bars on the remote control to cycle the picture through Auto, FULL, Dot by Dot ZOOM CINEMA CINEMA 14:9 4:3 WIDE WIDE 1 WIDE 2 PC Option 4:3 FULL Description adds side masks or displays the image in the correct format. If an image or menu appears cut or cropped, change the screen size during video from other input sources. For more information about...
... Masks, refer to "5.3.1 Adjust for Screen Masking (black bars on the remote control to cycle the picture through Auto, FULL, Dot by Dot ZOOM CINEMA CINEMA 14:9 4:3 WIDE WIDE 1 WIDE 2 PC Option 4:3 FULL Description adds side masks or displays the image in the correct format. If an image or menu appears cut or cropped, change the screen size during video from other input sources. For more information about...
Owner's Manual
Page 36
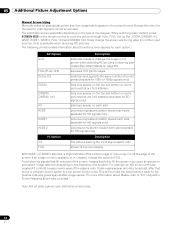
... Mask Detection is set to Wide Zoom and Side Mask Detection to Mode 1 or Mode 2. Cycle the screen size to select Auto for video signals that appear in a 4:3 image. To allow the panel to detect side masks, follow the steps below . 1 ) Access Side Mask through Pioneer's Pro Adjust support, top quality blacks, better balanced whites, and overall color improvements. 5.3.1 Adjust for Screen Masking (black bars on sides) Screen Masks fill areas...
... Mask Detection is set to Wide Zoom and Side Mask Detection to Mode 1 or Mode 2. Cycle the screen size to select Auto for video signals that appear in a 4:3 image. To allow the panel to detect side masks, follow the steps below . 1 ) Access Side Mask through Pioneer's Pro Adjust support, top quality blacks, better balanced whites, and overall color improvements. 5.3.1 Adjust for Screen Masking (black bars on sides) Screen Masks fill areas...
Owner's Manual
Page 52
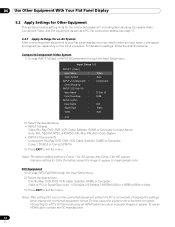
... below. Notes: After setting DVI, turn on the connected equipment (reboot if a PC is Comp. 1 for SD signals and Comp. 2 for an AV System After connecting other equipment to your flat panel display, you select. Auto, 1 (YUV422), 2 (YUV444), 3 (RGB16-235) or 4 (RGB 0-255) for Color System • INPUT 2 (Component) Component, Blu-Ray, DVD, DVR, VCR, Cable, Satellite, GAME or Computer; To use an HDMI cable, contact the PC...
... below. Notes: After setting DVI, turn on the connected equipment (reboot if a PC is Comp. 1 for SD signals and Comp. 2 for an AV System After connecting other equipment to your flat panel display, you select. Auto, 1 (YUV422), 2 (YUV444), 3 (RGB16-235) or 4 (RGB 0-255) for Color System • INPUT 2 (Component) Component, Blu-Ray, DVD, DVR, VCR, Cable, Satellite, GAME or Computer; To use an HDMI cable, contact the PC...
Owner's Manual
Page 53
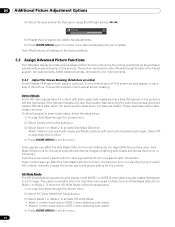
..., DVD, DVR, VCR, Cable, Satellite, GAME or Computer for adjusting the image position, clock phase and clock frequency. Manual Image Position and Clock Adjustments Usually Auto Setup for a PC is only available for the PC. 1 ) Access INPUT 3(D-Sub15) through the Screen menu. The Auto Setup option automatically adjusts these settings but the image position and clock can be adjusted manually too. The AV source device must be connected to the flat panel display and turned on...
..., DVD, DVR, VCR, Cable, Satellite, GAME or Computer for adjusting the image position, clock phase and clock frequency. Manual Image Position and Clock Adjustments Usually Auto Setup for a PC is only available for the PC. 1 ) Access INPUT 3(D-Sub15) through the Screen menu. The Auto Setup option automatically adjusts these settings but the image position and clock can be adjusted manually too. The AV source device must be connected to the flat panel display and turned on...
Owner's Manual
Page 54
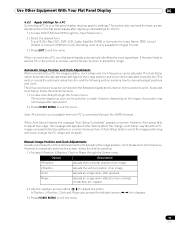
... when connecting a device that has a DVI output terminal, use only a DVID24 (digital) for incoming digital video signals. Press the INPUT button (remote control or panel) until the correct input is a communication method commonly used to control other equipment is connected, the panel can control the equipment. 06 Use Other Equipment With Your Flat Panel Display 6.3 Use HDMI Inputs High Definition Multimedia Interface (HDMI) is showing (INPUT 5, INPUT 6, INPUT 7, or INPUT 8). 2 ) Access Input Setup 2/2 through HDMI 4, Blu-Ray, DVD, DVR, VCR, Cable, Satellite, GAME or...
... when connecting a device that has a DVI output terminal, use only a DVID24 (digital) for incoming digital video signals. Press the INPUT button (remote control or panel) until the correct input is a communication method commonly used to control other equipment is connected, the panel can control the equipment. 06 Use Other Equipment With Your Flat Panel Display 6.3 Use HDMI Inputs High Definition Multimedia Interface (HDMI) is showing (INPUT 5, INPUT 6, INPUT 7, or INPUT 8). 2 ) Access Input Setup 2/2 through HDMI 4, Blu-Ray, DVD, DVR, VCR, Cable, Satellite, GAME or...
Owner's Manual
Page 66
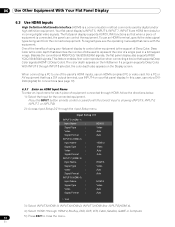
... appropriate menu on the password entry screen. 06 Use Other Equipment With Your Flat Panel Display "Virtual" Remote Control Settings 1 ) Enter your IP Address in the browser's address box. 2 ) Enter "admin" on the left. 66 En No Frame >> Model : ****** Name : ****** Location : ****** ****** To p Detail Settings Picture Terminal Functions INPUT1 INPUT5 ON INPUT2 INPUT6 STANDBY INPUT3 INPUT7 INPUT4 INPUT8 SPLIT AV SELECTION DISPLAY SUB INPUT AUTO SETUP SWAP FREEZE PIP SHIFT SCREEN SIZE EXIT UP USER MENU Network Settings Network...
... appropriate menu on the password entry screen. 06 Use Other Equipment With Your Flat Panel Display "Virtual" Remote Control Settings 1 ) Enter your IP Address in the browser's address box. 2 ) Enter "admin" on the left. 66 En No Frame >> Model : ****** Name : ****** Location : ****** ****** To p Detail Settings Picture Terminal Functions INPUT1 INPUT5 ON INPUT2 INPUT6 STANDBY INPUT3 INPUT7 INPUT4 INPUT8 SPLIT AV SELECTION DISPLAY SUB INPUT AUTO SETUP SWAP FREEZE PIP SHIFT SCREEN SIZE EXIT UP USER MENU Network Settings Network...
Owner's Manual
Page 68
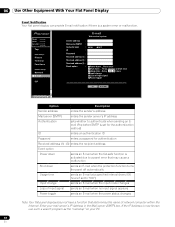
... Settings Picture Terminal Functions Network Settings Network E-mail ISF E-mail Web control system Sender address : Mail server(SMTP) : Authentication : ID : Password : Received address (1) : Received address (2) : Received address (3) : Event option : ON OFF Power down ... Enter your PC. 68 En Panel error Shut down ... Temp.,speaker and fan error Usage time ...Every 1000 hours Input change Loss of network computer within the Internet. If the IP Address is now known, use such a search program...
... Settings Picture Terminal Functions Network Settings Network E-mail ISF E-mail Web control system Sender address : Mail server(SMTP) : Authentication : ID : Password : Received address (1) : Received address (2) : Received address (3) : Event option : ON OFF Power down ... Enter your PC. 68 En Panel error Shut down ... Temp.,speaker and fan error Usage time ...Every 1000 hours Input change Loss of network computer within the Internet. If the IP Address is now known, use such a search program...
Owner's Manual
Page 70
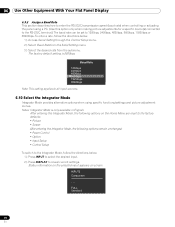
... controlling or adjusting the panel using a PC. (Use this option only when making picture adjustments for a specific device(s) connected to the RS-232C terminal.) The baud rate can be set to all input sources. 6.10 Select the Integrator Mode Integrator Mode provides alternative options when using specific functions/settings and picture adjustment menus. INPUT2 Component - - - Status information on the selected input appears on the Home Menu are reset to reveal current settings. The factory default setting...
... controlling or adjusting the panel using a PC. (Use this option only when making picture adjustments for a specific device(s) connected to the RS-232C terminal.) The baud rate can be set to all input sources. 6.10 Select the Integrator Mode Integrator Mode provides alternative options when using specific functions/settings and picture adjustment menus. INPUT2 Component - - - Status information on the selected input appears on the Home Menu are reset to reveal current settings. The factory default setting...
Owner's Manual
Page 77
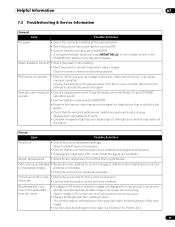
... block the signal. • Check that the remote's batteries are installed properly and hold a change. If the panel indicator lights red, press MONITOR (a) on the remote control or the STANDBY/ON button on the sides differ from or misaligned images windows or doorways. • Check the picture tone, adjust as possible to burning. Odd coloring and shades • Review the room lighting for recent changes or different natural lighting sources from the...
... block the signal. • Check that the remote's batteries are installed properly and hold a change. If the panel indicator lights red, press MONITOR (a) on the remote control or the STANDBY/ON button on the sides differ from or misaligned images windows or doorways. • Check the picture tone, adjust as possible to burning. Odd coloring and shades • Review the room lighting for recent changes or different natural lighting sources from the...
Owner's Manual
Page 78
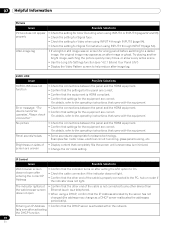
... playing another bright image, switching the picture quickly many times, or show a very active scene. • Use the Long Life Settings function (see "4.2.1 Extend Your Panel Life") • Display the Video Pattern screen to the operating instructions that came with the equipment. • Check the connections between the panel and the HDMI equipment. • Confirm that settings for plasma technology. No picture • Check the connections between the panel and the HDMI...
... playing another bright image, switching the picture quickly many times, or show a very active scene. • Use the Long Life Settings function (see "4.2.1 Extend Your Panel Life") • Display the Video Pattern screen to the operating instructions that came with the equipment. • Check the connections between the panel and the HDMI equipment. • Confirm that settings for plasma technology. No picture • Check the connections between the panel and the HDMI...


