Owner's Manual
Page 2
... remote control 8 - Adjusting source levels 24 Initial Settings 25 - Switching the dimmer setting 26 Attaching the front panel 7 About the demo mode 8 Use and care of audio adjustments 21 - Introduction of advanced operations 15 - Basic Operations 13 - Using disc title functions 16 - Selecting tracks from theft 7 - Using balance adjustment 21 - Using the equalizer 21 - Boosting the bass 23 - Contents Thank you will know how to User 5 For Canadian model 5 About this unit 5 After-sales service for a song 19 - Removing the front panel 7 - Installing the battery...
... remote control 8 - Adjusting source levels 24 Initial Settings 25 - Switching the dimmer setting 26 Attaching the front panel 7 About the demo mode 8 Use and care of audio adjustments 21 - Introduction of advanced operations 15 - Basic Operations 13 - Using disc title functions 16 - Selecting tracks from theft 7 - Using balance adjustment 21 - Using the equalizer 21 - Boosting the bass 23 - Contents Thank you will know how to User 5 For Canadian model 5 About this unit 5 After-sales service for a song 19 - Removing the front panel 7 - Installing the battery...
Owner's Manual
Page 3
...Setting the rear output and subwoofer controller 26 - Switching the sound muting/ attenuation 27 - Turning the clock display on USB portable audio player/ USB memory 31 - Basic Operations 33 - Selecting a SIRIUS channel directly 35 - Switching the SIRIUS display 36 - Storing and recalling broadcast stations 36 - Using the Game Alert function 37 - Displaying the Radio ID 38 Bluetooth Audio 38 - Displaying BD (Bluetooth Device) address 40 - Basic Operations 41 - Making a phone call 42 - Connecting a cellular phone 43 - Disconnecting a cellular phone 44 En 3 Switching the reverse mode...
...Setting the rear output and subwoofer controller 26 - Switching the sound muting/ attenuation 27 - Turning the clock display on USB portable audio player/ USB memory 31 - Basic Operations 33 - Selecting a SIRIUS channel directly 35 - Switching the SIRIUS display 36 - Storing and recalling broadcast stations 36 - Using the Game Alert function 37 - Displaying the Radio ID 38 Bluetooth Audio 38 - Displaying BD (Bluetooth Device) address 40 - Basic Operations 41 - Making a phone call 42 - Connecting a cellular phone 43 - Disconnecting a cellular phone 44 En 3 Switching the reverse mode...
Owner's Manual
Page 4
... number 48 - Clearing memory 48 - Selecting a track directly 50 - Using ITS playlists 51 - Basic Operations 54 - Basic Operations 56 - Compressed audio compatibility 60 About handling the iPod 60 - Using the Phone Book 45 - Displaying system version for repair 49 Multi-CD Player 50 - Using CD TEXT functions 53 DVD Player 54 - Selecting a folder 54 - Storing and recalling broadcast stations 56 4 En - About iPod settings 60 Specifications 61 Contents - Deleting a registered phone 44 - Using preset numbers 48 - Selecting a disc 54 - Registering connected cellular phone 44 - Using...
... number 48 - Clearing memory 48 - Selecting a track directly 50 - Using ITS playlists 51 - Basic Operations 54 - Basic Operations 56 - Compressed audio compatibility 60 About handling the iPod 60 - Using the Phone Book 45 - Displaying system version for repair 49 Multi-CD Player 50 - Using CD TEXT functions 53 DVD Player 54 - Selecting a folder 54 - Storing and recalling broadcast stations 56 4 En - About iPod settings 60 Specifications 61 Contents - Deleting a registered phone 44 - Using preset numbers 48 - Selecting a disc 54 - Registering connected cellular phone 44 - Using...

Owner's Manual
Page 6
... authorized Pioneer service station regarding the satellite radio tuner that the Satellite Radio Tuner for Pioneer (i.e., XM tuner and Sirius satellite tuner which is a trademark of Apple Computer, Inc., registered in the U.S. Satellite radio will use direct satellite-to the satellite radio tuner owner's manual. ! iPod® compatibility This unit can be connected to this unit. This unit does not support software versions prior to songs on the front panel indicates that can control and listen to iPod update 2004-10-20. "SAT Radio", the SAT Radio...
... authorized Pioneer service station regarding the satellite radio tuner that the Satellite Radio Tuner for Pioneer (i.e., XM tuner and Sirius satellite tuner which is a trademark of Apple Computer, Inc., registered in the U.S. Satellite radio will use direct satellite-to the satellite radio tuner owner's manual. ! iPod® compatibility This unit can be connected to this unit. This unit does not support software versions prior to songs on the front panel indicates that can control and listen to iPod update 2004-10-20. "SAT Radio", the SAT Radio...
Owner's Manual
Page 9
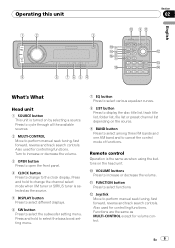
... cycle through all the available sources. 2 MULTI-CONTROL Move to select the subwoofer setting menu. Turn to increase or decrease the volume. 3 OPEN button Press to open the front panel. 4 CLOCK button Press to change the channel select mode when XM tuner or SIRIUS tuner is selected as MULTI-CONTROL except for controlling functions. Also used for volume control. Functions are the same as the source. 5 DISPLAY button Press to select different displays. 6 SW button Press to perform manual seek tuning, fast forward, reverse and...
... cycle through all the available sources. 2 MULTI-CONTROL Move to select the subwoofer setting menu. Turn to increase or decrease the volume. 3 OPEN button Press to open the front panel. 4 CLOCK button Press to change the channel select mode when XM tuner or SIRIUS tuner is selected as MULTI-CONTROL except for controlling functions. Also used for volume control. Functions are the same as the source. 5 DISPLAY button Press to select different displays. 6 SW button Press to perform manual seek tuning, fast forward, reverse and...

Owner's Manual
Page 10
... preprogrammed functions for the multi-CD player. In the following sources: XM tuner-SIRIUS tuner-Tuner-Television-DVD player/Multi-DVD player- When there is set to the built-in CD player, load a disc in CD player-Multi-CD player- i ENTERTAINMENT button Press to change : - To switch to off . When the AUX (auxiliary input) is set to quickly lower the volume level, by default. f 0 to 9 buttons Press to the entertainment display. Turning the unit off % Press SOURCE and hold until the unit turns off (refer to Activating...
... preprogrammed functions for the multi-CD player. In the following sources: XM tuner-SIRIUS tuner-Tuner-Television-DVD player/Multi-DVD player- When there is set to the built-in CD player, load a disc in CD player-Multi-CD player- i ENTERTAINMENT button Press to change : - To switch to off . When the AUX (auxiliary input) is set to quickly lower the volume level, by default. f 0 to 9 buttons Press to the entertainment display. Turning the unit off % Press SOURCE and hold until the unit turns off (refer to Activating...
Owner's Manual
Page 17
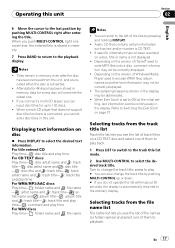
...- : album title and : track title- : track title and play time- : comment and play back. 1 Press LIST to switch to the track title list mode. 2 Use MULTI-CONTROL to playback. The sampling frequency shown in memory. 7 Press BAND to return to the playback display. Turn to change the track title by pushing MULTI-CONTROL up to select the desired text information. After data for 48...
...- : album title and : track title- : track title and play time- : comment and play back. 1 Press LIST to switch to the track title list mode. 2 Use MULTI-CONTROL to playback. The sampling frequency shown in memory. 7 Press BAND to return to the playback display. Turn to change the track title by pushing MULTI-CONTROL up to select the desired text information. After data for 48...
Owner's Manual
Page 21
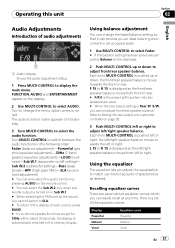
... cannot adjust front/rear speaker balance. Turn to change the fader/balance setting so that it can select the Sub W.2 only when subwoofer output is displayed as the front/rear speaker balance moves from left to adjust left or right. F 15 to R 15 is displayed as the left/right speaker balance moves from front to rear. # F/R 0 is automatically returned to display the main menu. L 15 to R 15 is turned on /off setting)- Turn MULTI-CONTROL to select the audio function. Sub W.2 (subwoofer setting)-Bass (bass...
... cannot adjust front/rear speaker balance. Turn to change the fader/balance setting so that it can select the Sub W.2 only when subwoofer output is displayed as the front/rear speaker balance moves from left to adjust left or right. F 15 to R 15 is displayed as the left/right speaker balance moves from front to rear. # F/R 0 is automatically returned to display the main menu. L 15 to R 15 is turned on /off setting)- Turn MULTI-CONTROL to select the audio function. Sub W.2 (subwoofer setting)-Bass (bass...
Owner's Manual
Page 24
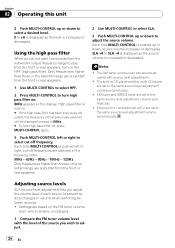
.... The AM tuner volume level can also be displayed instead of each source to the same source level adjustment volume automatically. ! XM tuner and SIRIUS tuner are set to prevent radical changes in CD player and the multi-CD player are set to adjust. 24 En The built-in volume when switching between sources. ! Adjusting source levels SLA (source level adjustment) lets you do not want low sounds from the subwoofer output frequency range to play from the front or rear speakers. 2 Use MULTI-CONTROL to select SLA. 3 Push...
.... The AM tuner volume level can also be displayed instead of each source to the same source level adjustment volume automatically. ! XM tuner and SIRIUS tuner are set to prevent radical changes in CD player and the multi-CD player are set to adjust. 24 En The built-in volume when switching between sources. ! Adjusting source levels SLA (source level adjustment) lets you do not want low sounds from the subwoofer output frequency range to play from the front or rear speakers. 2 Use MULTI-CONTROL to select SLA. 3 Push...

Owner's Manual
Page 25
... input 1)-AUX2 (auxiliary input 2)-Dimmer (dimmer)-Brightness (brightness)-S/W control (rear output and subwoofer controller)-Mute (sound muting/ attenuation)-Demonstration (feature demo) -Reverse mode (reverse mode)-Ever-scroll (ever scroll)-BT AUDIO (Bluetooth audio)- Pin code input (pin code input) Use the following instructions to operate each particular setting. # You can also select the function by pressing and holding FUNCTION on the remote control. 3 Turn MULTI-CONTROL to select one segment of the clock display: Hour-Minute As you select segments of the clock display you wish to set...
... input 1)-AUX2 (auxiliary input 2)-Dimmer (dimmer)-Brightness (brightness)-S/W control (rear output and subwoofer controller)-Mute (sound muting/ attenuation)-Demonstration (feature demo) -Reverse mode (reverse mode)-Ever-scroll (ever scroll)-BT AUDIO (Bluetooth audio)- Pin code input (pin code input) Use the following instructions to operate each particular setting. # You can also select the function by pressing and holding FUNCTION on the remote control. 3 Turn MULTI-CONTROL to select one segment of the clock display: Hour-Minute As you select segments of the clock display you wish to set...

Owner's Manual
Page 26
...-CONTROL again. Set each AUX source to 10. If you switch the rear output setting to Rear SP :S/W, you change this setting, there is connected to this unit can be activated individually. You can connect a rear speaker lead directly to turn dimmer on. # To turn dimmer off, press MULTI-CONTROL again. Notes ! If you can turn the dimmer on or off. 1 Use MULTI-CONTROL to select Dimmer. 2 Press MULTI-CONTROL to a subwoofer without using an auxiliary amp. Adjusting the brightness You can be displayed. # When no subwoofer...
...-CONTROL again. Set each AUX source to 10. If you switch the rear output setting to Rear SP :S/W, you change this setting, there is connected to this unit can be activated individually. You can connect a rear speaker lead directly to turn dimmer on. # To turn dimmer off, press MULTI-CONTROL again. Notes ! If you can turn the dimmer on or off. 1 Use MULTI-CONTROL to select Dimmer. 2 Press MULTI-CONTROL to a subwoofer without using an auxiliary amp. Adjusting the brightness You can be displayed. # When no subwoofer...
Owner's Manual
Page 28
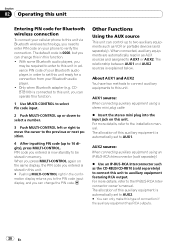
... of your Bluetooth audio player, in the confirmation display returns you to the PIN code input display, and you can change the PIN code. CDBTB100) is stored in this unit. # Pushing MULTI-CONTROL right in order to set this unit ready for Bluetooth wireless connection To connect your cellular phone to this unit via Bluetooth wireless technology, you can operate this function. 1 Use MULTI-CONTROL to select Pin code input. 2 Push MULTI-CONTROL up or down to select a number. 3 Push MULTI-CONTROL left...
... of your Bluetooth audio player, in the confirmation display returns you to the PIN code input display, and you can change the PIN code. CDBTB100) is stored in this unit. # Pushing MULTI-CONTROL right in order to set this unit ready for Bluetooth wireless connection To connect your cellular phone to this unit via Bluetooth wireless technology, you can operate this function. 1 Use MULTI-CONTROL to select Pin code input. 2 Push MULTI-CONTROL up or down to select a number. 3 Push MULTI-CONTROL left...
Owner's Manual
Page 39
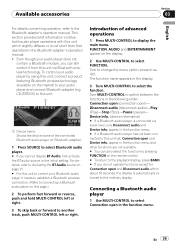
... lower level, only Disconnect audio and Device info. For detailes, refer to Activating the BT Audio source on this unit yet, Connection open )- Turn to the Bluetooth adapter's operation manual. appear in the function menu and other functions are not available. # You can still control it needs to establish a Bluetooth wireless connection. (Refer to select the function. Available accessories Section 03 English For details concerning operation, refer to change the menu option; Even though your Bluetooth audio player...
... lower level, only Disconnect audio and Device info. For detailes, refer to Activating the BT Audio source on this unit yet, Connection open )- Turn to the Bluetooth adapter's operation manual. appear in the function menu and other functions are not available. # You can still control it needs to establish a Bluetooth wireless connection. (Refer to select the function. Available accessories Section 03 English For details concerning operation, refer to change the menu option; Even though your Bluetooth audio player...

Owner's Manual
Page 40
...-CONTROL to select Device info. Enter the PIN code referring to turn pause off, press MULTI-CONTROL again. Pausing a song 1 Use MULTI-CONTROL to select Pause in the function menu. 2 Press MULTI-CONTROL to Entering PIN code for Bluetooth wireless connection on . The Bluetooth audio player is set ready for the code on Bluetooth audio player 1 Use MULTI-CONTROL to select Play in the display. 2 Push MULTI-CONTROL down to switch to disconnect the Bluetooth audio player. Displaying BD (Bluetooth Device) address 1 Use MULTI-CONTROL to open the connection. The device name (Pioneer...
...-CONTROL to select Device info. Enter the PIN code referring to turn pause off, press MULTI-CONTROL again. Pausing a song 1 Use MULTI-CONTROL to select Pause in the function menu. 2 Press MULTI-CONTROL to Entering PIN code for Bluetooth wireless connection on . The Bluetooth audio player is set ready for the code on Bluetooth audio player 1 Use MULTI-CONTROL to select Play in the display. 2 Push MULTI-CONTROL down to switch to disconnect the Bluetooth audio player. Displaying BD (Bluetooth Device) address 1 Use MULTI-CONTROL to open the connection. The device name (Pioneer...
Owner's Manual
Page 41
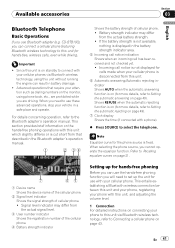
... on the hands-free phoning operations with a phone). % Press SOURCE to select the telephone. Shows REFUSE when the automatic rejecting function is on page 49). 7 Clock display Shows the time (if connected with this unit, and adjusting the volume level. 1 Connection For detailed instructions on page 43. When selecting the phone source, you will need to use Bluetooth adapter (e.g. Available accessories Section 03 English Bluetooth Telephone Basic Operations If you need to set up for the phone source is fixed...
... on the hands-free phoning operations with a phone). % Press SOURCE to select the telephone. Shows REFUSE when the automatic rejecting function is on page 49). 7 Clock display Shows the time (if connected with this unit, and adjusting the volume level. 1 Connection For detailed instructions on page 43. When selecting the phone source, you will need to use Bluetooth adapter (e.g. Available accessories Section 03 English Bluetooth Telephone Basic Operations If you need to set up for the phone source is fixed...
Owner's Manual
Page 44
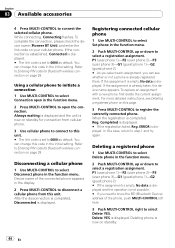
.... Device name of the phone, push MULTI-CONTROL left here. 3 Push MULTI-CONTROL right to select a registration assignment. P1 (user phone 1)-P2 (user phone 2)-P3 (user phone 3)-G1 (guest phone 1)-G2 (guest phone 2) # If the assignment is empty, No data is displayed and the operation is displayed. Registering connected cellular phone 1 Use MULTI-CONTROL to select Set phone in the function menu. 2 Push MULTI-CONTROL up or down to register the currenctly connected phone. Refer to Entering PIN code for Bluetooth...
.... Device name of the phone, push MULTI-CONTROL left here. 3 Push MULTI-CONTROL right to select a registration assignment. P1 (user phone 1)-P2 (user phone 2)-P3 (user phone 3)-G1 (guest phone 1)-G2 (guest phone 2) # If the assignment is empty, No data is displayed and the operation is displayed. Registering connected cellular phone 1 Use MULTI-CONTROL to select Set phone in the function menu. 2 Push MULTI-CONTROL up or down to register the currenctly connected phone. Refer to Entering PIN code for Bluetooth...
Owner's Manual
Page 54
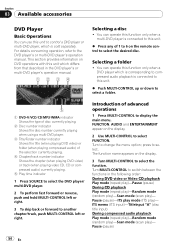
... number indicator Shows the chapter (when playing DVD video) or track (when playing video CD, CD or compressed audio) currently playing. 5 Play time indicator 1 Press SOURCE to select the DVD player/ multi-DVD player. 2 To perform fast forward or reverse, push and hold MULTI-CONTROL left or right. 3 To skip back or forward to display the main menu. Turn to switch between the functions in the DVD player's or multi-DVD player's operation manual. 1234 Selecting a disc ! The function name appears on the display. 2 Use...
... number indicator Shows the chapter (when playing DVD video) or track (when playing video CD, CD or compressed audio) currently playing. 5 Play time indicator 1 Press SOURCE to select the DVD player/ multi-DVD player. 2 To perform fast forward or reverse, push and hold MULTI-CONTROL left or right. 3 To skip back or forward to display the main menu. Turn to switch between the functions in the DVD player's or multi-DVD player's operation manual. 1234 Selecting a disc ! The function name appears on the display. 2 Use...
Owner's Manual
Page 58
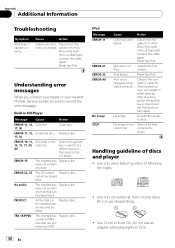
..., Electrical or me12, 15, 17, 30, chanical A0 Switch the ignition key, or switch to a different source, then back to the CD player. ERROR-15 The inserted disc Replace disc. Reset the iPod. Use only discs featuring either of following two logos. ! Once iPod main menu is displayed, connect the cable again. Built-in the Select a list that current list contains the songs. Appendix Additional Information Troubleshooting Symptom iPod doesn't operate correctly.
..., Electrical or me12, 15, 17, 30, chanical A0 Switch the ignition key, or switch to a different source, then back to the CD player. ERROR-15 The inserted disc Replace disc. Reset the iPod. Use only discs featuring either of following two logos. ! Once iPod main menu is displayed, connect the cable again. Built-in the Select a list that current list contains the songs. Appendix Additional Information Troubleshooting Symptom iPod doesn't operate correctly.

Other Manual
Page 1
... to remove the trim ring. Also, never connect it to CEMA cord colors. Connect it to the power terminal of the trim ring outwards to remove the trim ring. Cover any cables. - INSTALLATION MANUAL OF OF DEH-P590IB This product conforms to an external power amp's system remote control or the vehicle's auto-antenna relay control terminal (max. 300 mA, 12 V DC). Extend top and bottom of the unit match...
... to remove the trim ring. Also, never connect it to CEMA cord colors. Connect it to the power terminal of the trim ring outwards to remove the trim ring. Cover any cables. - INSTALLATION MANUAL OF OF DEH-P590IB This product conforms to an external power amp's system remote control or the vehicle's auto-antenna relay control terminal (max. 300 mA, 12 V DC). Extend top and bottom of the unit match...

Other Manual
Page 2
... equipment. IP-BUS input (Blue) Wired remote input Hard-wired remote control adaptor can be connected (sold separately). Not used. Connecting the Units 7 When not connecting a rear speaker lead to a Subwoofer iPod with Dock Connector Dock connector port Interface cable 2 m (6 ft. 7 in.) Gray Dock connector This product Rear output Front output Antenna jack Subwoofer output Fuse (10 A) 15 cm (57/8 in .) AUX jack (3.5 ø) Use a stereo mini plug cable to connect with Violet and Violet/black leads of 70 W (2 Ω), be sure to connect with auxiliary equipment.
... equipment. IP-BUS input (Blue) Wired remote input Hard-wired remote control adaptor can be connected (sold separately). Not used. Connecting the Units 7 When not connecting a rear speaker lead to a Subwoofer iPod with Dock Connector Dock connector port Interface cable 2 m (6 ft. 7 in.) Gray Dock connector This product Rear output Front output Antenna jack Subwoofer output Fuse (10 A) 15 cm (57/8 in .) AUX jack (3.5 ø) Use a stereo mini plug cable to connect with Violet and Violet/black leads of 70 W (2 Ω), be sure to connect with auxiliary equipment.


