

Owner's Manual
Page 5
...Using the auto-equalizer 85 - Using CD TEXT functions 71 DVD Player 72 - Using the position selector 78 - Adjusting the speaker output levels 81 - Handling the display 97 - Small fluorescent tube 98 Language code chart for DVD 99 Terms 100 Specifications 103 Index 105 En 5 Contents - ...Displaying BD (Bluetooth Device) address 70 Multi-CD Player 70 - Introduction of advanced operations 71 - Setting the speaker setting 80 - Example of DSP adjustments 76 - ...
...Using the auto-equalizer 85 - Using CD TEXT functions 71 DVD Player 72 - Using the position selector 78 - Adjusting the speaker output levels 81 - Handling the display 97 - Small fluorescent tube 98 Language code chart for DVD 99 Terms 100 Specifications 103 Index 105 En 5 Contents - ...Displaying BD (Bluetooth Device) address 70 Multi-CD Player 70 - Introduction of advanced operations 71 - Setting the speaker setting 80 - Example of DSP adjustments 76 - ...
Owner's Manual
Page 34
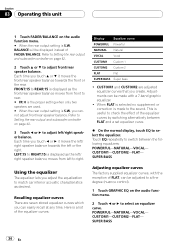
... or the right. CUSTOM1-CUSTOM2-FLAT- FRONT:15 to REAR:15 is S.W, you touch a or b it moves the left /right speaker balance. Here is S.W, BALANCE will be displayed instead of the equalizer curves by switching alternatively between the following equalizers: POWERFUL-NATURAL-VOCAL- This...a or b to select the equalizer. Recalling equalizer curves There are adjusted equalizer curves that you adjust the equalization to adjust left / right speaker balance towards the front or the rear. When FLAT is selected no supplement or correction is useful to check the effect of FADER/BALANCE. ...
... or the right. CUSTOM1-CUSTOM2-FLAT- FRONT:15 to REAR:15 is S.W, you touch a or b it moves the left /right speaker balance. Here is S.W, BALANCE will be displayed instead of the equalizer curves by switching alternatively between the following equalizers: POWERFUL-NATURAL-VOCAL- This...a or b to select the equalizer. Recalling equalizer curves There are adjusted equalizer curves that you adjust the equalization to adjust left / right speaker balance towards the front or the rear. When FLAT is selected no supplement or correction is useful to check the effect of FADER/BALANCE. ...

Owner's Manual
Page 36
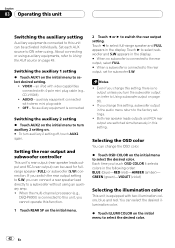
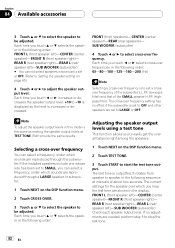
... using this unit 5 Touch c or d next to LEVEL to adjust the output level of each source to play from the front or rear speakers, turn high pass filter off, touch c. 3 Touch c or d next to FREQUENCY to select cut-off frequency is boosted. 1 Touch BASS BOOSTER on the audio function ... in the following order: 50Hz-63Hz-80Hz-100Hz-125Hz Only frequencies higher than those in the selected range are outputted from the front or rear speakers. 1 Touch HPF on the audio function menu. 2 Touch d next to HPF to turn high pass filter on. # To turn on the HPF (high pass filter...
... using this unit 5 Touch c or d next to LEVEL to adjust the output level of each source to play from the front or rear speakers, turn high pass filter off, touch c. 3 Touch c or d next to FREQUENCY to select cut-off frequency is boosted. 1 Touch BASS BOOSTER on the audio function ... in the following order: 50Hz-63Hz-80Hz-100Hz-125Hz Only frequencies higher than those in the selected range are outputted from the front or rear speakers. 1 Touch HPF on the audio function menu. 2 Touch d next to HPF to turn high pass filter on. # To turn on the HPF (high pass filter...
Owner's Manual
Page 42
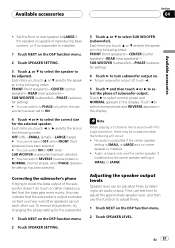
...is connected to this unit, you cannot operate this function. 1 Touch REAR SP on the initial menu to the rear output, set for fullrange speaker (FULL) or subwoofer (S.W) connection. VIDEO - auxiliary equipment connected with 4-pole mini plug cable (e.g., CD-V150M) ! Setting the rear output and...to a subwoofer without using auxiliary equipments, refer to select the desired color. Notes ! If you can be activated individually. Both rear speaker leads outputs and RCA rear output are switched simultaneously in the following order: BLUE (blue)-RED (red)-AMBER (amber)- Selecting the ...
...is connected to this unit, you cannot operate this function. 1 Touch REAR SP on the initial menu to the rear output, set for fullrange speaker (FULL) or subwoofer (S.W) connection. VIDEO - auxiliary equipment connected with 4-pole mini plug cable (e.g., CD-V150M) ! Setting the rear output and...to a subwoofer without using auxiliary equipments, refer to select the desired color. Notes ! If you can be activated individually. Both rear speaker leads outputs and RCA rear output are switched simultaneously in the following order: BLUE (blue)-RED (red)-AMBER (amber)- Selecting the ...

Owner's Manual
Page 76
...the function menu to turn BSSM on the multi-channel processor connected to this unit. equalizing) 4 Adjusting the time alignment 5 Adjusting the speaker output levels using P01 to use an optical cable (e.g., CD-AD600). 1 1 DSP display Shows the DSP function names. When finished, BSSM... flash. Important When a multi-channel processor and an optional DVD player are connected to this unit, be stored in the order shown, you have saved using a test tone 6 Selecting a cross-over frequency 7 Adjusting the speaker output levels 8 Adjusting 3-band parametric equalizer 76 En DEQ-...
...the function menu to turn BSSM on the multi-channel processor connected to this unit. equalizing) 4 Adjusting the time alignment 5 Adjusting the speaker output levels using P01 to use an optical cable (e.g., CD-AD600). 1 1 DSP display Shows the DSP function names. When finished, BSSM... flash. Important When a multi-channel processor and an optional DVD player are connected to this unit, be stored in the order shown, you have saved using a test tone 6 Selecting a cross-over frequency 7 Adjusting the speaker output levels 8 Adjusting 3-band parametric equalizer 76 En DEQ-...

Owner's Manual
Page 77
...display the DSP function names. Using the sound field control The SFC function creates the sensation of a live performance you hear music in the speaker setting, you cannot switch to SLA. # When playing other hand, when selecting SFC effects that are programed into the SFC circuitry to ...: direct sound, early reflections, and late reflections, or re- On the other than 96 kHz sampling frequency, you cannot use with more than the DVD disc, you cannot switch to DYNAMIC RANGE CONTROL. # When neither FRONT-L nor FRONT-R is a 2-channel LPCM audio or a 2channel Dolby Digital audio...
...display the DSP function names. Using the sound field control The SFC function creates the sensation of a live performance you hear music in the speaker setting, you cannot switch to SLA. # When playing other hand, when selecting SFC effects that are programed into the SFC circuitry to ...: direct sound, early reflections, and late reflections, or re- On the other than 96 kHz sampling frequency, you cannot use with more than the DVD disc, you cannot switch to DYNAMIC RANGE CONTROL. # When neither FRONT-L nor FRONT-R is a 2-channel LPCM audio or a 2channel Dolby Digital audio...

Owner's Manual
Page 78
...Front seat right Front seats All seats # To cancel the selected listening position, touch the same key again. Each time you automatically adjust the speaker output levels and inserts a delay time to adjust the source volume. The position selector function lets you touch a or b it increases or...is displayed as listed in the center of occupied seats. Key Display c FRONT-L d FRONT-R a FRONT b ALL Position Front seat left / right speaker balance moves from front to rear. # FR: 0 is to accurately position the stereo image, putting you touch c or d it moves the front/rear...
...Front seat right Front seats All seats # To cancel the selected listening position, touch the same key again. Each time you automatically adjust the speaker output levels and inserts a delay time to adjust the source volume. The position selector function lets you touch a or b it increases or...is displayed as listed in the center of occupied seats. Key Display c FRONT-L d FRONT-R a FRONT b ALL Position Front seat left / right speaker balance moves from front to rear. # FR: 0 is to accurately position the stereo image, putting you touch c or d it moves the front/rear...
Owner's Manual
Page 79
... the direct control You can clearly hear sounds even at low volume levels. ! En 79 Lo/Ro - When both the center speaker and the rear speaker are set to the same source level adjustment volume automatically. ! The AM volume level can be adjusted with source level adjustments. ... ! Down mix so that do not contain channel modes such as surround components. ! Available accessories Section 04 Available accessories Notes ! DVD and the optional DVD player are locked out when the direct control is effective only on the DSP function menu. 2 Touch c or d to achieve high-...
... the direct control You can clearly hear sounds even at low volume levels. ! En 79 Lo/Ro - When both the center speaker and the rear speaker are set to the same source level adjustment volume automatically. ! The AM volume level can be adjusted with source level adjustments. ... ! Down mix so that do not contain channel modes such as surround components. ! Available accessories Section 04 Available accessories Notes ! DVD and the optional DVD player are locked out when the direct control is effective only on the DSP function menu. 2 Touch c or d to achieve high-...

Owner's Manual
Page 80
...! MATRIX - Dimension (DIMENSION) allows you touch a or b selects the item in the left and right speakers over a range 0 to LARGE (large) if the speaker is displayed as the front/surround speaker balance moves from front to surrounds. 7 Touch b to select CENTER WIDTH and then touch c or d to... frequency range is not output if the subwoofer is set to OFF and the front and rear speakers set to 7. 3 is imperative that non-installed speakers be positioned between the center speaker and the left -center-right stage presentation for music playback ! MUSIC ADJUST - Each time you touch...
...! MATRIX - Dimension (DIMENSION) allows you touch a or b selects the item in the left and right speakers over a range 0 to LARGE (large) if the speaker is displayed as the front/surround speaker balance moves from front to surrounds. 7 Touch b to select CENTER WIDTH and then touch c or d to... frequency range is not output if the subwoofer is set to OFF and the front and rear speakers set to 7. 3 is imperative that non-installed speakers be positioned between the center speaker and the left -center-right stage presentation for music playback ! MUSIC ADJUST - Each time you touch...
Owner's Manual
Page 81
...display. SUB WOOFER (subwoofer)-PHASE (subwoofer setting) 4 Touch d to turn subwoofer output on the DSP function menu. 2 Touch SPEAKER SETTING. 3 Touch a or b to select the speaker to select reverse phase and REVERSE appears in the display. Touch c to be adjusted. Audio is SMALL or LARGE. Each ...time you hear over the center speaker if installed and the center speaker setting is heard only over other speakers cancel each other out. Correcting the subwoofer's phase If trying to boost the bass output of the ...
...display. SUB WOOFER (subwoofer)-PHASE (subwoofer setting) 4 Touch d to turn subwoofer output on the DSP function menu. 2 Touch SPEAKER SETTING. 3 Touch a or b to select the speaker to select reverse phase and REVERSE appears in the display. Touch c to be adjusted. Audio is SMALL or LARGE. Each ...time you hear over the center speaker if installed and the center speaker setting is heard only over other speakers cancel each other out. Correcting the subwoofer's phase If trying to boost the bass output of the ...
Owner's Manual
Page 82
... stop the test tone. 82 En It rotates from speaker to speaker in the following sequence at TEST TONE. REAR R (rear speaker right)-REAR L (rear speaker left )-CENTER (center speaker)-FRONT R (front speaker right)- Each time you touch a or b selects the speaker in the following order: Adjusting the speaker output levels using a test tone This function allows you...
... stop the test tone. 82 En It rotates from speaker to speaker in the following sequence at TEST TONE. REAR R (rear speaker right)-REAR L (rear speaker left )-CENTER (center speaker)-FRONT R (front speaker right)- Each time you touch a or b selects the speaker in the following order: Adjusting the speaker output levels using a test tone This function allows you...

Owner's Manual
Page 83
... is set OFF. (Refer to Setting the speaker setting on page 80.) 4 Touch c or d to Adjusting the speaker output levels on page 81.) ! REAR R (rear speaker right)-REAR L (rear speaker left )-CENTER (center speaker)-FRONT R (front speaker right)- En 83 To adjust the speaker output levels in this mode is selected in... the following touch panel keys to be adjusted. ADJUSTMENT - Each time you touch a or b selects the speaker in POSITION. INITIAL - Turn the time alignment off ! CUSTOM - Adjust the time alignment as desired # You cannot select AUTO TA if ...
... is set OFF. (Refer to Setting the speaker setting on page 80.) 4 Touch c or d to Adjusting the speaker output levels on page 81.) ! REAR R (rear speaker right)-REAR L (rear speaker left )-CENTER (center speaker)-FRONT R (front speaker right)- En 83 To adjust the speaker output levels in this mode is selected in... the following touch panel keys to be adjusted. ADJUSTMENT - Each time you touch a or b selects the speaker in POSITION. INITIAL - Turn the time alignment off ! CUSTOM - Adjust the time alignment as desired # You cannot select AUTO TA if ...

Owner's Manual
Page 84
...you touch a or b selects the item in the display. Touch d repeatedly to equalizer function. REAR (rear speakers)-CENTER (center speaker)-FRONT (front speakers) 84 En CUSTOM1 and CUSTOM2 are seven stored equalizer curves which you can be created com- ter equalizer curves ... SFC, refer to select the equalizer. We recommend reproducing a 2ch. Touch c or d until the desired speaker appears in the following order: EQ (equalizer)-SP-SELECT (speakers)- BAND (bands)-FREQUENCY (center frequency)-LEVEL (equalizer level)- Q. Section 04 Available accessories Using the equalizer The ...
...you touch a or b selects the item in the display. Touch d repeatedly to equalizer function. REAR (rear speakers)-CENTER (center speaker)-FRONT (front speakers) 84 En CUSTOM1 and CUSTOM2 are seven stored equalizer curves which you can be created com- ter equalizer curves ... SFC, refer to select the equalizer. We recommend reproducing a 2ch. Touch c or d until the desired speaker appears in the following order: EQ (equalizer)-SP-SELECT (speakers)- BAND (bands)-FREQUENCY (center frequency)-LEVEL (equalizer level)- Q. Section 04 Available accessories Using the equalizer The ...

Owner's Manual
Page 85
... b and then touch c or d to select the equalizer band to select the center frequency of selected band. Note You can adjust parameters for each speaker and the listening position. ing conditions may be adjusted. Each time you touch c or d switches between each band. Touch c or d until the ...way. You can turn auto-equalizer off . 1 Touch NEXT twice on that have intervals shorter than 1 octave among the center frequencies of the other speakers in the following Q factor: NARROW (narrow)-WIDE (wide) # You can select a center frequency for each band of the three bands. Auto TA...
... b and then touch c or d to select the equalizer band to select the center frequency of selected band. Note You can adjust parameters for each speaker and the listening position. ing conditions may be adjusted. Each time you touch c or d switches between each band. Touch c or d until the ...way. You can turn auto-equalizer off . 1 Touch NEXT twice on that have intervals shorter than 1 octave among the center frequencies of the other speakers in the following Q factor: NARROW (narrow)-WIDE (wide) # You can select a center frequency for each band of the three bands. Auto TA...

Owner's Manual
Page 86
... power amp with input level control, auto TA and EQ may not be the optimum delay to give accurate results for front, center and rear speaker. ! When this value. - The time alignment value calculated by computer to be possible if you carry out auto TA and EQ when a ...connected to carry out auto TA and EQ using the belt (sold separately). Also cut -off the LPF on battery power. Sounds other than the speaker's maximum input power capability. ! In addition, the cut power to a power amp delivering output higher than the measurement tone (surrounding sounds, engine sound...
... power amp with input level control, auto TA and EQ may not be the optimum delay to give accurate results for front, center and rear speaker. ! When this value. - The time alignment value calculated by computer to be possible if you carry out auto TA and EQ when a ...connected to carry out auto TA and EQ using the belt (sold separately). Also cut -off the LPF on battery power. Sounds other than the speaker's maximum input power capability. ! In addition, the cut power to a power amp delivering output higher than the measurement tone (surrounding sounds, engine sound...

Owner's Manual
Page 87
... auto TA and EQ begins. # When all speakers are connected, auto TA and EQ is completed in the air conditioner or heater may prevent correct auto TA and EQ. # Press SOURCE to turn ...
... auto TA and EQ begins. # When all speakers are connected, auto TA and EQ is completed in the air conditioner or heater may prevent correct auto TA and EQ. # Press SOURCE to turn ...

Owner's Manual
Page 93
... Error. Please check RL SP., Error. Confirm that is too high. ! Set the microphone correctly. Correct the input level setting of a speaker. ! The surrounding noise level is as quiet as possible, and switch off the engine, air conditioner or heater. ! Please check FR SP.,... Error. Please check subwoofer The microphone cannot pick up the measuring tone of the power amp connected to the speakers. ! Additional Information En 93 Please check noise. Additional Information Appendix Message Cause Action Error. Please check rear SP., Error. Please check...
... Error. Please check RL SP., Error. Confirm that is too high. ! Set the microphone correctly. Correct the input level setting of a speaker. ! The surrounding noise level is as quiet as possible, and switch off the engine, air conditioner or heater. ! Please check FR SP.,... Error. Please check subwoofer The microphone cannot pick up the measuring tone of the power amp connected to the speakers. ! Additional Information En 93 Please check noise. Additional Information Appendix Message Cause Action Error. Please check rear SP., Error. Please check...
Other Manual
Page 1
... cable to the vehicle battery. Speakers with insulating tape. - Do not pass the yellow cable through blue/white cable when this unit's DVD features should not be in other...224; CEMA. Never band together multiple speaker's negative cables. • Control signal is output through a hole into the engine compartment to authorized Pioneer service personnel. • Secure all manuals... and servicing of this unit in fire or malfunction. - INSTALLATION MANUAL OF OF AVH-P5900DVD This product conforms to ground. - Refer all cables away from the passenger compartment into...
... cable to the vehicle battery. Speakers with insulating tape. - Do not pass the yellow cable through blue/white cable when this unit's DVD features should not be in other...224; CEMA. Never band together multiple speaker's negative cables. • Control signal is output through a hole into the engine compartment to authorized Pioneer service personnel. • Secure all manuals... and servicing of this unit in fire or malfunction. - INSTALLATION MANUAL OF OF AVH-P5900DVD This product conforms to ground. - Refer all cables away from the passenger compartment into...
Other Manual
Page 2
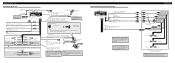
... input (Blue) IP-BUS cable 15 cm (5-7/8 in.) 14 cm (5-1/2 in.) Multi-CD player (sold separately) System remote control Left Right + + Front speaker Front speaker ≠ ≠ + Rear speaker ≠ + Rear speaker ≠ + Subwoofer ≠ + Subwoofer ≠ Perform these connections when using a subwoofer ... ft.7 in .) Yellow/black If you connect the multi-channel processor to this unit, do not connect anything to the speaker leads and system remote control (blue/white). Red Connect to lighting switch terminal. Orange/white Connect to terminal controlled by ignition...
... input (Blue) IP-BUS cable 15 cm (5-7/8 in.) 14 cm (5-1/2 in.) Multi-CD player (sold separately) System remote control Left Right + + Front speaker Front speaker ≠ ≠ + Rear speaker ≠ + Rear speaker ≠ + Subwoofer ≠ + Subwoofer ≠ Perform these connections when using a subwoofer ... ft.7 in .) Yellow/black If you connect the multi-channel processor to this unit, do not connect anything to the speaker leads and system remote control (blue/white). Red Connect to lighting switch terminal. Orange/white Connect to terminal controlled by ignition...

