Other Manual
Page 1
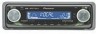
...of both products and connect cords that does not have the same function. Multi-CD player (sold separately) Yellow To terminal always supplied with this product to another product,.... Blue/white To system control terminal of the auto-antenna. INSTALLATION MANUAL OF OF DEH-P2600 DEH-P26 This product conforms to an external power amp's system remote control or the car...'s Auto-antenna relay control terminal (max. 300 mA 12 V DC). To protect the wiring, wrap adhesive tape around them where they have an ACC (accessory) position on this lead separately from the...
...of both products and connect cords that does not have the same function. Multi-CD player (sold separately) Yellow To terminal always supplied with this product to another product,.... Blue/white To system control terminal of the auto-antenna. INSTALLATION MANUAL OF OF DEH-P2600 DEH-P26 This product conforms to an external power amp's system remote control or the car...'s Auto-antenna relay control terminal (max. 300 mA 12 V DC). To protect the wiring, wrap adhesive tape around them where they have an ACC (accessory) position on this lead separately from the...

Other Manual
Page 4
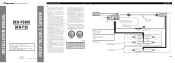
... Front-mount) or "Rear" (DIN Rear-mount installation, utilizing threaded screw holes at 2 places on each side. Fig. 7 10 Factory radio mounting bra1c2ket S1c1rew D13ashboard or Console Fig. 8 Fig. 9 Fixing the Front Panel If you do not operate the removing and attaching the front...the keys pressed against the sides of the unit, pull the unit out. Installation Note: • Before finally installing the unit, connect the wiring temporarily, making sure it is a sudden stop, like an emergency stop. • The semiconductor laser will be properly installed either truss screws ...
... Front-mount) or "Rear" (DIN Rear-mount installation, utilizing threaded screw holes at 2 places on each side. Fig. 7 10 Factory radio mounting bra1c2ket S1c1rew D13ashboard or Console Fig. 8 Fig. 9 Fixing the Front Panel If you do not operate the removing and attaching the front...the keys pressed against the sides of the unit, pull the unit out. Installation Note: • Before finally installing the unit, connect the wiring temporarily, making sure it is a sudden stop, like an emergency stop. • The semiconductor laser will be properly installed either truss screws ...


