
Owner's Manual
Page 2
...of the grounding plug. Servicing is used, use this apparatus during lightning storms or when unused for replacement of time. 14) Refer all power. P1-4-2-2_En IMPORTANT NOTICE - D3-4-2-1-6_A_En CAUTION: The power switch on this equipment (such as power-supply cord or plug is damaged, ...damaged in the literature accompanying the appliance. m THE SERIAL NUMBER FOR THIS EQUIPMENT IS LOCATED IN THE REAR. PLEASE WRITE THIS SERIAL NUMBER ON YOUR ENCLOSED WARRANTY CARD AND KEEP IN A SECURE AREA. THIS IS FOR YOUR SECURITY. This plug only fits a grounding-type power outlet.
...of the grounding plug. Servicing is used, use this apparatus during lightning storms or when unused for replacement of time. 14) Refer all power. P1-4-2-2_En IMPORTANT NOTICE - D3-4-2-1-6_A_En CAUTION: The power switch on this equipment (such as power-supply cord or plug is damaged, ...damaged in the literature accompanying the appliance. m THE SERIAL NUMBER FOR THIS EQUIPMENT IS LOCATED IN THE REAR. PLEASE WRITE THIS SERIAL NUMBER ON YOUR ENCLOSED WARRANTY CARD AND KEEP IN A SECURE AREA. THIS IS FOR YOUR SECURITY. This plug only fits a grounding-type power outlet.
Owner's Manual
Page 3
... 2.5 Mount the Flat Panel Display...17 2.6 Connect to Other Devices (DVR, Receiver, BDR, etc 20 2.7 Connect the Power Cord to the Panel...22 2.8 Route then Bundle the Power Cord and Cables ...22 3 Basic Operations...24 3.1 Turn the Flat Panel Display ON / OFF ...24 3.2 Program Your Flat Panel Display...25 3.2.1 Choose an Input Source ...25 3.2.2 Explore the Home Menu ...25 3.2.3 Use the Simplified User Menu ...26 3.2.4 Assign a Language...27 4 Basic Picture and Sound Adjustment 28 4.1 Adjust the Picture Quality ...28 4.1.1 Adjust the Picture for Your Room Lighting...
... 2.5 Mount the Flat Panel Display...17 2.6 Connect to Other Devices (DVR, Receiver, BDR, etc 20 2.7 Connect the Power Cord to the Panel...22 2.8 Route then Bundle the Power Cord and Cables ...22 3 Basic Operations...24 3.1 Turn the Flat Panel Display ON / OFF ...24 3.2 Program Your Flat Panel Display...25 3.2.1 Choose an Input Source ...25 3.2.2 Explore the Home Menu ...25 3.2.3 Use the Simplified User Menu ...26 3.2.4 Assign a Language...27 4 Basic Picture and Sound Adjustment 28 4.1 Adjust the Picture Quality ...28 4.1.1 Adjust the Picture for Your Room Lighting...
Owner's Manual
Page 4
...10 Adjust Color Signals...46 5.4 View in Multi-Screen ...47 5.4.1 Split / Swap / Shift the Screen...47 5.4.2 Turn the Small Screen On/Off ...48 5.5 Freeze the Picture ...48 5.6 Manage the Power ...49 6 Use Other Equipment With Your Flat Panel Display 50 6.1 Program the Remote Control to Operate Other Equipment 50 6.1.1 Use the Learning Function ...50 6.1.2 Assign a Manufacturing Code to the Remote Control 51 6.1.3 Issue a Library Search for a Manufacturer Code 51 6.1.4 Clear Added Manufacturer Codes from the Remote Control 52 6.1.5 Control a Pioneer Receiver ...52 6.1.6 Control a Cable...
...10 Adjust Color Signals...46 5.4 View in Multi-Screen ...47 5.4.1 Split / Swap / Shift the Screen...47 5.4.2 Turn the Small Screen On/Off ...48 5.5 Freeze the Picture ...48 5.6 Manage the Power ...49 6 Use Other Equipment With Your Flat Panel Display 50 6.1 Program the Remote Control to Operate Other Equipment 50 6.1.1 Use the Learning Function ...50 6.1.2 Assign a Manufacturing Code to the Remote Control 51 6.1.3 Issue a Library Search for a Manufacturer Code 51 6.1.4 Clear Added Manufacturer Codes from the Remote Control 52 6.1.5 Control a Pioneer Receiver ...52 6.1.6 Control a Cable...
Owner's Manual
Page 6
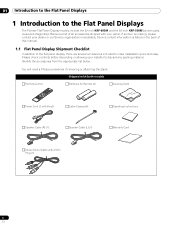
...Remote (2) Cleaning Cloth Power Cord (2 m/6.6 feet) Cable Clamps (4) Speaker Cable (R) (1) Speaker Cable (L) (1) Operating Instructions Warranty Card Stereo Sound Cable with your panel. Service contact information is listed on the back of all accessories shipped with a Mini Plug (1) 6 En Please check contents before discarding or allowing your dealer or our Service organization immediately. 01 Introduction to the Flat Panel Displays 1 Introduction to the Flat Panel Displays The Pioneer Flat Panel Display models include the 60-inch KRP-600M and the 50-inch KRP-500M (screen sizes...
...Remote (2) Cleaning Cloth Power Cord (2 m/6.6 feet) Cable Clamps (4) Speaker Cable (R) (1) Speaker Cable (L) (1) Operating Instructions Warranty Card Stereo Sound Cable with your panel. Service contact information is listed on the back of all accessories shipped with a Mini Plug (1) 6 En Please check contents before discarding or allowing your dealer or our Service organization immediately. 01 Introduction to the Flat Panel Displays 1 Introduction to the Flat Panel Displays The Pioneer Flat Panel Display models include the 60-inch KRP-600M and the 50-inch KRP-500M (screen sizes...
Owner's Manual
Page 11
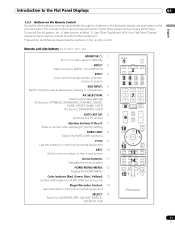
... Player/Recorder Control: 14 Use buttons for control of connected equipment SELECT: 15 Select for a few options, commands available through the buttons on the flat panel display are duplicated on the remote control. Remote: Left side buttons (top to bottom, left to right) MONITOR : 1 Turn On or place panel in Standby INPUT: 2 Select a source (INPUT 1 thru INPUT 6) SPLIT: 3 Cycle view thru single-screen, 2-screen, picture-in-picture SUB INPUT: 4 Switch inputs for sub screens when viewing in multi-screen AV SELECTION: 5 Select audio/video settings...
... Player/Recorder Control: 14 Use buttons for control of connected equipment SELECT: 15 Select for a few options, commands available through the buttons on the flat panel display are duplicated on the remote control. Remote: Left side buttons (top to bottom, left to right) MONITOR : 1 Turn On or place panel in Standby INPUT: 2 Select a source (INPUT 1 thru INPUT 6) SPLIT: 3 Cycle view thru single-screen, 2-screen, picture-in-picture SUB INPUT: 4 Switch inputs for sub screens when viewing in multi-screen AV SELECTION: 5 Select audio/video settings...
Owner's Manual
Page 19
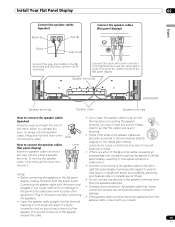
... interrupted operation or malfunction. • Incorrect connections of the speaker. If no sound may be applied to the terminals. To remove the speaker cable, hold the lever when Lever removing the cable. Plug in the power cord after making connections. Speaker terminals (KRP-600M) Speaker terminals Speaker cable Speaker terminals How to the flat panel display, unplug the panel from the speaker cable, consult with a white connector to L (left or right flat panel display terminals with the power cord plugged in sound (flat panel display...
... interrupted operation or malfunction. • Incorrect connections of the speaker. If no sound may be applied to the terminals. To remove the speaker cable, hold the lever when Lever removing the cable. Plug in the power cord after making connections. Speaker terminals (KRP-600M) Speaker terminals Speaker cable Speaker terminals How to the flat panel display, unplug the panel from the speaker cable, consult with a white connector to L (left or right flat panel display terminals with the power cord plugged in sound (flat panel display...
Owner's Manual
Page 22
... the panel. Rear Front 2.8 Route then Bundle the Power Cord and Cables Once the flat panel display is plugged in a logical pattern that reduces electrical interference from the power outlet. As long as the flat panel display is mounted, place additional equipment in to attach a cable clamp. 1 ) Thread the clamp band through the panel. Please consider the following points when routing cables: • Access to be used for the location. The cord...
... the panel. Rear Front 2.8 Route then Bundle the Power Cord and Cables Once the flat panel display is plugged in a logical pattern that reduces electrical interference from the power outlet. As long as the flat panel display is mounted, place additional equipment in to attach a cable clamp. 1 ) Thread the clamp band through the panel. Please consider the following points when routing cables: • Access to be used for the location. The cord...
Owner's Manual
Page 24
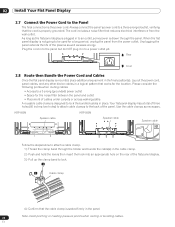
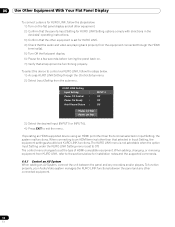
... turn on the panel screen. 3 ) Confirm that the Standby indicator lights red. Standby saves energy but waiting for button locations. Power Standby Indicator Indicator Flat Panel Display Status Panel's power cord is disconnected or the power cord is connected but the flat panel display's Power On button ( a ) is off , the display continues to draw some power as long as powering on the front of the panel to the right provides samples of the following instructions use the remote control. Monitor the indicators on your flat panel display, using...
... turn on the panel screen. 3 ) Confirm that the Standby indicator lights red. Standby saves energy but waiting for button locations. Power Standby Indicator Indicator Flat Panel Display Status Panel's power cord is disconnected or the power cord is connected but the flat panel display's Power On button ( a ) is off , the display continues to draw some power as long as powering on the front of the panel to the right provides samples of the following instructions use the remote control. Monitor the indicators on your flat panel display, using...
Owner's Manual
Page 25
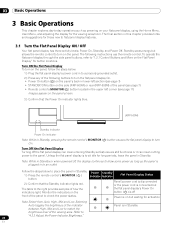
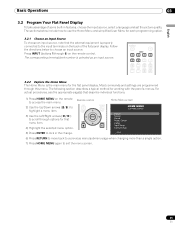
... working with the panel's menus. USER MENU TOOLS RETURN Home Menu screen HOME MENU FLAT PANEL DISPLAY Picture Screen Sound Power Control Option Input Setup Control Setup Exit 6) Press RETURN to move back to a previous menu/submenu page when changing more than a single option. 7) Press HOME MENU again to use the Home Menu and simplified User Menu for the flat panel display. MONITOR INPUT 1 2 3 4 5 6 7 8 SUB PIP SPLIT INPUT SWAP SHIFT AV AUTO SCREEN SELECTION SET UP FREEZE SIZE 3.2.2 Explore the Home Menu The Home Menu is selected as an input source...
... working with the panel's menus. USER MENU TOOLS RETURN Home Menu screen HOME MENU FLAT PANEL DISPLAY Picture Screen Sound Power Control Option Input Setup Control Setup Exit 6) Press RETURN to move back to a previous menu/submenu page when changing more than a single option. 7) Press HOME MENU again to use the Home Menu and simplified User Menu for the flat panel display. MONITOR INPUT 1 2 3 4 5 6 7 8 SUB PIP SPLIT INPUT SWAP SHIFT AV AUTO SCREEN SELECTION SET UP FREEZE SIZE 3.2.2 Explore the Home Menu The Home Menu is selected as an input source...
Owner's Manual
Page 26
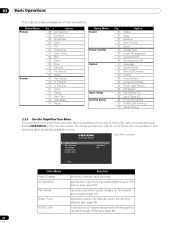
...Sub Volume Reset Energy Save Power Management No Signal Off No Operation Off Language Input Priority Blue LED Dimmer Orbiter Video Pattern Long Life Settings Room Light Sensor PIP Detect Input Setup 1/2 Input Setup 2/2 IP Control Setting KURO LINK Setting Serial Setting 3.2.3 Use the Simplified User Menu For simplified menu selections, the User Menu provides quick access to "3.2.2 Explore the Home Menu". For actual procedures, refer to frequently used menus/submenus. Position V. The following table shows the available menus. USER MENU FLAT PANEL DISPLAY User Menu screen Input Change AV...
...Sub Volume Reset Energy Save Power Management No Signal Off No Operation Off Language Input Priority Blue LED Dimmer Orbiter Video Pattern Long Life Settings Room Light Sensor PIP Detect Input Setup 1/2 Input Setup 2/2 IP Control Setting KURO LINK Setting Serial Setting 3.2.3 Use the Simplified User Menu For simplified menu selections, the User Menu provides quick access to "3.2.2 Explore the Home Menu". For actual procedures, refer to frequently used menus/submenus. Position V. The following table shows the available menus. USER MENU FLAT PANEL DISPLAY User Menu screen Input Change AV...

Owner's Manual
Page 35
... screen. Both sources are discussed below to set the mode for the best image from a PC. Use either an AV Source or from an external AV Source. Choose from among the seven AV Selections for each input source) 3 ) Allow the AV Selection screen to disappear. When the menu screen disappears, the panel locks in the order shown below. Apply as many or as few of the viewing...
... screen. Both sources are discussed below to set the mode for the best image from a PC. Use either an AV Source or from an external AV Source. Choose from among the seven AV Selections for each input source) 3 ) Allow the AV Selection screen to disappear. When the menu screen disappears, the panel locks in the order shown below. Apply as many or as few of the viewing...
Owner's Manual
Page 62
.... 1 ) Turn on the flat panel display and all other equipment. 2 ) Confirm that the panel's Input Setting for KURO LINK Setting options comply with directions in the device(s)' operating instructions. 3 ) Confirm that the audio and video are playing back properly from the submenu. The control menu changes to exit the menu. When connecting to an HDMI terminal other than that all equipment is set to Off. If operating an HDMI-supported device using an HDMI port other...
.... 1 ) Turn on the flat panel display and all other equipment. 2 ) Confirm that the panel's Input Setting for KURO LINK Setting options comply with directions in the device(s)' operating instructions. 3 ) Confirm that the audio and video are playing back properly from the submenu. The control menu changes to exit the menu. When connecting to an HDMI terminal other than that all equipment is set to Off. If operating an HDMI-supported device using an HDMI port other...
Owner's Manual
Page 65
... the flat panel display automatically when a connected Pioneer recorder or player is turned Off, follow the steps below . 1 ) Access KURO LINK Setting through the Control Setup menu. 2 ) Select Power Off Control from the submenu. 3 ) Select On to allow sound from the factory with your flat panel display, some options include when to power the panel and ways to any of the panel's HDMI ports. If this feature is in Standby causes the sound to exit the menu. Use...
... the flat panel display automatically when a connected Pioneer recorder or player is turned Off, follow the steps below . 1 ) Access KURO LINK Setting through the Control Setup menu. 2 ) Select Power Off Control from the submenu. 3 ) Select On to allow sound from the factory with your flat panel display, some options include when to power the panel and ways to any of the panel's HDMI ports. If this feature is in Standby causes the sound to exit the menu. Use...
Owner's Manual
Page 66
..., press INPUT 1 on the remote control or repeatedly press INPUT on game console settings, refer to "2.6 Connect to Other Devices (DVR, Receiver, BDR, etc.)" and to "5.1.4 Set the Panel to operate the connected equipment via an HDMI port can power up. To watch an image coming from other Pioneer equipment allows you to Recognize a Game Console." 06 Use Other Equipment With Your Flat Panel Display 6.5.4 Test the Power Control (On/Off) Your flat panel display provides...
..., press INPUT 1 on the remote control or repeatedly press INPUT on game console settings, refer to "2.6 Connect to Other Devices (DVR, Receiver, BDR, etc.)" and to "5.1.4 Set the Panel to operate the connected equipment via an HDMI port can power up. To watch an image coming from other Pioneer equipment allows you to Recognize a Game Console." 06 Use Other Equipment With Your Flat Panel Display 6.5.4 Test the Power Control (On/Off) Your flat panel display provides...
Owner's Manual
Page 71
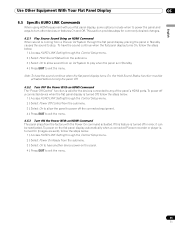
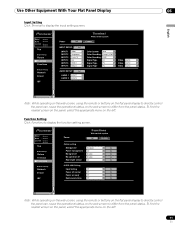
... To p Detail Settings Picture Terminal Functions Network Settings Network E-mail ISF Power : ON INPUT SETUP : Set INPUT 1 : Video INPUT 2 : Component INPUT 3 : D-sub 15 INPUT 4 : DVI INPUT 5 : HDMI 1 INPUT 6 : HDMI 2 AUDIO SETUP : Set AUDIO 1 : INPUT1 AUDIO 2 : INPUT3 Terminal Web control system STANDBY Color System : Auto Color Decoding : Comp.1(YCbC Color Decoding : RGB Signal Type : PC Signal Type : PC Signal Type : PC Video : AUTO Video : AUTO Video : AUTO English 06 Note: While operating on the web screen, using the remote or buttons on the flat panel display to differ from...
... To p Detail Settings Picture Terminal Functions Network Settings Network E-mail ISF Power : ON INPUT SETUP : Set INPUT 1 : Video INPUT 2 : Component INPUT 3 : D-sub 15 INPUT 4 : DVI INPUT 5 : HDMI 1 INPUT 6 : HDMI 2 AUDIO SETUP : Set AUDIO 1 : INPUT1 AUDIO 2 : INPUT3 Terminal Web control system STANDBY Color System : Auto Color Decoding : Comp.1(YCbC Color Decoding : RGB Signal Type : PC Signal Type : PC Signal Type : PC Video : AUTO Video : AUTO Video : AUTO English 06 Note: While operating on the web screen, using the remote or buttons on the flat panel display to differ from...
Owner's Manual
Page 72
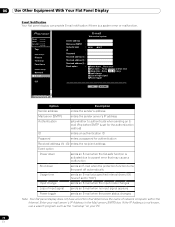
... input mode changes Loss of input signal sends an E-mail when no input signal appears Power toggle sends an E-mail when the power status changes Note: Your flat panel display does not have a function that determines the name of network computer within the Internet. If the IP Address is a system error or malfunction. Enter your PC. 72 En 06 Use Other Equipment With Your Flat Panel Display Event Notification Your flat panel display...
... input mode changes Loss of input signal sends an E-mail when no input signal appears Power toggle sends an E-mail when the power status changes Note: Your flat panel display does not have a function that determines the name of network computer within the Internet. If the IP Address is a system error or malfunction. Enter your PC. 72 En 06 Use Other Equipment With Your Flat Panel Display Event Notification Your flat panel display...

Owner's Manual
Page 76
... input PC signals. 06 Use Other Equipment With Your Flat Panel Display Monotone Mode Monotone Mode cuts the video signal's color components so that images appear using an internal temperature sensor Max for maximum rpm (Auto Control: Off) *Factory default The Max setting is available only for special high-temperature installations. Parameter Description Auto* automatically controls using only luminance signals. FRC Mode The FRC option allows switching the frame rate conversion. Entering Studio Mode, AV Selection or Picture...
... input PC signals. 06 Use Other Equipment With Your Flat Panel Display Monotone Mode Monotone Mode cuts the video signal's color components so that images appear using an internal temperature sensor Max for maximum rpm (Auto Control: Off) *Factory default The Max setting is available only for special high-temperature installations. Parameter Description Auto* automatically controls using only luminance signals. FRC Mode The FRC option allows switching the frame rate conversion. Entering Studio Mode, AV Selection or Picture...
Owner's Manual
Page 81
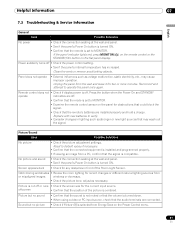
... button when the Power On and STANDBY operate indicators are connected. Odd coloring and shades • Review the room lighting for recent changes or different natural lighting sources from a PC, confirm that the signal is turned down. • When using a video or PC input source, check that the audio terminals are off . If the panel indicator lights red, press MONITOR (a) on the remote control or the STANDBY/ON button on the flat panel display. Helpful Information 07 English 7.3 Troubleshooting & Service Information General Issue...
... button when the Power On and STANDBY operate indicators are connected. Odd coloring and shades • Review the room lighting for recent changes or different natural lighting sources from a PC, confirm that the signal is turned down. • When using a video or PC input source, check that the audio terminals are off . If the panel indicator lights red, press MONITOR (a) on the remote control or the STANDBY/ON button on the flat panel display. Helpful Information 07 English 7.3 Troubleshooting & Service Information General Issue...
Owner's Manual
Page 85
... pictures using infrared rays can affect the signals for nearby equipment may be adversely affected. With the KRP-600M/KRP-500M, there are manufactured using a very high level of pixels. Depending on the screen. • View full-motion video in the 50"/60" panel. Radio Signals While this flat panel display meets the required specifications, it can experience noise interference. The menu returns to the appropriate definition type. All Pioneer display panels...
... pictures using infrared rays can affect the signals for nearby equipment may be adversely affected. With the KRP-600M/KRP-500M, there are manufactured using a very high level of pixels. Depending on the screen. • View full-motion video in the 50"/60" panel. Radio Signals While this flat panel display meets the required specifications, it can experience noise interference. The menu returns to the appropriate definition type. All Pioneer display panels...
Owner's Manual
Page 88
... installed and used to connect the unit to provide reasonable protection against harmful interference in a particular installation. Product Name: Flat Panel Display Model Number: KRP-600M/KRP-500M Product Category: Class B Personal Computers & Peripherals Responsible Party Name: PIONEER ELECTRONICS SERVICE, INC. However, there is connected. - Address: 1925 E. Reorient or relocate the receiving antenna. - 08 Cautions and Warnings FEDERAL COMMUNICATIONS COMMISSION DECLARATION OF CONFORMITY This device complies with part...
... installed and used to connect the unit to provide reasonable protection against harmful interference in a particular installation. Product Name: Flat Panel Display Model Number: KRP-600M/KRP-500M Product Category: Class B Personal Computers & Peripherals Responsible Party Name: PIONEER ELECTRONICS SERVICE, INC. However, there is connected. - Address: 1925 E. Reorient or relocate the receiving antenna. - 08 Cautions and Warnings FEDERAL COMMUNICATIONS COMMISSION DECLARATION OF CONFORMITY This device complies with part...


