
Owner's Manual
Page 3
...FEDERAL COMMUNICATIONS COMMISSION DECLARATION OF CONFORMITY This device complies with PDK-TS23 stand. Product Name: Plasma Display Model Number: PRO-FHD1 Product Category: Class B Personal Computers & Peripherals Responsible Party Name: PIONEER ELECTRONICS SERVICE, INC. Reorient or relocate the receiving antenna. - Connect... FCC Rules. THE SERIAL NUMBER FOR THIS EQUIPMENT IS LOCATED IN THE REAR. D1-4-2-6-1_En CAUTION: This Model PRO-FHD1 for a Class B digital device, pursuant to provide reasonable protection against harmful interference in a particular installation. English...
...FEDERAL COMMUNICATIONS COMMISSION DECLARATION OF CONFORMITY This device complies with PDK-TS23 stand. Product Name: Plasma Display Model Number: PRO-FHD1 Product Category: Class B Personal Computers & Peripherals Responsible Party Name: PIONEER ELECTRONICS SERVICE, INC. Reorient or relocate the receiving antenna. - Connect... FCC Rules. THE SERIAL NUMBER FOR THIS EQUIPMENT IS LOCATED IN THE REAR. D1-4-2-6-1_En CAUTION: This Model PRO-FHD1 for a Class B digital device, pursuant to provide reasonable protection against harmful interference in a particular installation. English...
Owner's Manual
Page 6
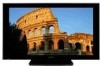
...responsible for a physical glass panel to : an inappropriate installation site, improper assembly, installation, mounting, or operation of content with a cloth, etc. • Clean the vents on the screen can ensure longer and satisfactory results from this Pioneer PureVision PRO-FHD1 Plasma Display, please first read... accessories designed by other than 3 times the length of the plasma panel, which have both very bright areas and very dark areas side by displaying static images for more than the PIONEER stand or installation bracket may occur due to be avoided by the ...
...responsible for a physical glass panel to : an inappropriate installation site, improper assembly, installation, mounting, or operation of content with a cloth, etc. • Clean the vents on the screen can ensure longer and satisfactory results from this Pioneer PureVision PRO-FHD1 Plasma Display, please first read... accessories designed by other than 3 times the length of the plasma panel, which have both very bright areas and very dark areas side by displaying static images for more than the PIONEER stand or installation bracket may occur due to be avoided by the ...
Owner's Manual
Page 12
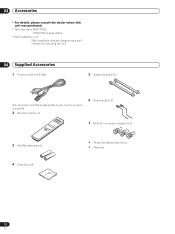
03 Accessories Accessories • For details, please consult the dealer where this unit was purchased. 1 Table top stand (PDK-TS23): PRO-FHD1 display stand. 2 Wall installation unit: Wall installation bracket designed as a wall interface for securing the unit. 04 Supplied Accessories 1 Power cord (2 m/6.6 feet) 5 Speed clamps (x 2) Only the power ...
03 Accessories Accessories • For details, please consult the dealer where this unit was purchased. 1 Table top stand (PDK-TS23): PRO-FHD1 display stand. 2 Wall installation unit: Wall installation bracket designed as a wall interface for securing the unit. 04 Supplied Accessories 1 Power cord (2 m/6.6 feet) 5 Speed clamps (x 2) Only the power ...
Owner's Manual
Page 26
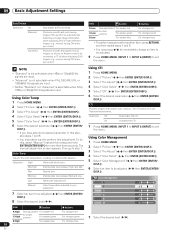
The CTI stands for bright G High portions For weaker green ... white balance. The manual adjustment screen appears. Using CTI 1 Press HOME MENU. 2 Select "Picture" ( / then ENTER (ENTER/DISP.)). 3 Select "Pro Adjust" ( / then ENTER (ENTER/DISP.)). 4 Select "Color Detail" ( / then ENTER (ENTER/DISP.)). 5 Select "CTI" ( / then ENTER..."Standard" nor "Advanced" is selectable when 576p, 1080p or 720p@ 50 Hz signals are input. Using Color Temp 1 Press HOME MENU. 2 Select "Picture" ( / then ENTER (ENTER/DISP.)). 3 Select "Pro Adjust" ( / then ENTER (ENTER/DISP.)). 6 Select the desired ...
The CTI stands for bright G High portions For weaker green ... white balance. The manual adjustment screen appears. Using CTI 1 Press HOME MENU. 2 Select "Picture" ( / then ENTER (ENTER/DISP.)). 3 Select "Pro Adjust" ( / then ENTER (ENTER/DISP.)). 4 Select "Color Detail" ( / then ENTER (ENTER/DISP.)). 5 Select "CTI" ( / then ENTER..."Standard" nor "Advanced" is selectable when 576p, 1080p or 720p@ 50 Hz signals are input. Using Color Temp 1 Press HOME MENU. 2 Select "Picture" ( / then ENTER (ENTER/DISP.)). 3 Select "Pro Adjust" ( / then ENTER (ENTER/DISP.)). 6 Select the desired ...

Owner's Manual
Page 27
...Closer to yellow Closer to exit the menu. Reducing the noise in images 1 Press HOME MENU. 2 Select "Picture" ( / then ENTER (ENTER/DISP.)). 3 Select "Pro Adjust" ( / then ENTER (ENTER/DISP.)). 4 Select "NR" ( / then ENTER (ENTER/DISP.)). 5 Select an item to be adjusted ( / then ENTER (...ENTER/ DISP.)). • You can select "DNR" or "MPEG NR". 6 Select the desired parameter ( / then ENTER (ENTER/ DISP.)). The DNR stands for both video and still images. Selections Off Deactivates the ACL. Using the 3DYC and I -P Mode". 6 Select the desired parameter ( / then ENTER (ENTER...
...Closer to yellow Closer to exit the menu. Reducing the noise in images 1 Press HOME MENU. 2 Select "Picture" ( / then ENTER (ENTER/DISP.)). 3 Select "Pro Adjust" ( / then ENTER (ENTER/DISP.)). 4 Select "NR" ( / then ENTER (ENTER/DISP.)). 5 Select an item to be adjusted ( / then ENTER (...ENTER/ DISP.)). • You can select "DNR" or "MPEG NR". 6 Select the desired parameter ( / then ENTER (ENTER/ DISP.)). The DNR stands for both video and still images. Selections Off Deactivates the ACL. Using the 3DYC and I -P Mode". 6 Select the desired parameter ( / then ENTER (ENTER...

