
Owner's Manual
Page 2
..., the openings should also be easily unplugged from the apparatus. 11) Only use attachments/accessories specified by the manufacturer. 12) Use only with the cart, stand, tripod, bracket, or table specified by operating the equipment on the equipment. Therefore, make sure to leave space around the unit for example, when on...
..., the openings should also be easily unplugged from the apparatus. 11) Only use attachments/accessories specified by the manufacturer. 12) Use only with the cart, stand, tripod, bracket, or table specified by operating the equipment on the equipment. Therefore, make sure to leave space around the unit for example, when on...

Owner's Manual
Page 3
Connect the equipment into an outlet on a circuit different from that to other stand is no guarantee that may invalidate the user's right to provide reasonable protection against harmful interference in instability causing possible ...radio or television reception, which the receiver is connected. - D8-10-3a_En IMPORTANT NOTICE - Product Name: Plasma Display Model Number: PRO-FHD1 Product Category: Class B Personal Computers & Peripherals Responsible Party Name: PIONEER ELECTRONICS SERVICE, INC. LONG BEACH, CA 90801-1760, U.S.A. These limits are used to connect the unit ...
Connect the equipment into an outlet on a circuit different from that to other stand is no guarantee that may invalidate the user's right to provide reasonable protection against harmful interference in instability causing possible ...radio or television reception, which the receiver is connected. - D8-10-3a_En IMPORTANT NOTICE - Product Name: Plasma Display Model Number: PRO-FHD1 Product Category: Class B Personal Computers & Peripherals Responsible Party Name: PIONEER ELECTRONICS SERVICE, INC. LONG BEACH, CA 90801-1760, U.S.A. These limits are used to connect the unit ...
Owner's Manual
Page 6
...side should be displayed for more than the PIONEER stand or installation bracket may occur due to: an inappropriate installation site, improper assembly, installation, mounting, or operation of parts and accessories manufactured by PIONEER. To ensure correct installation, experienced and qualified...avoided by the manufacturer's limited warranties: • Permanent residual images upon the phosphors of the panel. • The existence of a minute number of the Pioneer PRO-FHD1 Plasma Display will diminish very slowly, such as very precise and highly advanced technology. Direct Color ...
...side should be displayed for more than the PIONEER stand or installation bracket may occur due to: an inappropriate installation site, improper assembly, installation, mounting, or operation of parts and accessories manufactured by PIONEER. To ensure correct installation, experienced and qualified...avoided by the manufacturer's limited warranties: • Permanent residual images upon the phosphors of the panel. • The existence of a minute number of the Pioneer PRO-FHD1 Plasma Display will diminish very slowly, such as very precise and highly advanced technology. Direct Color ...
Owner's Manual
Page 9
...proper ventilation is provided or the manufacturer's instructions are not sure of the type of glass. Entering of the front protection panel changes, resulting in discolouration or warp. 24. Removing covers can cause overheating and/or shorten the life of service or...designed for ventilation. Power source - The Plasma Display used to follow the manufacturer's instructions. Servicing - a. d. Wall or ceiling mounting - The Plasma Display weighs about 39.8 kg. This product has been engineered and manufactured with utmost care. Stand - If you to high voltage and ...
...proper ventilation is provided or the manufacturer's instructions are not sure of the type of glass. Entering of the front protection panel changes, resulting in discolouration or warp. 24. Removing covers can cause overheating and/or shorten the life of service or...designed for ventilation. Power source - The Plasma Display used to follow the manufacturer's instructions. Servicing - a. d. Wall or ceiling mounting - The Plasma Display weighs about 39.8 kg. This product has been engineered and manufactured with utmost care. Stand - If you to high voltage and ...

Owner's Manual
Page 10
... specialist or the dealer where purchased. • When installing, be sure to use an M8 (Pitch = 1.25 mm) (1/16 in . PIONEER will not be held responsible for wall-mount installation, etc. to install it on rear surface wall, etc. 02 Safety Precautions Installation using the ... installation bracket • Please be sure to request installation or mounting of parts and accessories manufactured by other than the PIONEER stand or installation bracket (sold separately) • When possible, please install using accessories other companies. • For custom installation, please consult ...
... specialist or the dealer where purchased. • When installing, be sure to use an M8 (Pitch = 1.25 mm) (1/16 in . PIONEER will not be held responsible for wall-mount installation, etc. to install it on rear surface wall, etc. 02 Safety Precautions Installation using the ... installation bracket • Please be sure to request installation or mounting of parts and accessories manufactured by other than the PIONEER stand or installation bracket (sold separately) • When possible, please install using accessories other companies. • For custom installation, please consult ...
Owner's Manual
Page 12
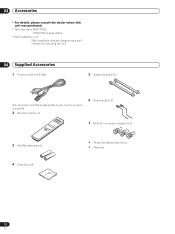
03 Accessories Accessories • For details, please consult the dealer where this unit was purchased. 1 Table top stand (PDK-TS23): PRO-FHD1 display stand. 2 Wall installation unit: Wall installation bracket designed as a wall interface for securing the unit. 04 Supplied Accessories 1 Power cord (2 m/6.6 feet) 5 Speed clamps (x 2) Only the power ...
03 Accessories Accessories • For details, please consult the dealer where this unit was purchased. 1 Table top stand (PDK-TS23): PRO-FHD1 display stand. 2 Wall installation unit: Wall installation bracket designed as a wall interface for securing the unit. 04 Supplied Accessories 1 Power cord (2 m/6.6 feet) 5 Speed clamps (x 2) Only the power ...
Owner's Manual
Page 16
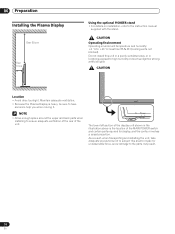
... not install this area to impact or unreasonable force, since damage to the instruction manual supplied with the stand. 06 Preparation Preparation Installing the Plasma Display Over 50 cm Over 10 cm Using the optional PIONEER stand • For details on installation, refer to the parts may result. 16 En As a result, when transporting and...
... not install this area to impact or unreasonable force, since damage to the instruction manual supplied with the stand. 06 Preparation Preparation Installing the Plasma Display Over 50 cm Over 10 cm Using the optional PIONEER stand • For details on installation, refer to the parts may result. 16 En As a result, when transporting and...

Owner's Manual
Page 17
Preparation 06 English Preventing the Plasma Display from Falling Over After installing the stand, be attached. min.) 1. NOTE Use hooks, ropes, chains, and fittings that are available on the market. Failure to ensure that the Plasma Display will not fall down and cause injury. The screws, hooks, ... if necessary. 1 Hook 2 Cord or chain Fitting 17 En Stabilizing on a table or floor Using a wall for stabilization Stabilize the Plasma Display as earthquakes, or of the floor with adequate strength should always be used to which it will vary according to the composition and ...
Preparation 06 English Preventing the Plasma Display from Falling Over After installing the stand, be attached. min.) 1. NOTE Use hooks, ropes, chains, and fittings that are available on the market. Failure to ensure that the Plasma Display will not fall down and cause injury. The screws, hooks, ... if necessary. 1 Hook 2 Cord or chain Fitting 17 En Stabilizing on a table or floor Using a wall for stabilization Stabilize the Plasma Display as earthquakes, or of the floor with adequate strength should always be used to which it will vary according to the composition and ...
Owner's Manual
Page 26
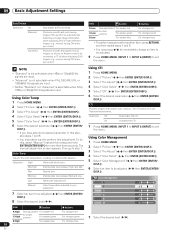
... input. • Neither "Standard" nor "Advanced" is selectable when 576p, 1080p or 720p@ 50 Hz signals are input. Using Color Temp 1 Press HOME MENU. 2 Select "Picture" ( / then ENTER (ENTER/DISP.)). 3 Select "Pro Adjust" ( / then ENTER (ENTER/DISP.)). 6 Select the desired parameter ( / then ENTER ...64257;c) by converting to exit the menu. 09 Basic Adjustment Settings PureCinema Selections Off Standard Advanced Deactivates the PureCinema. The CTI stands for bright G High portions For weaker green For stronger red For stronger green B High 26 For weaker blue For stronger ...
... input. • Neither "Standard" nor "Advanced" is selectable when 576p, 1080p or 720p@ 50 Hz signals are input. Using Color Temp 1 Press HOME MENU. 2 Select "Picture" ( / then ENTER (ENTER/DISP.)). 3 Select "Pro Adjust" ( / then ENTER (ENTER/DISP.)). 6 Select the desired parameter ( / then ENTER ...64257;c) by converting to exit the menu. 09 Basic Adjustment Settings PureCinema Selections Off Standard Advanced Deactivates the PureCinema. The CTI stands for bright G High portions For weaker green For stronger red For stronger green B High 26 For weaker blue For stronger ...

Owner's Manual
Page 27
...ENTER (ENTER/ DISP.)). Using the Dynamic Range Expander (DRE) functions 1 Press HOME MENU. 2 Select "Picture" ( / then ENTER (ENTER/DISP.)). 3 Select "Pro Adjust" ( / then ENTER (ENTER/DISP.)). 4 Select "DRE" ( / then ENTER (ENTER/DISP.)). 5 Select an item to be adjusted ( / then ENTER (ENTER/ DISP.))....3DYC. DNR Reduces video noise for Digital Noise Reduction. High Enhanced 3DYC Mid Standard 3DYC Low Moderate 3DYC 27 En The DNR stands for clean crisp images. This works for separating brightness signals and color signals. Activates the Black Level. Using the 3DYC and ...
...ENTER (ENTER/ DISP.)). Using the Dynamic Range Expander (DRE) functions 1 Press HOME MENU. 2 Select "Picture" ( / then ENTER (ENTER/DISP.)). 3 Select "Pro Adjust" ( / then ENTER (ENTER/DISP.)). 4 Select "DRE" ( / then ENTER (ENTER/DISP.)). 5 Select an item to be adjusted ( / then ENTER (ENTER/ DISP.))....3DYC. DNR Reduces video noise for Digital Noise Reduction. High Enhanced 3DYC Mid Standard 3DYC Low Moderate 3DYC 27 En The DNR stands for clean crisp images. This works for separating brightness signals and color signals. Activates the Black Level. Using the 3DYC and ...


