Owner's Manual
Page 4
... Safety Precautions 03 Accessories 04 Supplied Accessories 05 Part Names Main unit 13 Remote control unit 14 Connection panel 15 06 Preparation Installing the Plasma Display 16 Preventing the Plasma Display from that shown in images 27 Using the Dynamic Range Expander (DRE) functions 27 Using the ... clock manually (PC mode only 30 Selecting an input signal type 31 Color system setting 31 Selecting a screen size automatically (AV mode only 32 Selecting a screen size for buying this Pioneer product. However the method of the remote control unit 20 Cautions regarding the remote...
... Safety Precautions 03 Accessories 04 Supplied Accessories 05 Part Names Main unit 13 Remote control unit 14 Connection panel 15 06 Preparation Installing the Plasma Display 16 Preventing the Plasma Display from that shown in images 27 Using the Dynamic Range Expander (DRE) functions 27 Using the ... clock manually (PC mode only 30 Selecting an input signal type 31 Color system setting 31 Selecting a screen size automatically (AV mode only 32 Selecting a screen size for buying this Pioneer product. However the method of the remote control unit 20 Cautions regarding the remote...
Owner's Manual
Page 6
...plasma panel, which have static portions). • Avoid viewing the On Screen Display for extended periods, from a decoder, DVD player, VCR and all phosphor-based screens (for a prolonged period. The Pioneer PureVision PRO-FHD1 incorporates the latest in instability, and could result in the "WIDE" or "FULL" screen setting... for such accidents or malfunction. It also eliminates the need for a physical glass panel to be held responsible...
...plasma panel, which have static portions). • Avoid viewing the On Screen Display for extended periods, from a decoder, DVD player, VCR and all phosphor-based screens (for a prolonged period. The Pioneer PureVision PRO-FHD1 incorporates the latest in instability, and could result in the "WIDE" or "FULL" screen setting... for such accidents or malfunction. It also eliminates the need for a physical glass panel to be held responsible...
Owner's Manual
Page 8
... remain on the screen due to burning of the fluorescent materials. Image retention, also known as plasma display systems). This image retention may occur in the 4:3 aspect ratio (black or gray bars ... can occur in may cause image retention. In most cases, the image retention can be set to fill the entire screen with very high peak luminance are displayed for more than 1 minute... time, image retention may cause after-image lagging. 01 Important User Guidance Information CAUTION Panel sticking and after-image lag • Displaying the same images such as still images for...
... remain on the screen due to burning of the fluorescent materials. Image retention, also known as plasma display systems). This image retention may occur in the 4:3 aspect ratio (black or gray bars ... can occur in may cause image retention. In most cases, the image retention can be set to fill the entire screen with very high peak luminance are displayed for more than 1 minute... time, image retention may cause after-image lagging. 01 Important User Guidance Information CAUTION Panel sticking and after-image lag • Displaying the same images such as still images for...

Owner's Manual
Page 14
... 2 PC 8 3 INPUT 9 4 1 2 3 4 5 6 SPLIT SUB INPUT 5 VOLUME MUTING SWAP 6 10 11 12 RETURN 7 HOME MENU 13 ENTER AXD1534 14 15 PLASMA DISPLAY When handling the remote control unit • Do not drop the remote control unit or expose it to moisture. • Do not use this...or in operation or standby mode (page 21). 2 SCREEN SIZE button Press to select the screen size (page 23). 3 PC AUTO SET UP button When using computer signal input, automatically sets the "Position", "Clock" and "Phase" to optimum values (page 30). 4 INPUT 1 to 6 buttons Press to select the input...
... 2 PC 8 3 INPUT 9 4 1 2 3 4 5 6 SPLIT SUB INPUT 5 VOLUME MUTING SWAP 6 10 11 12 RETURN 7 HOME MENU 13 ENTER AXD1534 14 15 PLASMA DISPLAY When handling the remote control unit • Do not drop the remote control unit or expose it to moisture. • Do not use this...or in operation or standby mode (page 21). 2 SCREEN SIZE button Press to select the screen size (page 23). 3 PC AUTO SET UP button When using computer signal input, automatically sets the "Position", "Clock" and "Phase" to optimum values (page 30). 4 INPUT 1 to 6 buttons Press to select the input...
Owner's Manual
Page 21
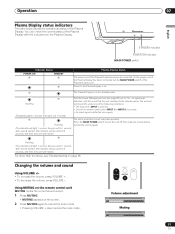
.... The unit will go out for 1 second; Operation 07 Operation Plasma Display status indicators The table below shows the operational status of the Plasma Display has been disconnected. Flashing With the Power Management function (page 29) set to "On", no signal was detected, with the indicators on the screen. 2 Press MUTING again to...
.... The unit will go out for 1 second; Operation 07 Operation Plasma Display status indicators The table below shows the operational status of the Plasma Display has been disconnected. Flashing With the Power Management function (page 29) set to "On", no signal was detected, with the indicators on the screen. 2 Press MUTING again to...
Owner's Manual
Page 22
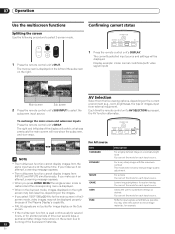
...allow manual image quality adjustment. The right and left and the subscreen on the current environment (e.g., room brightness), the type of the Plasma Display's capability. what was previously the main screen will be displayed properly because of images input from the five viewing options, depending... When in the 2-screen mode, images displayed on the right screen may look less fine, depending on the screen due to customize settings as possible. Allows the user to burning of the display will switch; 07 Operation Use the multiscreen functions Confirming current status Splitting the...
...allow manual image quality adjustment. The right and left and the subscreen on the current environment (e.g., room brightness), the type of the Plasma Display's capability. what was previously the main screen will be displayed properly because of images input from the five viewing options, depending... When in the 2-screen mode, images displayed on the right screen may look less fine, depending on the screen due to customize settings as possible. Allows the user to burning of the display will switch; 07 Operation Use the multiscreen functions Confirming current status Splitting the...
Owner's Manual
Page 23
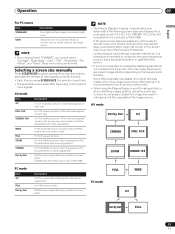
...size is recommended to view full screen motion video. • When using the Plasma Display in a profit-making activity, or when exhibiting images publicly, using the screen size function to customize settings as desired. PC mode FULL WIDE 4:3 Dot by Dot Description For 4:3 "...standard" pictures. For 14:9 letterbox pictures. A thin side mask appears on each side, and you cannot select "Contrast", "Brightness", "Color", "Tint", "Sharpness", "Pro Adjust", and "Reset";...
...size is recommended to view full screen motion video. • When using the Plasma Display in a profit-making activity, or when exhibiting images publicly, using the screen size function to customize settings as desired. PC mode FULL WIDE 4:3 Dot by Dot Description For 4:3 "...standard" pictures. For 14:9 letterbox pictures. A thin side mask appears on each side, and you cannot select "Contrast", "Brightness", "Color", "Tint", "Sharpness", "Pro Adjust", and "Reset";...
Owner's Manual
Page 24
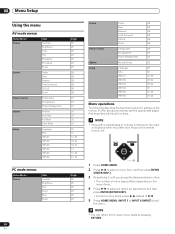
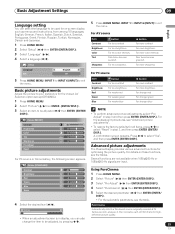
NOTE • Items within parentheses ( ) indicate notations for setting up the menus. RETURN HOME MENU ENTER AXD1509 1 Press HOME MENU. 2 Press / to select a menu item, and then press ENTER (ENTER/DISP.). 3 Repeat step 2 until .... 08 Menu Setup Menu Setup Using the menu AV mode menus Home Menu Picture Sound Power Control Option Setup Item Contrast Brightness Color Tint Sharpness Pro Adjust Reset Treble Bass Balance Front Surround FOCUS Reset Energy Save No Signal off Power Management Position Auto Size 4:3 Mode Drive Mode Language SR+ INPUT1...
NOTE • Items within parentheses ( ) indicate notations for setting up the menus. RETURN HOME MENU ENTER AXD1509 1 Press HOME MENU. 2 Press / to select a menu item, and then press ENTER (ENTER/DISP.). 3 Repeat step 2 until .... 08 Menu Setup Menu Setup Using the menu AV mode menus Home Menu Picture Sound Power Control Option Setup Item Contrast Brightness Color Tint Sharpness Pro Adjust Reset Treble Bass Balance Front Surround FOCUS Reset Energy Save No Signal off Power Management Position Auto Size 4:3 Mode Drive Mode Language SR+ INPUT1...
Owner's Manual
Page 25
...except DYNAMIC). Picture STANDARD Contrast 40 Brightness 0 Advanced picture adjustments The Plasma Display provides various advanced functions for high- definition picture ... confirmation screen appears. Red Green Blue Reset 0 2 Select "Picture" ( / then ENTER (ENTER/DISP.)). 0 3 Select "Pro Adjust" ( / then ENTER (ENTER/DISP.)). 0 4 Select "PureCinema" ( / then ENTER (ENTER/DISP.)). 5 Select the... available when 1080p@50 Hz or 1080p@60 Hz signals are input. Basic Adjustment Settings 09 Basic Adjustment Settings English Language setting You can also change...
...except DYNAMIC). Picture STANDARD Contrast 40 Brightness 0 Advanced picture adjustments The Plasma Display provides various advanced functions for high- definition picture ... confirmation screen appears. Red Green Blue Reset 0 2 Select "Picture" ( / then ENTER (ENTER/DISP.)). 0 3 Select "Pro Adjust" ( / then ENTER (ENTER/DISP.)). 0 4 Select "PureCinema" ( / then ENTER (ENTER/DISP.)). 5 Select the... available when 1080p@50 Hz or 1080p@60 Hz signals are input. Basic Adjustment Settings 09 Basic Adjustment Settings English Language setting You can also change...
Owner's Manual
Page 26
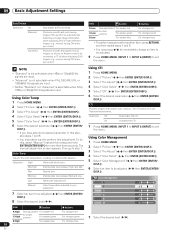
09 Basic Adjustment Settings PureCinema Selections Off Standard Advanced Deactivates the PureCinema. NOTE • "Standard" is not selectable when 480p or 720p@60 Hz signals are input. • "Advanced" is not selectable when PAL, SECAM, 576i, or 1080i@50 Hz signals are input. ...24 frames per second. The manual adjustment screen appears. Using Color Management 1 Press HOME MENU. 2 Select "Picture" ( / then ENTER (ENTER/DISP.)). 3 Select "Pro Adjust" ( / then ENTER (ENTER/DISP.)). 4 Select "Color Detail" ( / then ENTER (ENTER/DISP.)). 5 Select "Color Management" ( / then ENTER (ENTER/...
09 Basic Adjustment Settings PureCinema Selections Off Standard Advanced Deactivates the PureCinema. NOTE • "Standard" is not selectable when 480p or 720p@60 Hz signals are input. • "Advanced" is not selectable when PAL, SECAM, 576i, or 1080i@50 Hz signals are input. ...24 frames per second. The manual adjustment screen appears. Using Color Management 1 Press HOME MENU. 2 Select "Picture" ( / then ENTER (ENTER/DISP.)). 3 Select "Pro Adjust" ( / then ENTER (ENTER/DISP.)). 4 Select "Color Detail" ( / then ENTER (ENTER/DISP.)). 5 Select "Color Management" ( / then ENTER (ENTER/...

Owner's Manual
Page 27
... Deactivates the ACL. Using the Dynamic Range Expander (DRE) functions 1 Press HOME MENU. 2 Select "Picture" ( / then ENTER (ENTER/DISP.)). 3 Select "Pro Adjust" ( / then ENTER (ENTER/DISP.)). 4 Select "DRE" ( / then ENTER (ENTER/DISP.)). 5 Select an item to be adjusted ( / then ENTER (ENTER/ ... ENTER (ENTER/DISP.)). 5 Select an item to be adjusted. 8 Press HOME MENU, INPUT 1 to INPUT 6 (INPUT) to exit the menu. Basic Adjustment Settings 09 Item R Y button Closer to magenta Closer to red button Closer to yellow Closer to green • You can select "DNR" or "MPEG NR". 6...
... Deactivates the ACL. Using the Dynamic Range Expander (DRE) functions 1 Press HOME MENU. 2 Select "Picture" ( / then ENTER (ENTER/DISP.)). 3 Select "Pro Adjust" ( / then ENTER (ENTER/DISP.)). 4 Select "DRE" ( / then ENTER (ENTER/DISP.)). 5 Select an item to be adjusted ( / then ENTER (ENTER/ ... ENTER (ENTER/DISP.)). 5 Select an item to be adjusted. 8 Press HOME MENU, INPUT 1 to INPUT 6 (INPUT) to exit the menu. Basic Adjustment Settings 09 Item R Y button Closer to magenta Closer to red button Closer to yellow Closer to green • You can select "DNR" or "MPEG NR". 6...

Owner's Manual
Page 28
...; is a trademark of SRS Labs, Inc. • WOW technology is incorporated under license from INPUT6. • Signals for setting "3DYC": NTSC signal input and PAL signal input from SRS Labs, Inc. • The effect of this function differs depending on.../ then ENTER (ENTER/DISP.)). 3 Select "Front Surround" ( / ). 4 Select the desired parameter ( / ). Provides deep, rich bass using a new technology. 09 Basic Adjustment Settings I -P Mode" is not settable: 480p, 720p, 576p, 1080p. NOTE Can be adjusted ( / ). 4 Select the desired level ( / ). A confirmation screen appears. Adjust ...
...; is a trademark of SRS Labs, Inc. • WOW technology is incorporated under license from INPUT6. • Signals for setting "3DYC": NTSC signal input and PAL signal input from SRS Labs, Inc. • The effect of this function differs depending on.../ then ENTER (ENTER/DISP.)). 3 Select "Front Surround" ( / ). 4 Select the desired parameter ( / ). Provides deep, rich bass using a new technology. 09 Basic Adjustment Settings I -P Mode" is not settable: 480p, 720p, 576p, 1080p. NOTE Can be adjusted ( / ). 4 Select the desired level ( / ). A confirmation screen appears. Adjust ...

Owner's Manual
Page 29
...detected for 8 minutes. 1 Press HOME MENU. 2 Select "Power Control" ( / then ENTER (ENTER/DISP.). 3 Select "No Signal off The Plasma Display will be automatically placed into the standby mode if no input signal is subsequently detected, the unit automatically turns ON. 5 Press HOME MENU, ... brightness. No Signal off " ( / ). 4 Select "Enable" ( / ). Power Management The Plasma Display will be automatically placed into the standby mode. Basic Adjustment Settings 09 English Power Control Power Control provides convenient functions for 8 minutes. 5 Press HOME MENU, INPUT 1...
...detected for 8 minutes. 1 Press HOME MENU. 2 Select "Power Control" ( / then ENTER (ENTER/DISP.). 3 Select "No Signal off The Plasma Display will be automatically placed into the standby mode if no input signal is subsequently detected, the unit automatically turns ON. 5 Press HOME MENU, ... brightness. No Signal off " ( / ). 4 Select "Enable" ( / ). Power Management The Plasma Display will be automatically placed into the standby mode. Basic Adjustment Settings 09 English Power Control Power Control provides convenient functions for 8 minutes. 5 Press HOME MENU, INPUT 1...
Owner's Manual
Page 30
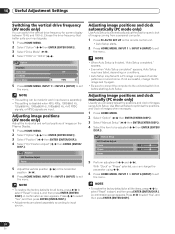
...for all the items, press / to select "Reset" in step 4, and then press ENTER (ENTER/ DISP.). 10 Useful Adjustment Settings Useful Adjustment Settings Switching the vertical drive frequency (AV mode only) You can change the PC image and try again. • Be sure to ... "Auto Setup completed" appears, Auto Setup may have failed, depending on conditions. • Auto Setup may fail with a PC image composed of images on the Plasma Display. 1 Press HOME MENU. 2 Select "Option" ( / then ENTER (ENTER/DISP.)). 3 Select "Position" ( / then ENTER (ENTER/DISP.)). 4 Select "H/V Position Adjust" (...
...for all the items, press / to select "Reset" in step 4, and then press ENTER (ENTER/ DISP.). 10 Useful Adjustment Settings Useful Adjustment Settings Switching the vertical drive frequency (AV mode only) You can change the PC image and try again. • Be sure to ... "Auto Setup completed" appears, Auto Setup may have failed, depending on conditions. • Auto Setup may fail with a PC image composed of images on the Plasma Display. 1 Press HOME MENU. 2 Select "Option" ( / then ENTER (ENTER/DISP.)). 3 Select "Position" ( / then ENTER (ENTER/DISP.)). 4 Select "H/V Position Adjust" (...
Owner's Manual
Page 31
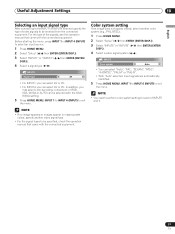
... Press HOME MENU. 2 Select "Setup" ( / then ENTER (ENTER/DISP.)). 3 Select "INPUT1" or "INPUT4" ( / then ENTER (ENTER/ DISP.)). 4 Select a signal type ( / ). Useful Adjustment Settings 10 English Selecting an input signal type After connecting to the INPUT1 or INPUT4 terminal, specify the type of video signals to be selected with... the XGA/ WXGA setting. 5 Press HOME MENU, INPUT 1 to INPUT 6 (INPUT) to exit the menu. For the type of the signals, see the operation ...
... Press HOME MENU. 2 Select "Setup" ( / then ENTER (ENTER/DISP.)). 3 Select "INPUT1" or "INPUT4" ( / then ENTER (ENTER/ DISP.)). 4 Select a signal type ( / ). Useful Adjustment Settings 10 English Selecting an input signal type After connecting to the INPUT1 or INPUT4 terminal, specify the type of video signals to be selected with... the XGA/ WXGA setting. 5 Press HOME MENU, INPUT 1 to INPUT 6 (INPUT) to exit the menu. For the type of the signals, see the operation ...

Owner's Manual
Page 32
...Option Position Auto Size 4:3 Mode . Selecting a screen size for received 4:3 aspect ratio signals (AV mode only) Specify whether the Plasma Display should choose the 4:3 mode or WIDE mode when 4:3 aspect ratio signals are received from a connected HDMI equipment (see page 33...). 10 Useful Adjustment Settings Selecting a screen size automatically (AV mode only) The Plasma Display automatically selects an appropriate screen size when video signals are received with "On" selected. To activate ...
...Option Position Auto Size 4:3 Mode . Selecting a screen size for received 4:3 aspect ratio signals (AV mode only) Specify whether the Plasma Display should choose the 4:3 mode or WIDE mode when 4:3 aspect ratio signals are received from a connected HDMI equipment (see page 33...). 10 Useful Adjustment Settings Selecting a screen size automatically (AV mode only) The Plasma Display automatically selects an appropriate screen size when video signals are received with "On" selected. To activate ...

Owner's Manual
Page 33
... console, and camcorder. Using HDMI Input This Plasma Display is equipped with the connected equipment. To use INPUT5 or INPUT6 to connect a decoder or VCR. • If decoder or VCR images do not come in clearly, you may need to change the input signal type setting using the menu. NOTE • Be... the relevant operation manual (DVD player, personal computer, etc.) carefully before making connections. Input signal correlation table 1920*1080p@24 Hz 1920*1080p@50 Hz 1920*[email protected]/60 Hz 1920*1080i@50 Hz 1920*[email protected]/60 Hz 1280*720p@50 Hz 1280*[email protected]/60 Hz 720*576p...
... console, and camcorder. Using HDMI Input This Plasma Display is equipped with the connected equipment. To use INPUT5 or INPUT6 to connect a decoder or VCR. • If decoder or VCR images do not come in clearly, you may need to change the input signal type setting using the menu. NOTE • Be... the relevant operation manual (DVD player, personal computer, etc.) carefully before making connections. Input signal correlation table 1920*1080p@24 Hz 1920*1080p@50 Hz 1920*[email protected]/60 Hz 1920*1080i@50 Hz 1920*[email protected]/60 Hz 1280*720p@50 Hz 1280*[email protected]/60 Hz 720*576p...

Owner's Manual
Page 34
...Setup" ( / then ENTER (ENTER/DISP.)). 3 Select "INPUT2" or "INPUT3" ( / then ENTER (ENTER/ DISP.)). 4 Select "Video" or "Audio" ( / ). 5 Set the "Video" or "Audio" setting. 6 Press HOME MENU, INPUT 1 to INPUT 6 (INPUT) to exit the menu. Connecting HDMI equipment When using the INPUT2 or INPUT3 HDMI terminal: INPUT2...NOTE • PC signals are out of correspondence. • HDMI input display on the equipment to identify the type of the Plasma Display (blue box) everytime the external devices changing the output format, this might causing the blank screen while detecting the signal ...
...Setup" ( / then ENTER (ENTER/DISP.)). 3 Select "INPUT2" or "INPUT3" ( / then ENTER (ENTER/ DISP.)). 4 Select "Video" or "Audio" ( / ). 5 Set the "Video" or "Audio" setting. 6 Press HOME MENU, INPUT 1 to INPUT 6 (INPUT) to exit the menu. Connecting HDMI equipment When using the INPUT2 or INPUT3 HDMI terminal: INPUT2...NOTE • PC signals are out of correspondence. • HDMI input display on the equipment to identify the type of the Plasma Display (blue box) everytime the external devices changing the output format, this might causing the blank screen while detecting the signal ...
Owner's Manual
Page 35
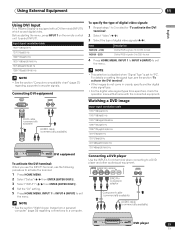
... on the remote control unit to select INPUT1. Using External Equipment 11 English Using DVI Input This Plasma Display is set to "PC". Input signal correlation table 1920*1080i@50 Hz 720*576p@50 Hz 1280*720p@50 Hz 1920*[email protected]/60 Hz 720*[email protected]/60 Hz 1280*[email protected]...@50 Hz 720*576i@50 Hz 720*[email protected]/60 Hz 720*[email protected]/60 Hz Connecting a DVD player Use the INPUT4, 5 or 6 terminal when connecting to 3 rovided for "To activate the DVI terminal". 2 Select "Video" ( / ). 3 Select the type of digital video signals ( / ). Before starting the menu, press INPUT 1 on setting...
... on the remote control unit to select INPUT1. Using External Equipment 11 English Using DVI Input This Plasma Display is set to "PC". Input signal correlation table 1920*1080i@50 Hz 720*576p@50 Hz 1280*720p@50 Hz 1920*[email protected]/60 Hz 720*[email protected]/60 Hz 1280*[email protected]...@50 Hz 720*576i@50 Hz 720*[email protected]/60 Hz 720*[email protected]/60 Hz Connecting a DVD player Use the INPUT4, 5 or 6 terminal when connecting to 3 rovided for "To activate the DVI terminal". 2 Select "Video" ( / ). 3 Select the type of digital video signals ( / ). Before starting the menu, press INPUT 1 on setting...

Owner's Manual
Page 36
... may be actually used. Watching an image from a personal computer Connecting a personal computer Use the INPUT1 or INPUT4 terminals to change the input signal type setting using the INPUT4 terminal: INPUT4 COMPONENT VIDEO / ANAROG RGB Y Pb/Cb Pr/Cr G B R HD VD INPUT4 R L RGB cable (commercially available) Audio cable (commercially available) Game...
... may be actually used. Watching an image from a personal computer Connecting a personal computer Use the INPUT1 or INPUT4 terminals to change the input signal type setting using the INPUT4 terminal: INPUT4 COMPONENT VIDEO / ANAROG RGB Y Pb/Cb Pr/Cr G B R HD VD INPUT4 R L RGB cable (commercially available) Audio cable (commercially available) Game...


