Owner's Manual
Page 5
... this player 8 DVD Video regions 9 MP3 compatibility information 9 2 Connecting Up Easy Setup 10 Home theater video connections 11 Home theater audio connections 12 3 Controls & Displays Display 13 Remote control 14 Front panel 15 4 Getting Started Setting the TV System (except for Taiwanese model 16 Using the Setup Navigator 17 Playing discs 20 Navigating...
... this player 8 DVD Video regions 9 MP3 compatibility information 9 2 Connecting Up Easy Setup 10 Home theater video connections 11 Home theater audio connections 12 3 Controls & Displays Display 13 Remote control 14 Front panel 15 4 Getting Started Setting the TV System (except for Taiwanese model 16 Using the Setup Navigator 17 Playing discs 20 Navigating...

Owner's Manual
Page 7
... inside the compartment. 3 Close the cover. 1 Note Incorrect use different kinds of each other equipment located close to this Pioneer product. When disposing of the remote. 7 En "Dolby" and the double-D symbol are in the box when you notice a fall off in the operating range... Theater Systems, Inc. *3 TruSurround and the ® symbol are no obstacles between the remote and the remote sensor on the unit's remote sensor. • Remote controllers for other . Avoid using the remote control: • Make sure that the plus and minus ends of battery to be used batteries...
... inside the compartment. 3 Close the cover. 1 Note Incorrect use different kinds of each other equipment located close to this Pioneer product. When disposing of the remote. 7 En "Dolby" and the double-D symbol are in the box when you notice a fall off in the operating range... Theater Systems, Inc. *3 TruSurround and the ® symbol are no obstacles between the remote and the remote sensor on the unit's remote sensor. • Remote controllers for other . Avoid using the remote control: • Make sure that the plus and minus ends of battery to be used batteries...
Owner's Manual
Page 10
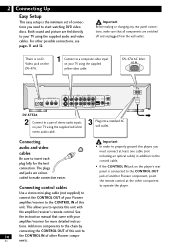
... sound and picture are switched off and unplugged from the wall outlet. DV-47A AC Inlet. Connecting control cables Use a stereo mini-plug cable (not supplied) to connect the CONTROL OUT of your Pioneer amplifier/receiver to the CONTROL IN of another Pioneer component, point the remote control at least one cable (not including an optical cable) in addition...
... sound and picture are switched off and unplugged from the wall outlet. DV-47A AC Inlet. Connecting control cables Use a stereo mini-plug cable (not supplied) to connect the CONTROL OUT of your Pioneer amplifier/receiver to the CONTROL IN of another Pioneer component, point the remote control at least one cable (not including an optical cable) in addition...
Owner's Manual
Page 14
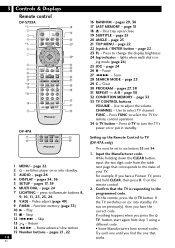
...- page 31 18 0 - Pause 27 1 ¡ - Press FUNC to use buttons 33 and 34. 1. Setting up the Remote Control to TV (DV-47A only) This most be set to select the TV for remote control operation. 34 TV button - For example, If you press the TV button, start again from the table next page...Use to illuminate buttons 8, 9, 10, 11, 23, 25, 26 8 V.ADJ - Press TV to turn the TV's power on the remote control. 2. Input the Manufacturer code. If nothing happens when you have a Pioneer TV, press and hold CLEAR, then press 0, 0 on or put in jog mode (page 24) 25 JOG - press to select...
...- page 31 18 0 - Pause 27 1 ¡ - Press FUNC to use buttons 33 and 34. 1. Setting up the Remote Control to TV (DV-47A only) This most be set to select the TV for remote control operation. 34 TV button - For example, If you press the TV button, start again from the table next page...Use to illuminate buttons 8, 9, 10, 11, 23, 25, 26 8 V.ADJ - Press TV to turn the TV's power on the remote control. 2. Input the Manufacturer code. If nothing happens when you have a Pioneer TV, press and hold CLEAR, then press 0, 0 on or put in jog mode (page 24) 25 JOG - press to select...
Owner's Manual
Page 15
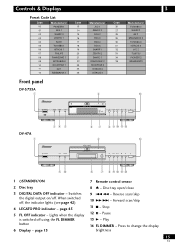
...26 27 28 29 30 31 32 33 34 35 Manufacturer TOSHIBA 2 SHARP 2 GE 2 MAGNAVOX 2 TOSHIBA 3 HITACHI 4 JVC 2 FUJITSU PIONEER 2 GRANDIENTE Front panel DV-S733A 1 2 ~ STANDBY/ON DIGITAL DATA OFF LEGATO PRO FL OFF DV-47A 1 34 5 STANDBY/ON FL OFF FL DIMMER 0 41 ¡¢ 7 8 3 Î 67 8 90 -= 2 ~ Î... OFF indicator - Reverse scan/skip 10 ¡ ¢ - Disc tray open/close 9 4 1 - Forward scan/skip 11 7 - page 13 7 Remote control sensor 8 0 - Play 14 FL DIMMER - Pause 13 3 - Lights when the display is switched off . When switched off, the indicator lights (see page...
...26 27 28 29 30 31 32 33 34 35 Manufacturer TOSHIBA 2 SHARP 2 GE 2 MAGNAVOX 2 TOSHIBA 3 HITACHI 4 JVC 2 FUJITSU PIONEER 2 GRANDIENTE Front panel DV-S733A 1 2 ~ STANDBY/ON DIGITAL DATA OFF LEGATO PRO FL OFF DV-47A 1 34 5 STANDBY/ON FL OFF FL DIMMER 0 41 ¡¢ 7 8 3 Î 67 8 90 -= 2 ~ Î... OFF indicator - Reverse scan/skip 10 ¡ ¢ - Disc tray open/close 9 4 1 - Forward scan/skip 11 7 - page 13 7 Remote control sensor 8 0 - Play 14 FL DIMMER - Pause 13 3 - Lights when the display is switched off . When switched off, the indicator lights (see page...

Owner's Manual
Page 17
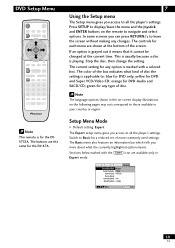
cursor up /down ENTER - Audio1 A2 Video1 V2 Language General Setup Navigator Setup Navigator Start Auto Start Off Setup using these controls: Joystick up /down - The buttons are shown at the bottom of the following OSDs using the Setup Navigator Move ENTER Select SETUP...; If a disc that's already loaded starts to play, press 7 to switch on -screen display (OSD) appears: DVD PLAYER Î Note This remote is for the DV-47A. Getting Started SET UP ENTER STOP 7 4 Using the Setup Navigator Before playing any discs, we strongly recommend using the Setup Navigator Move ENTER Select...
cursor up /down ENTER - Audio1 A2 Video1 V2 Language General Setup Navigator Setup Navigator Start Auto Start Off Setup using these controls: Joystick up /down - The buttons are shown at the bottom of the following OSDs using the Setup Navigator Move ENTER Select SETUP...; If a disc that's already loaded starts to play, press 7 to switch on -screen display (OSD) appears: DVD PLAYER Î Note This remote is for the DV-47A. Getting Started SET UP ENTER STOP 7 4 Using the Setup Navigator Before playing any discs, we strongly recommend using the Setup Navigator Move ENTER Select...
Owner's Manual
Page 20
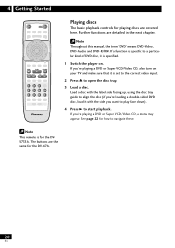
...DVD or Super VCD/Video CD, also turn on your TV and make sure that it is specified. 1 Switch the player on. Note This remote is set to the correct video input. 2 Press 0 to navigate these. The buttons are the same for playing discs are detailed in the next...4 Getting Started OPEN / CLOSE STOP 7 PLAY 3 PAUSE 8 PREVIOUS NEXT 4¢ REV FWD 1¡ 1 2 3 4 5 6 +10 7890 DVD PLAYER Î Playing discs The basic playback controls for the DV-47A. 20 En If a function is specific to a particular kind of DVD disc, it is for how to open the disc tray. 3 Load a disc.
...DVD or Super VCD/Video CD, also turn on your TV and make sure that it is specified. 1 Switch the player on. Note This remote is set to the correct video input. 2 Press 0 to navigate these. The buttons are the same for playing discs are detailed in the next...4 Getting Started OPEN / CLOSE STOP 7 PLAY 3 PAUSE 8 PREVIOUS NEXT 4¢ REV FWD 1¡ 1 2 3 4 5 6 +10 7890 DVD PLAYER Î Playing discs The basic playback controls for the DV-47A. 20 En If a function is specific to a particular kind of DVD disc, it is for how to open the disc tray. 3 Load a disc.
Owner's Manual
Page 39
The controls for each menu are shown at the current time. If an option is grayed out it means...screen. Stop the disc, then change the setting. Note The language options shown in the on-screen display illustrations on the remote to navigate and select options. Expert Setup Navigator Basic Parental Lock - green for any option is marked with the Expert mode.... the menu and the Joystick and ENTER buttons on the following pages may not correspond to Basic for the DV-47A. 7 Using the Setup menu The Setup menu gives you access to : blue for the DVS733A. This is usually because a disc...
The controls for each menu are shown at the current time. If an option is grayed out it means...screen. Stop the disc, then change the setting. Note The language options shown in the on-screen display illustrations on the remote to navigate and select options. Expert Setup Navigator Basic Parental Lock - green for any option is marked with the Expert mode.... the menu and the Joystick and ENTER buttons on the following pages may not correspond to Basic for the DV-47A. 7 Using the Setup menu The Setup menu gives you access to : blue for the DVS733A. This is usually because a disc...

Owner's Manual
Page 63
... is not a malfunction. If your amplifier-check the amp's instruction manual. 63 En set to work. • The CONTROL IN jack on the rear panel is not a malfunction. The remote control doesn't seem to Down Sample On. Put in the screen becoming black for your TV is connected using progressive-scan.... In this player. • The remote control is too far from the rear, center and subwoofer speakers, set Audio Out to 5.1 Channel (page 43). • The player is set to 5....
... is not a malfunction. If your amplifier-check the amp's instruction manual. 63 En set to work. • The CONTROL IN jack on the rear panel is not a malfunction. The remote control doesn't seem to Down Sample On. Put in the screen becoming black for your TV is connected using progressive-scan.... In this player. • The remote control is too far from the rear, center and subwoofer speakers, set Audio Out to 5.1 Channel (page 43). • The player is set to 5....
Owner's Manual
Page 69
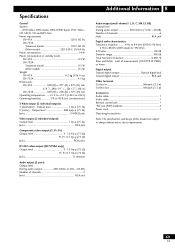
... Hz Power consumption 14 W Power consumption in standby mode DV-47A 0.3 W DV-733A Taiwanese model 0.3 W Other models 0.5 W Weight DV-47A 4.2 kg (9 lb 4 oz) DV-733A 4.5 kg Dimensions DV-47A 420 (W) x 277 (D) x 97.5 (H) mm (16 9/16 (W) x 10 15/16 (D) x 3 7/8 (H) in Minijack (3.5 ø) Control out Minijack (3.5 ø) Accessories Audio cable 1 Video cable 1 Remote control unit 1 "AA" size (R6P) batteries 2 Power cord 1 Operating Instructions...
... Hz Power consumption 14 W Power consumption in standby mode DV-47A 0.3 W DV-733A Taiwanese model 0.3 W Other models 0.5 W Weight DV-47A 4.2 kg (9 lb 4 oz) DV-733A 4.5 kg Dimensions DV-47A 420 (W) x 277 (D) x 97.5 (H) mm (16 9/16 (W) x 10 15/16 (D) x 3 7/8 (H) in Minijack (3.5 ø) Control out Minijack (3.5 ø) Accessories Audio cable 1 Video cable 1 Remote control unit 1 "AA" size (R6P) batteries 2 Power cord 1 Operating Instructions...


