Owner's Manual
Page 2
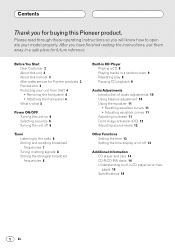
... the radio 6 Storing and recalling broadcast frequencies 7 Tuning in strong signals 8 Storing the strongest broadcast frequencies 8 Built-in CD Player Playing a CD 8 Playing tracks in a random order 9 Repeating play 9 Pausing CD playback 9 Audio Adjustments Introduction of audio adjustments 10 Using balance adjustment 10 Using the equalizer 11 • Recalling equalizer curves 11 • Adjusting equalizer curves 11 Adjusting loudness 11 Front image enhancer (FIE) 12 Adjusting source levels 12 Other Functions Setting the time 13 Setting the time display on...
... the radio 6 Storing and recalling broadcast frequencies 7 Tuning in strong signals 8 Storing the strongest broadcast frequencies 8 Built-in CD Player Playing a CD 8 Playing tracks in a random order 9 Repeating play 9 Pausing CD playback 9 Audio Adjustments Introduction of audio adjustments 10 Using balance adjustment 10 Using the equalizer 11 • Recalling equalizer curves 11 • Adjusting equalizer curves 11 Adjusting loudness 11 Front image enhancer (FIE) 12 Adjusting source levels 12 Other Functions Setting the time 13 Setting the time display on...
Owner's Manual
Page 3
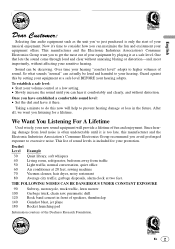
...city traffic, garbage disposals, alarm clock at a safe level. Now it there. To establish a safe level: • Start your volume control at a safe level BEFORE your hearing "comfort level" adapts to get the most importantly, without distortion. Over time your hearing adapts. Decibel Level Example 30 Quiet library, soft whispers... or loss in front of speakers, thunderclap 140 Gunshot blast, jet plane 180 Rocket launching pad Information courtesy of sound. English Español Deutsch Français Selecting fine audio equipment such as the unit you've just purchased is ...
...city traffic, garbage disposals, alarm clock at a safe level. Now it there. To establish a safe level: • Start your volume control at a safe level BEFORE your hearing "comfort level" adapts to get the most importantly, without distortion. Over time your hearing adapts. Decibel Level Example 30 Quiet library, soft whispers... or loss in front of speakers, thunderclap 140 Gunshot blast, jet plane 180 Rocket launching pad Information courtesy of sound. English Español Deutsch Français Selecting fine audio equipment such as the unit you've just purchased is ...
Owner's Manual
Page 4
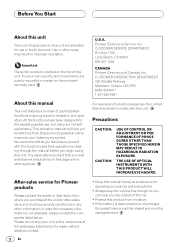
...-sales service (including warranty conditions) or any other information. Important The serial number is especially important that you purchased this unit for operating procedures and precautions. • Always keep the volume low enough so you can hear sounds outside of the car. • Protect this product from moisture. • If the battery is disconnected or discharged, the preset memory will help you...
...-sales service (including warranty conditions) or any other information. Important The serial number is especially important that you purchased this unit for operating procedures and precautions. • Always keep the volume low enough so you can hear sounds outside of the car. • Protect this product from moisture. • If the battery is disconnected or discharged, the preset memory will help you...

Owner's Manual
Page 5
... front panel 1 Place the front panel flat against the head unit. 2 Press the front panel into the face of the panel is firmly seated. Removing the front panel 1 Press DETACH to excessive shocks. • Keep the front panel out of the front panel and pull away to discourage theft. Important • Never use force or grip the display and the buttons tightly when removing or...
... front panel 1 Place the front panel flat against the head unit. 2 Press the front panel into the face of the panel is firmly seated. Removing the front panel 1 Press DETACH to excessive shocks. • Keep the front panel out of the front panel and pull away to discourage theft. Important • Never use force or grip the display and the buttons tightly when removing or...
Owner's Manual
Page 6
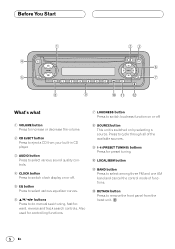
... CD player. 3 AUDIO button Press to select various sound quality controls. 4 CLOCK button Press to switch clock display on or off . 8 SOURCE button This unit is switched on or off . 5 EQ button Press to select various equalizer curves. 6 5/∞/2/3 buttons Press to do manual seek tuning, fast forward, reverse and track search controls. BAND button Press to select among three FM and one AM band and cancel the control mode of the available sources. 9 1-6 (PRESET TUNING) buttons Press for controlling functions. 7 LOUDNESS button...
... CD player. 3 AUDIO button Press to select various sound quality controls. 4 CLOCK button Press to switch clock display on or off . 8 SOURCE button This unit is switched on or off . 5 EQ button Press to select various equalizer curves. 6 5/∞/2/3 buttons Press to do manual seek tuning, fast forward, reverse and track search controls. BAND button Press to select among three FM and one AM band and cancel the control mode of the available sources. 9 1-6 (PRESET TUNING) buttons Press for controlling functions. 7 LOUDNESS button...
Owner's Manual
Page 7
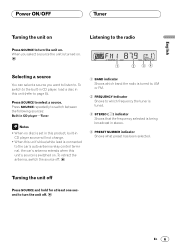
... which frequency the tuner is tuned. 3 STEREO () indicator Shows that the frequency selected is being broadcast in stereo. 4 PRESET NUMBER indicator Shows what preset has been selected. When you select a source the unit is switched on . 1 2 34 Selecting a source You can select a source you want to listen to the built-in CD player, load a disc in CD player source will not change. • When this unit's blue/white lead is connected to the car's auto-antenna relay control terminal, the car's antenna...
... which frequency the tuner is tuned. 3 STEREO () indicator Shows that the frequency selected is being broadcast in stereo. 4 PRESET NUMBER indicator Shows what preset has been selected. When you select a source the unit is switched on . 1 2 34 Selecting a source You can select a source you want to listen to the built-in CD player, load a disc in CD player source will not change. • When this unit's blue/white lead is connected to the car's auto-antenna relay control terminal, the car's antenna...

Owner's Manual
Page 8
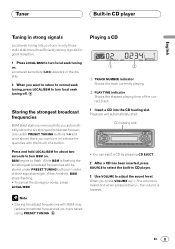
... down /-, the volume is being broadcast in stereo the STEREO () indicator will flash in the PRESET NUMBER indicator and then remain lit. Storing and recalling broadcast frequencies If you have pressed will light. Seek tuning starts as soon as you can also use 5 and ∞ to recall radio station frequencies assigned to PRESET TUNING buttons. 7 En The selected radio station frequency has been stored in memory. The number you press any...
... down /-, the volume is being broadcast in stereo the STEREO () indicator will flash in the PRESET NUMBER indicator and then remain lit. Storing and recalling broadcast frequencies If you have pressed will light. Seek tuning starts as soon as you can also use 5 and ∞ to recall radio station frequencies assigned to PRESET TUNING buttons. 7 En The selected radio station frequency has been stored in memory. The number you press any...
Owner's Manual
Page 9
... PRESET TUNING buttons 1-6 and once stored there you can eject a CD by pressing CD EJECT. 2 After a CD has been inserted, press SOURCE to select the built-in CD player. 3 Use VOLUME to adjust the sound level. BSM begins to turn local seek tuning on . While BSM is lowered. Français Italiano Nederlands En 8 Playing a CD 1 2 1 TRACK NUMBER indicator Shows the track currently playing. 2 PLAY TIME indicator Shows the elapsed playing time...
... PRESET TUNING buttons 1-6 and once stored there you can eject a CD by pressing CD EJECT. 2 After a CD has been inserted, press SOURCE to select the built-in CD player. 3 Use VOLUME to adjust the sound level. BSM begins to turn local seek tuning on . While BSM is lowered. Français Italiano Nederlands En 8 Playing a CD 1 2 1 TRACK NUMBER indicator Shows the track currently playing. 2 PLAY TIME indicator Shows the elapsed playing time...

Owner's Manual
Page 10
The track presently playing will resume at a time. Pressing 3 skips to play , check that you insert a disc the disc does not play in the display. Do not use an adapter when playing 8-cm CDs. • Do not insert anything other than a CD into the CD loading slot. • If you cannot insert a disc completely or if after you turned pause on . Tracks will...
The track presently playing will resume at a time. Pressing 3 skips to play , check that you insert a disc the disc does not play in the display. Do not use an adapter when playing 8-cm CDs. • Do not insert anything other than a CD into the CD loading slot. • If you cannot insert a disc completely or if after you turned pause on . Tracks will...
Owner's Manual
Page 11
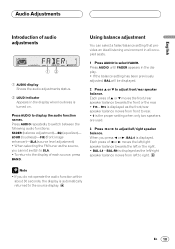
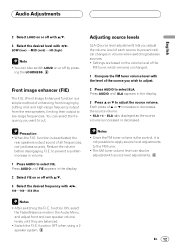
.../rear speaker balance towards the left or the right. • BAL:L9 - Press AUDIO to switch between the following audio functions: FADER (balance adjustment)-EQ (equalizer)- Press AUDIO repeatedly to display the audio function names. Each press of audio adjustments 12 1 AUDIO display Shows the audio adjustments status. 2 LOUD indicator Appears in the display when loudness is turned on. LOUD (loudness)-FIE (front image enhancer)-SLA (source level adjustment) • When selecting the FM tuner as the source...
.../rear speaker balance towards the left or the right. • BAL:L9 - Press AUDIO to switch between the following audio functions: FADER (balance adjustment)-EQ (equalizer)- Press AUDIO repeatedly to display the audio function names. Each press of audio adjustments 12 1 AUDIO display Shows the audio adjustments status. 2 LOUD indicator Appears in the display when loudness is turned on. LOUD (loudness)-FIE (front image enhancer)-SLA (source level adjustment) • When selecting the FM tuner as the source...

Owner's Manual
Page 12
... select the equalizer mode. Adjusting equalizer curves You can easily recall at low volume. 1 Press AUDIO to select LOUD. Each press of the adjustments are six stored equalizer curves which equalizer curve is selected. Adjusting loudness Loudness compensates for deficiencies in the display. 11 En and high-sound ranges at any time. This is useful to check the effect of the equalizer curves by switching alternatively between FLAT and a set...
... select the equalizer mode. Adjusting equalizer curves You can easily recall at low volume. 1 Press AUDIO to select LOUD. Each press of the adjustments are six stored equalizer curves which equalizer curve is selected. Adjusting loudness Loudness compensates for deficiencies in the display. 11 En and high-sound ranges at any time. This is useful to check the effect of the equalizer curves by switching alternatively between FLAT and a set...
Owner's Manual
Page 13
... the display. 2 Select FIE on or off with 5/∞. 3 Select the desired level with 2/3. Each press of all frequencies, not just bass sounds. function is increased or decreased. Notes • After switching the F.I .E. En 12 Italiano Nederlands ing the LOUDNESS. Adjusting source levels SLA (Source level adjustment) lets you want to cut. function ON, select the Fader/Balance mode in the Audio Menu, and adjust front and rear speaker volume levels until SLA appears in volume. 1 Press AUDIO...
... the display. 2 Select FIE on or off with 5/∞. 3 Select the desired level with 2/3. Each press of all frequencies, not just bass sounds. function is increased or decreased. Notes • After switching the F.I .E. En 12 Italiano Nederlands ing the LOUDNESS. Adjusting source levels SLA (Source level adjustment) lets you want to cut. function ON, select the Fader/Balance mode in the Audio Menu, and adjust front and rear speaker volume levels until SLA appears in volume. 1 Press AUDIO...
Owner's Manual
Page 14
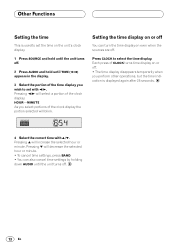
... the sources are off . 13 En Setting the time display on or off You can also cancel time settings by holding down AUDIO until the unit turns off . Pressing 5 will blink. Other Functions Setting the time This is displayed again after 25 seconds. 4 Select the correct time with 2/3. Pressing 2/3 will select a portion of the clock display the portion selected will increase the selected hour or minute. Each press of CLOCK turns time display on...
... the sources are off . 13 En Setting the time display on or off You can also cancel time settings by holding down AUDIO until the unit turns off . Pressing 5 will blink. Other Functions Setting the time This is displayed again after 25 seconds. 4 Select the correct time with 2/3. Pressing 2/3 will select a portion of the clock display the portion selected will increase the selected hour or minute. Each press of CLOCK turns time display on...

Owner's Manual
Page 15
... a problem turn off the CD player for cracks, scratches or warped discs before using them. Dirt or condensation on components inside this unit may interrupt CD playback. CD-R/CD-RW discs • CD-R (CD-Recordable)/CD-RW (CDRewritable) discs recorded on CD-R/CD-RW units other than a music CD recorder may not play properly on this CD player due to not operate properly...
... a problem turn off the CD player for cracks, scratches or warped discs before using them. Dirt or condensation on components inside this unit may interrupt CD playback. CD-R/CD-RW discs • CD-R (CD-Recordable)/CD-RW (CDRewritable) discs recorded on CD-R/CD-RW units other than a music CD recorder may not play properly on this CD player due to not operate properly...
Owner's Manual
Page 16
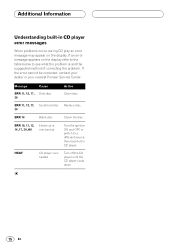
... the CD player cools down. 15 En If the error cannot be corrected, contact your dealer or your nearest Pioneer Service Center. ERR 11, 12, 17, Scratched disc Replace disc. 30 ERR 14 Blank disc Check the disc. ERR 10, 11, 12, Electrical or 14, 17, 30, A0 mechanical Turn the ignition ON and OFF, or switch to a different source, then back...
... the CD player cools down. 15 En If the error cannot be corrected, contact your dealer or your nearest Pioneer Service Center. ERR 11, 12, 17, Scratched disc Replace disc. 30 ERR 14 Blank disc Check the disc. ERR 10, 11, 12, Electrical or 14, 17, 30, A0 mechanical Turn the ignition ON and OFF, or switch to a different source, then back...
Owner's Manual
Page 17
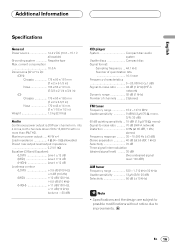
... Level: ±12 dB (MID Level: ±12 dB (HIGH Level: ±12 dB Loudness contour (LOW 3.5 dB (100 Hz), +3 dB (10 kHz) (MID 10 dB (100 Hz), +6.5 dB (10 kHz) (HIGH 11 dB (100 Hz), +11 dB (10 kHz) (volume : -30 dB) CD player System Compact disc audio system Usable discs Compact disc Signal format: Sampling frequency ... 44.1 kHz Number of channels .......... 2 (stereo) FM tuner Frequency...
... Level: ±12 dB (MID Level: ±12 dB (HIGH Level: ±12 dB Loudness contour (LOW 3.5 dB (100 Hz), +3 dB (10 kHz) (MID 10 dB (100 Hz), +6.5 dB (10 kHz) (HIGH 11 dB (100 Hz), +11 dB (10 kHz) (volume : -30 dB) CD player System Compact disc audio system Usable discs Compact disc Signal format: Sampling frequency ... 44.1 kHz Number of channels .......... 2 (stereo) FM tuner Frequency...
Owner's Manual
Page 52
Box 1760, Long Beach, California 90801, U.S.A. Del Valle Mexico, D.F. Copyright © 2001 by Pioneer Corporation. All rights reserved. Tous droits de reproduction et de traduction réservés. LTD. 178-184 Boundary Road, Braeside, Victoria 3195, Australia TEL: (03) 9586-6300 PIONEER ELECTRONICS OF CANADA, INC. 300 Allstate Parkway, Markham, Ontario L3R OP2, Canada...
Box 1760, Long Beach, California 90801, U.S.A. Del Valle Mexico, D.F. Copyright © 2001 by Pioneer Corporation. All rights reserved. Tous droits de reproduction et de traduction réservés. LTD. 178-184 Boundary Road, Braeside, Victoria 3195, Australia TEL: (03) 9586-6300 PIONEER ELECTRONICS OF CANADA, INC. 300 Allstate Parkway, Markham, Ontario L3R OP2, Canada...

Other Manual
Page 1
... any leads. Rear output This Product Fuse Antenna jack Blue/white To system control terminal of the unit and tapping into the engine compartment to connect to a terminal coupled with output and/or impedance values other equipment by ignition switch (12 V DC) ON/OFF. INSTALLATION MANUAL OF OF DEH-1400 DEH-14 This product conforms to an external power amp's system remote control or the car's Auto-antenna relay control terminal (max...
... any leads. Rear output This Product Fuse Antenna jack Blue/white To system control terminal of the unit and tapping into the engine compartment to connect to a terminal coupled with output and/or impedance values other equipment by ignition switch (12 V DC) ON/OFF. INSTALLATION MANUAL OF OF DEH-1400 DEH-14 This product conforms to an external power amp's system remote control or the car's Auto-antenna relay control terminal (max...
Other Manual
Page 4
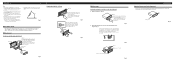
... installing the unit, connect the wiring temporarily, making sure it .) Insert the supplied extraction keys into the unit, as possible using the screw holes on the side of the unit 1. The use the supplied fixing screws and fix the front panel to the factory radio mounting bracket. (Fig. 8) (Fig. 9) Select a position where the screw holes of the bracket and the screw holes of the head unit...
... installing the unit, connect the wiring temporarily, making sure it .) Insert the supplied extraction keys into the unit, as possible using the screw holes on the side of the unit 1. The use the supplied fixing screws and fix the front panel to the factory radio mounting bracket. (Fig. 8) (Fig. 9) Select a position where the screw holes of the bracket and the screw holes of the head unit...


