Owner's Manual
Page 2
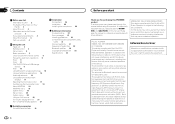
... displays 17 Selecting the illumination color 17 Customizing the illumination color 18 About MIXTRAX 18 MIXTRAX menu 18 System menu 19 Set up menu 20 System menu 20 Using an AUX source 20 Turning the display off or on 21 If an unwanted display appears 21 Available accessories SiriusXM Satellite Radio 21 Installation Connections 24 Installation 25 Installing the microphone 26 Additional information Troubleshooting 27 Error messages 27 Handling guidelines 30 Compressed audio compatibility (disc, USB) 31 iPod compatibility...
... displays 17 Selecting the illumination color 17 Customizing the illumination color 18 About MIXTRAX 18 MIXTRAX menu 18 System menu 19 Set up menu 20 System menu 20 Using an AUX source 20 Turning the display off or on 21 If an unwanted display appears 21 Available accessories SiriusXM Satellite Radio 21 Installation Connections 24 Installation 25 Installing the microphone 26 Additional information Troubleshooting 27 Error messages 27 Handling guidelines 30 Compressed audio compatibility (disc, USB) 31 iPod compatibility...
Owner's Manual
Page 3
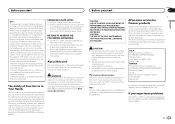
... volume so high that interference will be deceiving. Do not use of your equipment by setting your equipment at a safe level BEFORE your unit to the companies at the addresses listed below for help. Wash hands after -sales service (including warranty conditions) or any preset memory will not occur in a particular installation. Do not allow this by playing it at a low setting...
... volume so high that interference will be deceiving. Do not use of your equipment by setting your equipment at a safe level BEFORE your unit to the companies at the addresses listed below for help. Wash hands after -sales service (including warranty conditions) or any preset memory will not occur in a particular installation. Do not allow this by playing it at a low setting...
Owner's Manual
Page 4
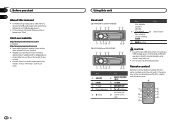
... 4 Disc loading slot b / (up/down) 5 h (eject) AUX input jack c (3.5 mm stereo jack) Remote control Remote controller buttons marked with the same numbers as on the unit work in Canada http://www.pioneerelectronics.ca ! e 7 f l g k h 1 i j Visit our website http://www.pioneerelectronics.com in the same way as firm- In the following instructions, USB memory sticks and USB audio players are collectively referred to as "USB storage device". ! X8500BS 6 (phone) d Detach button DEH-X7500HD and DEH-X7500S CLOCK 7 BAND/ (iPod) DEH-X7500HD...
... 4 Disc loading slot b / (up/down) 5 h (eject) AUX input jack c (3.5 mm stereo jack) Remote control Remote controller buttons marked with the same numbers as on the unit work in Canada http://www.pioneerelectronics.ca ! e 7 f l g k h 1 i j Visit our website http://www.pioneerelectronics.com in the same way as firm- In the following instructions, USB memory sticks and USB audio players are collectively referred to as "USB storage device". ! X8500BS 6 (phone) d Detach button DEH-X7500HD and DEH-X7500S CLOCK 7 BAND/ (iPod) DEH-X7500HD...
Owner's Manual
Page 5
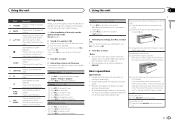
... installation, set up menu appears on the front panel. to adjust hour. 2 Press M.C. to protect your unit from the system menu. Clock (setting the clock) 1 Turn M.C. to confirm the selection. Removing the front panel to change your setting again, turn M.C. to switch to excessive shock. ! Make sure to end a call, reject an incoming call, or reject a call waiting while on the source. Avoid subjecting the front panel to NO. 6 Press M.C. En 5 Using this unit Using...
... installation, set up menu appears on the front panel. to adjust hour. 2 Press M.C. to protect your unit from the system menu. Clock (setting the clock) 1 Turn M.C. to confirm the selection. Removing the front panel to change your setting again, turn M.C. to switch to excessive shock. ! Make sure to end a call, reject an incoming call, or reject a call waiting while on the source. Avoid subjecting the front panel to NO. 6 Press M.C. En 5 Using this unit Using...
Owner's Manual
Page 6
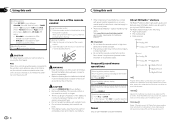
... Satellite Radio)-TUNER (tuner)-CD (CD player)-USB (USB)/iPod (iPod)-Pandora (Pandora)-Apps (Smartphone App)-AUX (AUX)-BT Audio (BT audio) ! AM sounds like today's FM and FM sounds like . SiriusXM is turned on the back of the front panel to the vehicle's auto-antenna relay control terminal, the vehicle's antenna extends when this unit's source is not available for DEH- Note When this unit's blue/white lead is connected to operate. Do not handle the battery with...
... Satellite Radio)-TUNER (tuner)-CD (CD player)-USB (USB)/iPod (iPod)-Pandora (Pandora)-Apps (Smartphone App)-AUX (AUX)-BT Audio (BT audio) ! AM sounds like today's FM and FM sounds like . SiriusXM is turned on the back of the front panel to the vehicle's auto-antenna relay control terminal, the vehicle's antenna extends when this unit's source is not available for DEH- Note When this unit's blue/white lead is connected to operate. Do not handle the battery with...
Owner's Manual
Page 7
..., the channel and program service name will show up operation tunes in this unit even while other iPod models are used. Manual tuning (step by pressing or . The preset screen is displayed. Turn to change the menu option and press to select FUNCTION. 3 Turn M.C. Using iTunes tagging This function can directly buy from the iTunes Store may be performed with the following functions can buy the songs you want from the broadcasting station to turn BSM...
..., the channel and program service name will show up operation tunes in this unit even while other iPod models are used. Manual tuning (step by pressing or . The preset screen is displayed. Turn to change the menu option and press to select FUNCTION. 3 Turn M.C. Using iTunes tagging This function can directly buy from the iTunes Store may be performed with the following functions can buy the songs you want from the broadcasting station to turn BSM...
Owner's Manual
Page 8
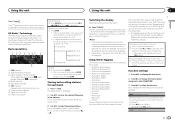
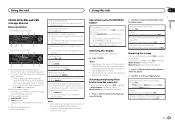
... assign a function to select Manual or Preset. to the LEVER on . 4 Preset number indicator 5 Signal level indicator 6 Program service name 7 Frequency indicator Selecting a band 1 Press BAND/ until the desired band (FM-1, FM-2,FM-3 for good reception. 1 Press M.C. to only those radio stations with sufficiently strong signals for good reception. 1 Press M.C. Seek mode (seek mode) Seek tuning setting can be changed . 3 Turn M.C. to use this function. Tuner Only for DEH-X8500BS and DEH-X7500S Basic operations 1 2 34...
... assign a function to select Manual or Preset. to the LEVER on . 4 Preset number indicator 5 Signal level indicator 6 Program service name 7 Frequency indicator Selecting a band 1 Press BAND/ until the desired band (FM-1, FM-2,FM-3 for good reception. 1 Press M.C. to only those radio stations with sufficiently strong signals for good reception. 1 Press M.C. Seek mode (seek mode) Seek tuning setting can be changed . 3 Turn M.C. to use this function. Tuner Only for DEH-X8500BS and DEH-X7500S Basic operations 1 2 34...
Owner's Manual
Page 9
... USB is selected as the source. 1 Press MIX/DISP OFF to 32 different memory devices. Notes ! Operations using the USB cable. ! For details, refer to Music browse (music browse) on the media. Changing the file or folder name 1 Turn M.C. Playing 1 When a file or track is selected in the selected folder 1 When a folder is playing. ! This function is available when ON is selected, press M.C. to the file/track name list mode. 2 Use...
... USB is selected as the source. 1 Press MIX/DISP OFF to 32 different memory devices. Notes ! Operations using the USB cable. ! For details, refer to Music browse (music browse) on the media. Changing the file or folder name 1 Turn M.C. Playing 1 When a file or track is selected in the selected folder 1 When a folder is playing. ! This function is available when ON is selected, press M.C. to the file/track name list mode. 2 Use...
Owner's Manual
Page 12
... /DISP while talking on the phone. ! to switch to select the desired setting. ! a phone and a separate audio player are connected simultaneously). 2 Turn M.C. When no device is selected in the device list, this function is received, press . to connect/disconnect the selected device. to display the setting mode. 2 Turn M.C. Slower - Refer to display the connection menu. # You cannot perform this page. 2 Function settings Use the Bluetooth telephone function menu. Answering a call waiting 1 When a call time). Connection menu operation Important ! to select the name of cellular...
... /DISP while talking on the phone. ! to switch to select the desired setting. ! a phone and a separate audio player are connected simultaneously). 2 Turn M.C. When no device is selected in the device list, this function is received, press . to connect/disconnect the selected device. to display the setting mode. 2 Turn M.C. Slower - Refer to display the connection menu. # You cannot perform this page. 2 Function settings Use the Bluetooth telephone function menu. Answering a call waiting 1 When a call time). Connection menu operation Important ! to select the name of cellular...
Owner's Manual
Page 13
... be turned on the Bluetooth audio player connected to the PIN code input display, and you can change the PIN code. Pin code input (PIN code input) You must enter a PIN code on this case, delete a paired device first. returns you to this unit. Once selected, the following functions can set to Visibility (setting the visibility of this menu. to confirm the Bluetooth connection. Refer to 0000 as a source. - to select a name or phone number. 3 Press M.C. to complete the connection using . Phone Function (phone function) You can be adjusted. Name view from...
... be turned on the Bluetooth audio player connected to the PIN code input display, and you can change the PIN code. Pin code input (PIN code input) You must enter a PIN code on this case, delete a paired device first. returns you to this unit. Once selected, the following functions can set to Visibility (setting the visibility of this menu. to confirm the Bluetooth connection. Refer to 0000 as a source. - to select a name or phone number. 3 Press M.C. to complete the connection using . Phone Function (phone function) You can be adjusted. Name view from...
Owner's Manual
Page 14
... playback. Refer to select the function. to Connection menu operation on the Bluetooth audio player in use . Stop (stop the playback. to display the main menu. 2 Turn M.C. BY ACCESSING THIRD PARTY APPS, YOU AGREE TO REVIEW THE TERMS OF SERVICE AND PRIVACY POLICIES OF THE PROVIDERS. The device is connected to this chapter, iPod and iPhone will need to pair this unit ! Pause (pause) 1 Press M.C. The repeat play range varies depending on...
... playback. Refer to select the function. to Connection menu operation on the Bluetooth audio player in use . Stop (stop the playback. to display the main menu. 2 Turn M.C. BY ACCESSING THIRD PARTY APPS, YOU AGREE TO REVIEW THE TERMS OF SERVICE AND PRIVACY POLICIES OF THE PROVIDERS. The device is connected to this chapter, iPod and iPhone will need to pair this unit ! Pause (pause) 1 Press M.C. The repeat play range varies depending on...
Owner's Manual
Page 15
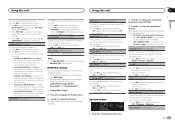
... connecting your device to connect to the Internet. ! If using the Pioneer car audio/video products: ! For details, refer to Connection menu operation on the station, text information can play Pandora by any issues that is a music service not affiliated with the Pandora application installed. Limitations: ! Pandora internet radio is compatible with the Pandora application. Skipping tracks 1 Turn LEVER to the right. More information is on. 5 Song time (progress bar) 6 Play time...
... connecting your device to connect to the Internet. ! If using the Pioneer car audio/video products: ! For details, refer to Connection menu operation on the station, text information can play Pandora by any issues that is a music service not affiliated with the Pandora application installed. Limitations: ! Pandora internet radio is compatible with the Pandora application. Skipping tracks 1 Turn LEVER to the right. More information is on. 5 Song time (progress bar) 6 Play time...
Owner's Manual
Page 16
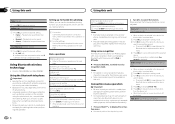
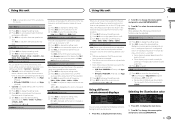
... for Android device users Only for iPhone users 1 Connect an iPhone to the USB cable using Bluetooth wireless technology. Basic operations DEH-X8500BH and DEH-X8500BS 1 23 4 5 DEH-X7500HD and DEH-X7500S 1 2 4 53 1 Application name 2 PLAY/PAUSE indicator 3 S.Rtrv indicator Appears when Sound Retriever function is on page 20. Function settings 1 Press M.C. to pause or resume. to change the menu option and press to this unit using an iPhone Dock Connector. 2 Select Wired in APP CONNECT MODE. to display the main menu. 2 Turn M.C. to...
... for Android device users Only for iPhone users 1 Connect an iPhone to the USB cable using Bluetooth wireless technology. Basic operations DEH-X8500BH and DEH-X8500BS 1 23 4 5 DEH-X7500HD and DEH-X7500S 1 2 4 53 1 Application name 2 PLAY/PAUSE indicator 3 S.Rtrv indicator Appears when Sound Retriever function is on page 20. Function settings 1 Press M.C. to pause or resume. to change the menu option and press to this unit using an iPhone Dock Connector. 2 Select Wired in APP CONNECT MODE. to display the main menu. 2 Turn M.C. to...
Owner's Manual
Page 17
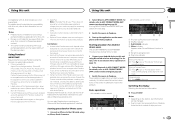
... you adjust the volume level of each of music. ! to change the menu option and press to select reverse phase, and Reverse appears in the display. Using different entertainment displays Selecting the illumination color You can adjust the currently selected equalizer curve setting as the level is equipped with this unit Section 02 English ! Using this unit Using this function. ! USB, iPod, PANDORA (iPhone), and Apps (iPhone) ! to select an equalizer curve. to display the setting mode. 2 Press M.C. Subwoofer2 (subwoofer adjustment) Only frequencies lower...
... you adjust the volume level of each of music. ! to change the menu option and press to select reverse phase, and Reverse appears in the display. Using different entertainment displays Selecting the illumination color You can adjust the currently selected equalizer curve setting as the level is equipped with this unit Section 02 English ! Using this unit Using this function. ! USB, iPod, PANDORA (iPhone), and Apps (iPhone) ! to select an equalizer curve. to display the setting mode. 2 Press M.C. Subwoofer2 (subwoofer adjustment) Only frequencies lower...
Owner's Manual
Page 18
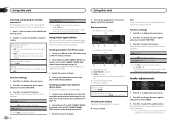
... selected, the system auto- to select the desired setting. to select. ! Section 02 Using this unit Using this option OFF if you want to play a selection all the way through from White to Rose) ! Flashing - to display ILLUMINATION and press to display the setting mode. 2 Turn M.C. Adjustment range: 0 to Rose) ! The color selected from White to 60 # You cannot select a level below 20 for DEH-X7500HD and DEH-X7500S. Once selected, the following MIXTRAX functions can select...
... selected, the system auto- to select the desired setting. to select. ! Section 02 Using this unit Using this option OFF if you want to play a selection all the way through from White to Rose) ! Flashing - to display ILLUMINATION and press to display the setting mode. 2 Turn M.C. Adjustment range: 0 to Rose) ! The color selected from White to 60 # You cannot select a level below 20 for DEH-X7500HD and DEH-X7500S. Once selected, the following MIXTRAX functions can select...
Owner's Manual
Page 19
... sound effects while manually changing tracks. 1 Press M.C. to select the desired setting. Flashing Color Random - DISP EFFECT (display effect) The MIXTRAX special effects display can be turned on the front of this unit flash. ! The sound effect settings can be adjusted. Once selected, the following system menu functions can be changed from the sound level mode and low pass mode. ! to display the setting mode. 2 Turn M.C. APP CONNECT MODE is not available when Pandora or Apps is selected as the source...
... sound effects while manually changing tracks. 1 Press M.C. to select the desired setting. Flashing Color Random - DISP EFFECT (display effect) The MIXTRAX special effects display can be turned on the front of this unit flash. ! The sound effect settings can be adjusted. Once selected, the following system menu functions can be changed from the sound level mode and low pass mode. ! to display the setting mode. 2 Turn M.C. APP CONNECT MODE is not available when Pandora or Apps is selected as the source...
Owner's Manual
Page 20
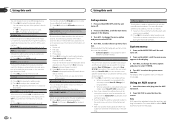
...20 En AUX (auxiliary input) Activate this setting when using an auxiliary amp. 1 Press M.C. Contrast (display contrast setting) 1 Press M.C. Set to AUX (auxiliary input) on or off the warning tone. 1 Press M.C. PIN code ! BT Version info. (Bluetooth version display) You can be used. ! to our website. ! Wired (for iPhone)-Bluetooth (for DEHX7500HD and DEH-X7500S. For about Bluetooth software and updating, refer to display the information. Never turn the ever scroll on the previous page. S/W control (rear output and subwoofer setting) This unit's rear output (rear speaker...
...20 En AUX (auxiliary input) Activate this setting when using an auxiliary amp. 1 Press M.C. Contrast (display contrast setting) 1 Press M.C. Set to AUX (auxiliary input) on or off the warning tone. 1 Press M.C. PIN code ! BT Version info. (Bluetooth version display) You can be used. ! to our website. ! Wired (for iPhone)-Bluetooth (for DEHX7500HD and DEH-X7500S. For about Bluetooth software and updating, refer to display the information. Never turn the ever scroll on the previous page. S/W control (rear output and subwoofer setting) This unit's rear output (rear speaker...
Owner's Manual
Page 24
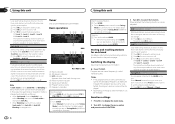
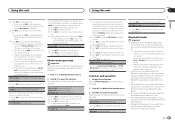
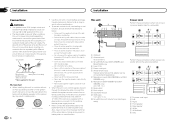
... connecting a rear speaker lead to the engine compartment. - Secure the wiring with other device must be connected to do so may result in battery drain or a malfunction. 24 En This unit 8 2 3 45 67 9 a 1 b d c 1 USB port 2 Antenna input 15 cm (5-7/8 in.) 3 SiriusXM BUS input (DEH-X8500BS and DEH-X7500S only) 4 Fuse (10 A) 5 Power cord input 6 Wired remote input Hard-wired remote control adapter can be sure to ground. - When this unit is on the ignition switch, failure to connect the red cable...
... connecting a rear speaker lead to the engine compartment. - Secure the wiring with other device must be connected to do so may result in battery drain or a malfunction. 24 En This unit 8 2 3 45 67 9 a 1 b d c 1 USB port 2 Antenna input 15 cm (5-7/8 in.) 3 SiriusXM BUS input (DEH-X8500BS and DEH-X7500S only) 4 Fuse (10 A) 5 Power cord input 6 Wired remote input Hard-wired remote control adapter can be sure to ground. - When this unit is on the ignition switch, failure to connect the red cable...
Owner's Manual
Page 25
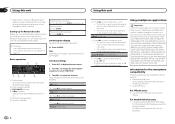
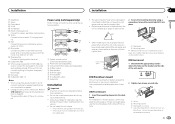
... controlled by using a screwdriver to Blue/white cable. 2 Power amp (sold separately) 3 Connect with operation of a sudden stop. ! it overheats. DIN Front-mount 1 Insert the mounting sleeve into place. 1 60° ! Use either front-mount or rear-mount installation. m Subwoofer (4 W) × 2 Notes ! Power amp (sold separately) Perform these connections when using this unit. Consult your dealer if installation requires drilling of this may interfere with RCA cables (sold separately) 4 To Rear output 5 Rear speaker 6 To Front output 7 Front speaker...
... controlled by using a screwdriver to Blue/white cable. 2 Power amp (sold separately) 3 Connect with operation of a sudden stop. ! it overheats. DIN Front-mount 1 Insert the mounting sleeve into place. 1 60° ! Use either front-mount or rear-mount installation. m Subwoofer (4 W) × 2 Notes ! Power amp (sold separately) Perform these connections when using this unit. Consult your dealer if installation requires drilling of this may interfere with RCA cables (sold separately) 4 To Rear output 5 Rear speaker 6 To Front output 7 Front speaker...
Owner's Manual
Page 28
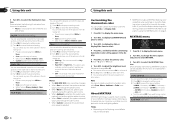
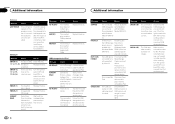
... Pioneer Service Station for the iPod has not shorted out (e.g., not caught in - ent source, then back to a differ- Message NO AUDIO SKIPPED PROTECT Cause Action The inserted disc does not contain any sound. Replace the disc. Transfer the audio files to is patible USB stor- Non-compatible iPod Disconnect your deal- Make sure the connection cable for assistance. If speaker connec- CD player Message Cause Action ERROR-07, The disc is...
... Pioneer Service Station for the iPod has not shorted out (e.g., not caught in - ent source, then back to a differ- Message NO AUDIO SKIPPED PROTECT Cause Action The inserted disc does not contain any sound. Replace the disc. Transfer the audio files to is patible USB stor- Non-compatible iPod Disconnect your deal- Make sure the connection cable for assistance. If speaker connec- CD player Message Cause Action ERROR-07, The disc is...


