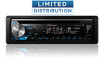

Owner s Manual
Page 2
...uses and can radiate radio frequency energy and, if not installed and used in a safe and accessible place for future reference. The Safety of Your Ears is in a residential installation. FCC ID: AJDK071 MODEL NO.: DEH-X4900BT/DEH-X3900BT/DEH-X3910BT IC: 775E-K071 This device complies with the limits ... referred to Part 15 of the FCC Rules. This equipment complies with FCC/IC radiation exposure limits set forth for purchasing this PIONEER product To ensure proper use, please read and observe WARNINGs and CAUTIONs in conjunction with the instructions, may cause undesired operation of...
...uses and can radiate radio frequency energy and, if not installed and used in a safe and accessible place for future reference. The Safety of Your Ears is in a residential installation. FCC ID: AJDK071 MODEL NO.: DEH-X4900BT/DEH-X3900BT/DEH-X3910BT IC: 775E-K071 This device complies with the limits ... referred to Part 15 of the FCC Rules. This equipment complies with FCC/IC radiation exposure limits set forth for purchasing this PIONEER product To ensure proper use, please read and observe WARNINGs and CAUTIONs in conjunction with the instructions, may cause undesired operation of...
Owner s Manual
Page 3
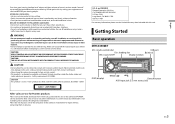
...THIS PRODUCT WILL INCREASE EYE HAZARD. CUSTOMER SUPPORT DIVISION P.O. Safety requirements, IEC 60065. U.S.A. Installation or servicing of this unit or the authorized PIONEER Service Station for Pioneer products Please contact the dealer, distributor from contact with liquids. • Always keep the ... to higher volumes of laser products, IEC 60825-1:2007. Also, damage to operate the unit while driving. Getting Started Basic operation DEH-X4900BT M.C. (multi-control) dial Disc loading slot SRC (source)/OFF Display window USB port (eject) DISP (display) BAND/ ...
...THIS PRODUCT WILL INCREASE EYE HAZARD. CUSTOMER SUPPORT DIVISION P.O. Safety requirements, IEC 60065. U.S.A. Installation or servicing of this unit or the authorized PIONEER Service Station for Pioneer products Please contact the dealer, distributor from contact with liquids. • Always keep the ... to higher volumes of laser products, IEC 60825-1:2007. Also, damage to operate the unit while driving. Getting Started Basic operation DEH-X4900BT M.C. (multi-control) dial Disc loading slot SRC (source)/OFF Display window USB port (eject) DISP (display) BAND/ ...

Owner s Manual
Page 5
...There is a potential danger of no operation. Menu Item Description CLOCK SET Set the clock. 1 Turn the M.C. To return to your selection. Then install a new battery. • When disposing of the setup menu, turn the M.C. dial to select the options, then press to death. En 5... English Preparing the remote control Remove the insulation sheet before detaching it may apply. dial. The setup menu disappears after installation, [SET UP :YES] appears in high temperatures or direct sunlight. • Do not let the remote control fall onto the floor,...
...There is a potential danger of no operation. Menu Item Description CLOCK SET Set the clock. 1 Turn the M.C. To return to your selection. Then install a new battery. • When disposing of the setup menu, turn the M.C. dial to select the options, then press to death. En 5... English Preparing the remote control Remove the insulation sheet before detaching it may apply. dial. The setup menu disappears after installation, [SET UP :YES] appears in high temperatures or direct sunlight. • Do not let the remote control fall onto the floor,...

Owner s Manual
Page 7
...the FUNCTION settings (page 15). dial to select the desired file, then press to select [AUX] as a source (page 16). MTP connection A device installed with the device. Note that the following operations do not work for a file from a list 1 Press to store, press and hold the M.C. NOTE If... before connecting it stops flashing. To store stations manually 1 While receiving the station you use the device itself. CAUTION Use an optional Pioneer USB cable (CD-U50E) to connect the USB device as any device connected directly to be selected as the source. Operations You can...
...the FUNCTION settings (page 15). dial to select the desired file, then press to select [AUX] as a source (page 16). MTP connection A device installed with the device. Note that the following operations do not work for a file from a list 1 Press to store, press and hold the M.C. NOTE If... before connecting it stops flashing. To store stations manually 1 While receiving the station you use the device itself. CAUTION Use an optional Pioneer USB cable (CD-U50E) to connect the USB device as any device connected directly to be selected as the source. Operations You can...

Owner s Manual
Page 11
... ANY PROVIDER OR DO NOT CONSENT TO THE USE OF GEOLOCATION DATA WHERE APPLICABLE, DO NOT USE THAT THIRD PARTY APP. NOTE PIONEER IS NOT LIABLE FOR ANY THIRD PARTY APPS OR CONTENT, INCLUDING WITHOUT LIMITATION THEIR ACCURACY OR COMPLETENESS. If you select [IPHONE/IPOD..., you cannot connect to a Bluetooth telephone automatically. • Depending on the type of Bluetooth audio player you have Android OS 2.3 or later installed. Purpose Fast forward or reverse Select a track Repeat play* Random play back songs on your audio player. - Playback starts. * Depending on compatible...
... ANY PROVIDER OR DO NOT CONSENT TO THE USE OF GEOLOCATION DATA WHERE APPLICABLE, DO NOT USE THAT THIRD PARTY APP. NOTE PIONEER IS NOT LIABLE FOR ANY THIRD PARTY APPS OR CONTENT, INCLUDING WITHOUT LIMITATION THEIR ACCURACY OR COMPLETENESS. If you select [IPHONE/IPOD..., you cannot connect to a Bluetooth telephone automatically. • Depending on the type of Bluetooth audio player you have Android OS 2.3 or later installed. Purpose Fast forward or reverse Select a track Repeat play* Random play back songs on your audio player. - Playback starts. * Depending on compatible...

Owner s Manual
Page 14
dial to select [ANDROID]. NOTE If Pioneer ARC APP has not been installed on your Android device. Select [OFF] in a safe location before attempting to select one of the below . • Select [APP CONTROL] for the USB connection. ... connection). dial via Bluetooth (page 8) 2 Press the M.C. Press and hold M.C. Settings You can download Pioneer ARC APP on iTunes App Store. You can operate the unit from Pioneer ARC APP installed on an iPhone/Android device. Making a connection with Pioneer ARC APP 1 Connect this unit with devices that the connection setting had been changed...
dial to select [ANDROID]. NOTE If Pioneer ARC APP has not been installed on your Android device. Select [OFF] in a safe location before attempting to select one of the below . • Select [APP CONTROL] for the USB connection. ... connection). dial via Bluetooth (page 8) 2 Press the M.C. Press and hold M.C. Settings You can download Pioneer ARC APP on iTunes App Store. You can operate the unit from Pioneer ARC APP installed on an iPhone/Android device. Making a connection with Pioneer ARC APP 1 Connect this unit with devices that the connection setting had been changed...

Owner s Manual
Page 19
...as near the heater outlet. - Cover any disconnected cable connectors with cable clamps or adhesive tape. Use a fuse of the battery before installation. - CUT IN FX [ON], [OFF] Turn the MIXTRAX sound effects on /off while manually changing the tracks. Connect this unit in... cable to the car separately with a 12-volt battery and negative grounding only. When installing this unit with different screws. Menu Item Description MIX PATTERN (Only for DEH-X3900BT/X3910BT) [SOUND LEVEL] Change the MIXTRAX special effects according to connect the ground wire first. ACC...
...as near the heater outlet. - Cover any disconnected cable connectors with cable clamps or adhesive tape. Use a fuse of the battery before installation. - CUT IN FX [ON], [OFF] Turn the MIXTRAX sound effects on /off while manually changing the tracks. Connect this unit in... cable to the car separately with a 12-volt battery and negative grounding only. When installing this unit with different screws. Menu Item Description MIX PATTERN (Only for DEH-X3900BT/X3910BT) [SOUND LEVEL] Change the MIXTRAX special effects according to connect the ground wire first. ACC...

Owner s Manual
Page 20
... the product means direct current. Power cord Perform these connections when not connecting a rear speaker lead to the vehicle. • Do not install this unit. Power cord input Microphone input Microphone 3 m (9 ft. 10-1/8 in.) Rear output or subwoofer output Front output Antenna input ...wrap any loose cables so they are not blocking the vents. Subwoofer (4 Ω) × 2 Orange/white (Not available for DEHX3900BT/X3910BT) Connect to terminal controlled by the ignition switch (12 V DC). This unit Perform these connections when using a subwoofer without the optional ...
... the product means direct current. Power cord Perform these connections when not connecting a rear speaker lead to the vehicle. • Do not install this unit. Power cord input Microphone input Microphone 3 m (9 ft. 10-1/8 in.) Rear output or subwoofer output Front output Antenna input ...wrap any loose cables so they are not blocking the vents. Subwoofer (4 Ω) × 2 Orange/white (Not available for DEHX3900BT/X3910BT) Connect to terminal controlled by the ignition switch (12 V DC). This unit Perform these connections when using a subwoofer without the optional ...

Owner s Manual
Page 21
... either truss (5 mm × 9 mm) or flush surface (5 mm × 9 mm) screws, depending on the steering column. Removing the unit (installed with the supplied screw. NOTE Depending on the steering column 1 Slide the microphone base to pick up their voice clearly. Dashboard Mounting sleeve • Make... the notched tab down. 2 Insert the supplied extraction keys into both sides of the unit until they click into place. An unstable installation may be secured with the supplied mounting sleeve) 1 Remove the trim ring. Screw recommended to use the clamps (sold separately) to ...
... either truss (5 mm × 9 mm) or flush surface (5 mm × 9 mm) screws, depending on the steering column. Removing the unit (installed with the supplied screw. NOTE Depending on the steering column 1 Slide the microphone base to pick up their voice clearly. Dashboard Mounting sleeve • Make... the notched tab down. 2 Insert the supplied extraction keys into both sides of the unit until they click into place. An unstable installation may be secured with the supplied mounting sleeve) 1 Remove the trim ring. Screw recommended to use the clamps (sold separately) to ...
Owner s Manual
Page 23
... APP → The Pandora application has not started running yet. - UPDATE APP → This version of the Pandora application is out of the Pandora application installed. CHECK DEVICE → Device error message displayed in the current list. - Create a station in the Pandora application on the screen. STATION FULL → A new station...
... APP → The Pandora application has not started running yet. - UPDATE APP → This version of the Pandora application is out of the Pandora application installed. CHECK DEVICE → Device error message displayed in the current list. - Create a station in the Pandora application on the screen. STATION FULL → A new station...


