Owner's Manual
Page 89
... distance in the specified location. The time alignment value calculated by computer to be set to place the microphone in the following circumstances. Using another microphone may be possible if you lower power amp input level. When this unit is connected to the standard ...position. ! When this function measures the car interior acoustic characteristics to carry out auto TA and EQ using the supplied microphone. CAUTION ! Be sure to create an auto-equalizer curve, a loud measurement tone (noise) may prevent measurement, or result in as ...
... distance in the specified location. The time alignment value calculated by computer to be set to place the microphone in the following circumstances. Using another microphone may be possible if you lower power amp input level. When this unit is connected to the standard ...position. ! When this function measures the car interior acoustic characteristics to carry out auto TA and EQ using the supplied microphone. CAUTION ! Be sure to create an auto-equalizer curve, a loud measurement tone (noise) may prevent measurement, or result in as ...
Owner's Manual
Page 90
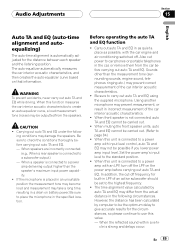
When delays occur for hands-free phoning to this unit is turned off . The auto TA and EQ may differ depending on which the microphone is connected to operate the auto TA and EQ. Noise from the fan in the center of the headrest of the driver's seat, facing ...sold separately). When a subwoofer is placed. If the engine is selected automatically. 5 Press SOURCE and hold EQ to ON or ACC. If desired, place the microphone on active subwoofers or external amps. ! The fader/balance settings return to the center position. (Refer to page 85.) - If the car's air conditioner or...
When delays occur for hands-free phoning to this unit is turned off . The auto TA and EQ may differ depending on which the microphone is connected to operate the auto TA and EQ. Noise from the fan in the center of the headrest of the driver's seat, facing ...sold separately). When a subwoofer is placed. If the engine is selected automatically. 5 Press SOURCE and hold EQ to ON or ACC. If desired, place the microphone on active subwoofers or external amps. ! The fader/balance settings return to the center position. (Refer to page 85.) - If the car's air conditioner or...

Owner's Manual
Page 91
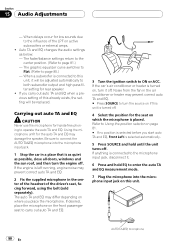
If the microphone is displayed. Audio Adjustments 8 Press MULTI-CONTROL to start the auto TA and EQ. 9 Get out of car interior acoustic characteristics is not possible, an ... and EQ is completed, Setup complete is subjected to cancel the auto TA and EQ mode. 12 Store the microphone carefully in the glove compartment or any other safe place. Store the microphone carefully in the glove compartment. Section 15 En 91 English When correct measurement of the car and close the...
If the microphone is displayed. Audio Adjustments 8 Press MULTI-CONTROL to start the auto TA and EQ. 9 Get out of car interior acoustic characteristics is not possible, an ... and EQ is completed, Setup complete is subjected to cancel the auto TA and EQ mode. 12 Store the microphone carefully in the glove compartment or any other safe place. Store the microphone carefully in the glove compartment. Section 15 En 91 English When correct measurement of the car and close the...
Owner's Manual
Page 102
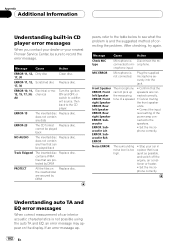
...Disconnect the miconnected to see what the problem is and the suggested method of a speaker. ! MIC ERROR Microphone is not connected. Appendix Additional Information Understanding built-in CD player error messages When you contact your dealer or your car in a place that is as quiet as... possible, and switch off the engine, air conditioner or heater. ! After checking, try again. Stop your nearest Pioneer Service Center, be played...
...Disconnect the miconnected to see what the problem is and the suggested method of a speaker. ! MIC ERROR Microphone is not connected. Appendix Additional Information Understanding built-in CD player error messages When you contact your dealer or your car in a place that is as quiet as... possible, and switch off the engine, air conditioner or heater. ! After checking, try again. Stop your nearest Pioneer Service Center, be played...
Other Manual
Page 1
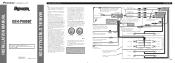
... separately) Connecting cords with cable clamps or adhesive tape. IP-BUS input (Blue) Multi-CD player IP-BUS cable (sold separately) System remote control + Front speaker ≠ Red ... connector is blue, and the output side is ground. Do not route wiring in .) Microphone input (Hands-free phoning/AUTO TA&EQ) Before installing this lead separately from the vehicle ...Manual for vehicles with auxiliary equipment. Connect to CEMA cord colors. INSTALLATION MANUAL OF OF DEH-P980BT This product conforms to an external power amp's system remote control or the car's Auto...
... separately) Connecting cords with cable clamps or adhesive tape. IP-BUS input (Blue) Multi-CD player IP-BUS cable (sold separately) System remote control + Front speaker ≠ Red ... connector is blue, and the output side is ground. Do not route wiring in .) Microphone input (Hands-free phoning/AUTO TA&EQ) Before installing this lead separately from the vehicle ...Manual for vehicles with auxiliary equipment. Connect to CEMA cord colors. INSTALLATION MANUAL OF OF DEH-P980BT This product conforms to an external power amp's system remote control or the car's Auto...
Other Manual
Page 3
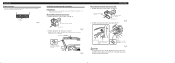
... and orientation that it will enable it to pick up , install the microphone clip. (Lowering the sun visor reduces the recognition rate for hands-free phoning Installation notes • Install the microphone in such a way that will not obstruct driving. Installation Fixing the front... screw to fix the front panel to become wound around the steering column or gearstick. Install the microphone clip on the microphone clip. (Fig. 12) Microphone for handsfree phoning Microphone clip 2. Clamps Use clamps to secure the lead where necessary inside the vehicle. Fixing screw Fig....
... and orientation that it will enable it to pick up , install the microphone clip. (Lowering the sun visor reduces the recognition rate for hands-free phoning Installation notes • Install the microphone in such a way that will not obstruct driving. Installation Fixing the front... screw to fix the front panel to become wound around the steering column or gearstick. Install the microphone clip on the microphone clip. (Fig. 12) Microphone for handsfree phoning Microphone clip 2. Clamps Use clamps to secure the lead where necessary inside the vehicle. Fixing screw Fig....


