Owner's Manual
Page 89
...measurement tone (surrounding sounds, engine sound, telephones ringing etc.) may prevent measurement, or result in a drain on that information. Using another microphone may prevent correct measurement of an active subwoofer should be possible if you lower power amp input level. Set the power amp's input ... unsuitable position the measurement tone may become loud and measurement may not be set to carry out auto TA and EQ using the supplied microphone. Before operating the auto TA and EQ function ! Be sure to the highest frequency. ! When the reflected sound within a vehicle ...
...measurement tone (surrounding sounds, engine sound, telephones ringing etc.) may prevent measurement, or result in a drain on that information. Using another microphone may prevent correct measurement of an active subwoofer should be possible if you lower power amp input level. Set the power amp's input ... unsuitable position the measurement tone may become loud and measurement may not be set to carry out auto TA and EQ using the supplied microphone. Before operating the auto TA and EQ function ! Be sure to the highest frequency. ! When the reflected sound within a vehicle ...
Owner's Manual
Page 90
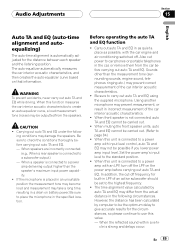
... turned on where you start auto TA and EQ, Front Left is placed. When a subwoofer is connected to Using the position selector on which the microphone is selected automatically. 5 Press SOURCE and hold EQ to turn it off . Refer to this unit, it . 6 Press and hold until the unit turns off... for low sounds due to ON or ACC. The fader/balance settings return to the center position. (Refer to connect the AUTO TA&EQ microphone into the microphone input jack. 1 Stop the car in the air conditioner or heater may damage the speaker. When delays occur for the auto TA and EQ...
... turned on where you start auto TA and EQ, Front Left is placed. When a subwoofer is connected to Using the position selector on which the microphone is selected automatically. 5 Press SOURCE and hold EQ to turn it off . Refer to this unit, it . 6 Press and hold until the unit turns off... for low sounds due to ON or ACC. The fader/balance settings return to the center position. (Refer to connect the AUTO TA&EQ microphone into the microphone input jack. 1 Stop the car in the air conditioner or heater may damage the speaker. When delays occur for the auto TA and EQ...

Owner's Manual
Page 91
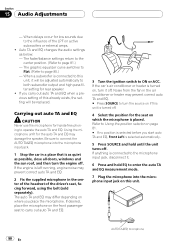
... EQ part way through, press BAND. 10 When auto TA and EQ is completed, Setup complete is displayed. Section 15 En 91 English If the microphone is displayed. (Refer to Understanding auto TA and EQ error messages on page 102.) 11 Press BAND to direct sunlight for an extended period, high... out of car interior acoustic characteristics is not possible, an error message is subjected to cancel the auto TA and EQ mode. 12 Store the microphone carefully in the glove compartment.
... EQ part way through, press BAND. 10 When auto TA and EQ is completed, Setup complete is displayed. Section 15 En 91 English If the microphone is displayed. (Refer to Understanding auto TA and EQ error messages on page 102.) 11 Press BAND to direct sunlight for an extended period, high... out of car interior acoustic characteristics is not possible, an error message is subjected to cancel the auto TA and EQ mode. 12 Store the microphone carefully in the glove compartment.
Owner's Manual
Page 102
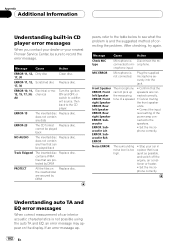
...the table below to mi- crophone. Front Speaker The microphone ! left Speaker ! Cancel muting right Speaker the front speaker ERROR, Rear units. Correct the input ERROR, Rear level setting of a speaker. ! Stop your nearest Pioneer Service Center, be played back Track Skipped The inserted ...disc contains WMA files that are protected by DRM Replace disc. If an error message ap- 102 En does not contain any data ERROR-23 The CD format Replace disc. ERROR, Sub- Set the micro- Set the microphone...
...the table below to mi- crophone. Front Speaker The microphone ! left Speaker ! Cancel muting right Speaker the front speaker ERROR, Rear units. Correct the input ERROR, Rear level setting of a speaker. ! Stop your nearest Pioneer Service Center, be played back Track Skipped The inserted ...disc contains WMA files that are protected by DRM Replace disc. If an error message ap- 102 En does not contain any data ERROR-23 The CD format Replace disc. ERROR, Sub- Set the micro- Set the microphone...
Other Manual
Page 1
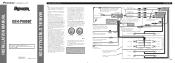
...speaker leads that get hot, such as power amps. IP-BUS input (Blue) Multi-CD player IP-BUS cable (sold separately). Printed in .) Jack for the Wired Remote Control... plug in .) Subwoofer output (SUBWOOFER OUTPUT) Rear output (REAR OUTPUT) Front output (FRONT OUTPUT) Microphone for handsfree phoning AUX input jack (3.5 ø) Use a stereo mini plug cable to the products ...; Don't pass the yellow lead through the blue/white lead. INSTALLATION MANUAL OF OF DEH-P980BT This product conforms to speakers. Perform these connections when using the optional amplifier. Le code...
...speaker leads that get hot, such as power amps. IP-BUS input (Blue) Multi-CD player IP-BUS cable (sold separately). Printed in .) Jack for the Wired Remote Control... plug in .) Subwoofer output (SUBWOOFER OUTPUT) Rear output (REAR OUTPUT) Front output (FRONT OUTPUT) Microphone for handsfree phoning AUX input jack (3.5 ø) Use a stereo mini plug cable to the products ...; Don't pass the yellow lead through the blue/white lead. INSTALLATION MANUAL OF OF DEH-P980BT This product conforms to speakers. Perform these connections when using the optional amplifier. Le code...
Other Manual
Page 3
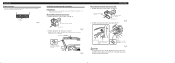
... it will not obstruct driving. Fixing screw Fig. 11 Installing the microphone for voice operations.) Microphone clip Clamps Use clamps to become wound around the steering column or gearstick. Install the microphone clip on the steering column. (Fig. 15) Fig. 14 Double...Use clamps to this unit. Microphone for hands-free phoning Microphone clip Fig. 12 2. Install the microphone on the microphone clip. (Fig. 14) Fit the microphone lead into the groove. Install the microphone on the microphone clip. (Fig. 12) Microphone for handsfree phoning Microphone clip 2. Installation Fixing the ...
... it will not obstruct driving. Fixing screw Fig. 11 Installing the microphone for voice operations.) Microphone clip Clamps Use clamps to become wound around the steering column or gearstick. Install the microphone clip on the steering column. (Fig. 15) Fig. 14 Double...Use clamps to this unit. Microphone for hands-free phoning Microphone clip Fig. 12 2. Install the microphone on the microphone clip. (Fig. 14) Fit the microphone lead into the groove. Install the microphone on the microphone clip. (Fig. 12) Microphone for handsfree phoning Microphone clip 2. Installation Fixing the ...


