Owner's Manual
Page 2
... 25 Browsing for Pioneer products 7 Visit our website 8 Protecting your model properly. Introduction of advanced operations 17 - Connecting the most recently connected Bluetooth audio player 25 - Installing the battery 9 ... advanced operations 21 - Storing and recalling broadcast frequencies 14 - Playing tracks in CD Player 15 - Using disc title functions 18 - Basic Operations 20 - Changing ...Please read through these operating instructions so you have finished reading the instructions, keep this manual in a random order (shuffle) 22 - Remote control 11 Basic Operations 12 -...
... 25 Browsing for Pioneer products 7 Visit our website 8 Protecting your model properly. Introduction of advanced operations 17 - Connecting the most recently connected Bluetooth audio player 25 - Installing the battery 9 ... advanced operations 21 - Storing and recalling broadcast frequencies 14 - Playing tracks in CD Player 15 - Using disc title functions 18 - Basic Operations 20 - Changing ...Please read through these operating instructions so you have finished reading the instructions, keep this manual in a random order (shuffle) 22 - Remote control 11 Basic Operations 12 -...
Owner's Manual
Page 49
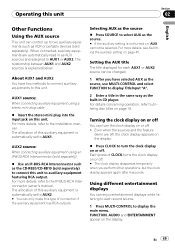
... display appears again after 4 seconds. Even when the sources and the feature demo are automatically read in CD player. En 49 When connected, auxiliary equipments are off . The allocation of this auxiliary equipment is not...as VCR or portable devices (sold separetely) to connect this unit to select AUX as the CD-RB20/CD-RB10 (sold separately). For more details, refer to display the main menu. Operating this unit...each sound source. 1 Press MULTI-CONTROL to the installation manual. FUNCTION, AUDIO and ENTERTAINMENT appear on or off You can turn the clock display on page 18...
... display appears again after 4 seconds. Even when the sources and the feature demo are automatically read in CD player. En 49 When connected, auxiliary equipments are off . The allocation of this auxiliary equipment is not...as VCR or portable devices (sold separetely) to connect this unit to select AUX as the CD-RB20/CD-RB10 (sold separately). For more details, refer to display the main menu. Operating this unit...each sound source. 1 Press MULTI-CONTROL to the installation manual. FUNCTION, AUDIO and ENTERTAINMENT appear on or off You can turn the clock display on page 18...
Other Manual
Page 1
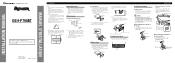
...unit match. 3. Install the microphone clip on the steering column 1. Microphone Microphone clip When installing the microphone on the sun visor. INSTALLATION MANUAL DEH-P790BT This product conforms to the following installation methods. DIN Front-mount Installation with supplied screw. DIN Rear-mount 1. Install this unit away from...side of the vehicle. • Do not install this unit, make sure you do not plan to secure the lead where necessary inside the vehicle. Screw Dashboard or Console Factory radio mounting bracket Fastening the front panel If you ...
...unit match. 3. Install the microphone clip on the steering column 1. Microphone Microphone clip When installing the microphone on the sun visor. INSTALLATION MANUAL DEH-P790BT This product conforms to the following installation methods. DIN Front-mount Installation with supplied screw. DIN Rear-mount 1. Install this unit away from...side of the vehicle. • Do not install this unit, make sure you do not plan to secure the lead where necessary inside the vehicle. Screw Dashboard or Console Factory radio mounting bracket Fastening the front panel If you ...

Other Manual
Page 2
... W (output value) and 4 ohm to 8 ohm (impedance value). • To prevent short-circuit, overheating or malfunction, be sure to check all manuals and connect cords correctly. Place all cables away from hot places, such as near the heater outlet. - Do not remove RCA caps if RCA cables ... remote control or the vehicle's auto-antenna relay control terminal (max. 300 mA, 12 V DC). Connecting the Units ENGLISH Note: • When this unit is installed in fire or malfunction. - F ACC O F O OF OF N STAR N STAR T T ACC position No ACC position • Use this unit in order to share...
... W (output value) and 4 ohm to 8 ohm (impedance value). • To prevent short-circuit, overheating or malfunction, be sure to check all manuals and connect cords correctly. Place all cables away from hot places, such as near the heater outlet. - Do not remove RCA caps if RCA cables ... remote control or the vehicle's auto-antenna relay control terminal (max. 300 mA, 12 V DC). Connecting the Units ENGLISH Note: • When this unit is installed in fire or malfunction. - F ACC O F O OF OF N STAR N STAR T T ACC position No ACC position • Use this unit in order to share...


