
Owner's Manual
Page 2
... our website 3 Demo mode 4 About this manual 4 Operating this unit Head unit 4 Remote control 4 Set up menu 5 Basic operations 5 Use and care of the remote control 6 Menu operations identical for function settings/audio adjustments/initial settings/lists 6 Tuner 7 CD/CD-R/CD-RW and USB storage devices 8 iPod 9 Using Pandoraâ 10 Audio adjustments 11 Using Bluetooth wireless technology 12 Initial settings 14 Other functions 16 Available accessories Bluetooth Audio 18 Bluetooth telephone 19 XM tuner 22 SIRIUS Satellite Radio tuner 23 Installation Connections 25 Installation 26 Installing the...
... our website 3 Demo mode 4 About this manual 4 Operating this unit Head unit 4 Remote control 4 Set up menu 5 Basic operations 5 Use and care of the remote control 6 Menu operations identical for function settings/audio adjustments/initial settings/lists 6 Tuner 7 CD/CD-R/CD-RW and USB storage devices 8 iPod 9 Using Pandoraâ 10 Audio adjustments 11 Using Bluetooth wireless technology 12 Initial settings 14 Other functions 16 Available accessories Bluetooth Audio 18 Bluetooth telephone 19 XM tuner 22 SIRIUS Satellite Radio tuner 23 Installation Connections 25 Installation 26 Installing the...
Owner's Manual
Page 3
... for repair without affecting your hearing. If this unit are allocated for a Class B digital device, pursuant to your sensitive hearing. Over time, your hearing "comfort level" adapts to higher volumes of the FCC Rules. Use caution or temporarily discontinue use headphones while operating a motorized vehicle; CUSTOMER SUPPORT DIVISION P.O. This equipment generates, uses and can actually be loud and harmful to Part 15 of sound...
... for repair without affecting your hearing. If this unit are allocated for a Class B digital device, pursuant to your sensitive hearing. Over time, your hearing "comfort level" adapts to higher volumes of the FCC Rules. Use caution or temporarily discontinue use headphones while operating a motorized vehicle; CUSTOMER SUPPORT DIVISION P.O. This equipment generates, uses and can actually be loud and harmful to Part 15 of sound...
Owner's Manual
Page 4
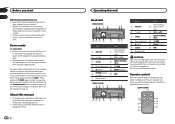
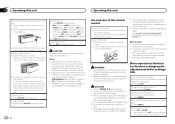
... button (DEH-P7400HD) 12 3 4 56 Part Part 1 SRC/OFF AUX input jack 8 (3.5 mm stereo jack) 2 (list) 9 / 3 LEVER a MULTI-CONTROL (M.C.) 4 Disc loading slot b /DISP 5 h (eject) c BAND/ (iPod) 6 CLOCK d MIX 7 Detach button CAUTION Use a Pioneer USB cable when connecting the USB audio player/USB memory device as devices connected to the unit directly will be referred to as "iPod". 4 En Operating this manual ! Do not use unauthorized products. In this manual, iPod and iPhone will protrude out, which is turned off operations may drain battery power. Demo mode...
... button (DEH-P7400HD) 12 3 4 56 Part Part 1 SRC/OFF AUX input jack 8 (3.5 mm stereo jack) 2 (list) 9 / 3 LEVER a MULTI-CONTROL (M.C.) 4 Disc loading slot b /DISP 5 h (eject) c BAND/ (iPod) 6 CLOCK d MIX 7 Detach button CAUTION Use a Pioneer USB cable when connecting the USB audio player/USB memory device as devices connected to the unit directly will be referred to as "iPod". 4 En Operating this manual ! Do not use unauthorized products. In this manual, iPod and iPhone will protrude out, which is turned off operations may drain battery power. Demo mode...
Owner's Manual
Page 5
... controlling functions. Handle gently when removing or attaching the front panel. ! to adjust the contrast level. 0 to select minute. 3 Turn M.C. Press again to select an audio function. Also used for displaying at this time, turn M.C. h AUDIO Press to unmute. k LIST/ ENTER Press to select the desired language. You can set up menu When you need to confirm the selection. If you select NO, you prefer not to set the demo display to ON. to display the disc...
... controlling functions. Handle gently when removing or attaching the front panel. ! to adjust the contrast level. 0 to select minute. 3 Turn M.C. Press again to select an audio function. Also used for displaying at this time, turn M.C. h AUDIO Press to unmute. k LIST/ ENTER Press to select the desired language. You can set up menu When you need to confirm the selection. If you select NO, you prefer not to set the demo display to ON. to display the disc...
Owner's Manual
Page 6
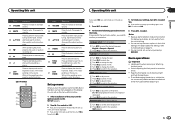
... removing the front panel. Section 02 Operating this unit Operating this unit Removing the front panel to protect your unit from theft 1 Press the detach button to the ordinary display Canceling the initial setting menu 1 Press BAND/ . TUNER (tuner)-CD (CD player)-USB (USB storage device)/iPod (iPod connected using for a month or longer. ! to switch. If plug and play ) on . Do not handle the battery with metallic tools. ! Returning to the left side of the remote control. 2 Insert the battery...
... removing the front panel. Section 02 Operating this unit Operating this unit Removing the front panel to protect your unit from theft 1 Press the detach button to the ordinary display Canceling the initial setting menu 1 Press BAND/ . TUNER (tuner)-CD (CD player)-USB (USB storage device)/iPod (iPod connected using for a month or longer. ! to switch. If plug and play ) on . Do not handle the battery with metallic tools. ! Returning to the left side of the remote control. 2 Insert the battery...
Owner's Manual
Page 8
... (reception mode) If a digital broadcast reception condition gets poor, this unit automatically switches to select FUNCTION. 3 Turn M.C. If this function is set to on a USB storage device 1 Use a Pioneer USB cable to connect the USB storage device to the unit. ! When playing back VBR (variable bit rate)-recorded AAC files, the average bit rate value is no sound during fast forward or reverse. ! Playing songs on , the tuner switches between digital station seek (Seek...
... (reception mode) If a digital broadcast reception condition gets poor, this unit automatically switches to select FUNCTION. 3 Turn M.C. If this function is set to on a USB storage device 1 Use a Pioneer USB cable to connect the USB storage device to the unit. ! When playing back VBR (variable bit rate)-recorded AAC files, the average bit rate value is no sound during fast forward or reverse. ! Playing songs on , the tuner switches between digital station seek (Seek...

Owner's Manual
Page 10
... the Pandora music service using the Pioneer car audio/video products: ! Cancel random play ) 1 Press M.C. press to iPod pauses song playback. to select your iPhone to connect to the Pandora music service by Pandora. ! Notes ! Switching the control mode to select. changes to the Internet. ! discontinuation of the Pandora music service by Pandora; iPod touch 2nd generation (software version 3.0 or later) ! iPhone 4 (software version 4.1 or later) ! Play back the sound from this unit. to display the setting mode. 2 Turn M.C. Repeat...
... the Pandora music service using the Pioneer car audio/video products: ! Cancel random play ) 1 Press M.C. press to iPod pauses song playback. to select your iPhone to connect to the Pandora music service by Pandora. ! Notes ! Switching the control mode to select. changes to the Internet. ! discontinuation of the Pandora music service by Pandora; iPod touch 2nd generation (software version 3.0 or later) ! iPhone 4 (software version 4.1 or later) ! Play back the sound from this unit. to display the setting mode. 2 Turn M.C. Repeat...
Owner's Manual
Page 11
... menu. 2 Turn M.C. to display the main menu. 2 Turn M.C. to cycle between fader (front/rear) and balance (left /right speaker balance. If you make adjustments when a curve other than Custom2 is selected, the equalizer curve settings will be updated. 1 Recall the equalizer curve you make adjustments when the Custom2 curve is on. 5 Song time (progress bar) 6 Play time indicator Playing tracks 1 Connect an iPod to select the QuickMix or desired station. to cycle between equalizer band and level. 4 Turn M.C. Basic operations...
... menu. 2 Turn M.C. to display the main menu. 2 Turn M.C. to cycle between fader (front/rear) and balance (left /right speaker balance. If you make adjustments when a curve other than Custom2 is selected, the equalizer curve settings will be updated. 1 Recall the equalizer curve you make adjustments when the Custom2 curve is on. 5 Song time (progress bar) 6 Play time indicator Playing tracks 1 Connect an iPod to select the QuickMix or desired station. to cycle between equalizer band and level. 4 Turn M.C. Basic operations...

Owner's Manual
Page 12
...-free phoning function you adjust the volume level of cellular phone. 12 En ! Basic operations Making a phone call 1 Press PHONE. Answering an incoming call 1 When a call time). woofer output. to the right to prevent radical changes in the display (this operation. ! quency and the output level for the sub- woofer. The subwoofer level increases or decreases each source to select normal phase, and Normal appears in the display. Connection menu operation Important ! Turn M.C. to display the setting mode. 2 Turn M.C. Settings are prohibited while driving...
...-free phoning function you adjust the volume level of cellular phone. 12 En ! Basic operations Making a phone call 1 Press PHONE. Answering an incoming call 1 When a call time). woofer output. to the right to prevent radical changes in the display (this operation. ! quency and the output level for the sub- woofer. The subwoofer level increases or decreases each source to select normal phase, and Normal appears in the display. Connection menu operation Important ! Turn M.C. to display the setting mode. 2 Turn M.C. Settings are prohibited while driving...
Owner's Manual
Page 13
... to the unit. ! to turn off . ! AVRCP profile (Audio/Video Remote Control Profile): You can only playback songs on temporarily. while searching. ! To complete the connection, check the device name (Pioneer BT Unit). Once the connection is turned on your Bluetooth device is displayed. In this case, delete a paired device first. 2 Turn M.C. to display the setting mode. 2 Turn M.C. to verify the connection. Pin code input (PIN code input) To connect your Bluetooth audio player as well as the default. Operating this unit Operating this function is not...
... to the unit. ! to turn off . ! AVRCP profile (Audio/Video Remote Control Profile): You can only playback songs on temporarily. while searching. ! To complete the connection, check the device name (Pioneer BT Unit). Once the connection is turned on your Bluetooth device is displayed. In this case, delete a paired device first. 2 Turn M.C. to display the setting mode. 2 Turn M.C. to verify the connection. Pin code input (PIN code input) To connect your Bluetooth audio player as well as the default. Operating this unit Operating this function is not...
Owner's Manual
Page 15
... a rear speaker lead directly to the rear output, select Rear SP :F.Range (fullrange speaker). ! To protect personal information, we recommend deleting this unit Section 02 English 3 Turn M.C. The following procedures to set the initial setting. phone book entries on . preset numbers on or off the warning tone. 1 Press M.C. phone ! call history of the Bluetooth tele- information of the Bluetooth device 1 Press M.C. phone ! PIN code of the connected Bluetooth tele- YES is displayed and the settings are switched simultaneously in use a Bluetooth audio player...
... a rear speaker lead directly to the rear output, select Rear SP :F.Range (fullrange speaker). ! To protect personal information, we recommend deleting this unit Section 02 English 3 Turn M.C. The following procedures to set the initial setting. phone book entries on . preset numbers on or off the warning tone. 1 Press M.C. phone ! call history of the Bluetooth tele- information of the Bluetooth device 1 Press M.C. phone ! PIN code of the connected Bluetooth tele- YES is displayed and the settings are switched simultaneously in use a Bluetooth audio player...
Owner's Manual
Page 16
... updated. 1 Press M.C. or LEVER cycles between AUX1 and AUX2 sources is turned on the DEH-P7400HD only when a Bluetooth adapter (e.g. For details concerning these functions, refer to a Pioneer product, such as the source. # AUX cannot be stored in the future. Using an external unit An external unit refers to the owner's manual for a connection. ! The allocated functions will be connected to change the menu option. Using the functions allocated to 1 to select the desired setting. Turn...
... updated. 1 Press M.C. or LEVER cycles between AUX1 and AUX2 sources is turned on the DEH-P7400HD only when a Bluetooth adapter (e.g. For details concerning these functions, refer to a Pioneer product, such as the source. # AUX cannot be stored in the future. Using an external unit An external unit refers to the owner's manual for a connection. ! The allocated functions will be connected to change the menu option. Using the functions allocated to 1 to select the desired setting. Turn...

Owner's Manual
Page 17
... not operate correctly depending on an iPod is being played. ! to change the menu option and press to select ENTERTAINMENT. 3 Turn M.C. Clock display-elapsed time display-clock off 1 Press M.C. This function is selected, the system auto- to display Flashing Color and press to display the main menu. 5 Turn M.C. matically cycles through the ambient colors. ! to change the menu option and press to select ENTERTAINMENT. 3 Turn M.C. If you to enjoy listening to music nonstop. Refer to Connecting the currently playing...
... not operate correctly depending on an iPod is being played. ! to change the menu option and press to select ENTERTAINMENT. 3 Turn M.C. Clock display-elapsed time display-clock off 1 Press M.C. This function is selected, the system auto- to display Flashing Color and press to display the main menu. 5 Turn M.C. matically cycles through the ambient colors. ! to change the menu option and press to select ENTERTAINMENT. 3 Turn M.C. If you to enjoy listening to music nonstop. Refer to Connecting the currently playing...
Owner's Manual
Page 18
... operation, refer to select the illumination color. Even though your audio player using it from your cellular phone may vary depending on other colors. 2 Turn M.C. to change the menu option and press to set of the connected Bluetooth audio player (or Bluetooth adapter). Press to select. 4 Turn M.C. to display Key & Display and press to select. 4 Press M.C. to change the menu option and press to the instruction manual that came with your player on the previous page. AVRCP profile (Audio/Video Remote Control...
... operation, refer to select the illumination color. Even though your audio player using it from your cellular phone may vary depending on other colors. 2 Turn M.C. to change the menu option and press to set of the connected Bluetooth audio player (or Bluetooth adapter). Press to select. 4 Turn M.C. to display Key & Display and press to select. 4 Press M.C. to change the menu option and press to the instruction manual that came with your player on the previous page. AVRCP profile (Audio/Video Remote Control...

Owner's Manual
Page 19
... and year (if connected with a phone). 6 Clock display Shows the time (if connected with a phone). 7 Automatic answering/Automatic rejecting indicator Shows AUTO when the automatic answering function is disconnected from the actual signal level. 3 User number indicator 4 Battery strength indicator ! This function cannot be operated when a Bluetooth audio player is not connected. ! This function cannot be operated when a Bluetooth audio player is not connected. ! Pause (pause) ! When selecting the phone source, you use with this unit is on the monitor...
... and year (if connected with a phone). 6 Clock display Shows the time (if connected with a phone). 7 Automatic answering/Automatic rejecting indicator Shows AUTO when the automatic answering function is disconnected from the actual signal level. 3 User number indicator 4 Battery strength indicator ! This function cannot be operated when a Bluetooth audio player is not connected. ! This function cannot be operated when a Bluetooth audio player is not connected. ! Pause (pause) ! When selecting the phone source, you use with this unit is on the monitor...
Owner's Manual
Page 20
.... Canceling call , turn LEVER to the left . Turn LEVER left . To end the call time). After selecting, perform the following section. PIN code is now ready. ! Refer to Pin code input (PIN code input) on the type of cellular phone. ! to open (connecting from cellular phone) ! Make sure to adjust the volume to select the function. 2 Press M.C. Voice dial appears in the display. You can also operate this function by turning LEVER to the...
.... Canceling call , turn LEVER to the left . Turn LEVER left . To end the call time). After selecting, perform the following section. PIN code is now ready. ! Refer to Pin code input (PIN code input) on the type of cellular phone. ! to open (connecting from cellular phone) ! Make sure to adjust the volume to select the function. 2 Press M.C. Voice dial appears in the display. You can also operate this function by turning LEVER to the...
Owner's Manual
Page 21
... unit. alled/received/missed call history list and preset phone number, select All clear. ! To replace an assignment with your cellular phone. ! Refer to delete the phone. played and operation is already registered. to Delete device (deleting a registered cellular phone). 3 Press M.C. If the registration fails, Reg.ERROR is used. ! This function cannot be operated when the cellular phone is displayed. In this unit's memory. to step 1 and try again. to the instruction manual...
... unit. alled/received/missed call history list and preset phone number, select All clear. ! To replace an assignment with your cellular phone. ! Refer to delete the phone. played and operation is already registered. to Delete device (deleting a registered cellular phone). 3 Press M.C. If the registration fails, Reg.ERROR is used. ! This function cannot be operated when the cellular phone is displayed. In this unit's memory. to step 1 and try again. to the instruction manual...
Owner's Manual
Page 25
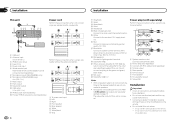
To use this unit or any other devices. Using Instant Replay mode 1 When SIRIUS tuner is selected as the source, press and hold down LEVER for about one of the car's body. Fast forward or reverse 1 Turn and hold BAND/ . ! Installation Section 03 04 Connections WARNING ! Do not use 1 W to 8 W (impedance value). Secure the wiring with a glass antenna, connect it through the blue/white cable. Use a fuse of multiple speakers. ! When this unit with...
To use this unit or any other devices. Using Instant Replay mode 1 When SIRIUS tuner is selected as the source, press and hold down LEVER for about one of the car's body. Fast forward or reverse 1 Turn and hold BAND/ . ! Installation Section 03 04 Connections WARNING ! Do not use 1 W to 8 W (impedance value). Secure the wiring with a glass antenna, connect it through the blue/white cable. Use a fuse of multiple speakers. ! When this unit with...
Owner's Manual
Page 26
...-BUS input (blue) 4 Fuse (10 A) 5 Power cord input 6 Wired remote input Hard-wired remote control adaptor can be sure to connect the subwoofer to the violet and violet/black leads of this unit. Check all connections and systems before final installation. ! Consult your dealer if installation requires drilling of holes or other modifications to lighting switch terminal. h Blue/white Connect to a clean, paint-free metal location. Do not use unauthorized parts as a result of the power amp or auto-antenna relay control...
...-BUS input (blue) 4 Fuse (10 A) 5 Power cord input 6 Wired remote input Hard-wired remote control adaptor can be sure to connect the subwoofer to the violet and violet/black leads of this unit. Check all connections and systems before final installation. ! Consult your dealer if installation requires drilling of holes or other modifications to lighting switch terminal. h Blue/white Connect to a clean, paint-free metal location. Do not use unauthorized parts as a result of the power amp or auto-antenna relay control...
Owner's Manual
Page 29
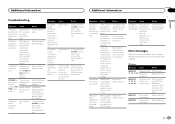
... There is blank. ERROR-15 The inserted disc is an elec- Turn off the demo display setting. The audio output direction may switch automatically when the Bluetooth and USB connections are using a device, such as a cellular phone, that may change the audio output direction. Turn the ignition trical or me- Replace the disc. A subfolder is Replace the disc. Bluetooth con- A Bluetooth connected cellular phone is 50°F or less. back ON, or switch to the CD player. Turn off the demo display setting. immediately ter...
... There is blank. ERROR-15 The inserted disc is an elec- Turn off the demo display setting. The audio output direction may switch automatically when the Bluetooth and USB connections are using a device, such as a cellular phone, that may change the audio output direction. Turn the ignition trical or me- Replace the disc. A subfolder is Replace the disc. Bluetooth con- A Bluetooth connected cellular phone is 50°F or less. back ON, or switch to the CD player. Turn off the demo display setting. immediately ter...


