Owner's Manual
Page 3
...on iPod 42 - Disconnecting a Bluetooth audio player 45 En 3 Adjusting loudness 27 - Adjusting initial settings 29 - Setting the clock 30 - Turning the clock display on your iPod 41 - Browsing for Bluetooth wireless connection 32 Other Functions 33 - Basic Operations 43 - Introduction of ... 31 - Introduction of advanced operations 38 - Using balance adjustment 26 - Switching the reverse mode 32 - Displaying the Radio ID 37 SIRIUS Satellite Radio tuner 38 - Using the high pass filter 28 - Selecting the display language 30 - Switching the dimmer setting 30...
...on iPod 42 - Disconnecting a Bluetooth audio player 45 En 3 Adjusting loudness 27 - Adjusting initial settings 29 - Setting the clock 30 - Turning the clock display on your iPod 41 - Browsing for Bluetooth wireless connection 32 Other Functions 33 - Basic Operations 43 - Introduction of ... 31 - Introduction of advanced operations 38 - Using balance adjustment 26 - Switching the reverse mode 32 - Displaying the Radio ID 37 SIRIUS Satellite Radio tuner 38 - Using the high pass filter 28 - Selecting the display language 30 - Switching the dimmer setting 30...
Owner's Manual
Page 10
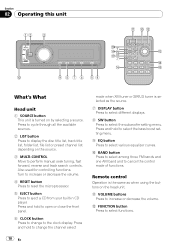
... button Press to reset the microprocessor. 5 EJECT button Press to increase or decrease the volume. Press and hold to open or close the front panel. 6 CLOCK button Press to change the channel select mode when XM tuner or SIRIUS tuner is selected as when using the buttons on the head unit.... b VOLUME buttons Press to eject a CD from your built-in CD player. Also used for controlling functions. a BAND button Press to select among three FM bands and one AM band and to select functions...
... button Press to reset the microprocessor. 5 EJECT button Press to increase or decrease the volume. Press and hold to open or close the front panel. 6 CLOCK button Press to change the channel select mode when XM tuner or SIRIUS tuner is selected as when using the buttons on the head unit.... b VOLUME buttons Press to eject a CD from your built-in CD player. Also used for controlling functions. a BAND button Press to select among three FM bands and one AM band and to select functions...
Owner's Manual
Page 29
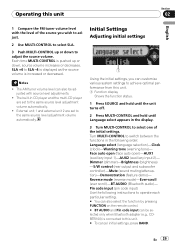
... (sound muting/attenuation)-Demonstration (feature demo)- Pin code input (pin code input) Use the following order: Language select (language selection)-Clock (clock)-Warning tone (warning tone)- Face auto open (face auto open)-AUX1 (auxiliary input 1)-AUX2 (auxiliary input 2)- Reverse mode (reverse ...2 are set to the same source level adjustment volume automatically. En 29 SLA +4 to switch between the functions in CD player and the multi-CD player are set to the same source level adjustment volume automatically. ! Operating this unit. # To cancel initial settings,...
... (sound muting/attenuation)-Demonstration (feature demo)- Pin code input (pin code input) Use the following order: Language select (language selection)-Clock (clock)-Warning tone (warning tone)- Face auto open (face auto open)-AUX1 (auxiliary input 1)-AUX2 (auxiliary input 2)- Reverse mode (reverse ...2 are set to the same source level adjustment volume automatically. En 29 SLA +4 to switch between the functions in CD player and the multi-CD player are set to the same source level adjustment volume automatically. ! Operating this unit. # To cancel initial settings,...
Owner's Manual
Page 30
...-CONTROL to select Dimmer. 30 En Switching the dimmer setting To prevent the display from the head unit within four seconds of the clock display the segment selected will sound. You can select the language best suited to your convenience, this unit equips multiple language display....MULTI-CONTROL. ! Note You can be activated individually. This function is automatically dimmed when the car's headlights are rounded down to put a clock right. Section 02 Operating this unit Selecting the display language For your first language. 1 Use MULTI-CONTROL to select Language select. 2 Press...
...-CONTROL to select Dimmer. 30 En Switching the dimmer setting To prevent the display from the head unit within four seconds of the clock display the segment selected will sound. You can select the language best suited to your convenience, this unit equips multiple language display....MULTI-CONTROL. ! Note You can be activated individually. This function is automatically dimmed when the car's headlights are rounded down to put a clock right. Section 02 Operating this unit Selecting the display language For your first language. 1 Use MULTI-CONTROL to select Language select. 2 Press...
Owner's Manual
Page 34
...can enjoy entertainment displays while listening to each AUX1 or AUX2 source can be selected. CD - Even when the sources and the feature demo are off, the clock display appears on the display. % Press CLOCK to turn the clock display on or off , press PGM again. % Press PGM and hold until ...AUX appears in CD player ! Turn to change the menu option; iPod ! Bluetooth audio player ! DVD - ...
...can enjoy entertainment displays while listening to each AUX1 or AUX2 source can be selected. CD - Even when the sources and the feature demo are off, the clock display appears on the display. % Press CLOCK to turn the clock display on or off , press PGM again. % Press PGM and hold until ...AUX appears in CD player ! Turn to change the menu option; iPod ! Bluetooth audio player ! DVD - ...

Owner's Manual
Page 37
... can also select the XM channel select setting in the XM preset number indicator and then remain lit. press and hold CLOCK again. 2 Push MULTI-CONTROL up or down to select RADIO ID from memory. # You can also change the station by pushing MULTI-CONTROL up or down . The number you ...CH 000, the ID code is canceled. # Display of the ID code repeats displaying RADIO ID and the ID code one of preset tuning buttons 1 to 6 and hold CLOCK to switch to select the desired station. Displaying the Radio ID Channel number select setting If you have pressed will flash and then remain...
... can also select the XM channel select setting in the XM preset number indicator and then remain lit. press and hold CLOCK again. 2 Push MULTI-CONTROL up or down to select RADIO ID from memory. # You can also change the station by pushing MULTI-CONTROL up or down . The number you ...CH 000, the ID code is canceled. # Display of the ID code repeats displaying RADIO ID and the ID code one of preset tuning buttons 1 to 6 and hold CLOCK to switch to select the desired station. Displaying the Radio ID Channel number select setting If you have pressed will flash and then remain...
Owner's Manual
Page 39
...CAT appears in the display. # To return to the ordinary display. Note You can also select the function by using MULTI-CONTROL. Press and hold CLOCK again. 2 Push MULTI-CONTROL up or down to select the desired channel category. 3 Push MULTI-CONTROL left or right to select the desired channel ...remote control. # To return to the channel display, press BAND. # If you want to store in memory press one -time scroll. % Press and hold CLOCK to switch to select the scroll setting. Up to 18 stations, six for each of preset tuning buttons 1 to six broadcast stations for selecting a channel...
...CAT appears in the display. # To return to the ordinary display. Note You can also select the function by using MULTI-CONTROL. Press and hold CLOCK again. 2 Push MULTI-CONTROL up or down to select the desired channel category. 3 Push MULTI-CONTROL left or right to select the desired channel ...remote control. # To return to the channel display, press BAND. # If you want to store in memory press one -time scroll. % Press and hold CLOCK to switch to select the scroll setting. Up to 18 stations, six for each of preset tuning buttons 1 to six broadcast stations for selecting a channel...

