
Owner's Manual
Page 2
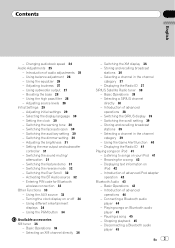
... will know how to User 5 For Canadian model 5 About this Pioneer product. Remote control 10 Basic Operations 11 - Introduction of advanced operations 23 - Playing tracks in CD Player 14 - After you have finished reading the instructions, keep this unit What's What 10 - Using the remote control 9 Operating this manual in a random order (shuffle...
... will know how to User 5 For Canadian model 5 About this Pioneer product. Remote control 10 Basic Operations 11 - Introduction of advanced operations 23 - Playing tracks in CD Player 14 - After you have finished reading the instructions, keep this unit What's What 10 - Using the remote control 9 Operating this manual in a random order (shuffle...
Owner's Manual
Page 3
...demo 31 - Switching the reverse mode 32 - Using the AUX source 33 - Basic Operations 36 - Selecting an XM channel directly 36 - Displaying the Radio ID 37 SIRIUS Satellite Radio tuner 38 - Switching the scroll setting 39 - Displaying the Radio ID 41 Playing songs on iPod 42 - Introduction... - Selecting a channel in the channel category 37 - Basic Operations 43 - Pausing a song 45 - Changing audiobook speed 24 Audio Adjustments 25 - Using the equalizer 26 - Switching the warning tone 30 - Adjusting the brightness 31 - Switching the Ever Scroll 32 - Switching the XM display 36 -...
...demo 31 - Switching the reverse mode 32 - Using the AUX source 33 - Basic Operations 36 - Selecting an XM channel directly 36 - Displaying the Radio ID 37 SIRIUS Satellite Radio tuner 38 - Switching the scroll setting 39 - Displaying the Radio ID 41 Playing songs on iPod 42 - Introduction... - Selecting a channel in the channel category 37 - Basic Operations 43 - Pausing a song 45 - Changing audiobook speed 24 Audio Adjustments 25 - Using the equalizer 26 - Switching the warning tone 30 - Adjusting the brightness 31 - Switching the Ever Scroll 32 - Switching the XM display 36 -...
Owner's Manual
Page 4
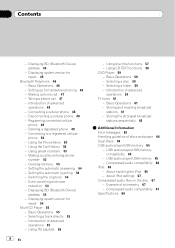
... 49 - Setting the automatic rejecting 54 - Switching the ring tone 54 - Displaying system version for hands-free phoning 46 - Selecting a track directly 55 - Using ITS playlists 56 4 En - Using CD TEXT functions 58 DVD Player 59 - Introduction of a hierarchy 67 - USB audio player/USB memory compatibility 65 - Compressed audio compatibility 66 iPod 66...
... 49 - Setting the automatic rejecting 54 - Switching the ring tone 54 - Displaying system version for hands-free phoning 46 - Selecting a track directly 55 - Using ITS playlists 56 4 En - Using CD TEXT functions 58 DVD Player 59 - Introduction of a hierarchy 67 - USB audio player/USB memory compatibility 65 - Compressed audio compatibility 66 iPod 66...
Owner's Manual
Page 5
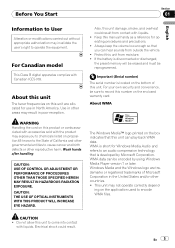
...INSTRUMENTS WITH THIS PRODUCT WILL INCREASE EYE HAZARD. ing on the enclosed warranty card. En 5 About this unit The tuner frequencies on this unit. Use in the United States and/or other countries. ! Also, this unit damage, smoke, and overheat could result. Keep this unit are trademarks ... from moisture. ! This unit may invalidate the user's right to encode WMA files. CAUTION ! Do not allow this number on the application used to operate the equipment. Wash hands after handling. Always keep the volume low enough so that this unit from outside the vehicle. ! For ...
...INSTRUMENTS WITH THIS PRODUCT WILL INCREASE EYE HAZARD. ing on the enclosed warranty card. En 5 About this unit The tuner frequencies on this unit. Use in the United States and/or other countries. ! Also, this unit damage, smoke, and overheat could result. Keep this unit are trademarks ... from moisture. ! This unit may invalidate the user's right to encode WMA files. CAUTION ! Do not allow this number on the application used to operate the equipment. Wash hands after handling. Always keep the volume low enough so that this unit from outside the vehicle. ! For ...
Owner's Manual
Page 6
and other countries. Pioneer CD-IU50 interface cable is required. Firmware Ver. 1.2 or later ! CD-IB100N). For satellite radio tuner operation, please refer to your dealer. - ver broadcasting technology to provide listeners in their cars and at home with ... the U.S. For details, consult your dealer or nearest authorized Pioneer service station regarding the satellite radio tuner that the Satellite Radio Tuner for such use is also available. This unit can be controlled by this unit. Satellite radio will use direct satellite-to-recei- Section 01 Before You Start About ...
and other countries. Pioneer CD-IU50 interface cable is required. Firmware Ver. 1.2 or later ! CD-IB100N). For satellite radio tuner operation, please refer to your dealer. - ver broadcasting technology to provide listeners in their cars and at home with ... the U.S. For details, consult your dealer or nearest authorized Pioneer service station regarding the satellite radio tuner that the Satellite Radio Tuner for such use is also available. This unit can be controlled by this unit. Satellite radio will use direct satellite-to-recei- Section 01 Before You Start About ...
Owner's Manual
Page 7
...or distributor from it. U.S.A. "SAT Radio", the SAT Radio logo and all related marks are trademarks of direct sunlight and high temperatures. ! Pioneer Electronics (USA) Inc. Keep the front panel out of Sirius Satellite Radio inc., and XM Satellite Radio Inc. CUSTOMER SUPPORT DIVISION P.O. We ... and the front panel will keep your purchase on file to help you purchased this unit for data lost while using this unit. ! Pioneer accepts no responsibility for after turning the ignition switch to on the latest products and technologies. 3 Download owner's manuals...
...or distributor from it. U.S.A. "SAT Radio", the SAT Radio logo and all related marks are trademarks of direct sunlight and high temperatures. ! Pioneer Electronics (USA) Inc. Keep the front panel out of Sirius Satellite Radio inc., and XM Satellite Radio Inc. CUSTOMER SUPPORT DIVISION P.O. We ... and the front panel will keep your purchase on file to help you purchased this unit for data lost while using this unit. ! Pioneer accepts no responsibility for after turning the ignition switch to on the latest products and technologies. 3 Download owner's manuals...

Owner's Manual
Page 8
.... ! One is set to prevent permanent damage. Section 01 Before You Start Removing the front panel 1 Press and hold EJECT to operate properly ! Prior to using this unit is the feature demo mode. If this unit should be reset under the following conditions: 8 En Take care not to grip it too...
.... ! One is set to prevent permanent damage. Section 01 Before You Start Removing the front panel 1 Press and hold EJECT to operate properly ! Prior to using this unit is the feature demo mode. If this unit should be reset under the following conditions: 8 En Take care not to grip it too...
Owner's Manual
Page 9
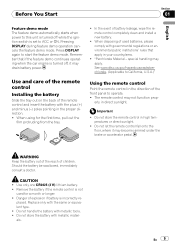
...- erly in high temperatures or direct sunlight. ! Remove the battery if the remote control is not used batteries, please comply with the plus (+) and minus (-) poles pointing in the proper direction. ! When disposing of used for the first time, pull out the film protruding from the tray. ! Should the battery be ...swallowed, immediately consult a doctor. Use and care of the remote control Installing the battery Slide the tray out on the back of the remote control and insert the battery with...
...- erly in high temperatures or direct sunlight. ! Remove the battery if the remote control is not used batteries, please comply with the plus (+) and minus (-) poles pointing in the proper direction. ! When disposing of used for the first time, pull out the film protruding from the tray. ! Should the battery be ...swallowed, immediately consult a doctor. Use and care of the remote control Installing the battery Slide the tray out on the back of the remote control and insert the battery with...
Owner's Manual
Page 10
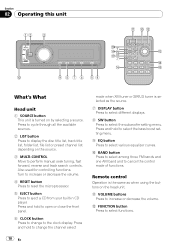
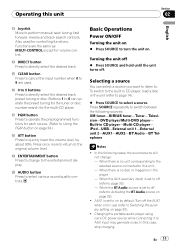
...VOLUME buttons Press to perform manual seek tuning, fast forward, reverse and track search controls. c FUNCTION button Press to eject a CD from your built-in CD player. Turn to increase or decrease the volume. 4 RESET button Press to reset the microprocessor. 5 EJECT button Press to ... boost setting menu. 9 EQ button Press to select the subwoofer setting menu. Press and hold to change to cancel the control mode of functions. Also used for controlling functions. Section 02 Operating this unit 12 3 a 9 8 7 6 54 b ac k j h 1 i 7 d e g f What's What Head unit 1 SOURCE ...
...VOLUME buttons Press to perform manual seek tuning, fast forward, reverse and track search controls. c FUNCTION button Press to eject a CD from your built-in CD player. Turn to increase or decrease the volume. 4 RESET button Press to reset the microprocessor. 5 EJECT button Press to ... boost setting menu. 9 EQ button Press to select the subwoofer setting menu. Press and hold to change to cancel the control mode of functions. Also used for controlling functions. Section 02 Operating this unit 12 3 a 9 8 7 6 54 b ac k j h 1 i 7 d e g f What's What Head unit 1 SOURCE ...
Owner's Manual
Page 11
Functions are used for the multi-CD player. f CLEAR button Press to cancel the input number when 0 to quickly lower the volume level, by ...-External unit 1-External unit 2-AUX1-AUX2-BT Audio-BT Telephone Notes ! When there is no disc or magazine in use (refer to Switching the auxiliary setting on page 34.) i ATT button Press to 9 are the same as MULTI-...CONTROL except for each source. (Refer to change : - Turn off (refer to this case, stop charging. Also used . Press once more to return to AUX input may generate noise. Turning the unit off % Press SOURCE and hold until...
Functions are used for the multi-CD player. f CLEAR button Press to cancel the input number when 0 to quickly lower the volume level, by ...-External unit 1-External unit 2-AUX1-AUX2-BT Audio-BT Telephone Notes ! When there is no disc or magazine in use (refer to Switching the auxiliary setting on page 34.) i ATT button Press to 9 are the same as MULTI-...CONTROL except for each source. (Refer to change : - Turn off (refer to this case, stop charging. Also used . Press once more to return to AUX input may generate noise. Turning the unit off % Press SOURCE and hold until...

Owner's Manual
Page 12
...To perform seek tuning, push and hold MULTI-CONTROL left or right for good reception is on. 4 Preset number indicator 5 Signal level indicator Shows the radio wave strength. 6 Frequency indicator 1 Press SOURCE to select the tuner. 2 Press BAND to external unit 1 or external unit 2 is turned on. External...adjust the sound level. To retract the antenna, turn the source off. Two external units can skip stations. Adjusting the volume % Use MULTI-CONTROL to a Pioneer product (such as you can be controlled by pushing MULTI-CONTROL left or right. # If you push and hold MULTI-CONTROL ...
...To perform seek tuning, push and hold MULTI-CONTROL left or right for good reception is on. 4 Preset number indicator 5 Signal level indicator Shows the radio wave strength. 6 Frequency indicator 1 Press SOURCE to select the tuner. 2 Press BAND to external unit 1 or external unit 2 is turned on. External...adjust the sound level. To retract the antenna, turn the source off. Two external units can skip stations. Adjusting the volume % Use MULTI-CONTROL to a Pioneer product (such as you can be controlled by pushing MULTI-CONTROL left or right. # If you push and hold MULTI-CONTROL ...

Owner's Manual
Page 13
...to select. # You can tune in to those frequencies with BSM may replace broadcast frequencies you have selected will flash in memory. 3 Use MULTI-CONTROL to preset tuning numbers by pressing FUNCTION on . Introduction of advanced operations 1 Press MULTI-CONTROL to the ordinary display. Storing ...BSM on the remote control. # To return to the frequency display, press BAND. # If you press the same preset tuning button the radio station frequency is automatically returned to display the main menu. Six strongest broadcast frequencies will be stored in memory. 1 When you find a ...
...to select. # You can tune in to those frequencies with BSM may replace broadcast frequencies you have selected will flash in memory. 3 Use MULTI-CONTROL to preset tuning numbers by pressing FUNCTION on . Introduction of advanced operations 1 Press MULTI-CONTROL to the ordinary display. Storing ...BSM on the remote control. # To return to the frequency display, press BAND. # If you press the same preset tuning button the radio station frequency is automatically returned to display the main menu. Six strongest broadcast frequencies will be stored in memory. 1 When you find a ...
Owner's Manual
Page 14
... is displayed. ! Turn to open the front panel. Section 02 Operating this unit # To cancel the storage process, press MULTI-CONTROL again. 3 Use MULTI-CONTROL to select Local in CD player can be played back.) Read the precautions with discs and player on . # To turn local seek tuning on page 64. 1 23...)-recorded WMA files, the average bit rate value is displayed instead of only the strongest stations, while lower settings let you tune in only those radio stations with sufficiently strong signals for good reception. 1 Use MULTI-CONTROL to select the desired station.
... is displayed. ! Turn to open the front panel. Section 02 Operating this unit # To cancel the storage process, press MULTI-CONTROL again. 3 Use MULTI-CONTROL to select Local in CD player can be played back.) Read the precautions with discs and player on . # To turn local seek tuning on page 64. 1 23...)-recorded WMA files, the average bit rate value is displayed instead of only the strongest stations, while lower settings let you tune in only those radio stations with sufficiently strong signals for good reception. 1 Use MULTI-CONTROL to select the desired station.
Owner's Manual
Page 15
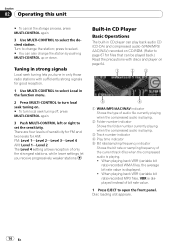
... or MIXED-MODE CDs, compressed audio and CD-DA can select a track directly by pressing CLEAR. 3 Press DIRECT. However, if folder 01 (ROOT) contains no files, playback commences with folder 02.) Selecting a track directly When using the remote control, you to search every 10 tracks in the ... disc. ! When playing compressed audio, there is automatically canceled. About Ever Scroll, refer to enter the desired track number. # You can eject a CD (CD-ROM) by pressing BAND. ! Track number input display appears. 2 Press 0 to 9 buttons to Switching the Ever Scroll on page 63. ! The...
... or MIXED-MODE CDs, compressed audio and CD-DA can select a track directly by pressing CLEAR. 3 Press DIRECT. However, if folder 01 (ROOT) contains no files, playback commences with folder 02.) Selecting a track directly When using the remote control, you to search every 10 tracks in the ... disc. ! When playing compressed audio, there is automatically canceled. About Ever Scroll, refer to enter the desired track number. # You can eject a CD (CD-ROM) by pressing BAND. ! Track number input display appears. 2 Press 0 to 9 buttons to Switching the Ever Scroll on page 63. ! The...
Owner's Manual
Page 16
...- Tracks will have already been recorded on the remote control. # When playing a CD TEXT disc, you cannot switch to play )- Folder repeat - Refer to Selecting a repeat play on this page. 1 Use MULTI-CONTROL to select Scan mode in the function menu. 2 Press MULTI-CONTROL to ...FUNCTION, AUDIO and ENTERTAINMENT appear on the display. 3 Turn MULTI-CONTROL to select FUNCTION. The function name appears on the display. 2 Use MULTI-CONTROL to select the function. Repeat the current folder # If you do not operate functions except for TitleInput "A" within the selected ...
...- Tracks will have already been recorded on the remote control. # When playing a CD TEXT disc, you cannot switch to play )- Folder repeat - Refer to Selecting a repeat play on this page. 1 Use MULTI-CONTROL to select Scan mode in the function menu. 2 Press MULTI-CONTROL to ...FUNCTION, AUDIO and ENTERTAINMENT appear on the display. 3 Turn MULTI-CONTROL to select FUNCTION. The function name appears on the display. 2 Use MULTI-CONTROL to select the function. Repeat the current folder # If you do not operate functions except for TitleInput "A" within the selected ...

Owner's Manual
Page 17
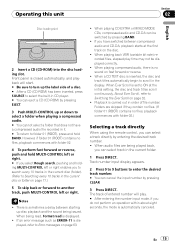
...-CONTROL to turn scan play off , press MULTI-CONTROL again. Entering disc titles Use the disc title input feature to store up to 10 characters long. 1 Play the CD that CD will begin again. Operating this unit. 1 Use MULTI-CONTROL to select Compression in the unit. Rough search - Searching every 10...function menu. 3 Press DISPLAY to switch between fast forward/reverse and searching every 10 tracks. The next time you insert a CD for which you to search every 10 tracks. 1 Use MULTI-CONTROL to select Search mode in the function menu. 2 Press MULTI-CONTROL to turn pause off . # If the ...
...-CONTROL to turn scan play off , press MULTI-CONTROL again. Entering disc titles Use the disc title input feature to store up to 10 characters long. 1 Play the CD that CD will begin again. Operating this unit. 1 Use MULTI-CONTROL to select Compression in the unit. Rough search - Searching every 10...function menu. 3 Press DISPLAY to switch between fast forward/reverse and searching every 10 tracks. The next time you insert a CD for which you to search every 10 tracks. 1 Use MULTI-CONTROL to select Search mode in the function menu. 2 Press MULTI-CONTROL to turn pause off . # If the ...
Owner's Manual
Page 18
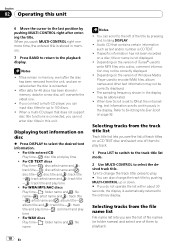
...list of file names (or folder names) and select one of them to play back. 1 Press LIST to switch to the track title list mode. 2 Use MULTI-CONTROL to encode WMA files, album names and other text information may be correctly displayed. ! Depending on a disc, title or name is reinserted. !...the Ever Scroll on disc % Press DISPLAY to the playback display. For title entered CD Play time- : disc title and play time ! If specific information has not been recorded on the version of iTunes® used to select the desired track title. Selecting tracks from the track title list Track title...
...list of file names (or folder names) and select one of them to play back. 1 Press LIST to switch to the track title list mode. 2 Use MULTI-CONTROL to encode WMA files, album names and other text information may be correctly displayed. ! Depending on a disc, title or name is reinserted. !...the Ever Scroll on disc % Press DISPLAY to the playback display. For title entered CD Play time- : disc title and play time ! If specific information has not been recorded on the version of iTunes® used to select the desired track title. Selecting tracks from the track title list Track title...

Owner's Manual
Page 19
... is automatically returned to select the desired file name (or folder name). push right to see a list of the files (or folders) in the display. 2 Use MULTI-CONTROL to the ordinary display. Turn to change the name of files and folders appear in the selected folder. # You can also change the...
... is automatically returned to select the desired file name (or folder name). push right to see a list of the files (or folders) in the display. 2 Use MULTI-CONTROL to the ordinary display. Turn to change the name of files and folders appear in the selected folder. # You can also change the...
Owner's Manual
Page 20
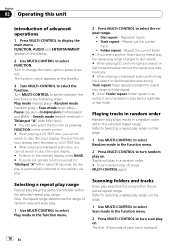
...input display appears. 2 Press 0 to 9 buttons to enter the desired track number. # You can - The function name appears on the display. 2 Use MULTI-CONTROL to select the repeat range. Turn MULTI-CONTROL to switch between the functions in the following order: Play mode (repeat play)-Random mode... (random play)-Scan mode (scan play range. 1 Use MULTI-CONTROL to select Play mode in the function menu. 2 Press MULTI-CONTROL repeatedly to select FUNCTION. Repeat just the current file ! Pushing...
...input display appears. 2 Press 0 to 9 buttons to enter the desired track number. # You can - The function name appears on the display. 2 Use MULTI-CONTROL to select the repeat range. Turn MULTI-CONTROL to switch between the functions in the following order: Play mode (repeat play)-Random mode... (random play)-Scan mode (scan play range. 1 Use MULTI-CONTROL to select Play mode in the function menu. 2 Press MULTI-CONTROL repeatedly to select FUNCTION. Repeat just the current file ! Pushing...

Owner's Manual
Page 21
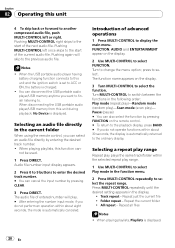
... menu. 3 Press MULTI-CONTROL to select Pause in a random order. # To turn pause off, press MULTI-CONTROL again. Pausing playback 1 Use MULTI-CONTROL to turn pause on . Audio files will play in the function menu. 2 Press MULTI-CONTROL to playback. When Ever Scroll is ... off , press MULTI-CONTROL again. Scanning folders and files Scan play searches the file within the selected repeat range. 1 Select the repeat range. 2 Use MULTI-CONTROL to the playback display, select Scan mode again by pressing and holding DISPLAY. ! Play time- : folder name and : file name -...
... menu. 3 Press MULTI-CONTROL to select Pause in a random order. # To turn pause off, press MULTI-CONTROL again. Pausing playback 1 Use MULTI-CONTROL to turn pause on . Audio files will play in the function menu. 2 Press MULTI-CONTROL to playback. When Ever Scroll is ... off , press MULTI-CONTROL again. Scanning folders and files Scan play searches the file within the selected repeat range. 1 Select the repeat range. 2 Use MULTI-CONTROL to the playback display, select Scan mode again by pressing and holding DISPLAY. ! Play time- : folder name and : file name -...


