Owner's Manual
Page 2
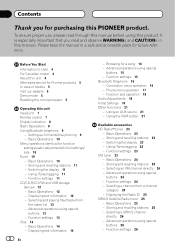
... for a song 14 - Function settings 13 iPod 14 - Basic Operations 14 - Browsing for purchasing this PIONEER product. Connection menu operation 16 - Phone menu operation 17 - Selecting an XM channel directly 24 - Selecting a SIRIUS channel directly 26 - Before You Start Information to User 4 For Canadian model 4 About this unit Head unit 7 Remote control 7 Display indication 8 Basic Operations 8 Using Bluetooth telephone 9 - Displaying text information 12 - Selecting and playing files/tracks from a channel category 24 - Function settings 24 - To ensure proper...
... for a song 14 - Function settings 13 iPod 14 - Basic Operations 14 - Browsing for purchasing this PIONEER product. Connection menu operation 16 - Phone menu operation 17 - Selecting an XM channel directly 24 - Selecting a SIRIUS channel directly 26 - Before You Start Information to User 4 For Canadian model 4 About this unit Head unit 7 Remote control 7 Display indication 8 Basic Operations 8 Using Bluetooth telephone 9 - Displaying text information 12 - Selecting and playing files/tracks from a channel category 24 - Function settings 24 - To ensure proper...
Owner's Manual
Page 4
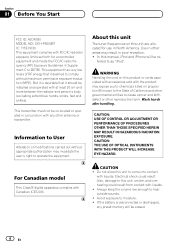
...: AJDK030 MODEL NO.: DEH-P6200BT IC: 775E-K030 This equipment complies with FCC/IC radiation exposure limits set forth for use in conjunction with any preset memory will be co-located or operated in North America. About this unit The tuner frequencies on this unit, smoke, and overheating could result. CAUTION ! Also, damage to come into contact with liquids. ! CAUTION: USE OF CONTROL OR ADJUSTMENT OR...
...: AJDK030 MODEL NO.: DEH-P6200BT IC: 775E-K030 This equipment complies with FCC/IC radiation exposure limits set forth for use in conjunction with any preset memory will be co-located or operated in North America. About this unit The tuner frequencies on this unit, smoke, and overheating could result. CAUTION ! Also, damage to come into contact with liquids. ! CAUTION: USE OF CONTROL OR ADJUSTMENT OR...
Owner's Manual
Page 5
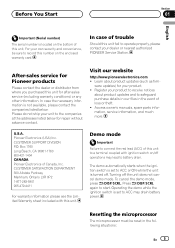
... the Limited Warranty sheet included with ignition switch on/off operations may drain battery power. Demo mode Important Failure to connect the red lead (ACC) of this unit to a terminal coupled with this unit. To cancel the demo mode, press /DISP/SCRL. For your product to receive notices about product updates (such as firm- After-sales service for Pioneer products Please contact the dealer or...
... the Limited Warranty sheet included with ignition switch on/off operations may drain battery power. Demo mode Important Failure to connect the red lead (ACC) of this unit to a terminal coupled with this unit. To cancel the demo mode, press /DISP/SCRL. For your product to receive notices about product updates (such as firm- After-sales service for Pioneer products Please contact the dealer or...
Owner's Manual
Page 7
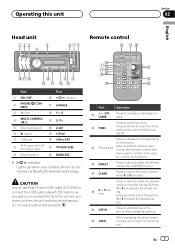
.... tion. CAUTION Use an optional Pioneer USB cable (CD-U50E) to connect the USB audio player/USB memory as any device connected directly to increase or decrease volume. Buttons o 0 to 9 buttons 1 to 6 4 MULTI-CONTROL (M.C.) d 3/ 5 Disc loading slot e 2/ 6 h (eject) f 1/iPod 7 USB port g S.Rtrv/SAT 8 AUX input jack (3.5 h mm stereo jack) /DISP/SCRL 9 Detach button i BAND/ESC ! p OFF/H Press to display the list depending on the phone while operating a phone. En 7 Operating this unit Section 02 English Head unit 123 5 4 678 Remote control j hk ihg...
.... tion. CAUTION Use an optional Pioneer USB cable (CD-U50E) to connect the USB audio player/USB memory as any device connected directly to increase or decrease volume. Buttons o 0 to 9 buttons 1 to 6 4 MULTI-CONTROL (M.C.) d 3/ 5 Disc loading slot e 2/ 6 h (eject) f 1/iPod 7 USB port g S.Rtrv/SAT 8 AUX input jack (3.5 h mm stereo jack) /DISP/SCRL 9 Detach button i BAND/ESC ! p OFF/H Press to display the list depending on the phone while operating a phone. En 7 Operating this unit Section 02 English Head unit 123 5 4 678 Remote control j hk ihg...

Owner's Manual
Page 9
... panel and the head unit are prohibited while driving. Selecting a source 1 Press SRC/OFF to adjust volume. to cycle between: XM TUNER (XM tuner)-SIRIUS (SIRIUS tuner)- When this unit's blue/white lead is connected to connect with your cellular phone via Bluetooth wireless technology, using the phone book, etc., are connected on the left until it without the engine running can drain the battery power. ! Since this unit's source is turned on standby to the vehicle's auto-antenna relay control...
... panel and the head unit are prohibited while driving. Selecting a source 1 Press SRC/OFF to adjust volume. to cycle between: XM TUNER (XM tuner)-SIRIUS (SIRIUS tuner)- When this unit's blue/white lead is connected to connect with your cellular phone via Bluetooth wireless technology, using the phone book, etc., are connected on the left until it without the engine running can drain the battery power. ! Since this unit's source is turned on standby to the vehicle's auto-antenna relay control...
Owner's Manual
Page 10
... 02 Operating this unit Basic Operations Making a phone call 1 Refer to the ordinary display from the actual call time). Rejecting an incoming call 1 When a call time appears in the display (this may not be available. ! You can cancel seek tuning by pushing M.C. Adjusting the other party's listening volume 1 Push M.C. Notes ! If private mode is selected on the phone. ! The estimated call is received, press M.C. ! Returning to Phone menu operation...
... 02 Operating this unit Basic Operations Making a phone call 1 Refer to the ordinary display from the actual call time). Rejecting an incoming call 1 When a call time appears in the display (this may not be available. ! You can cancel seek tuning by pushing M.C. Adjusting the other party's listening volume 1 Push M.C. Notes ! If private mode is selected on the phone. ! The estimated call is received, press M.C. ! Returning to Phone menu operation...
Owner's Manual
Page 11
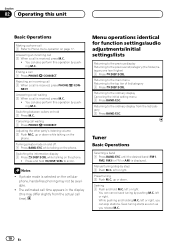
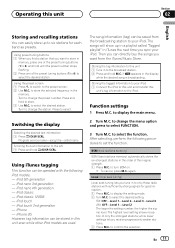
... preset screen. 2 Use M.C. iPod touch - Then you can be stored in this unit even while other iPod models are used. again. to the broadcast station. 2 Press and hold to store the selected frequency in the memory. Using iTunes tagging This function can be operated with sufficiently strong signals for each band as presets. Storing the tag information to this unit 1 Tune in to display the setting mode. 2 Turn M.C. After selecting, perform the following iPod models...
... preset screen. 2 Use M.C. iPod touch - Then you can be stored in this unit even while other iPod models are used. again. to the broadcast station. 2 Press and hold to store the selected frequency in the memory. Using iTunes tagging This function can be operated with sufficiently strong signals for each band as presets. Storing the tag information to this unit 1 Tune in to display the setting mode. 2 Turn M.C. After selecting, perform the following iPod models...
Owner's Manual
Page 12
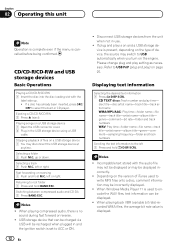
... right. Please change plug and play time- Notes ! Ejecting a CD/CD-R/CD-RW 1 Press h (eject). Fast forwarding or reversing 1 Push and hold BAND/ESC. When Windows Media Player 11 is no sound during fast forward or reverse. ! Selecting a track 1 Push M.C. When playing compressed audio, there is used to USB PnP (plug and play is on the engine. CD/CD-R/CD-RW and USB storage devices Basic Operations Playing a CD...
... right. Please change plug and play time- Notes ! Ejecting a CD/CD-R/CD-RW 1 Press h (eject). Fast forwarding or reversing 1 Push and hold BAND/ESC. When Windows Media Player 11 is no sound during fast forward or reverse. ! Selecting a track 1 Push M.C. When playing compressed audio, there is used to USB PnP (plug and play is on the engine. CD/CD-R/CD-RW and USB storage devices Basic Operations Playing a CD...
Owner's Manual
Page 15
... operated from the connected iPod. ! to display the setting mode. 2 Turn M.C. However the repeat range is different from your iPod on . Shuffle all (shuffle all on this page. to change the menu option and press to the currently playing song on the previous page. For details about the settings, refer to the link play ) ! to it using special buttons Selecting a repeat play songs from your iPod This function is displayed. ! Plays...
... operated from the connected iPod. ! to display the setting mode. 2 Turn M.C. However the repeat range is different from your iPod on . Shuffle all (shuffle all on this page. to change the menu option and press to the currently playing song on the previous page. For details about the settings, refer to the link play ) ! to it using special buttons Selecting a repeat play songs from your iPod This function is displayed. ! Plays...
Owner's Manual
Page 16
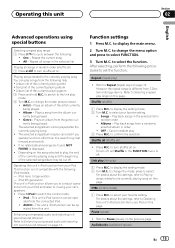
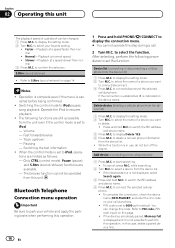
... select your cellular phone. ! When the control mode is in use, do not turn off the engine. Only CTRL (control mode), Pause (pause) and S.Rtrv (sound retriever) functions are limited as the default. Press and hold PHONE/ /CONNECT to delete. ! to display the setting mode. 2 Turn M.C. To cancel, press M.C. while searching. 2 Turn M.C. To complete the connection, check the device name (DEH-P6200BT) and enter the link code on the device name. If five devices...
... select your cellular phone. ! When the control mode is in use, do not turn off the engine. Only CTRL (control mode), Pause (pause) and S.Rtrv (sound retriever) functions are limited as the default. Press and hold PHONE/ /CONNECT to delete. ! to display the setting mode. 2 Turn M.C. To cancel, press M.C. while searching. 2 Turn M.C. To complete the connection, check the device name (DEH-P6200BT) and enter the link code on the device name. If five devices...
Owner's Manual
Page 17
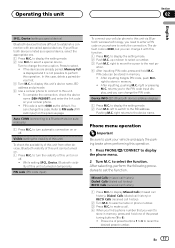
... device) address display) 1 Press M.C. Phone menu operation Important Be sure to park your phone to display the phone menu. 2 Turn M.C. Missed Calls (missed call history) Dialed Calls (dialed call history) REC'D Calls (received call history). 2 Turn M.C. to a Bluetooth device automatically) 1 Press M.C. If five devices are called special devices. Auto CONN (connecting to select a name or phone number. 3 Press M.C. lity of this operation. 1 Press PHONE/ /CONNECT to verify the connection. PIN code (PIN code input) To connect your cellular phone to store in memory...
... device) address display) 1 Press M.C. Phone menu operation Important Be sure to park your phone to display the phone menu. 2 Turn M.C. Missed Calls (missed call history) Dialed Calls (dialed call history) REC'D Calls (received call history). 2 Turn M.C. to a Bluetooth device automatically) 1 Press M.C. If five devices are called special devices. Auto CONN (connecting to select a name or phone number. 3 Press M.C. lity of this operation. 1 Press PHONE/ /CONNECT to verify the connection. PIN code (PIN code input) To connect your cellular phone to store in memory...
Owner's Manual
Page 18
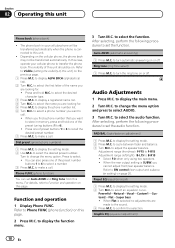
... to select. ! to call . Powerful-Natural-Vocal-Custom1-Custom2-Flat-Super bass ! to display the setting mode. 2 Use M.C. Press and hold one of the name you want to this unit Phone book (phone book) ! to display ALPH SRCH (alphabetical list). 2 Turn M.C. to change the menu option and press to select the desired preset number. Graphic EQ (equalizer adjustment) 18 En Turn to select the audio function. Refer to recall the desired preset number. 7 Press M.C. to SW control (rear output and subwoofer setting...
... to select. ! to call . Powerful-Natural-Vocal-Custom1-Custom2-Flat-Super bass ! to display the setting mode. 2 Use M.C. Press and hold one of the name you want to this unit Phone book (phone book) ! to display ALPH SRCH (alphabetical list). 2 Turn M.C. to change the menu option and press to select the desired preset number. Graphic EQ (equalizer adjustment) 18 En Turn to select the audio function. Refer to recall the desired preset number. 7 Press M.C. to SW control (rear output and subwoofer setting...
Owner's Manual
Page 19
... source, you make adjustments when the Custom2 curve is common for each source to prevent radical changes in volume when switching between equalizer band and level. 3 Press M.C. If you adjust the volume level of subwoofer. 3 Press M.C. to select. 100Hz-315Hz-1.25kHz-3.15kHz-8kHz 4 Press M.C. to display the setting mode. 2 Press M.C. to switch to display the setting mode. 2 Turn M.C. to level and then turn M.C. to display the setting mode. 2 Press M.C. to select the desired setting. to cycle between cut-off frequency...
... source, you make adjustments when the Custom2 curve is common for each source to prevent radical changes in volume when switching between equalizer band and level. 3 Press M.C. If you adjust the volume level of subwoofer. 3 Press M.C. to select. 100Hz-315Hz-1.25kHz-3.15kHz-8kHz 4 Press M.C. to display the setting mode. 2 Press M.C. to switch to display the setting mode. 2 Turn M.C. to level and then turn M.C. to display the setting mode. 2 Press M.C. to select the desired setting. to cycle between cut-off frequency...
Owner's Manual
Page 20
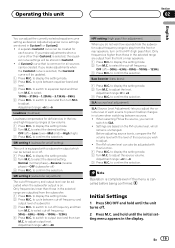
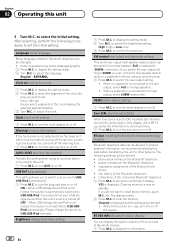
... display the information. Please change the source to display the setting mode. 2 Turn M.C. Clearing memory is turned off the ignition, a warning tone sounds. to USB/USB-iPod manually. English-ESPAÑOL Clock set the initial setting. If you do not turn the ever scroll on standby. to other persons. Section 02 Operating this function is in the display. Language (multi language) Menu language related to Bluetooth telephone can connect a rear speaker lead directly to a subwoofer without using an auxiliary device connected...
... display the information. Please change the source to display the setting mode. 2 Turn M.C. Clearing memory is turned off the ignition, a warning tone sounds. to USB/USB-iPod manually. English-ESPAÑOL Clock set the initial setting. If you do not turn the ever scroll on standby. to other persons. Section 02 Operating this function is in the display. Language (multi language) Menu language related to Bluetooth telephone can connect a rear speaker lead directly to a subwoofer without using an auxiliary device connected...
Owner's Manual
Page 28
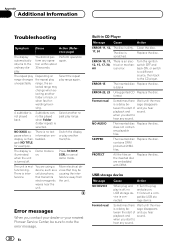
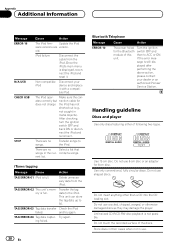
... protected WMA files. Turn the plug and play range again. sage disappears tween the start of and you start to the CD player. Built-in CD Player Message Cause Action ERROR-11, 12, The disc is dirty. 17, 30 The disc is on the inserted disc are using a Move electrical de- ERROR-15 The inserted disc Replace the disc. PROTECT All the files on . Connect a compatible USB storage device. Switch the display...
... protected WMA files. Turn the plug and play range again. sage disappears tween the start of and you start to the CD player. Built-in CD Player Message Cause Action ERROR-11, 12, The disc is dirty. 17, 30 The disc is on the inserted disc are using a Move electrical de- ERROR-15 The inserted disc Replace the disc. PROTECT All the files on . Connect a compatible USB storage device. Switch the display...
Owner's Manual
Page 29
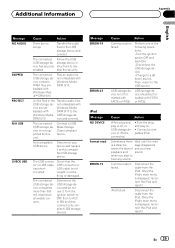
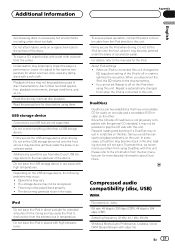
... of the following operations. -Turn the ignition switch OFF and back ON. -Disconnect the USB storage device. -Change to the USB source. iPod failure Disconnect the cable from the iPod. The USB connec- Once the iPod's main menu is connected. ! Disconnect the USB storage device and do not use it . Then, return to a different source. Turn the plug and play is off, no songs. Check that the tor or USB cable USB connector or has short...
... of the following operations. -Turn the ignition switch OFF and back ON. -Disconnect the USB storage device. -Change to the USB source. iPod failure Disconnect the cable from the iPod. The USB connec- Once the iPod's main menu is connected. ! Disconnect the USB storage device and do not use it . Then, return to a different source. Turn the plug and play is off, no songs. Check that the tor or USB cable USB connector or has short...
Owner's Manual
Page 30
.... Once the iPod's main menu is displayed, reconnect the iPod and reset it with a compatible iPod. iTunes tagging Message Cause Action TAG ERROR-01 iPod is still displayed after performing the above action, please contact your device and replace it . Do not use . Make sure the conates correctly but nection cable for 8-cm disc. There are no Select a list that songs in use 8-cm disc or an adapter for does...
.... Once the iPod's main menu is displayed, reconnect the iPod and reset it with a compatible iPod. iTunes tagging Message Cause Action TAG ERROR-01 iPod is still displayed after performing the above action, please contact your device and replace it . Do not use . Make sure the conates correctly but nection cable for 8-cm disc. There are no Select a list that songs in use 8-cm disc or an adapter for does...
Owner's Manual
Page 31
... it to adjust to off on the iPod when using this unit changes the EQ (equalizer) setting of the iPod to the warmer temperature for discs before using DualDisc with high temperatures. When an iPod is connected, this unit. Repeat is automatically changed to All when the iPod is not physically compatible with the general CD standard, it may not be played back properly. ! Compressed audio compatibility (disc, USB) WMA File...
... it to adjust to off on the iPod when using this unit changes the EQ (equalizer) setting of the iPod to the warmer temperature for discs before using DualDisc with high temperatures. When an iPod is connected, this unit. Repeat is automatically changed to All when the iPod is not physically compatible with the general CD standard, it may not be played back properly. ! Compressed audio compatibility (disc, USB) WMA File...
Owner's Manual
Page 35
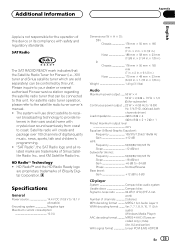
... ! HD Radioä Technology ! work) Number of Sirius Satellite Radio Inc., and XM Satellite Radio Inc. For satellite radio tuner operation, please refer to -recei- Please inquire to your dealer or nearest authorized Pioneer service station regarding the satellite radio tuner that the Satellite Radio Tuner for Pioneer (i.e., XM tuner and Sirius satellite tuner which are sold separately) can be controlled by this unit. Satellite radio will use direct satellite-to the satellite radio tuner owner's manual. ! The system will create and package over 100 channels of this device or...
... ! HD Radioä Technology ! work) Number of Sirius Satellite Radio Inc., and XM Satellite Radio Inc. For satellite radio tuner operation, please refer to -recei- Please inquire to your dealer or nearest authorized Pioneer service station regarding the satellite radio tuner that the Satellite Radio Tuner for Pioneer (i.e., XM tuner and Sirius satellite tuner which are sold separately) can be controlled by this unit. Satellite radio will use direct satellite-to the satellite radio tuner owner's manual. ! The system will create and package over 100 channels of this device or...
Installation Manual
Page 2
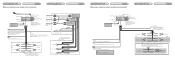
... V supply terminal. Blue/white Connect to system control terminal of the power amp or auto-antenna relay control terminal (max. 300 mA 12 V DC). Black (chassis ground) Connect to a clean, paint-free metal location. System remote control Perform these connections when using the optional amplifier. Subwoofer Front speaker Rear speaker Subwoofer Front speaker Rear speaker Connecting the unit English When using a subwoofer without using a subwoofer of 70 W (2 Ω...
... V supply terminal. Blue/white Connect to system control terminal of the power amp or auto-antenna relay control terminal (max. 300 mA 12 V DC). Black (chassis ground) Connect to a clean, paint-free metal location. System remote control Perform these connections when using the optional amplifier. Subwoofer Front speaker Rear speaker Subwoofer Front speaker Rear speaker Connecting the unit English When using a subwoofer without using a subwoofer of 70 W (2 Ω...


