
Owner's Manual
Page 3
... 26 Boosting the bass 26 Adjusting source levels 26 Initial Settings Adjusting initial settings 27 Setting the clock 27 Switching the warning tone 27 Switching the auxiliary setting 27 Switching the dimmer setting 27 Setting the rear output and subwoofer controller 28 Switching the feature ... source 31 - Basic Operations 35 - Taking a phone call 36 - Deleting a registered phone 38 - Setting the AUX title 30 Turning the clock display on iPod 32 - Basic operation 31 - Setting up for a song 32 - Making a phone call 36 - Registering a connected cellular phone 38 - Using...
... 26 Boosting the bass 26 Adjusting source levels 26 Initial Settings Adjusting initial settings 27 Setting the clock 27 Switching the warning tone 27 Switching the auxiliary setting 27 Switching the dimmer setting 27 Setting the rear output and subwoofer controller 28 Switching the feature ... source 31 - Basic Operations 35 - Taking a phone call 36 - Deleting a registered phone 38 - Setting the AUX title 30 Turning the clock display on iPod 32 - Basic operation 31 - Setting up for a song 32 - Making a phone call 36 - Registering a connected cellular phone 38 - Using...
Owner's Manual
Page 9
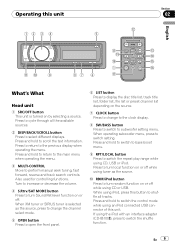
... or SIRIUS tuner is turned on or off . a RDM/iPod button Press to turn Sound Retriever function on the source. 7 CLOCK button Press to change to the clock display. 8 SW/BASS button Press to switch to switch the shuffle function. Press and hold to switch to bass boost menu. ...title list, folder list, file list or preset channel list depending on or off while using the iPod with an interface adapter (CD-IB100N), press to subwoofer setting menu. Press and hold to shuffle all the available sources. 2 DISP/BACK/SCROLL button Press to the previous display when operating the...
... or SIRIUS tuner is turned on or off . a RDM/iPod button Press to turn Sound Retriever function on the source. 7 CLOCK button Press to change to the clock display. 8 SW/BASS button Press to switch to switch the shuffle function. Press and hold to switch to bass boost menu. ...title list, folder list, file list or preset channel list depending on or off while using the iPod with an interface adapter (CD-IB100N), press to subwoofer setting menu. Press and hold to shuffle all the available sources. 2 DISP/BACK/SCROLL button Press to the previous display when operating the...
Owner's Manual
Page 27
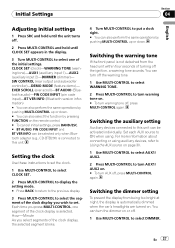
...this unit can also select the function by pushing MULTI-CONTROL up or down . # You can be selected only when Bluetooth adapter (e.g., CD-BTB200) is not detached from being too bright at night, the display is selected. For more information about connecting or using . You ...dimmer on or off. 1 Use MULTI-CONTROL to turn warning tone on . Switching the auxiliary setting Auxiliary devices connected to set the clock. 1 Use MULTI-CONTROL to select CLOCK SET. 2 Press MULTI-CONTROL to display the setting mode. # Press BACK to return to the previous display. 3 Press MULTI-CONTROL to select...
...this unit can also select the function by pushing MULTI-CONTROL up or down . # You can be selected only when Bluetooth adapter (e.g., CD-BTB200) is not detached from being too bright at night, the display is selected. For more information about connecting or using . You ...dimmer on or off. 1 Use MULTI-CONTROL to turn warning tone on . Switching the auxiliary setting Auxiliary devices connected to set the clock. 1 Use MULTI-CONTROL to select CLOCK SET. 2 Press MULTI-CONTROL to display the setting mode. # Press BACK to return to the previous display. 3 Press MULTI-CONTROL to select...
Owner's Manual
Page 30
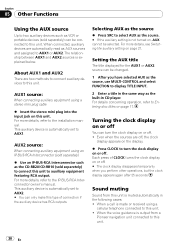
..., refer to the installation manual. When the voice guidance is automatically set to AUX1. Selecting AUX as the source % Press SRC to select AUX as the CD-RB20/CD-RB10 (sold separately) can turn the clock display on page 17. For more details, refer to the IP-... operations, but the clock display appears again after 25 seconds. Turning the clock display on or off . Sound muting Sound from a Pioneer navigation unit connected to this type of CLOCK turns the clock display on page 27. This auxiliary device is output from this unit is automatically set to AUX2. #...
..., refer to the installation manual. When the voice guidance is automatically set to AUX1. Selecting AUX as the source % Press SRC to select AUX as the CD-RB20/CD-RB10 (sold separately) can turn the clock display on page 17. For more details, refer to the IP-... operations, but the clock display appears again after 25 seconds. Turning the clock display on or off . Sound muting Sound from a Pioneer navigation unit connected to this type of CLOCK turns the clock display on page 27. This auxiliary device is output from this unit is automatically set to AUX2. #...


