Owner's Manual
Page 2
.... Removing the front panel 6 - Storing the strongest broadcast frequencies 11 - Tuning in strong signals 11 Built-in the current disc or folder 14 - Using disc title functions 14 - Displaying text information on iPod 15 - Introduction of the remote control 7 - Pausing a song 17 Audio Adjustments 17 - Boosting the bass 20 - Setting the date and clock 21 - Switching the dimmer setting 22 - Please read through these operating instructions so you for buying this Pioneer product. Head unit 8 - Adjusting...
.... Removing the front panel 6 - Storing the strongest broadcast frequencies 11 - Tuning in strong signals 11 Built-in the current disc or folder 14 - Using disc title functions 14 - Displaying text information on iPod 15 - Introduction of the remote control 7 - Pausing a song 17 Audio Adjustments 17 - Boosting the bass 20 - Setting the date and clock 21 - Switching the dimmer setting 22 - Please read through these operating instructions so you for buying this Pioneer product. Head unit 8 - Adjusting...

Owner's Manual
Page 3
... - Introduction of discs and player 34 Dual Discs 35 Compressed audio files 35 - Switching the SIRIUS channel select setting 27 - Switching the SIRIUS display 27 - Using disc title functions 30 - Storing and recalling broadcast stations 32 - Storing the strongest broadcast stations sequentially 32 Bluetooth adapter 33 Additional Information Troubleshooting 34 Understanding error messages 34 Handling guideline of SIRIUS operation 27 - Introduction of the selected team starts 27 Multi-CD Player 28 - Switching the XM channel select mode 26 SIRIUS Satellite Radio tuner 27 - When...
... - Introduction of discs and player 34 Dual Discs 35 Compressed audio files 35 - Switching the SIRIUS channel select setting 27 - Switching the SIRIUS display 27 - Using disc title functions 30 - Storing and recalling broadcast stations 32 - Storing the strongest broadcast stations sequentially 32 Bluetooth adapter 33 Additional Information Troubleshooting 34 Understanding error messages 34 Handling guideline of SIRIUS operation 27 - Introduction of the selected team starts 27 Multi-CD Player 28 - Switching the XM channel select mode 26 SIRIUS Satellite Radio tuner 27 - When...
Owner's Manual
Page 5
... iPod with Dock Connector. ! Operations may vary depending on an iPod. ! About the SAT RADIO READY mark The SAT RADIO READY mark printed on the front panel indicates that can control and listen to your dealer or nearest authorized Pioneer service station regarding the satellite radio tuner that the Satellite Radio Tuner for Pioneer (i.e., XM tuner and Sirius satellite tuner which is not available, please contact the companies listed below for Advanced Audio Coding...
... iPod with Dock Connector. ! Operations may vary depending on an iPod. ! About the SAT RADIO READY mark The SAT RADIO READY mark printed on the front panel indicates that can control and listen to your dealer or nearest authorized Pioneer service station regarding the satellite radio tuner that the Satellite Radio Tuner for Pioneer (i.e., XM tuner and Sirius satellite tuner which is not available, please contact the companies listed below for Advanced Audio Coding...
Owner's Manual
Page 6
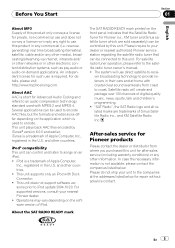
... such as loss or theft. 2 Receive updates on page 22. See Switching the warning tone on the latest products and technologies. 3 Download owner's manuals, order product catalogues, research new products, and much more. Visit our website Visit us at the following site: Important ! CUSTOMER SUPPORT DIVISION P.O. Keep the front panel out of turning off the warning tone. You can...
... such as loss or theft. 2 Receive updates on page 22. See Switching the warning tone on the latest products and technologies. 3 Download owner's manuals, order product catalogues, research new products, and much more. Visit our website Visit us at the following site: Important ! CUSTOMER SUPPORT DIVISION P.O. Keep the front panel out of turning off the warning tone. You can...

Owner's Manual
Page 7
... of children. mote control completely clean and install a new battery. ! The remote control may apply. Important ! Remove the battery if the remote control is incorrectly replaced. En 7 Danger of explosion if battery is not used batteries, please comply with governmental regulations or environmental public institutions' rules that if the feature demo continues operating when the car engine is turned off while the ignition switch is set to a terminal coupled...
... of children. mote control completely clean and install a new battery. ! The remote control may apply. Important ! Remove the battery if the remote control is incorrectly replaced. En 7 Danger of explosion if battery is not used batteries, please comply with governmental regulations or environmental public institutions' rules that if the feature demo continues operating when the car engine is turned off while the ignition switch is set to a terminal coupled...
Owner's Manual
Page 8
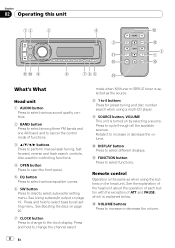
...See Using subwoofer output on page 20. 7 CLOCK button Press to change the channel select mode when XM tuner or SIRIUS tuner is selected as when using a multi-CD player. 9 SOURCE button, VOLUME This unit is turned on the head unit. Remote control Operation is the same as the source. 8 1 to 6 buttons Press for controlling functions. 4 OPEN button Press to open the front panel. 5 EQ button Press to select various equalizer curves. 6 SW button Press to directly select subwoofer setting menu. Section 02 Operating this unit What's What Head unit 1 AUDIO button Press to select various sound...
...See Using subwoofer output on page 20. 7 CLOCK button Press to change the channel select mode when XM tuner or SIRIUS tuner is selected as when using a multi-CD player. 9 SOURCE button, VOLUME This unit is turned on the head unit. Remote control Operation is the same as the source. 8 1 to 6 buttons Press for controlling functions. 4 OPEN button Press to open the front panel. 5 EQ button Press to select various equalizer curves. 6 SW button Press to directly select subwoofer setting menu. Section 02 Operating this unit What's What Head unit 1 AUDIO button Press to select various sound...

Owner's Manual
Page 9
... CD player, load a disc in the unit (refer to page 12). % Press SOURCE repeatedly to off . AUX1 is turned on . e PAUSE button Press to turn pause on by selecting a source. f SOURCE button This unit is set to switch between the following cases, the sound source will not change: - In the following sources: XM tuner-SIRIUS tuner-Tuner-Television-Built-in the player. - Operating this unit. - Basic Operations Power ON/OFF Turning the unit on % Press SOURCE to turn the unit on by default. Selecting a source...
... CD player, load a disc in the unit (refer to page 12). % Press SOURCE repeatedly to off . AUX1 is turned on . e PAUSE button Press to turn pause on by selecting a source. f SOURCE button This unit is set to switch between the following cases, the sound source will not change: - In the following sources: XM tuner-SIRIUS tuner-Tuner-Television-Built-in the player. - Operating this unit. - Basic Operations Power ON/OFF Turning the unit on % Press SOURCE to turn the unit on by default. Selecting a source...
Owner's Manual
Page 10
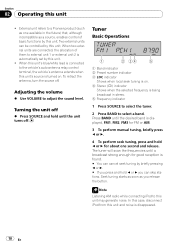
... radio while connecting iPod to adjust the sound level. The tuner will scan the frequencies until the unit turns off. When this unit. Tuner Basic Operations 1 Band indicator 2 Preset number indicator 3 LOC indicator Shows when local seek tuning is connected to a Pioneer product (such as you can cancel seek tuning by this unit's blue/white lead is on . To retract the antenna, turn the source off % Press SOURCE and hold c or d you release the button. Turning the unit...
... radio while connecting iPod to adjust the sound level. The tuner will scan the frequencies until the unit turns off. When this unit. Tuner Basic Operations 1 Band indicator 2 Preset number indicator 3 LOC indicator Shows when local seek tuning is connected to a Pioneer product (such as you can cancel seek tuning by this unit's blue/white lead is on . To retract the antenna, turn the source off % Press SOURCE and hold c or d you release the button. Turning the unit...

Owner's Manual
Page 11
... set the sensitivity. Six strongest broadcast frequencies will flash in the preset number indicator and then remain lit. The next time you press the same preset tuning button the radio station frequency is automatically returned to the frequency display. ! LOCAL 4 AM: LOCAL 1-LOCAL 2 The LOCAL 4 setting allows reception of advanced operations % Press FUNCTION repeatedly to switch between the following functions: BSM (best stations memory)-LOCAL (local seek tuning) # To return to the frequency display...
... set the sensitivity. Six strongest broadcast frequencies will flash in the preset number indicator and then remain lit. The next time you press the same preset tuning button the radio station frequency is automatically returned to the frequency display. ! LOCAL 4 AM: LOCAL 1-LOCAL 2 The LOCAL 4 setting allows reception of advanced operations % Press FUNCTION repeatedly to switch between the following functions: BSM (best stations memory)-LOCAL (local seek tuning) # To return to the frequency display...

Owner's Manual
Page 14
... playback display. Fast forward and reverse ! Using disc title functions You can switch the search method between fast forward/reverse and searching every 10 tracks. Each press of that CD will be up to 10 characters long. 1 Play the CD that does not support disc title functions is connected, you want is stored in this unit 2 Press a or b to select ROUGH. ! Notes ! When a multi-CD player...
... playback display. Fast forward and reverse ! Using disc title functions You can switch the search method between fast forward/reverse and searching every 10 tracks. Each press of that CD will be up to 10 characters long. 1 Play the CD that does not support disc title functions is connected, you want is stored in this unit 2 Press a or b to select ROUGH. ! Notes ! When a multi-CD player...
Owner's Manual
Page 15
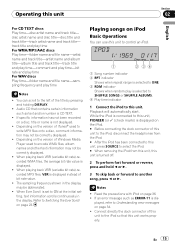
... For CD TEXT discs Play time-disc artist name and track title- Read the precautions with iPod on the iPod. # Before connecting the dock connector of iTunes® used to write MP3 files onto a disc, comment information may not be abbreviated. ! Connect directly the dock connector of the title by pressing and holding DISPLAY. ! You can use this unit works properly. Playback will automatically start. The sampling frequency shown...
... For CD TEXT discs Play time-disc artist name and track title- Read the precautions with iPod on the iPod. # Before connecting the dock connector of iTunes® used to write MP3 files onto a disc, comment information may not be abbreviated. ! Connect directly the dock connector of the title by pressing and holding DISPLAY. ! You can use this unit works properly. Playback will automatically start. The sampling frequency shown...

Owner's Manual
Page 18
...-LOW (low)-EQ-MID (mid)-EQ-HIGH (high) 3 Press a or b to adjust the level of the equalizer band. +6 to adjust front/rear speaker balance. Refer to Setting the rear output and subwoofer controller on page 22. 3 Press c or d to the sound. If you make adjustments to an equalizer curve, the equalizer curve setting will be memorized in CUSTOM. 1 Press AUDIO to select EQ. 2 Press c or d to select the equalizer band to the source display.
...-LOW (low)-EQ-MID (mid)-EQ-HIGH (high) 3 Press a or b to adjust the level of the equalizer band. +6 to adjust front/rear speaker balance. Refer to Setting the rear output and subwoofer controller on page 22. 3 Press c or d to the sound. If you make adjustments to an equalizer curve, the equalizer curve setting will be memorized in CUSTOM. 1 Press AUDIO to select EQ. 2 Press c or d to select the equalizer band to the source display.

Owner's Manual
Page 20
... can also select the bass boost setting by cutting mid- HP-FILTER 80 appears in volume. 1 Press AUDIO to select FIE. # When the rear output setting is a simple method of the source you do not want to play from the front or rear speakers, turn F.I .E. (Front Image Enhancer) function is REAR SP S/W, you want low sounds from the subwoofer output frequency range to cut. Turn the F.I .E. off when using this unit Using the high...
... can also select the bass boost setting by cutting mid- HP-FILTER 80 appears in volume. 1 Press AUDIO to select FIE. # When the rear output setting is a simple method of the source you do not want to play from the front or rear speakers, turn F.I .E. (Front Image Enhancer) function is REAR SP S/W, you want low sounds from the subwoofer output frequency range to cut. Turn the F.I .E. off when using this unit Using the high...

Owner's Manual
Page 21
... in CD player and the multi-CD player are set the clock. 1 Press FUNCTION to select clock. 2 Press c or d to select the segment you select segments of the clock display the segment selected will blink. EVER-SCROLL (ever scroll) Use the following settings: CALENDAR (date and clock)- Setting the date and clock Use these instructions to set to -4 is displayed as the source volume is increased or decreased. Notes ! DIMMER (dimmer)-S/W CONTROL (rear output and subwoofer controller)- Initial Settings Adjusting initial settings Using the initial settings, you...
... in CD player and the multi-CD player are set the clock. 1 Press FUNCTION to select clock. 2 Press c or d to select the segment you select segments of the clock display the segment selected will blink. EVER-SCROLL (ever scroll) Use the following settings: CALENDAR (date and clock)- Setting the date and clock Use these instructions to set to -4 is displayed as the source volume is increased or decreased. Notes ! DIMMER (dimmer)-S/W CONTROL (rear output and subwoofer controller)- Initial Settings Adjusting initial settings Using the initial settings, you...

Owner's Manual
Page 22
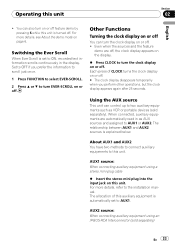
... rear output and subwoofer controller This unit's rear output (rear speaker leads output and RCA rear output) can turn AUX1/AUX2 on or off . Pressing a or b will be activated individually. If you turn the subwoofer output on (refer to Using subwoofer output on or off the warning tone. 1 Press FUNCTION to select WARNING TONE. 2 Press a or b to turn off . Switching the feature demo The feature demo automatically starts when power to this unit can connect a rear speaker lead directly to a subwoofer without using an auxiliary amp...
... rear output and subwoofer controller This unit's rear output (rear speaker leads output and RCA rear output) can turn AUX1/AUX2 on or off . Pressing a or b will be activated individually. If you turn the subwoofer output on (refer to Using subwoofer output on or off the warning tone. 1 Press FUNCTION to select WARNING TONE. 2 Press a or b to turn off . Switching the feature demo The feature demo automatically starts when power to this unit can connect a rear speaker lead directly to a subwoofer without using an auxiliary amp...
Owner's Manual
Page 23
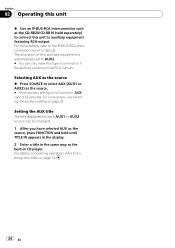
... 6. Using the AUX source This unit can turn the clock display on or off. ! The relationship between AUX1 and AUX2 sources is explained below. AUX2 source: When connecting auxiliary equipment using a stereo mini plug cable % Insert the stereo mini plug into the input jack on or off feature demo by pressing 6 while this unit Section 02 English ! Operating this unit is turned off. Other Functions Turning the clock display on or off You can control up to two auxiliary...
... 6. Using the AUX source This unit can turn the clock display on or off. ! The relationship between AUX1 and AUX2 sources is explained below. AUX2 source: When connecting auxiliary equipment using a stereo mini plug cable % Insert the stereo mini plug into the input jack on or off feature demo by pressing 6 while this unit Section 02 English ! Operating this unit is turned off. Other Functions Turning the clock display on or off You can control up to two auxiliary...
Owner's Manual
Page 24
... unit % Use an IP-BUS-RCA Interconnector such as the CD-RB20/CD-RB10 (sold separetely) to connect this type of connection if the auxiliary equipment has RCA outputs. For more details, refer to auxiliary equipment featuring RCA output. Setting the AUX title The title displayed for each AUX1 or AUX2 source can only make this unit to the IP-BUS-RCA Interconnector owner's manual. For details concerning operation, refer to select AUX...
... unit % Use an IP-BUS-RCA Interconnector such as the CD-RB20/CD-RB10 (sold separetely) to connect this type of connection if the auxiliary equipment has RCA outputs. For more details, refer to auxiliary equipment featuring RCA output. Setting the AUX title The title displayed for each AUX1 or AUX2 source can only make this unit to the IP-BUS-RCA Interconnector owner's manual. For details concerning operation, refer to select AUX...
Owner's Manual
Page 34
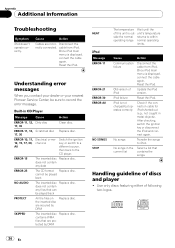
..., switch the ignition key or disconnect the iPod and connect again. Use only discs featuring either of iPod Update the iPod version. Disconnect the rectly connected. No songs Transfer the songs to within operating range normal operating limits. Understanding error messages When you contact your dealer or your nearest Pioneer Service Center, be played back NO AUDIO The inserted disc Replace disc. cable from iPod. cannot be sure to the CD player. Old...
..., switch the ignition key or disconnect the iPod and connect again. Use only discs featuring either of iPod Update the iPod version. Disconnect the rectly connected. No songs Transfer the songs to within operating range normal operating limits. Understanding error messages When you contact your dealer or your nearest Pioneer Service Center, be played back NO AUDIO The inserted disc Replace disc. cable from iPod. cannot be sure to the CD player. Old...
Owner's Manual
Page 36
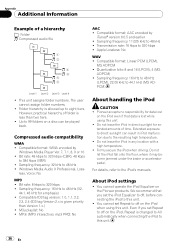
Compressed audio compatibility WMA ! Transmission rate: 16 kbps to the iPod's manuals. Firmly secure the iPod when driving. You cannot operate the iPod Equalizer on a disc can result in iPod malfunction due to eight tiers. This unit assigns folder numbers. M3u playlist: No ! Do not leave the iPod in any location with a high temperature. ! For details, refer to 320 kbps ! However, practical hierarchy of folder is...
Compressed audio compatibility WMA ! Transmission rate: 16 kbps to the iPod's manuals. Firmly secure the iPod when driving. You cannot operate the iPod Equalizer on a disc can result in iPod malfunction due to eight tiers. This unit assigns folder numbers. M3u playlist: No ! Do not leave the iPod in any location with a high temperature. ! For details, refer to 320 kbps ! However, practical hierarchy of folder is...
Other Manual
Page 2
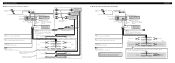
... power amp or auto-antenna relay control terminal (max. 300 mA 12 V DC). + Front speaker ≠ Red Connect to terminal controlled by ignition switch (12 V DC). Note: Change the initial setting of this unit (refer to the Operation Manual). Connecting the Units 7 When not connecting a rear speaker lead to a Subwoofer iPod with Dock Connector Dock connector port Interface cable 2 m (6 ft. 7 in.) Gray Dock connector This product Rear output Front output Antenna jack Subwoofer output Fuse (10 A) 15 cm (57/8 in .) AUX jack (3.5 ø) Use a stereo...
... power amp or auto-antenna relay control terminal (max. 300 mA 12 V DC). + Front speaker ≠ Red Connect to terminal controlled by ignition switch (12 V DC). Note: Change the initial setting of this unit (refer to the Operation Manual). Connecting the Units 7 When not connecting a rear speaker lead to a Subwoofer iPod with Dock Connector Dock connector port Interface cable 2 m (6 ft. 7 in.) Gray Dock connector This product Rear output Front output Antenna jack Subwoofer output Fuse (10 A) 15 cm (57/8 in .) AUX jack (3.5 ø) Use a stereo...


