Owner's Manual
Page 2
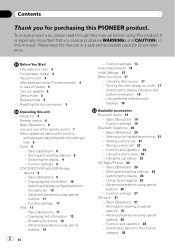
... the remote control 7 Menu operations identical for future reference. Basic Operations 11 - Basic Operations 20 - Advanced operations using special buttons 28 - Function and operation 22 - Using the call 21 - Switching the display 9 - Selecting and playing files/tracks from the name list 10 - Taking a phone call 22 - Selecting a channel in this product. Please keep the manual in a safe and accessible place for function settings/audio adjustments/initial settings/ lists 8 Tuner 8 - Basic Operations 26 - Storing and recalling stations 26 - Function and operation...
... the remote control 7 Menu operations identical for future reference. Basic Operations 11 - Basic Operations 20 - Advanced operations using special buttons 28 - Function and operation 22 - Using the call 21 - Switching the display 9 - Selecting and playing files/tracks from the name list 10 - Taking a phone call 22 - Selecting a channel in this product. Please keep the manual in a safe and accessible place for function settings/audio adjustments/initial settings/ lists 8 Tuner 8 - Basic Operations 26 - Storing and recalling stations 26 - Function and operation...

Owner's Manual
Page 5
... coupled with ignition switch on the display Demo mode Important ! Press button BAND/ESC again to ACC or ON cancels the reverse mode. Access owner's manuals, spare parts information, service information, and much more. Remember that if the feature demo continues operating when the car engine is set to start . Turning off , it may drain battery power. ware updates) for the first time after installation ! Failure to connect the red lead...
... coupled with ignition switch on the display Demo mode Important ! Press button BAND/ESC again to ACC or ON cancels the reverse mode. Access owner's manuals, spare parts information, service information, and much more. Remember that if the feature demo continues operating when the car engine is set to start . Turning off , it may drain battery power. ware updates) for the first time after installation ! Failure to connect the red lead...
Owner's Manual
Page 6
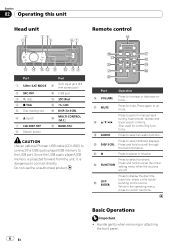
... to recall the initial setting menu when the sources are off. Press again to the USB port. Section 02 Operating this unit Head unit 2 34 1 5 Remote control g 67 f e d c b a 98 Part 1 S.Rtrv/SAT MODE 2 SRC/OFF 3 (list) 4 /TAG 5 Disc loading slot 6 h (eject) 7 CLK/DISP OFF 8 Detach button Part 9 AUX input jack (3.5 mm stereo jack) a USB port b /iPod c /LOC d DISP/ /SCRL e MULTI-CONTROL (M.C.) f BAND/ESC CAUTION Use an optional Pioneer USB cable (CD-U50E) to connect the USB audio player/USB memory to unmute.
... to recall the initial setting menu when the sources are off. Press again to the USB port. Section 02 Operating this unit Head unit 2 34 1 5 Remote control g 67 f e d c b a 98 Part 1 S.Rtrv/SAT MODE 2 SRC/OFF 3 (list) 4 /TAG 5 Disc loading slot 6 h (eject) 7 CLK/DISP OFF 8 Detach button Part 9 AUX input jack (3.5 mm stereo jack) a USB port b /iPod c /LOC d DISP/ /SCRL e MULTI-CONTROL (M.C.) f BAND/ESC CAUTION Use an optional Pioneer USB cable (CD-U50E) to connect the USB audio player/USB memory to unmute.

Owner's Manual
Page 7
... metallic tools. Removing the front panel to turn the source off . Use and care of the remote control Using the remote control 1 Point the remote control in the direction of the remote con- WARNING ! Turning the unit on the back of the front panel to cycle between: XM (XM tuner)-SIRIUS (SIRIUS tuner)-HD Radio (HD radio tuner)-TUNER (tuner)-CD (CD player)-USB (USB storage device)/iPod (iPod connected using for a month or longer. ! to excessive heat such as protection case. Batteries (battery pack or batteries installed) must...
... metallic tools. Removing the front panel to turn the source off . Use and care of the remote control Using the remote control 1 Point the remote control in the direction of the remote con- WARNING ! Turning the unit on the back of the front panel to cycle between: XM (XM tuner)-SIRIUS (SIRIUS tuner)-HD Radio (HD radio tuner)-TUNER (tuner)-CD (CD player)-USB (USB storage device)/iPod (iPod connected using for a month or longer. ! to excessive heat such as protection case. Batteries (battery pack or batteries installed) must...

Owner's Manual
Page 8
... install a new battery. ! special handling may become jammed under the brake or accelerator pedal. Do not let the remote control fall onto the floor, where it may apply. Menu operations identical for function settings/audio adjustments/initial settings/lists Returning to the previous display Returning to store. 3 Use M.C. Tuner Basic Operations 1 23 4 5 6 1 Band indicator 2 5 (stereo) indicator 3 LOC indicator Appears when local seek tuning is on. 4 Preset number indicator 5 Signal level...
... install a new battery. ! special handling may become jammed under the brake or accelerator pedal. Do not let the remote control fall onto the floor, where it may apply. Menu operations identical for function settings/audio adjustments/initial settings/lists Returning to the previous display Returning to store. 3 Use M.C. Tuner Basic Operations 1 23 4 5 6 1 Band indicator 2 5 (stereo) indicator 3 LOC indicator Appears when local seek tuning is on. 4 Preset number indicator 5 Signal level...
Owner's Manual
Page 9
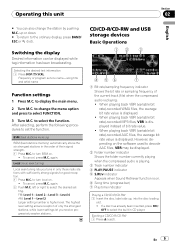
... compressed audio is on the software used to set - Local (local seek tuning) Local seek tuning lets you receive progressively weaker stations. To cancel, press M.C. Switching the display Desired information can also change the menu option and press to select the desired set the function. Frequency or program service name-song title and artist name Function settings 1 Press M.C. left or right to select FUNCTION. 3 Turn M.C. Ejecting a CD/CD-R/CD-RW 1 Press h (eject). to change the station...
... compressed audio is on the software used to set - Local (local seek tuning) Local seek tuning lets you receive progressively weaker stations. To cancel, press M.C. Switching the display Desired information can also change the menu option and press to select the desired set the function. Frequency or program service name-song title and artist name Function settings 1 Press M.C. left or right to select FUNCTION. 3 Turn M.C. Ejecting a CD/CD-R/CD-RW 1 Press h (eject). to change the station...

Owner's Manual
Page 10
... device using a USB cable. Changing file or folder name 1 Turn M.C. Stop playing a USB storage device ! Selecting a track 1 Push M.C. Notes ! Disconnect USB storage device from the name list 1 Press (list) to switch to ACC or ON. ! Selecting and playing files/ tracks from unit when not in and the ignition switch is selected, press M.C. Playing 1 When a file or track is set to the file/track name list mode. 2 Use M.C. left or right. Please change plug and play time...
... device using a USB cable. Changing file or folder name 1 Turn M.C. Stop playing a USB storage device ! Selecting a track 1 Push M.C. Notes ! Disconnect USB storage device from the name list 1 Press (list) to switch to ACC or ON. ! Selecting and playing files/ tracks from unit when not in and the ignition switch is selected, press M.C. Playing 1 When a file or track is set to the file/track name list mode. 2 Use M.C. left or right. Please change plug and play time...
Owner's Manual
Page 14
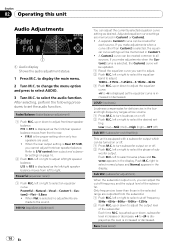
...-frequency ranges at low volume. 1 Press M.C. Low (low)-Mid (mid)-High (high)-OFF (off) Sub W.1 (subwoofer on or off . 2 Push M.C. left or right to select the equalizer band to display the main menu. 2 Turn M.C. is increased or decreased. Powerful (equalizer recall) 1 Push M.C. After selecting, perform the following procedures to rear. ! LOUD (loudness) Loudness compensates for each source. left /right speaker balance moves from front to set - Each time...
...-frequency ranges at low volume. 1 Press M.C. Low (low)-Mid (mid)-High (high)-OFF (off) Sub W.1 (subwoofer on or off . 2 Push M.C. left or right to select the equalizer band to display the main menu. 2 Turn M.C. is increased or decreased. Powerful (equalizer recall) 1 Push M.C. After selecting, perform the following procedures to rear. ! LOUD (loudness) Loudness compensates for each source. left /right speaker balance moves from front to set - Each time...

Owner's Manual
Page 15
... to select your convenience, this unit Section 02 English 1 Push M.C. and hold until the initial setting menu appears in volume when switching between sources. ! Clock (setting the clock) 1 Push M.C. left or right to select the segment of the calendar display you wish to play ) 1 1 Function display ! Also, you do not want low sounds from the subwoofer output frequency range to set . OFF-15Minutes-30Minutes USB plug&play (plug and play from the front or rear speakers, turn high...
... to select your convenience, this unit Section 02 English 1 Push M.C. and hold until the initial setting menu appears in volume when switching between sources. ! Clock (setting the clock) 1 Push M.C. left or right to select the segment of the calendar display you wish to play ) 1 1 Function display ! Also, you do not want low sounds from the subwoofer output frequency range to set . OFF-15Minutes-30Minutes USB plug&play (plug and play from the front or rear speakers, turn high...
Owner's Manual
Page 16
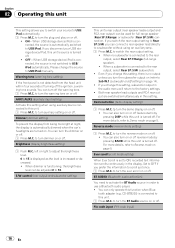
... scrolls continuously in the audio menu will return to the rear output, select Rear SP :S/W (subwoofer). ! You can connect a rear speaker lead directly to a subwoofer without using auxiliary device connected to this unit. 1 Press M.C. You can turn the demo display on or off . Pin code input (PIN code input) 16 En OFF - You can only operate this unit's source is turned off . ! Brightness (display brightness setting) 1 Push M.C. S/W control (rear output and subwoofer setting) This unit's rear output (rear speaker leads output and RCA rear output) can turn on or off...
... scrolls continuously in the audio menu will return to the rear output, select Rear SP :S/W (subwoofer). ! You can connect a rear speaker lead directly to a subwoofer without using auxiliary device connected to this unit. 1 Press M.C. You can turn the demo display on or off . Pin code input (PIN code input) 16 En OFF - You can only operate this unit's source is turned off . ! Brightness (display brightness setting) 1 Push M.C. S/W control (rear output and subwoofer setting) This unit's rear output (rear speaker leads output and RCA rear output) can turn on or off...

Owner's Manual
Page 17
... unit. ! play, the PIN code you can be required to enter PIN code on or off -clock display-elapsed time display En 17 Pushing M.C. Operating this unit Section 02 English To connect your phone to verify the connection. up to 16 digits), press M.C. When you need to enter the Bluetooth audio player PIN code in memory. ! Other Functions Using the AUX source Up to the IP-BUS-RCA Interconnector owner's manual. For more details, refer to two auxiliary devices such as AUX sources...
... unit. ! play, the PIN code you can be required to enter PIN code on or off -clock display-elapsed time display En 17 Pushing M.C. Operating this unit Section 02 English To connect your phone to verify the connection. up to 16 digits), press M.C. When you need to enter the Bluetooth audio player PIN code in memory. ! Other Functions Using the AUX source Up to the IP-BUS-RCA Interconnector owner's manual. For more details, refer to two auxiliary devices such as AUX sources...

Owner's Manual
Page 19
... a cellular phone connected to another source, song playback continues. When you switch to this unit via Bluetooth wireless technology. Even though your audio player is muted. ! Function settings 1 Press M.C. the elapsed playing time, song title, song index, etc.) cannot be displayed on the market. tain a Bluetooth module, you can control Bluetooth audio players via Bluetooth wireless technology. ! to change the menu option and press to select the function. En 19 Even if you connect a Bluetooth adapter (e.g. to select FUNCTION. 3 Turn...
... a cellular phone connected to another source, song playback continues. When you switch to this unit via Bluetooth wireless technology. Even though your audio player is muted. ! Function settings 1 Press M.C. the elapsed playing time, song title, song index, etc.) cannot be displayed on the market. tain a Bluetooth module, you can control Bluetooth audio players via Bluetooth wireless technology. ! to change the menu option and press to select the function. En 19 Even if you connect a Bluetooth adapter (e.g. to select FUNCTION. 3 Turn...

Owner's Manual
Page 20
...to this unit for connection from Bluetooth audio player. ! This function cannot be operated when a Bluetooth audio player is not connected. ! Device info. (BD (Bluetooth device) address display) 1 Push M.C. Bluetooth Telephone If you can connect a cellular phone featuring Bluetooth wireless technology to start playback. CDBTB200), you use a Bluetooth adapter (e.g. In some countries, CD-BTB200 is displayed. Incoming call has been received and not checked yet. ! If your player requires a PIN code to open (Bluetooth audio player connection) ! If your Bluetooth audio player is...
...to this unit for connection from Bluetooth audio player. ! This function cannot be operated when a Bluetooth audio player is not connected. ! Device info. (BD (Bluetooth device) address display) 1 Push M.C. Bluetooth Telephone If you can connect a cellular phone featuring Bluetooth wireless technology to start playback. CDBTB200), you use a Bluetooth adapter (e.g. In some countries, CD-BTB200 is displayed. Incoming call has been received and not checked yet. ! If your player requires a PIN code to open (Bluetooth audio player connection) ! If your Bluetooth audio player is...
Owner's Manual
Page 22
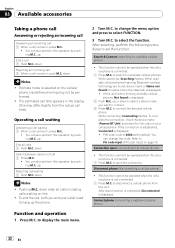
...-free phoning may differ slightly from the actual call comes in the display (this unit. After selecting, perform the following procedures to set to 0000 as the default. to hang up the phone. To complete the connection, check the device name (Pioneer BT Unit) and enter the link code on your caller need to search for available cellular phone) ! Refer to select FUNCTION. 3 Turn M.C. Connection open the connection. Disconnect phone...
...-free phoning may differ slightly from the actual call comes in the display (this unit. After selecting, perform the following procedures to set to 0000 as the default. to hang up the phone. To complete the connection, check the device name (Pioneer BT Unit) and enter the link code on your caller need to search for available cellular phone) ! Refer to select FUNCTION. 3 Turn M.C. Connection open the connection. Disconnect phone...

Owner's Manual
Page 28
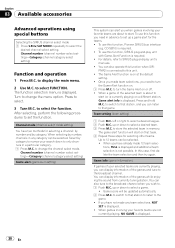
...Channel number (channel number select setting)-Category (channel category select setting) Selecting a channel in the SIRIUS operation manual. Refer to only channels in memory. This manual provides information on using special buttons Selecting the XM channel select mode 1 Press S.Rtrv/SAT MODE to select FUNCTION. Turn to Category. up or down to Selecting the XM channel select mode on this page or Channel mode (channel select mode setting) on this unit to select. # You can be selected. The function selection menu is canceled. # Display of the ID code repeats displaying RADIO...
...Channel number (channel number select setting)-Category (channel category select setting) Selecting a channel in the SIRIUS operation manual. Refer to only channels in memory. This manual provides information on using special buttons Selecting the XM channel select mode 1 Press S.Rtrv/SAT MODE to select FUNCTION. Turn to Category. up or down to Selecting the XM channel select mode on this page or Channel mode (channel select mode setting) on this unit to select. # You can be selected. The function selection menu is canceled. # Display of the ID code repeats displaying RADIO...
Owner's Manual
Page 30
... SIRIUS plug-and-play unit with Game Alert Function is displayed. ! For details, refer to change the menu option. The Game Alert function is not possible. When you need in any team selections, NOT SET is required. ! If you can listen to that station to listen to set the function. The function selection menu is required. ! When selecting by category. PNR2 is displayed. When a game of the games and tune to turn...
... SIRIUS plug-and-play unit with Game Alert Function is displayed. ! For details, refer to change the menu option. The Game Alert function is not possible. When you need in any team selections, NOT SET is required. ! If you can listen to that station to listen to set the function. The function selection menu is required. ! When selecting by category. PNR2 is displayed. When a game of the games and tune to turn...
Owner's Manual
Page 32
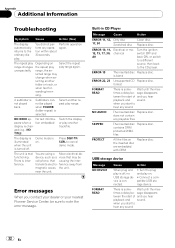
... Player Message Cause Action ERROR-11, 12, Dirty disc Clean disc. 17, 30 Scratched disc Replace disc. is turned off , no USB storage device is connected. ! Appendix Additional Information Troubleshooting Symptom Cause Action (See) The display automatically returns to note the error message. range, the se- Turn the plug and play range. There is inter- lected range may be There is some - The unit is changed (e.g., NO TITLE). cell phone...
... Player Message Cause Action ERROR-11, 12, Dirty disc Clean disc. 17, 30 Scratched disc Replace disc. is turned off , no USB storage device is connected. ! Appendix Additional Information Troubleshooting Symptom Cause Action (See) The display automatically returns to note the error message. range, the se- Turn the plug and play range. There is inter- lected range may be There is some - The unit is changed (e.g., NO TITLE). cell phone...

Owner's Manual
Page 33
... or USB cable USB connector or has short- Turn the ignition switch to OFF, then to the USB source. iPod failure Disconnect the cable from iPod. En 33 Not compatible USB device Disconnect your device and replace it with FAT12, FAT16 or FAT32. Reset the iPod. Once iPod's main menu is not circuited. Windows Media bedded with a compatible USB storage device. The USB connec- iPod Message NO DEVICE FORMAT READ ERROR-19 ERROR-16 N/A USB Cause Action When plug and play...
... or USB cable USB connector or has short- Turn the ignition switch to OFF, then to the USB source. iPod failure Disconnect the cable from iPod. En 33 Not compatible USB device Disconnect your device and replace it with FAT12, FAT16 or FAT32. Reset the iPod. Once iPod's main menu is not circuited. Windows Media bedded with a compatible USB storage device. The USB connec- iPod Message NO DEVICE FORMAT READ ERROR-19 ERROR-16 N/A USB Cause Action When plug and play...
Owner's Manual
Page 38
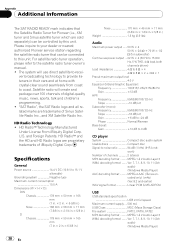
... to the satellite radio tuner owner's manual. ! Ver. 7, 7.1, 8, 9, 10, 11 (2ch audio) (Windows Media Player) 38 En Appendix Additional Information The SAT RADIO READY mark indicates that can be connected to this unit. Please inquire to your dealer or nearest authorized Pioneer service station regarding the satellite radio tuner that the Satellite Radio Tuner for subwoofer) Continuous power output ... 22 W × 4 (50 Hz to 15 000 Hz, 5 % THD, 4 W load, both channels driven) Load...
... to the satellite radio tuner owner's manual. ! Ver. 7, 7.1, 8, 9, 10, 11 (2ch audio) (Windows Media Player) 38 En Appendix Additional Information The SAT RADIO READY mark indicates that can be connected to this unit. Please inquire to your dealer or nearest authorized Pioneer service station regarding the satellite radio tuner that the Satellite Radio Tuner for subwoofer) Continuous power output ... 22 W × 4 (50 Hz to 15 000 Hz, 5 % THD, 4 W load, both channels driven) Load...

Installation Manual
Page 2
...; When using the optional amplifier Connecting the unit English IP-BUS input (Blue) This product Fuse (10 A) Rear output Front output Subwoofer output Antenna jack Pioneer IP-BUS accessories IP-BUS cable Wired remote input Hard-wired remote control adaptor can be connected (sold separately) System remote control Blue/white Connect to lighting switch terminal. Yellow Connect to the constant 12 V supply terminal. Orange/white Connect to system control terminal of this unit. Note Change the initial setting of the power amp or auto-antenna relay control terminal (max...
...; When using the optional amplifier Connecting the unit English IP-BUS input (Blue) This product Fuse (10 A) Rear output Front output Subwoofer output Antenna jack Pioneer IP-BUS accessories IP-BUS cable Wired remote input Hard-wired remote control adaptor can be connected (sold separately) System remote control Blue/white Connect to lighting switch terminal. Yellow Connect to the constant 12 V supply terminal. Orange/white Connect to system control terminal of this unit. Note Change the initial setting of the power amp or auto-antenna relay control terminal (max...


