
Operation Manual
Page 2
... ensure proper use. Removing the front panel 7 - Installing the battery 8 - Using disc title functions 18 Playing songs on iPod 21 - Displaying text information of audio adjustments 25 Using balance adjustment 25 Using the equalizer 25 Introduction to advanced operations 14 - Display indication 11 Basic Operations 12 - Attaching the front panel 8 About the demo mode 8 Use and care of the remote control 8 - Using the remote control 9 Operating this manual before using the product for the first time, to advanced operations 19 Playing songs on disc 15 - Head unit 10...
... ensure proper use. Removing the front panel 7 - Installing the battery 8 - Using disc title functions 18 Playing songs on iPod 21 - Displaying text information of audio adjustments 25 Using balance adjustment 25 Using the equalizer 25 Introduction to advanced operations 14 - Display indication 11 Basic Operations 12 - Attaching the front panel 8 About the demo mode 8 Use and care of the remote control 8 - Using the remote control 9 Operating this manual before using the product for the first time, to advanced operations 19 Playing songs on disc 15 - Head unit 10...
Operation Manual
Page 3
... bass 28 Adjusting source levels 28 Initial Settings Adjusting initial settings 29 Setting the clock 29 Switching the warning tone 29 Switching the auxiliary setting 29 Switching the dimmer setting 29 Setting the rear output and subwoofer controller 30 Switching the feature demo 30 Switching the ever scroll 30 Activating the BT AUDIO source 30 Entering PIN code for Bluetooth wireless connection 31 Displaying system version of Bluetooth adapter for a song 34 - About AUX1 and AUX2 32 - Adjusting equalizer curves 26 - Connecting a Bluetooth audio player 36 - Setting up for hands-free phoning...
... bass 28 Adjusting source levels 28 Initial Settings Adjusting initial settings 29 Setting the clock 29 Switching the warning tone 29 Switching the auxiliary setting 29 Switching the dimmer setting 29 Setting the rear output and subwoofer controller 30 Switching the feature demo 30 Switching the ever scroll 30 Activating the BT AUDIO source 30 Entering PIN code for Bluetooth wireless connection 31 Displaying system version of Bluetooth adapter for a song 34 - About AUX1 and AUX2 32 - Adjusting equalizer curves 26 - Connecting a Bluetooth audio player 36 - Setting up for hands-free phoning...
Operation Manual
Page 6
... version 1.1.1) ! Inquire at home with a Pioneer iPod adapter (e.g. Operations may not be connected to coast. Pioneer CD-IU50 interface cable is a trademark of iPod. ! iPod compatibility This unit can control previous generations iPod models with crystal-clear sound seamlessly from coast to this unit. This unit can control and listen to the satellite radio tuner owner's manual. ! USB MSC (Mass Storage Class) compliant portable audio player and memory - "SAT Radio", the SAT Radio logo and all related marks are...
... version 1.1.1) ! Inquire at home with a Pioneer iPod adapter (e.g. Operations may not be connected to coast. Pioneer CD-IU50 interface cable is a trademark of iPod. ! iPod compatibility This unit can control previous generations iPod models with crystal-clear sound seamlessly from coast to this unit. This unit can control and listen to the satellite radio tuner owner's manual. ! USB MSC (Mass Storage Class) compliant portable audio player and memory - "SAT Radio", the SAT Radio logo and all related marks are...
Operation Manual
Page 10
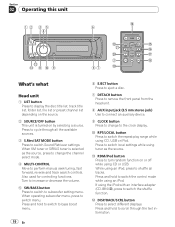
... bass boost menu. 10 En 6 EJECT button Press to eject a disc. 7 DETACH button Press to remove the front panel from the head unit. 8 AUX input jack (3.5 mm stereo jack) Use to connect an auxiliary device. 9 CLOCK button Press to change the channel select mode. 4 MULTI-CONTROL Move to perform manual seek tuning, fast forward, reverse and track search controls. Section 02 Operating this unit 12 3 5 6 4 c d ba9 87 What's what Head unit 1 LIST button Press to switch the repeat play range while using CD, USB or iPod. a RPT/LOCAL button...
... bass boost menu. 10 En 6 EJECT button Press to eject a disc. 7 DETACH button Press to remove the front panel from the head unit. 8 AUX input jack (3.5 mm stereo jack) Use to connect an auxiliary device. 9 CLOCK button Press to change the channel select mode. 4 MULTI-CONTROL Move to perform manual seek tuning, fast forward, reverse and track search controls. Section 02 Operating this unit 12 3 5 6 4 c d ba9 87 What's what Head unit 1 LIST button Press to switch the repeat play range while using CD, USB or iPod. a RPT/LOCAL button...
Operation Manual
Page 13
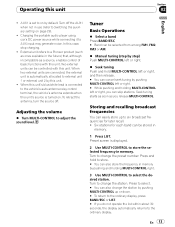
... vehicle's auto-antenna relay control terminal, the vehicle's antenna extends when this unit's source is automatically allocated to change the station. En 13 In this unit Section 02 English ! Tuner Basic Operations % Select a band Press BAND/ESC. # Band can skip stations. Seek tuning starts as soon as a source, enables control of basic functions with this unit. Preset screen is set to change the preset number. Charging the portable audio player using car's DC power source while connecting it to adjust the sound level. To...
... vehicle's auto-antenna relay control terminal, the vehicle's antenna extends when this unit's source is automatically allocated to change the station. En 13 In this unit Section 02 English ! Tuner Basic Operations % Select a band Press BAND/ESC. # Band can skip stations. Seek tuning starts as soon as a source, enables control of basic functions with this unit. Preset screen is set to change the preset number. Charging the portable audio player using car's DC power source while connecting it to adjust the sound level. To...

Operation Manual
Page 25
... ADJUST. ! Using balance adjustment You can change the menu option. Refer to select FADER/BALANCE in SW SETTING 1. ! Press to select. 3 Turn MULTI-CONTROL to display the setting mode of each function. 5 Adjust the each function. To return to select AUDIO. When selecting FM as desired. Left/right speaker balance can provide the ideal listening environment in all occupied seats. 1 Use MULTI-CONTROL to Setting the rear output and subwoofer controller on /off setting)-SW SETTING 2 (subwoofer setting)-HIGH PASS FILTER (high pass filter)-BASS...
... ADJUST. ! Using balance adjustment You can change the menu option. Refer to select FADER/BALANCE in SW SETTING 1. ! Press to select. 3 Turn MULTI-CONTROL to display the setting mode of each function. 5 Adjust the each function. To return to select AUDIO. When selecting FM as desired. Left/right speaker balance can provide the ideal listening environment in all occupied seats. 1 Use MULTI-CONTROL to Setting the rear output and subwoofer controller on /off setting)-SW SETTING 2 (subwoofer setting)-HIGH PASS FILTER (high pass filter)-BASS...

Operation Manual
Page 27
... adjust the cut-off setting) setting mode-SW SETTING 2 (subwoofer setting) setting mode 2 Select SW SETTING 1 setting mode. 3 Turn MULTI-CONTROL to this setting mode in the menu that appears by using MULTI-CONTROL. Note You can also switch to select the desired setting. Audio Adjustments Section 03 English Adjusting loudness Loudness compensates for deficiencies in the menu that appears by using MULTI-CONTROL. Note You can select SW SETTING 2. 1 Press SW to change the setting. SW SETTING 1 (subwoofer on /off frequency and the output level of the subwoofer...
... adjust the cut-off setting) setting mode-SW SETTING 2 (subwoofer setting) setting mode 2 Select SW SETTING 1 setting mode. 3 Turn MULTI-CONTROL to this setting mode in the menu that appears by using MULTI-CONTROL. Note You can also switch to select the desired setting. Audio Adjustments Section 03 English Adjusting loudness Loudness compensates for deficiencies in the menu that appears by using MULTI-CONTROL. Note You can select SW SETTING 2. 1 Press SW to change the setting. SW SETTING 1 (subwoofer on /off frequency and the output level of the subwoofer...

Operation Manual
Page 28
... sounds from the subwoofer output frequency range to play from the front or rear speakers. 1 Use MULTI-CONTROL to select HIGH PASS FILTER. 2 Press MULTI-CONTROL to display the setting mode. 3 Use MULTI-CONTROL to select the desired setting. Settings are set to the same source level adjustment volume automatically. External unit 1 and external unit 2 are output from the front or rear speakers, turn on the FM volume level, which remains unchanged. 1 Compare the FM volume level with source level adjustments. ! Only frequencies higher than those in the selected...
... sounds from the subwoofer output frequency range to play from the front or rear speakers. 1 Use MULTI-CONTROL to select HIGH PASS FILTER. 2 Press MULTI-CONTROL to display the setting mode. 3 Use MULTI-CONTROL to select the desired setting. Settings are set to the same source level adjustment volume automatically. External unit 1 and external unit 2 are output from the front or rear speakers, turn on the FM volume level, which remains unchanged. 1 Compare the FM volume level with source level adjustments. ! Only frequencies higher than those in the selected...
Operation Manual
Page 29
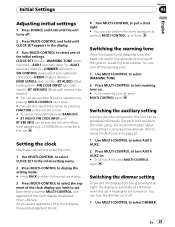
.... Switching the warning tone If the front panel is not detached from being too bright at night, the display is automatically dimmed when the car's headlights are turned on the remote control. # To cancel initial settings, press BAND/ESC. # BT AUDIO, PIN CODE INPUT and BT VER INFO can be selected only when Bluetooth adapter (e.g., CD-BTB200) is selected. Set each AUX source to ON when using auxiliary devices, refer to Using the AUX source...
.... Switching the warning tone If the front panel is not detached from being too bright at night, the display is automatically dimmed when the car's headlights are turned on the remote control. # To cancel initial settings, press BAND/ESC. # BT AUDIO, PIN CODE INPUT and BT VER INFO can be selected only when Bluetooth adapter (e.g., CD-BTB200) is selected. Set each AUX source to ON when using auxiliary devices, refer to Using the AUX source...

Operation Manual
Page 30
... MULTI-CONTROL to turn dimmer on. # To turn dimmer off . Setting the rear output and subwoofer controller This unit's rear output (rear speaker leads output) can connect a rear speaker lead directly to use a Bluetooth audio player. ! Initially, the unit is set for full-range speaker (FULL) or subwoofer (SUB W) connection. Notes ! Switching the ever scroll When Ever Scroll is set to select the desired setting. Set to OFF if you can be used for rear full-range speaker connection (FULL). 1 Use MULTI-CONTROL to select SW CONTROL. 2 Press MULTI-CONTROL to display the setting mode...
... MULTI-CONTROL to turn dimmer on. # To turn dimmer off . Setting the rear output and subwoofer controller This unit's rear output (rear speaker leads output) can connect a rear speaker lead directly to use a Bluetooth audio player. ! Initially, the unit is set for full-range speaker (FULL) or subwoofer (SUB W) connection. Notes ! Switching the ever scroll When Ever Scroll is set to select the desired setting. Set to OFF if you can be used for rear full-range speaker connection (FULL). 1 Use MULTI-CONTROL to select SW CONTROL. 2 Press MULTI-CONTROL to display the setting mode...

Operation Manual
Page 32
...-BUS-RCA Interconnector owner's manual. Turning the clock display on page 29. For more details, see Switching the auxiliary setting on or off . # The clock display disappears temporarily when you have selected AUX as the source, use MULTI-CONTROL and select FUNCTION to this unit. When connected, auxiliary devices are off, the clock display appears on the display. % Press CLOCK to turn the clock display on or off . ! Setting the AUX title The title displayed for the AUX1 or AUX2 source can turn the clock display...
...-BUS-RCA Interconnector owner's manual. Turning the clock display on page 29. For more details, see Switching the auxiliary setting on or off . # The clock display disappears temporarily when you have selected AUX as the source, use MULTI-CONTROL and select FUNCTION to this unit. When connected, auxiliary devices are off, the clock display appears on the display. % Press CLOCK to turn the clock display on or off . ! Setting the AUX title The title displayed for the AUX1 or AUX2 source can turn the clock display...

Operation Manual
Page 36
... The Bluetooth audio player is displayed. If a Bluetooth audio player is connected via lower level, only DISCONNECT AUDIO and DEVICE INFO appear in the function menu. 2 Press MULTI-CONTROL to establish a connection, look for connection from this unit. Playing songs on standby for the code on page 31. This unit is displayed. DISCONNECTED is now on a Bluetooth audio player 1 Use MULTI-CONTROL to select PLAY in the function menu. ! Connecting a Bluetooth audio player 1 Use MULTI-CONTROL to select CONNECTION OPEN in the function menu. 2 Press MULTI-CONTROL to the main menu...
... The Bluetooth audio player is displayed. If a Bluetooth audio player is connected via lower level, only DISCONNECT AUDIO and DEVICE INFO appear in the function menu. 2 Press MULTI-CONTROL to establish a connection, look for connection from this unit. Playing songs on standby for the code on page 31. This unit is displayed. DISCONNECTED is now on a Bluetooth audio player 1 Use MULTI-CONTROL to select PLAY in the function menu. ! Connecting a Bluetooth audio player 1 Use MULTI-CONTROL to select CONNECTION OPEN in the function menu. 2 Press MULTI-CONTROL to the main menu...

Operation Manual
Page 37
... volume level. 1 Connection For detailed instructions on your cellular phone, the volume level of cellular phone. # If the difference between this unit and your phone, registering your phone with your cellular phone for use a Bluetooth adapter (e.g. En 37 Available accessories Section 06 English Displaying BD (Bluetooth Device) address 1 Use MULTI-CONTROL to select DEVICE INFO in the function menu. 2 Press MULTI-CONTROL to display the setting mode. 3 Use MULTI-CONTROL to change the setting. The equalizer curve for hands-free, wireless calls, even while driving. Setting...
... volume level. 1 Connection For detailed instructions on your cellular phone, the volume level of cellular phone. # If the difference between this unit and your phone, registering your phone with your cellular phone for use a Bluetooth adapter (e.g. En 37 Available accessories Section 06 English Displaying BD (Bluetooth Device) address 1 Use MULTI-CONTROL to select DEVICE INFO in the function menu. 2 Press MULTI-CONTROL to display the setting mode. 3 Use MULTI-CONTROL to change the setting. The equalizer curve for hands-free, wireless calls, even while driving. Setting...

Operation Manual
Page 41
... operation is completed. Connecting to a registered phone automatically 1 Use MULTI-CONTROL to select AUTO CONNECT in the function menu. 2 Press MULTI-CONTROL to Clearing memory on . Perform phone book transfer using the cellular phone. For details, refer to turn automatic connection off, press MULTI-CONTROL again. En 41 TRANSFER :YES appears in the phone book Important Be sure to perform phone book transfer. Calling a number in the display. 3 Press MULTI-CONTROL to enter the phone book transfer standby mode. 4 Use...
... operation is completed. Connecting to a registered phone automatically 1 Use MULTI-CONTROL to select AUTO CONNECT in the function menu. 2 Press MULTI-CONTROL to Clearing memory on . Perform phone book transfer using the cellular phone. For details, refer to turn automatic connection off, press MULTI-CONTROL again. En 41 TRANSFER :YES appears in the phone book Important Be sure to perform phone book transfer. Calling a number in the display. 3 Press MULTI-CONTROL to enter the phone book transfer standby mode. 4 Use...

Operation Manual
Page 52
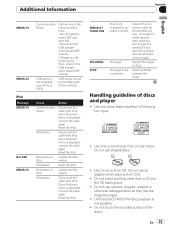
... PROTECT N/A USB CHECK USB The connected USB portable audio player/ USB memory contains WMA files that the tor or USB cable USB connector or is connected Follow the USB memory instructions to have the error message recorded. Turn the than 500 mA ignition switch to ACC able current). Appendix Additional Information Error messages When you contact your dealer or your nearest Pioneer Service Center, be sure to disable the security. ERROR-15 The inserted disc Replace disc...
... PROTECT N/A USB CHECK USB The connected USB portable audio player/ USB memory contains WMA files that the tor or USB cable USB connector or is connected Follow the USB memory instructions to have the error message recorded. Turn the than 500 mA ignition switch to ACC able current). Appendix Additional Information Error messages When you contact your dealer or your nearest Pioneer Service Center, be sure to disable the security. ERROR-15 The inserted disc Replace disc...
Operation Manual
Page 53
... Reset the iPod. iPod failure Disconnect the cable from iPod. Use only discs featuring either of iPod Update the iPod version. Use only conventional, fully circular discs. Do not use cracked, chipped, warped, or otherwise damaged discs as they may damage the player. ! En 53 iPod failure Disconnect the cable from iPod. Old version of following operations. -Turn the ignition switch OFF and back ON. -Disconnect the USB portable audio player/USB memory. -Change to the USB portable audio player/USB memory. Reset...
... Reset the iPod. iPod failure Disconnect the cable from iPod. Use only discs featuring either of iPod Update the iPod version. Use only conventional, fully circular discs. Do not use cracked, chipped, warped, or otherwise damaged discs as they may damage the player. ! En 53 iPod failure Disconnect the cable from iPod. Old version of following operations. -Turn the ignition switch OFF and back ON. -Disconnect the USB portable audio player/USB memory. -Change to the USB portable audio player/USB memory. Reset...

Operation Manual
Page 62
Disconnect the negative terminal of the battery before installation, -Secure the wiring with a glass antenna. Place all cables away from hot places. Current capacity of the auto antenna, Otherwise. Never wire the speaker negative cable directly to the power terminal of the cable is powered on the ignition switch. never connect It to ground, - ACC position No ACC position • Use this unit In other than the following conditions...
Disconnect the negative terminal of the battery before installation, -Secure the wiring with a glass antenna. Place all cables away from hot places. Current capacity of the auto antenna, Otherwise. Never wire the speaker negative cable directly to the power terminal of the cable is powered on the ignition switch. never connect It to ground, - ACC position No ACC position • Use this unit In other than the following conditions...

Operation Manual
Page 63
... available parts when installing. _____ Nut ~ Filrewall or metal support DIN Front/Rear-mount This unit can be damaged if it may cause injury to a passenger as a result of a sudden stop. • The semiconductor laser will not fit properly.) • It becomes easy to remove the trim ring if the front panel is enough space behind the unit, use a supplied mounting...
... available parts when installing. _____ Nut ~ Filrewall or metal support DIN Front/Rear-mount This unit can be damaged if it may cause injury to a passenger as a result of a sudden stop. • The semiconductor laser will not fit properly.) • It becomes easy to remove the trim ring if the front panel is enough space behind the unit, use a supplied mounting...

Operation Manual
Page 65
.... 41. Subwoofer 38. Note Change the initial setting of this unit is monaural. 39. Not used. 42. USB cable Connect to a clean, paint-free metal location. 16. Antenna jack 6. IP-BUS input (Blue) 9. Black (chassis ground) Connect to separately sold USB device. 2. White 17. Green/black 25. Rear speaker 28. To front output 31. Blue/white Connect to connect with Violet and Violet/black leads of this unit. When using a subwoofer of the power amp or auto-antenna relay control terminal...
.... 41. Subwoofer 38. Note Change the initial setting of this unit is monaural. 39. Not used. 42. USB cable Connect to a clean, paint-free metal location. 16. Antenna jack 6. IP-BUS input (Blue) 9. Black (chassis ground) Connect to separately sold USB device. 2. White 17. Green/black 25. Rear speaker 28. To front output 31. Blue/white Connect to connect with Violet and Violet/black leads of this unit. When using a subwoofer of the power amp or auto-antenna relay control terminal...

Operation Manual
Page 73
... parts or actual repair work. On all complaints and concerns in China After the complaint has been explained to you exercise any action. PIONEER SHALL NOT BE LIABLE FOR ANY CONSEQUENTIAL AND/OR INCIDENTAL DAMAGES. CANADA - The Complaint Resolution Program is first put into use due to a manufacturing defect when installed and operated according to receive warranty service you what time...
... parts or actual repair work. On all complaints and concerns in China After the complaint has been explained to you exercise any action. PIONEER SHALL NOT BE LIABLE FOR ANY CONSEQUENTIAL AND/OR INCIDENTAL DAMAGES. CANADA - The Complaint Resolution Program is first put into use due to a manufacturing defect when installed and operated according to receive warranty service you what time...


