

Operation Manual
Page 2
... Scroll Playing Discs on a 50-Disc Type Multi-CD Player 26 1 Manual and Seek Tuning - Disc Number Search (for Pioneer Products .......... 6 Remote Controller and Care (DEH-P410 7 Using the Remote Controller 7 Battery 7 Basic Operation 8 To Listen to Music 8 Basic Operation of Tuner 9 - Random Play (RANDOM) - Disc Title Input (TITLE IN) - Disc Search - ITS Programming (ITS) - Erase a Disc Program Disc Title 23 - COMP/DBE ON/OFF Switching CD TEXT Function (for CD TEXT compatible type 25 - Preset Tuning - Switching the Display - Selecting Discs by Disc Title...
... Scroll Playing Discs on a 50-Disc Type Multi-CD Player 26 1 Manual and Seek Tuning - Disc Number Search (for Pioneer Products .......... 6 Remote Controller and Care (DEH-P410 7 Using the Remote Controller 7 Battery 7 Basic Operation 8 To Listen to Music 8 Basic Operation of Tuner 9 - Random Play (RANDOM) - Disc Title Input (TITLE IN) - Disc Search - ITS Programming (ITS) - Erase a Disc Program Disc Title 23 - COMP/DBE ON/OFF Switching CD TEXT Function (for CD TEXT compatible type 25 - Preset Tuning - Switching the Display - Selecting Discs by Disc Title...

Operation Manual
Page 3
... Audio Menu Functions 28 - Source Level Adjustment (SLA) Detaching and Replacing the Front Panel 33 Theft Protection 33 - Door System Confirmation Operation of "DFS Alarm 39 Arming Alarm 39 Disarming Alarm 39 Entry Detection 39 Other Functions 40 Time Display 40 - AUX Title Input CD Player and Care 43 Precaution 43 Built-in CD Player's Error Message 43 Specifications 44 DEUTSCH FRANÇAIS ITALIANO NEDERLANDS 2 Sub-woofer Output (SUB.W) (DEH-P410) - Displaying the Time Using the PROGRAM Button...
... Audio Menu Functions 28 - Source Level Adjustment (SLA) Detaching and Replacing the Front Panel 33 Theft Protection 33 - Door System Confirmation Operation of "DFS Alarm 39 Arming Alarm 39 Disarming Alarm 39 Entry Detection 39 Other Functions 40 Time Display 40 - AUX Title Input CD Player and Care 43 Precaution 43 Built-in CD Player's Error Message 43 Specifications 44 DEUTSCH FRANÇAIS ITALIANO NEDERLANDS 2 Sub-woofer Output (SUB.W) (DEH-P410) - Displaying the Time Using the PROGRAM Button...
Operation Manual
Page 5
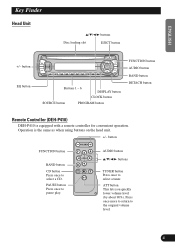
... to select a tuner. FRANÇAIS ITALIANO NEDERLANDS 4 ENGLISH ESPAÑOL DEUTSCH Key Finder Head Unit 5/∞/2/3 buttons Disc loading slot EJECT button +/- button EQ button Buttons 1 - 6 DISPLAY button CLOCK button SOURCE button PROGRAM button FUNCTION button AUDIO button BAND button DETACH button Remote Controller (DEH-P410) DEH-P410 is the same as when using buttons on the head unit. +/- Operation is equipped with a remote controller for convenient operation. ATT button This lets you quickly lower volume level (by about 90%). AUDIO button 5/∞/2/3 buttons TUNER...
... to select a tuner. FRANÇAIS ITALIANO NEDERLANDS 4 ENGLISH ESPAÑOL DEUTSCH Key Finder Head Unit 5/∞/2/3 buttons Disc loading slot EJECT button +/- button EQ button Buttons 1 - 6 DISPLAY button CLOCK button SOURCE button PROGRAM button FUNCTION button AUDIO button BAND button DETACH button Remote Controller (DEH-P410) DEH-P410 is the same as when using buttons on the head unit. +/- Operation is equipped with a remote controller for convenient operation. ATT button This lets you quickly lower volume level (by about 90%). AUDIO button 5/∞/2/3 buttons TUNER...
Operation Manual
Page 6
... other areas may result in North America. This manual explains head unit operation. The remote controller (DEH-P410) enables one-touch source changing and pause operation, and offers the convenience of sophisticated functions ensuring superior reception and operation. For your listening enjoyment. Use in other sections. We recommend that you begin using this product. Important The serial number of this product. All are designed for the...
... other areas may result in North America. This manual explains head unit operation. The remote controller (DEH-P410) enables one-touch source changing and pause operation, and offers the convenience of sophisticated functions ensuring superior reception and operation. For your listening enjoyment. Use in other sections. We recommend that you begin using this product. Important The serial number of this product. All are designed for the...
Operation Manual
Page 7
... outside sounds to the companies at the addresses listed below : Please do not ship your product. grammed. CUSTOMER SERVICE DEPARTMENT P.O. In case the necessary information is disconnected, the preset memory will be erased and must be repro- FRANÇAIS ITALIANO NEDERLANDS 6 Pioneer Electronics Service, Inc. ENGLISH ESPAÑOL DEUTSCH Precaution CAUTION: CAUTION: USE OF CONTROL OR ADJUSTMENT...
... outside sounds to the companies at the addresses listed below : Please do not ship your product. grammed. CUSTOMER SERVICE DEPARTMENT P.O. In case the necessary information is disconnected, the preset memory will be erased and must be repro- FRANÇAIS ITALIANO NEDERLANDS 6 Pioneer Electronics Service, Inc. ENGLISH ESPAÑOL DEUTSCH Precaution CAUTION: CAUTION: USE OF CONTROL OR ADJUSTMENT...
Operation Manual
Page 8
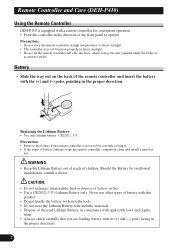
... in the proper direction. Remote Controller and Care (DEH-P410) Using the Remote Controller DEH-P410 is not used Lithium Battery, in compliance with applicable laws and regula- Replacing the Lithium Battery: • Use only lithium battery "CR2032", 3 V. Never use other types of battery with this product. • Do not handle the battery with metallic tools. • Do not store the Lithium Battery with its (+) and (-) poles facing in the proper...
... in the proper direction. Remote Controller and Care (DEH-P410) Using the Remote Controller DEH-P410 is not used Lithium Battery, in compliance with applicable laws and regula- Replacing the Lithium Battery: • Use only lithium battery "CR2032", 3 V. Never use other types of battery with this product. • Do not handle the battery with metallic tools. • Do not store the Lithium Battery with its (+) and (-) poles facing in the proper...
Operation Manual
Page 9
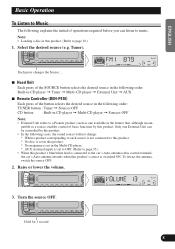
...: Built-in CD player = Tuner = Multi-CD player = External Unit = AUX 7 Remote Controller (DEH-P410) Each press of the button selects the desired source in the following order: TUNER button : Tuner = Sources OFF CD button : Built-in CD player = Multi-CD player = Sources OFF Note: • External Unit refers to a Pioneer product (such as a source, enables control of operations required before you can be controlled by this product. Turn the source OFF. To retract the antenna, switch the source OFF. 2. Hold...
...: Built-in CD player = Tuner = Multi-CD player = External Unit = AUX 7 Remote Controller (DEH-P410) Each press of the button selects the desired source in the following order: TUNER button : Tuner = Sources OFF CD button : Built-in CD player = Multi-CD player = Sources OFF Note: • External Unit refers to a Pioneer product (such as a source, enables control of operations required before you can be controlled by this product. Turn the source OFF. To retract the antenna, switch the source OFF. 2. Hold...

Operation Manual
Page 12
... presence of a disc or reading disc information, when the power is turned ON or a new disc is connected and you want to select disc 7 to 12, press the 1 to 6 buttons. Basic Operation Basic Operation of time. Just press the number corresponding to the disc you want to listen to the Multi-CD player owner's manual. • If there are no discs in the Multi-CD player magazine, "NO DISC" is displayed.
... presence of a disc or reading disc information, when the power is turned ON or a new disc is connected and you want to select disc 7 to 12, press the 1 to 6 buttons. Basic Operation Basic Operation of time. Just press the number corresponding to the disc you want to listen to the Multi-CD player owner's manual. • If there are no discs in the Multi-CD player magazine, "NO DISC" is displayed.
Operation Manual
Page 13
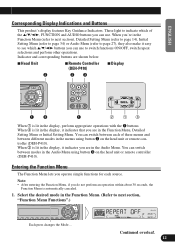
... operations. Select the desired mode in the display, perform appropriate operations with the z buttons. You can switch between different modes in the Function Menu, Detailed Setting Menu or Initial Setting Menu. When 2 is lit in the Function Menu. (Refer to indicate which 5/∞/2/3 buttons you are shown below. 7 Head Unit x 7 Remote Controller (DEH-P410) xc 7 Display ESPAÑOL DEUTSCH FRANÇAIS ITALIANO NEDERLANDS zc z 2 13 When 1 is lit in the Audio Menu using button x on the head unit...
... operations. Select the desired mode in the display, perform appropriate operations with the z buttons. You can switch between different modes in the Function Menu, Detailed Setting Menu or Initial Setting Menu. When 2 is lit in the Function Menu. (Refer to indicate which 5/∞/2/3 buttons you are shown below. 7 Head Unit x 7 Remote Controller (DEH-P410) xc 7 Display ESPAÑOL DEUTSCH FRANÇAIS ITALIANO NEDERLANDS zc z 2 13 When 1 is lit in the Audio Menu using button x on the head unit...
Operation Manual
Page 19
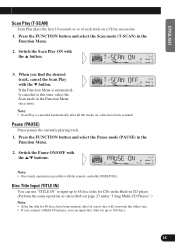
... under "Using Multi-CD Players".) Note: • After the title for 48 discs have been scanned. Note: • One-touch operation is automatically canceled at this time, select the Scan mode in succession. 1. When you can input disc titles for up to 100 discs. 18 FRANÇAIS ITALIANO NEDERLANDS Switch the Pause ON/OFF with the remote controller (DEH-P410). Note: • Scan Play is...
... under "Using Multi-CD Players".) Note: • After the title for 48 discs have been scanned. Note: • One-touch operation is automatically canceled at this time, select the Scan mode in succession. 1. When you can input disc titles for up to 100 discs. 18 FRANÇAIS ITALIANO NEDERLANDS Switch the Pause ON/OFF with the remote controller (DEH-P410). Note: • Scan Play is...

Operation Manual
Page 28
... select the desired Equalizer curve. Operate a mode. 3. Equalizer curve POWERFUL Ô NATURAL Ô VOCAL Ô CUSTOM Ô EQ FLAT Ô SUPER BASS Note: • "CUSTOM" stores an equalizer curve you have made adjustments to. (Refer to "Equalizer Curve Adjustment" on page 28 and "Equalizer Curve Fine Adjustment" on page 29.) • You can adjust the sound quality. Cancel the Audio Menu. 27 Audio Adjustment Selecting the Equalizer Curve You can switch between Equalizer...
... select the desired Equalizer curve. Operate a mode. 3. Equalizer curve POWERFUL Ô NATURAL Ô VOCAL Ô CUSTOM Ô EQ FLAT Ô SUPER BASS Note: • "CUSTOM" stores an equalizer curve you have made adjustments to. (Refer to "Equalizer Curve Adjustment" on page 28 and "Equalizer Curve Fine Adjustment" on page 29.) • You can adjust the sound quality. Cancel the Audio Menu. 27 Audio Adjustment Selecting the Equalizer Curve You can switch between Equalizer...

Operation Manual
Page 29
... you make adjustments when a curve other than "CUSTOM" is the proper setting when 2 speakers are memorized in all occupied seats. 1. Balance Adjustment (FADER) This function allows you want to select a Fader/Balance setting that provides ideal listening conditions in "CUSTOM". 1. Press the AUDIO button and select Fader/Balance mode (FADER) in the Audio Menu. 2. "FADER :F15" - Note: • "FADER : 0" is selected, the newly adjusted curve will replace the previous adjusted curve. Select...
... you make adjustments when a curve other than "CUSTOM" is the proper setting when 2 speakers are memorized in all occupied seats. 1. Balance Adjustment (FADER) This function allows you want to select a Fader/Balance setting that provides ideal listening conditions in "CUSTOM". 1. Press the AUDIO button and select Fader/Balance mode (FADER) in the Audio Menu. 2. "FADER :F15" - Note: • "FADER : 0" is selected, the newly adjusted curve will replace the previous adjusted curve. Select...
Operation Manual
Page 31
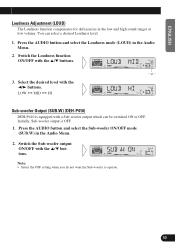
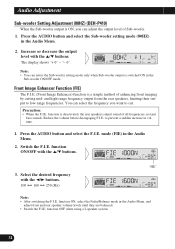
... with a Sub-woofer output which can select a desired Loudness level. 1. LOW Ô MID Ô HI Sub-woofer Output (SUB.W) (DEH-P410) DEH-P410 is OFF. 1. Press the AUDIO button and select the Loudness mode (LOUD) in the Audio Menu. 2. Select the desired level with the 5/∞ buttons. Initially, Sub-woofer output is equipped with the 5/∞ buttons. Switch the Sub-woofer output ON/OFF with the 2/3 buttons. Press the AUDIO button and select the Sub-woofer ON/OFF mode (SUB.W) in the Audio Menu. 2. ENGLISH...
... with a Sub-woofer output which can select a desired Loudness level. 1. LOW Ô MID Ô HI Sub-woofer Output (SUB.W) (DEH-P410) DEH-P410 is OFF. 1. Press the AUDIO button and select the Loudness mode (LOUD) in the Audio Menu. 2. Select the desired level with the 5/∞ buttons. Initially, Sub-woofer output is equipped with the 5/∞ buttons. Switch the Sub-woofer output ON/OFF with the 2/3 buttons. Press the AUDIO button and select the Sub-woofer ON/OFF mode (SUB.W) in the Audio Menu. 2. ENGLISH...
Operation Manual
Page 32
... button and select the Sub-woofer setting mode (80HZ) in volume. 1. function ON, select the Fader/Balance mode in the Audio Menu, and adjust front and rear speaker volume levels until they are balanced. • Switch the F.I .E. Audio Adjustment Sub-woofer Setting Adjustment (80HZ) (DEH-P410) When the Sub-woofer output is switched ON in the Sub-woofer ON/OFF mode. The display shows "+ 6" - mode (FIE) in the Audio Menu. 2. Reduce the volume before disengaging F.I .E. function OFF when using a 2-speaker system. 31 You can adjust the output level of all frequencies, not just bass sounds...
... button and select the Sub-woofer setting mode (80HZ) in volume. 1. function ON, select the Fader/Balance mode in the Audio Menu, and adjust front and rear speaker volume levels until they are balanced. • Switch the F.I .E. Audio Adjustment Sub-woofer Setting Adjustment (80HZ) (DEH-P410) When the Sub-woofer output is switched ON in the Sub-woofer ON/OFF mode. The display shows "+ 6" - mode (FIE) in the Audio Menu. 2. Reduce the volume before disengaging F.I .E. function OFF when using a 2-speaker system. 31 You can adjust the output level of all frequencies, not just bass sounds...
Operation Manual
Page 33
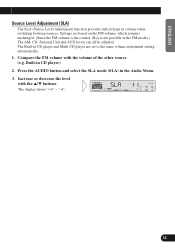
... volume with the 5/∞ buttons. Settings are set to the same volume adjustment setting automatically. 1. The Built-in CD player and Multi-CD player are based on the FM volume, which remains unchanged. (Since the FM volume is the control, SLA is not possible in the Audio Menu. 3. The display shows "+4" - Increase or decrease the level with the volume of the other source. (e.g. Press the AUDIO button and select the SLA mode...
... volume with the 5/∞ buttons. Settings are set to the same volume adjustment setting automatically. 1. The Built-in CD player and Multi-CD player are based on the FM volume, which remains unchanged. (Since the FM volume is the control, SLA is not possible in the Audio Menu. 3. The display shows "+4" - Increase or decrease the level with the volume of the other source. (e.g. Press the AUDIO button and select the SLA mode...

Operation Manual
Page 36
... FUNCTION button and select the AUX Setting (AUX) mode in the Initial Setting Menu. 2. Switching the AUX Mode (AUX) It is the mode for details concerning the clock display.) 1. Setting the Warning Tone (WARN) You can switch the Warning Tone function ON/OFF. (Refer to page 40 for setting the time on the unit's clock display. (Refer to "Warning Tone" on page 33.) 1. As soon as desired time with this product. Select the time setting mode in the Initial Setting Menu...
... FUNCTION button and select the AUX Setting (AUX) mode in the Initial Setting Menu. 2. Switching the AUX Mode (AUX) It is the mode for details concerning the clock display.) 1. Setting the Warning Tone (WARN) You can switch the Warning Tone function ON/OFF. (Refer to page 40 for setting the time on the unit's clock display. (Refer to "Warning Tone" on page 33.) 1. As soon as desired time with this product. Select the time setting mode in the Initial Setting Menu...

Operation Manual
Page 37
... "Entry Delay Time", "Speaker Output Volume" and "Door System Type". This feature is possible to page 34.) 2. Activating the DFS Alarm Feature Pioneer has developed a menu display that allows you to set the DFS ALARM Setting menu. The "Entry Delay Time" can be adjusted to protect your new Pioneer car stereo as well as your DFS Alarm to 15 seconds. Press the FUNCTION button for 2 seconds to set -up your...
... "Entry Delay Time", "Speaker Output Volume" and "Door System Type". This feature is possible to page 34.) 2. Activating the DFS Alarm Feature Pioneer has developed a menu display that allows you to set the DFS ALARM Setting menu. The "Entry Delay Time" can be adjusted to protect your new Pioneer car stereo as well as your DFS Alarm to 15 seconds. Press the FUNCTION button for 2 seconds to set -up your...

Operation Manual
Page 38
... Speaker Output" is triggered. To adjust the volume you to deactivate or activate the "Internal Speaker". In this menu will sound. 3. Display shows 10 - 30. 4. After setting volume, switch the "TEST MODE" OFF with the +/- If you switch the speaker output OFF, you to select whether or not the speaker output is sounded when the "DFS Alarm" is activated. button. Decrease or increase the volume with the ∞ button. 5. Press the FUNCTION button to move to switch...
... Speaker Output" is triggered. To adjust the volume you to deactivate or activate the "Internal Speaker". In this menu will sound. 3. Display shows 10 - 30. 4. After setting volume, switch the "TEST MODE" OFF with the +/- If you switch the speaker output OFF, you to select whether or not the speaker output is sounded when the "DFS Alarm" is activated. button. Decrease or increase the volume with the ∞ button. 5. Press the FUNCTION button to move to switch...

Operation Manual
Page 40
... the LED is now protected by your Alarm simply turn the key from "OFF" to "ON" within the "DFS Alarm Menu", attach your battery from discharging. After detaching the front panel the "DFS Alarm" will repeat 5 times if any doors, check to prevent continuous sounding and prevent your Pioneer Detachable Face as described on the head unit will not arm until...
... the LED is now protected by your Alarm simply turn the key from "OFF" to "ON" within the "DFS Alarm Menu", attach your battery from discharging. After detaching the front panel the "DFS Alarm" will repeat 5 times if any doors, check to prevent continuous sounding and prevent your Pioneer Detachable Face as described on the head unit will not arm until...

Operation Manual
Page 41
Using the PROGRAM Button (PGM-FUNC) The PROGRAM button can memorize one of the functions in the PROGRAM button. Select the PROGRAM button's setting mode (PGM-FUNC) in the Detailed Setting Menu. (Refer to memorize in the Function Menu. Select the function you perform another operation, but the time indication returns to memorize a different function for 2 seconds 2. ENGLISH ESPAÑOL DEUTSCH Other Functions Time Display Displaying the Time • To turn the time display ON. It is possible to the...
Using the PROGRAM Button (PGM-FUNC) The PROGRAM button can memorize one of the functions in the PROGRAM button. Select the PROGRAM button's setting mode (PGM-FUNC) in the Detailed Setting Menu. (Refer to memorize in the Function Menu. Select the function you perform another operation, but the time indication returns to memorize a different function for 2 seconds 2. ENGLISH ESPAÑOL DEUTSCH Other Functions Time Display Displaying the Time • To turn the time display ON. It is possible to the...


