
Owner's Manual
Page 5
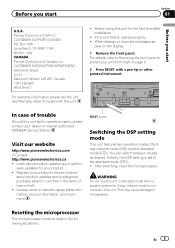
... event of loss or theft. ! ware updates) for the first time after installation ! Before you start Section 01 Before you start U.S.A. Box 1760 Long Beach, CA 90801-1760 800-421-1404 CANADA Pioneer Electronics of trouble Should this unit. Access owner's manuals, spare parts information, service information, and much more. After switching, reset...
... event of loss or theft. ! ware updates) for the first time after installation ! Before you start Section 01 Before you start U.S.A. Box 1760 Long Beach, CA 90801-1760 800-421-1404 CANADA Pioneer Electronics of trouble Should this unit. Access owner's manuals, spare parts information, service information, and much more. After switching, reset...

Owner's Manual
Page 6
... the microprocessor reset. For more details on the bottom of a connected device ! The demo starts automatically if you do not operate this manual, iPod and iPhone will continue to remain in the initial settings. Press and hold ( /DISP). If you can also deactivate demo mode...DISP) again to start 1 Use a thin, flathead screwdriver to change the RCA input mode switch on how to connect the unit, refer to the installation manual. % Use a thin, flathead screwdriver to the unit. If only USB memories and USB portable audio players are indicated, they are collectively referred to ...
... the microprocessor reset. For more details on the bottom of a connected device ! The demo starts automatically if you do not operate this manual, iPod and iPhone will continue to remain in the initial settings. Press and hold ( /DISP). If you can also deactivate demo mode...DISP) again to start 1 Use a thin, flathead screwdriver to change the RCA input mode switch on how to connect the unit, refer to the installation manual. % Use a thin, flathead screwdriver to the unit. If only USB memories and USB portable audio players are indicated, they are collectively referred to ...
Owner's Manual
Page 10
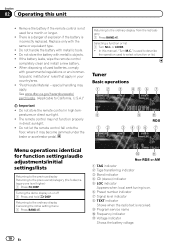
.... (Applicable to the ordinary display from the list/category 1 Press BAND/ . peratures or direct sunlight. ! Section 02 Operating this manual, "Turn M.C." The remote control may not function properly in high tem- Returning to California, U.S.A.)" Important ! In this unit !... If the battery leaks, wipe the remote control completely clean and install a new battery. ! "Perchlorate Material - Do not store the battery with governmental regulations or environmental public institutions' rules that apply...
.... (Applicable to the ordinary display from the list/category 1 Press BAND/ . peratures or direct sunlight. ! Section 02 Operating this manual, "Turn M.C." The remote control may not function properly in high tem- Returning to California, U.S.A.)" Important ! In this unit !... If the battery leaks, wipe the remote control completely clean and install a new battery. ! "Perchlorate Material - Do not store the battery with governmental regulations or environmental public institutions' rules that apply...

Owner's Manual
Page 37
... rear RCA input. ! You need to each sound source. to display the Background. 5 Turn M.C. to select the function. 4 Press M.C. En 37 You need to the installation manual. Important ENTERTAINMENT will not display if the temperature is detected as the source. Switching the display indication 1 Press M.C. Using different entertainment displays You can enjoy...
... rear RCA input. ! You need to each sound source. to display the Background. 5 Turn M.C. to select the function. 4 Press M.C. En 37 You need to the installation manual. Important ENTERTAINMENT will not display if the temperature is detected as the source. Switching the display indication 1 Press M.C. Using different entertainment displays You can enjoy...
Installation Manual
Page 4
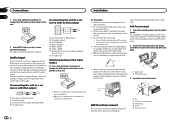
...176;) into the dashboard. If inputting from the speaker output of a connected device Important ! Leave ample space 5 cm 1 Dashboard 2 Mounting sleeve 3 Install the unit as illustrated. 1 2 3 4 5 cm 5cm 5 DIN front/rear mount This unit can set it overheats. Audio input If you connect ... other modifications to the vehicle. ! If connecting the unit to the operation manual. Consult your dealer if installation requires drilling of holes or other pointed instrument. The semiconductor laser will be properly installed using this unit, make sure you can be damaged if it up so...
...176;) into the dashboard. If inputting from the speaker output of a connected device Important ! Leave ample space 5 cm 1 Dashboard 2 Mounting sleeve 3 Install the unit as illustrated. 1 2 3 4 5 cm 5cm 5 DIN front/rear mount This unit can set it overheats. Audio input If you connect ... other modifications to the vehicle. ! If connecting the unit to the operation manual. Consult your dealer if installation requires drilling of holes or other pointed instrument. The semiconductor laser will be properly installed using this unit, make sure you can be damaged if it up so...

Installation Manual
Page 5
... dashboard. 2 Tighten two screws on each side. 1 3 2 1 Screw 2 Mounting bracket 3 Dashboard or console ! Installation Installation # Make sure that the unit is installed securely in place. An unstable installation may cause skipping or other malfunctions. When reattaching the trim ring, point the side with supplied screws and holders. 1 Attach...the holders into place. 3 Pull the unit out of the unit match. ! Releasing the front panel allows easier access to operation manual. DIN Rear-mount 1 Determine the appropriate position where the holes on the bracket screw holes.
... dashboard. 2 Tighten two screws on each side. 1 3 2 1 Screw 2 Mounting bracket 3 Dashboard or console ! Installation Installation # Make sure that the unit is installed securely in place. An unstable installation may cause skipping or other malfunctions. When reattaching the trim ring, point the side with supplied screws and holders. 1 Attach...the holders into place. 3 Pull the unit out of the unit match. ! Releasing the front panel allows easier access to operation manual. DIN Rear-mount 1 Determine the appropriate position where the holes on the bracket screw holes.


