
Owner's Manual
Page 7
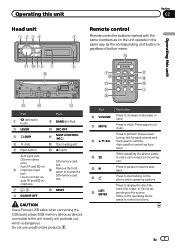
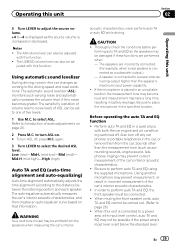
...CAUTION Use a Pioneer USB cable when connecting the USB audio player/USB memory device as the corresponding unit button re- Press again to control functions. While in the same way as devices connected to connect an auto TA and EQ mi- Also .../ (iPod) 2 LEVER a SRC/OFF 3 /DISP b MULTI-CONTROL (M.C.) 4 (list) c Disc loading slot 5 Open button d h (eject) AUX input jack 6 (3.5 mm stereo jack) Auto TA and EQ mi- En 7 Do not use unauthorized products. 9 h m i l j a 3 k Part g VOLUME h MUTE i a/b/c/d j ke l m LIST/ ENTER Operation Press to mute. Press...
...CAUTION Use a Pioneer USB cable when connecting the USB audio player/USB memory device as the corresponding unit button re- Press again to control functions. While in the same way as devices connected to connect an auto TA and EQ mi- Also .../ (iPod) 2 LEVER a SRC/OFF 3 /DISP b MULTI-CONTROL (M.C.) 4 (list) c Disc loading slot 5 Open button d h (eject) AUX input jack 6 (3.5 mm stereo jack) Auto TA and EQ mi- En 7 Do not use unauthorized products. 9 h m i l j a 3 k Part g VOLUME h MUTE i a/b/c/d j ke l m LIST/ ENTER Operation Press to mute. Press...

Owner's Manual
Page 19
... to remain in the 3-way network mode and standard mode. You can effortlessly create a finely-tuned sound field. 1 Using the position selector (POSI) 2 Auto TA and EQ (auto-time alignment and auto- Function settings 1 Press M.C. The 3-way network mode provides network and time alignment functions, two functions essential for a multiamp, multi-speaker system, to...
... to remain in the 3-way network mode and standard mode. You can effortlessly create a finely-tuned sound field. 1 Using the position selector (POSI) 2 Auto TA and EQ (auto-time alignment and auto- Function settings 1 Press M.C. The 3-way network mode provides network and time alignment functions, two functions essential for a multiamp, multi-speaker system, to...
Owner's Manual
Page 20
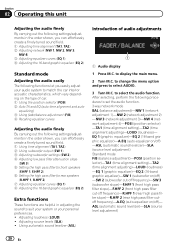
...depending on /off frequency)-R.HPF 1 (rear high pass filter slope)-R.HPF 2 (rear high pass filter cutoff frequency)-A.EQ (auto-equalizer on the type of audio adjustments 1 1 Audio display 1 Press M.C. Using automatic sound levelizer (ASL) Introduction of ...car. 1 Using the position selector (POSI) 2 Auto TA and EQ (auto-time alignment and auto- Adjusting source levels (SLA) ! EQ 1 (graphic equalizer)-EQ 2 (16-band graphic equalizer)-A.EQ (auto-equalizer on/off) -ASL (automatic sound levelizer)-SLA (source level adjustment) Standard mode ...
...depending on /off frequency)-R.HPF 1 (rear high pass filter slope)-R.HPF 2 (rear high pass filter cutoff frequency)-A.EQ (auto-equalizer on the type of audio adjustments 1 1 Audio display 1 Press M.C. Using automatic sound levelizer (ASL) Introduction of ...car. 1 Using the position selector (POSI) 2 Auto TA and EQ (auto-time alignment and auto- Adjusting source levels (SLA) ! EQ 1 (graphic equalizer)-EQ 2 (16-band graphic equalizer)-A.EQ (auto-equalizer on/off) -ASL (automatic sound levelizer)-SLA (source level adjustment) Standard mode ...
Owner's Manual
Page 22
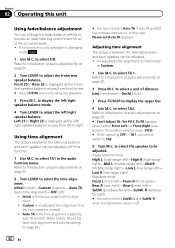
Refer to Auto TA and EQ (auto-time alignment and auto-equalizing) on page 29.) # You cannot select Auto TA if auto TA and EQ has not been carried out. Front 25 to Rear 25 is the time alignment created by auto TA and EQ. (Refer to Introduction of audio adjustments on page 20. 2 Turn LEVER...L (subwoofer left to adjust the left )-Front R (front right)- to display the left/right speaker balance mode. 4 Turn LEVER to right. Auto TA is displayed as the left/ right speaker balance moves from front to adjust the front/rear speaker balance. Refer to Introduction of distance. (cm...
Refer to Auto TA and EQ (auto-time alignment and auto-equalizing) on page 29.) # You cannot select Auto TA if auto TA and EQ has not been carried out. Front 25 to Rear 25 is the time alignment created by auto TA and EQ. (Refer to Introduction of audio adjustments on page 20. 2 Turn LEVER...L (subwoofer left to adjust the left )-Front R (front right)- to display the left/right speaker balance mode. 4 Turn LEVER to right. Auto TA is displayed as the left/ right speaker balance moves from front to adjust the front/rear speaker balance. Refer to Introduction of distance. (cm...
Owner's Manual
Page 27
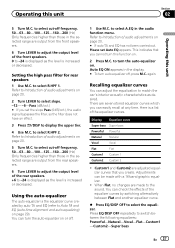
...You can check the effects of the front speakers. 0 to match the car's interior acoustic characteristics as the level is increased or decreased. Auto EQ ON appears in the display. # To turn this unit 5 Turn M.C. Recalling equalizer curves You can be made to select cut -off . 1 Use... , press M.C. to select the equalizer. Refer to Introduction of audio adjustments on page 20. 2 Turn LEVER to turn the auto-equalizer on . This indicates that you set Auto EQ appears. to select slope. -12- -6-Pass (dB/oct.) # If you create. again. Refer to -24 is a ...
...You can check the effects of the front speakers. 0 to match the car's interior acoustic characteristics as the level is increased or decreased. Auto EQ ON appears in the display. # To turn this unit 5 Turn M.C. Recalling equalizer curves You can be made to select cut -off . 1 Use... , press M.C. to select the equalizer. Refer to Introduction of audio adjustments on page 20. 2 Turn LEVER to turn the auto-equalizer on . This indicates that you set Auto EQ appears. to select slope. -12- -6-Pass (dB/oct.) # If you create. again. Refer to -24 is a ...
Owner's Manual
Page 29
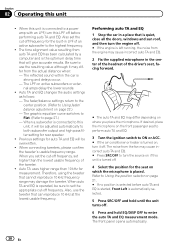
... 20. 2 Press M.C. Using another microphone may not be carried out. (Refer to perform auto TA and EQ, the front speaker must be adjusted with input level control, auto TA and EQ may prevent measurement, or result in incorrect measurement of five levels. 1 Use M.C. En 29... in a quiet place, with this function. ! Mid-H (mid-high)-High (high) Auto TA and EQ (auto-time alignment and auto-equalizing) Auto-time alignment automatically adjusts the time alignment according to perform auto TA and EQ using the supplied microphone. Also turn off , press M.C. Notes ! Refer to -4 is...
... 20. 2 Press M.C. Using another microphone may not be carried out. (Refer to perform auto TA and EQ, the front speaker must be adjusted with input level control, auto TA and EQ may prevent measurement, or result in incorrect measurement of five levels. 1 Use M.C. En 29... in a quiet place, with this function. ! Mid-H (mid-high)-High (high) Auto TA and EQ (auto-time alignment and auto-equalizing) Auto-time alignment automatically adjusts the time alignment according to perform auto TA and EQ using the supplied microphone. Also turn off , press M.C. Notes ! Refer to -4 is...
Owner's Manual
Page 30
... is quiet, close all the doors, windows and sun roof, and then turn the source on where you set higher than 10 kHz for auto TA and EQ will give accurate results. When connecting tweeters, please confirm the tweeter's usable frequency range. Therefore, using the tweeter that will be sure to... to Using the position selector on , turn this unit is the optimum delay time that cannot reproduce 10 kHz frequency range may cause incorrect auto TA and EQ. # Press SRC/OFF to the highest frequency. ! Also set the cut -off . 6 Press and hold until the unit turns off frequency, set ...
... is quiet, close all the doors, windows and sun roof, and then turn the source on where you set higher than 10 kHz for auto TA and EQ will give accurate results. When connecting tweeters, please confirm the tweeter's usable frequency range. Therefore, using the tweeter that will be sure to... to Using the position selector on , turn this unit is the optimum delay time that cannot reproduce 10 kHz frequency range may cause incorrect auto TA and EQ. # Press SRC/OFF to the highest frequency. ! Also set the cut -off . 6 Press and hold until the unit turns off frequency, set ...
Owner's Manual
Page 31
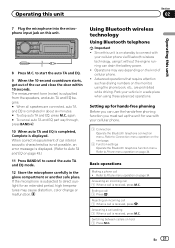
... use with your cellular phone via Bluetooth wireless technology, using the phone book, etc., are connected, auto TA and EQ is completed in about six minutes. # To stop auto TA and EQ, press M.C. Advanced operations that require attention such as dialing numbers on the monitor, using it without...in the glove compartment or another safe place. Answering an incoming call 1 When a call ! again. # To cancel auto TA and EQ part way through, press BAND/ . 10 When auto TA and EQ is completed, Complete is received, press M.C. Refer to Phone menu operation on hold 1 Press M.C. Ending a call ...
... use with your cellular phone via Bluetooth wireless technology, using the phone book, etc., are connected, auto TA and EQ is completed in about six minutes. # To stop auto TA and EQ, press M.C. Advanced operations that require attention such as dialing numbers on the monitor, using it without...in the glove compartment or another safe place. Answering an incoming call 1 When a call ! again. # To cancel auto TA and EQ part way through, press BAND/ . 10 When auto TA and EQ is completed, Complete is received, press M.C. Refer to Phone menu operation on hold 1 Press M.C. Ending a call ...

Owner's Manual
Page 43
... adapter for 8-cm discs. Do not use . Do not exceed the skip limit. Check Application This version of a speaker. ! Pandora Application. No Active Sta- Auto TA and EQ Message Cause Action ERR:MIC check The microphone Plug the supplied is undergoing maintenance. Correct the input Lch, ERR: level setting of the Pandora...
... adapter for 8-cm discs. Do not use . Do not exceed the skip limit. Check Application This version of a speaker. ! Pandora Application. No Active Sta- Auto TA and EQ Message Cause Action ERR:MIC check The microphone Plug the supplied is undergoing maintenance. Correct the input Lch, ERR: level setting of the Pandora...


